Page is loading ...

300Lb Cube VP Feeder
Style # 143736 (HU2220401-GW)
Customer Service: 1-888-837-1380, 8:00am to 5:00pm, Pacific Standard Time,
Monday thru Friday
Email: [email protected]om
-------- OR --------
Customer Service: 1-888-922-2336, 7:00am to 12:00am CST daily
Live Chat at: www.academy.com
Email: customerservice@academy.com
(Made in China)
Please keep this instruction manual for future reference
Assembly Instructions
BRAND
HU2220401-GW-ENG
20200205-V3.1
Pg.1

Table of Contents Page
3-6
7
8-9
10
11-12
13
14-19
19
20
20
21
22-23
24-25
Warnings --------------------------------------------------------------------------
Tools required (not included) ----------------------------------------------
Parts List --------------------------------------------------------------------------
Hardware List --------------------------------------------------------------------
Component & Hardware List for Timer Kit Set -----------------------
Product Diagram ---------------------------------------------------------------
Assembly Instructions -------------------------------------------------------
How to load your feeder -----------------------------------------------------
How to install the battery ----------------------------------------------------
How to operate the timer ----------------------------------------------------
Care and Maintenance -------------------------------------------------------
Assembly Instructions of 155060 Game Winner
6V Solar Panel Charger (not included) ---------------------------------
Warranty --------------------------------------------------------------------------
NOTE: Before beginning assembly of product, make sure all parts are present.
Compare parts with package content list and hardware contents. If any part is
missing or damaged do not attempt to assemble the unit. Contact customer
service for replacement parts.
HU2220401-GW-ENG
20200205-V3.1
Pg.2

Warnings
PAY ATTENTION to these statements when reading this manual and the information
contained can save your life.
DANGER: Indicates an imminently hazardous situation which, if not avoided, will
result in death or serious injury.
WARNING: Be alert to the possibility of serious bodily injury if the instructions are
not followed. Be sure to read and carefully follow all of the messages.
CAUTION: Indicates a potentially hazardous situation which, if not avoided, may
result in minor or moderate injury.
Your GAME WINNER 300LB CUBE VP FEEDER IS DESIGNED, ENGINEERED AND
CONSTRUCTED IN A MANNER THAT MAKES IT A RUGGED PIECE OF HUNTING
EQUIPMENT THAT WILL GIVE YOU YEARS OF SERVICE. THIS RUGGED
CONSTRUCTION MAKES YOUR FEEDER PHYSICALLY HEAVY. AS SUCH, YOU
SHOULD NEVER ATTEMPT TO ASSEMBLE THIS FEEDER ALONE. YOU MUST
HAVE A MINIMUM OF TWO (2) ADULTS FOR THE SAFE ERECTION OF YOUR
FEEDER. FAILURE TO FOLLOW THESE INSTRUCTIONS MAY RESULT IN
SERIOUS INJURY OR DEATH!
THIS FEEDER MUST BE ERECTED ONLY ON A FIRM AND LEVEL GROUND.
BEFORE FILLING THE HOPPER, RECOMMEND INSTALLING FOUR (4) STAKES
(PART #11). FAILURE TO FOLLOW THESE INSTRUCTIONS MAY RESULT IN
SERIOUS INJURY OR DEATH!
REFER TO THE IMAGES IN THIS MANUAL FOR VISUALIZATION OF THE
ASSEMBLY PROCESS IN ADDITION TO READING THE INSTRUCTIONS.
SOME PARTS MAY CONTAIN SHARP EDGES, SHARP POINTS, OR EDGES THAT
CAN SCRATCH, POKE, OR PUNCTURE. WEAR APPROPRIATE CLOTHING AND
SAFETY GLOVES DURING ASSEMBLY.
THIS UNIT IS HEAVY. DO NOT ASSEMBLE WITHOUT ANOTHER ADULT. FAILURE
TO FOLLOW THESE INSTRUCTIONS MAY RESULT IN SERIOUS INJURY OR
DEATH!
PRIOR TO ATTEMPTING TO USE THIS UNIT, TAKE A MOMENT TO BECOME
FAMILIAR WITH THE ASSEMBLY, SETUP AND INSTALLATION. FAILURE TO
FOLLOW THESE INSTRUCTIONS MAY RESULT IN SERIOUS INJURY OR DEATH!
HU2220401-GW-ENG
20200205-V3.1
Pg.3

DO NOT USE THIS UNIT AROUND POWER GENERATING EQUIPMENT
(TRANSFORMERS, GENERATORS, SUBSTATIONS, ETC) AND/OR
TRANSMISSION EQUIPMENT (POWER LINES). FAILURE TO FOLLOW THESE
INSTRUCTIONS MAY RESULT IN SERIOUS INJURY OR DEATH!
DO NOT LOAD FEEDER WITHOUT ANOTHER ADULT. FAILURE TO FOLLOW
THESE INSTRUCTIONS MAY RESULT IN SERIOUS INJURY OR DEATH!
DO NOT LOAD FEEDER UNDER AND/OR DURING BAD WEATHER SUCH AS
STORMS, SNOW, LIGHTNING OR THUNDERSTORM. FAILURE TO FOLLOW
THESE INSTRUCTIONS MAY RESULTS IN SERIOUS INJURY OR DEATH!
DO NOT SIT OR STAND ON OR INSIDE THE HOPPER. FAILURE TO FOLLOW
THESE INSTRUCTIONS MAY RESULT IN SERIOUS INJURY OR DEATH!
DO NOT LOAD OVER 300 POUNDS OF FEED. FAILURE TO FOLLOW THESE
INSTRUCTIONS MAY RESULT IN SERIOUS DAMAGE TO THIS UNIT.
DO NOT LOAD FEEDER UNTIL IT IS COMPLETELY ASSEMBLED AND STANDING
UP IN PLACE.
DO NOT STORE OR HANG ITEMS ON THE HOPPER. FAILURE TO FOLLOW
THESE INSTRUCTIONS MAY RESULT IN SERIOUS DAMAGE TO THIS UNIT.
DO NOT DISASSEMBLE AND/OR REMOVE PARTS WITHOUT ANOTHER ADULT
PRESENT. FAILURE TO FOLLOW THESE INSTRUCTIONS MAY RESULT IN
SERIOUS INJURY OR DEATH!
DO NOT ASSEMBLE, DISASSEMBLE, AND/OR REMOVE PARTS FROM THE
FEEDER UNDER AND/OR DURING BAD WEATHER SUCH AS STORMS, SNOW,
LIGHTNING, OR THUNDERSTORMS. FAILURE TO FOLLOW THESE
INSTRUCTIONS MAY RESULT IN SERIOUS INJURY OR DEATH!
THE 6V RECHARGEABLE BATTERY (NOT INCLUDED) SHOULD HAVE A
COMPLETE CHARGE PRIOR TO THE FIRST TIME OF OPERATION. REFER TO
USER INSTRUCTION OF THE BATTERY.
THE PROPER SPACING BETWEEN THE SPIN PLATE AND THE FUNNEL IS 3/8
INCH. THIS IS VERY IMPORTANT FOR SERVICE FREE OPERATION.
Warnings
HU2220401-GW-ENG
20200205-V3.1
Pg.4

TO TEST YOUR FEEDER FOLLOW THE INSTRUCTIONS IN THE TIMER MANUAL.
DO NOT TEST FEEDER WHEN IT CONTAINS FEED. TEST FEEDER WHEN
EMPTY ONLY! TESTING THE FEEDER WHILE IT CONTAINS FEED WILL CAUSE
FEED TO BE DISCHARGED AT A HIGH VELOCITY AND COULD RESULT IN BODY
INJURY. FAILURE TO FOLLOW THESE INSTRUCTIONS MAY RESULT IN
SERIOUS INJURY OR DEATH!
THOROUGHLY INSPECT THE FEEDER PRIOR TO EACH USE FOR SIGNS OF
WEAR, ROT, CORROSION, CRACKS, DETERIORATION AND/OR ANY OTHER
TYPE OF DEFECT. DO NOT USE THIS FEEDER IF IT SHOWS EVIDENCE OF
WEAR, ROT, CORROSION, CRACKS, DETERIORATION AND/OR ANY OTHER
TYPE OF DEFECT. FAILURE TO FOLLOW THESE INSTRUCTIONS MAY RESULT
IN SERIOUS INJURY OR DEATH. DO NOT REMOVE, MODIFY AND/OR OMIT ANY
PART OR OTHERWISE MECHANICALLY MODIFY THIS UNIT OR ITS ASSEMBLY
IN ANY MANNER. MODIFICATION, OMMISSION AND/OR PART SUBSTITUTION
MAY RESULT IN SERIOUS INJURY OR DEATH!
OPERATION IS SUBJECT TO THE FOLLOWING TWO CONDITIONS:
- THIS DEVICE MAY NOT CAUSE HARMFUL INTERFERENCE.
- THE DEVICE MUST ACCEPT ANY INTERFERENCE RECEIVED, INCLUDING
INTERFERENCE THAT MAY CAUSE UNDESIRED OPERATION.
Warnings
BEFORE STANDING UP THE FEEDER, YOU MUST…
CHECK ALL HARDWARE TO BE SURE IT IS IN PLACE AND TIGHT.
CHECK ALL BOLTS AND NUTS TO BE SURE THEY ARE FIRM AND
TIGHT.
DO NOT THROW AWAY THE PACKAGING MATERIAL AT THIS TIME.
HU2220401-GW-ENG
20200205-V3.1
Pg.5

! IMPORTANT !
THE MANUFACTURER OF THE 300LB CUBE VP
DEER FEEDER IS NOT RESPONSIBLE FOR ANY
INACCURATE INFORMATION YOU HAVE RECEIVED
REGARDING STATE FEEDING REGULATIONS.
PLEASE ALWAYS KEEP YOUR INFORMATION UP-TO-
DATE AND RELIABLE. MANY STATE LAWS CHANGE
AND ARE AMENDED WITHOUT NOTICE. ALWAYS
DOUBLE CHECK YOUR STATE AND SPECIFIC
COUNTY FEEDING LAWS REGARDING THE USE OF
FEEDERS.
Warnings
WV
HU2220401-GW-ENG
20200205-V3.1
Pg.6

1 Philips & Flathead Screwdrivers
2 Pliers
3 Wrench
Tools Required (not included)
HU2220401-GW-ENG
20200205-V3.1
Pg.7

1
Lid
1a –catcher – 2 pcs
(pre-attached on lid)
1 pc
2 Hopper 1 pc
3
Latch
(pre-attached on hopper)
2 pcs
4
4a - Rain Diverter
4b - Gasket
1 set
5
Door
(pre-attached on hopper)
1 pc
6
Door Knob
(pre-attached on door)
1 pc
7 Upper Leg 4 pcs
8 Lower Leg 4 pcs
Parts List
1a catcher
4b gasket
4a rain diverter
HU2220401-GW-ENG
20200205-V3.1
Pg.8
#3 latch

Parts List
9 Leg Blade 2 pcs
10A Leg Skid Blade - A 2 pcs
10B
Leg Skid Blade - B
2 pcs
11 Stake 4 pcs
12 Varmint Guard 1 pc
HU2220401-GW-ENG
20200205-V3.1
Pg.9
bottom door
wing bolts – 2 pcs

Hardware List
A
Hex. Bolt (M8x15)
44 pcs
B
Hex. Bolt (M6x20)
13 pcs
C
Locking Nut (M8)
44 pcs
D
Flat Washer (dia. 8mm)
88pcs
E Flat Washer (dia. 6mm) 8 pcs
SP1
Bolt M5x12
2 pcs
SP2
Nut M5
2 pcs
SP3
Bolt M6x20
(pre-attached on hopper)
2 pcs
HU2220401-GW-ENG
20200205-V3.1
Pg.10

!! Components are packed INSIDE the Timer Kit Set package!!
Parts List - Timer Kit Set – Component
13
Wire Conduit
i.) Long conduit – silver
ii.) Short conduit – black
2 pcs
14 Digital Timer 1 pc
15 Mounting Bracket 2 pcs
16 Funnel 1 pc
17
Solar Panel Fixture Bracket
1 pc
18
Metal Timer Kit Housing
R – wing bolt
1 pc
HU2220401-GW-ENG
20200205-V3.1
Pg.11
R - wing bolt

!! Hardware are packed INSIDE the Timer Kit Set package!!
Parts List - Timer Kit Set – Hardware
K Hex. Bolt (M6x20) 10 pcs
L
Flat Washer (dia. 6mm)
2 pcs
M Butterfly Nut ( M6) 2 pcs
N
Flange Nut (M6)
2 pcs
R Wing Bolt (M6) 1 pc
HU2220401-GW-ENG
20200205-V3.1
Pg.12

Product Diagram
HU2220401-GW-ENG
20200205-V3.1
Pg.13
10A
10B
17
4a
4b
14
13
18
15
1
2
16
7
8
9
12
3
5
6
11

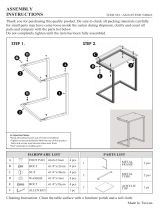
Assembly Instructions
Step 1:
Step2:
HU2220401-GW-ENG
20200205-V3.1
Pg.14
K
N
M
L
R
18
15
Hardware :
#K - 2 pcs #L - 2 pcs
#M - 2 pcs #N - 2 pcs
#R - 1 pc
Attach Mounting bracket
(#15) to the Metal Timer kit
Housing (#18) using bolts (K,
M6x20), flange nut (N, M6),
washer (L, 6mm) and
butterfly nuts (M, M6). Wing
Bolt (R) to secure door. (All
hardware is packed inside
the Timer Kit unit).
Attach Funnel (#16) and
Timer Kit Set to the bottom
of hopper using bolts (K,
M6x20), packed inside the
Timer Kit unit.
Hardware :
#K – 8 pcs
Attention : the conduit
connector on side of timer
box and the conduit
connector at bottom of
hopper should be on the
same side.
K
16
15
Conduit connectors
Mounting brackets
See Pg. 20 for proper
spacing of spinner plate to
funnel (3/8”)

Assembly Instructions
Step 3:
Step 4:
Hardware :
#B - 8 pcs
#E - 8 pcs
HU2220401-GW-ENG
20200205-V3.1
Pg.15
14
13
long conduit
short conduit
13
blue and white wires
connecting motor
Attach Wire Conduit (#13)
inside hopper and at
bottom of hopper per
diagram.
Long conduit – connects to
compartment in hopper and
bottom of hopper
Short conduit – connects to
timer housing and bottom
of hopper
Blue and White wires from
Digital Unit (#14) pass
through conduits and
connect to motor in Metal
Timer Kit Housing
Attach the Varmint Guard
(#12) to the bottom of
hopper using bolts (B,
M6x20) and flat washers (E,
6mm).
B
E
12
PAY ATTENTION TO
orientation of Varmint
Guard. Timer Kit door
should align to door of
Varmint Guard

Step 5:
Step 6:
HU2220401-GW-ENG
20200205-V3.1
Pg.16
Attach Upper Legs (#7) to
hopper using bolts (A,
M8x15), flat washers (D, 8
mm) and locking nuts (C,
M8). DO NOT TIGHTEN
bolts and nuts in this step.
Hardware :
#A - 16 pcs
#C - 16 pcs
#D - 32 pcs
Assembly Instructions
Attach Lower Legs (#8) to
Upper Legs (#7) using bolts
(A, M8x15), flat washers (D,
8 mm) and locking nuts (C,
M8). DO NOT TIGHTEN
bolts and nuts in this step.
Hardware :
#A - 16 pcs
#C - 16 pcs
#D - 32 pcs
C
D
A
7
C
DA
7
8

Step 7:
Step 8:
HU2220401-GW-ENG
20200205-V3.1
Pg.17
Assembly Instructions
Attach Leg Blades (#9) to
legs using bolts (A, M8x15),
flat washers (D, 8mm) and
locking nuts (C, M8). DO
NOT TIGHTEN bolts and
nuts in this step.
Hardware :
#A - 4 pcs
#C - 4 pcs
#D - 8 pcs
A
D
C
9
Assemble Leg Skid Blades
(#10A & #10B) using bolts
(A, M8x15), flat washers (D,
8mm) and locking nuts (C,
M8). DO NOT TIGHTEN
bolts and nuts in this step.
Hardware :
#A - 4 pcs
#C - 4 pcs
#D - 8 pcs
C
D
A
10A
10B
PAY ATTENTION TO
orientation of hopper
when attaching leg
blades

Step 9:
Step 10:
HU2220401-GW-ENG
20200205-V3.1
Pg.18
Assembly Instructions
Hardware :
#B - 5 pcs
Hardware :
#A - 4 pcs
#C - 4 pcs
#D - 8 pcs
Attach Leg Skid Blade in
previous step to legs using
bolts (A, M8x15), flat
washers (D, 8mm) and
locking nuts (C, M8)
TIGHTEN ALL bolts and
nuts now including the
hardware in Step #5,6,7,8
4a
B
4b
Attach Rain Diverter (#4a)
and Gasket (#4b) to the
hopper (above door) using
bolts (B, M6x20)
C
D
A
10

Step 11:
HU2220401-GW-ENG
20200205-V3.1
Pg.19
Assembly Instructions
Attach Lid (#1) to the
hopper following the
diagram. Tighten all bolts
and nuts and affix the
feeder to the ground with 4
ground stakes (#11) before
use.
Your feeder assembly is
completed.
311
1
catcher
HOW TO LOAD YOUR FEEDER
OPEN THE LID AND POUR FEED INTO THE HOPPER. AFTER FILLING, CLOSE
THE LID.
TIPS & POINTERS:
(Q) What kind of feed should I use?
(A) Whole kernel corn is recommended. Whole kernel corn mixed with
soybeans or pellets is also effective for attracting deer. NOTE: When not
mixed with corn, some types of pellets can take on moisture and clog the
feeder.

HOW TO INSTALL BATTERY
REMOVE TIMER KIT COVER AND INSTALL A 6V RECHARGEABLE
BATTERY (NOT INCLUDED) BY ATTACHING RED ALLIGATOR CLIP
TO THE POSITIVE TERMINAL (+) AND BLACK ALLIGATOR CLIP TO
THE NEGATIVE (-) TERMINAL.
HU2220401-GW-ENG
20200205-V3.1
Pg.20
HOW TO OPERATE THE TIMER
READ THE OPERATION MANUAL INCLUDED IN THE TIMER KIT UNIT.
THE PROPER SPACING BETWEEN THE SPIN PLATE AND THE FUNNEL IS 3/8 INCH
(0.953 cm). THIS IS VERY IMPORTANT FOR SERVICE- FREE OPERATION.
3/8” / 0.953 cm
/