Electrolux EI23BC80KS8A Owner's manual
- Category
- Side-by-side fridge-freezers
- Type
- Owner's manual
This manual is also suitable for

EN FREEZER / REFRIGERATOR USE AND CARE GUIDE
................................... FR REFRIGERATEUR/CQNGELATEUR GUIDE D:UTILISATION ETD:ENTRETIEN
:i:i:iiiiiiiii iiiiiiiiiiiiiiiiiiiiiiiiiiiiiiiiiiiiiiiiiiiiiiii

_i:_i_ii_i_!_!_i@!_!:ii!_!:ii!_!_!ii_!_ii_i!_!!_!i_ii_i!ii_iii@_i_i_i_iii_ii
Finding information
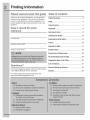
Please read and save this guide Tabmeof contents
Thank you forchoos ng E ectro ux our new prem um Fin in Inf rm i n 2
[J g 0 at 0 ..............................................
brand in home appliances.This Use & Care Guide is
part of our comm tment to customer sat sfact on and f
Sa ety ............................................................... 3
product qualitythroughoutthe service life of your new
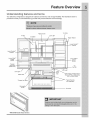
appliance. FeatureOverview................................................. 5
Keep a record for quick Installation ......................................................... 6
reference
::::::::, : RemovingtheDoors ............................................ 11
^ nn "in "h W" r^ I 14
_o ecl gl e ale _uppy ..................................
__ controls..........................................................._
Electroluxmodel number
A.tornatieleelVlaker............................................ 17
___ StorageFeatures ................................................ 18
St0,.gF00_._S_,_.gE.0,gv..............................23
..........................
24
Changingthe Water andAir Filters........................... 25
i!_!_i!i_ii_!i!_!_i!i_ii_!i!_!_i!i_ii_!i!_!_i!i_ii_!i!_!_i!i_ii_!i!_!_i!i_ii_!i!_!_i!i_ii_!i!_!_i@ii_i

Westronglyencourageresponsibleappliancerecycling/

Safety
Emectricaminformation
• The refrigerator must be plugged into its own
dedicated 115 Volt, 60 Hz, AC-only non-GFCl
electric outlet. The power cord of the appliance is
equipped with a three-prong grounding plug for your
protection against electrical shock hazards. It must
be plugged directly into a properly grounded three-
prong receptacle. The receptacle must be installed
in accordance with local codes and ordinances.
Consult a qualified electrician. Do not use an
extension cord or adapter plug.
= If the power cord is damaged, it should be replaced
by the manufacturer, service technician, or a
qualified person.
= Never unplug the refrigerator bypulling on the power
cord. Always grip the plug firmly and pull straightout
from the receptacleto prevent damaging the power cord.
To avoid electrical shock, unplug the refrigerator
before cleaning and before replacing a light bulb or
LED light.
Performance may be affected ifthe voltage varies
by 10% or more. Operating the refrigerator with
insufficient power can damage the compressor.
Such damage is not covered under your warranty.
Do not plug the unit into an outlet controlled by a
wall switch or pull cord to prevent the refrigerator
from being turned off accidentally.
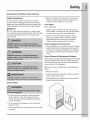
Grounding type wall receptacle
SDo not, under any"_
f ._i_. [ .,_ circumstances, [
_cut, remove, or |
1 i!_ [_ll_ bypass the |
3-'prong grounded plug _I_
T, turn _ _er _ur r_frige_r, unplug t"e
p )_er c_a f_ the_ll _Ut!_

Luxury-Glide TM
Crisper
Luxury-Glide TM
Crisper
i_i!_!_i!i_ii_!i!_!_i!i_ii_!i!_!_i!i_ii_!i!_!_i!i_ii_!i!_!_i!i_ii_!i!_!_i!i_ii_!i!_!_i!i_ii_!i!_!_i!i_i@:_

Installation
Required Tools
You wiii need the following tools:
Components Provided:
Top Hinge Top Hinge
Cover Front Cover Rear
Screw _ _crew
__ Top Lower
Hinge Hinge _
Screw Screw _
Tooms Necessary:
Phillips TM
Head or
#2 Square Drive
Head
OR
Socket
Wrench Set
3/8" Fixed
Wrench
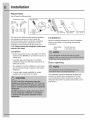
This Use & Care Guide provides general installation
and operating instructions for your model. We
recommend using a service or kitchen contracting
professional to install your refrigerator. Use the
refrigerator only as instructed in this Use & Care
Guide. Before starting the refrigerator, follow these
important first steps.
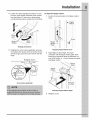
Allow the following clearances for ease of installation,
proper air circulation, and plumbing and electrical
connections:
Sides & Top 3/8inch (9.5 mm)
Back 1 inch (25.4 mm)
* Choose a place that is near a grounded, non-GFCl,
electrical outlet. Do Not use an extension cord or an
adapter plug.
* if possible, place the refrigerator out of direct ..............................................................................................................................................................................................................................................................................................
sunlight and away from the range, dishwasher, or D_r nn_nine
other heat sources. _ _r_
The refr gerator must be nsta ed on a f oor that s :_.....................................................
level and strong enough to support a fully loaded
refrigerator.
, _emsel_e_ _J_ln a 28 degree eRea_a8
Consider water supply availability for models
equipped with an automatic ice maker. Your refrigerator should be positioned to allow easy
[ : access to a counter when removing food. For best
} use of refrigerator drawers and freezer baskets, the
refrigerator should be in a position where both can be
E fu y opened
i
r_ i_NNr.)) ) ) ) ) ) ) ) ) )

Installation
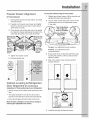
Freezer Drawer Amignment
(if necessary)
1 Check gasket seal around top, bottom, and sides
of freezer drawer.
2 If gasket is not sealed, open drawer and slightly
loosen four drawer screws (two on each side) to
allow drawer to rotate.
3 Close drawer and recheck the seal on the gasket
(A). Open the drawer grabbing by the sides in the
center (B). Be careful not to rotate the drawer.
Remove H ex
: Head Drawer
Screw:
To level the cabinet using the front rollers:
1 Slightly open freezer drawer. Lift the toe grille and
gently pull forward (see illustration).
2 You can raise or lower each door. Use a 3/sinch
socket wrench to turn the adjustment screws
(1 per side).
Toe Grille Must _
• " _1
Ft nSoton / I_',7.
Antiitip Bracket (_. _"
\_Z_ 12" Assembly _J,_ BY
_" / /
______'_---- (3) Retaining Clips
Remove Remove
Hex Head
Drawer Drawer
Screw Screw
4 Tighten four drawer screws.
5 Recheck gasket seal.
To raise: turn adjustment screw clockwise.
To lower: turn adjustment screw
counterclockwise.
Ensure both doors are bind-free with their seals
touching the cabinet on all four sides and that
cabinet is stable.
4 After unit is leveled, lower anti-tip leg until it
contacts the floor.
Against , ,, ,,
Freezer : o :
Drawer
b h
o_ _ o_ _
Cabinet Leve_in 9 & Refrigerator I
DOOr Amignment (if necessary)
Guidelines for final positioning of your refrigerator" :: , :: : :::::::::
All four corners of the cabinet must rest firmly on the _ ,j
f oor
= The sides should tilt 1/4inch (6 mm)from front to _ (/,O '_ /y'_
back (to ensure that doors c ose and sea proper y) I Anti-tip _'q /,/
Leg /i
• Doors should align with each other and be level. _/_!\ I
Most of these conditions can be met by raising or _
lowering the adjustable front rollers.
g. y..g. p .

Installation
i!_!_i!i_ii_!i!_!_i!i_ii_!i!_!_i!i_ii_!i!_!_i!i_ii_!i!_!_i!i_ii_!i!_!_i!i_ii_!i!_!_i!i_ii_!i!_!_i!i_ii_!i!_!_i!i_ii_!i!_!_ii_i
To adjust the door stop:
Door stop isadjustable between 85 to 145 degrees.
Adjustable Door Stop
1 Open door to provide access to screw.
2 Loosen screw.
3 Adjust door to desired location.
5 Retighten screw.
Stoic
Re-tighten
Screw
6 Ensure door stops in desired locationbefore
resuming normal use.
To level the doors using the adjustable lower hinge
(select models):
1 Remove all food itemsfrom door bins on door
being adjusted.
2 Open doors to 90 degrees.
3 Loosen or remove screw.
i!_!_i!i_ii_!i!_!_i!i_ii_!i!_!_i!i_ii_!i!_!_i!i_ii_!i!_!_i!i_ii_!i!_!_i!i_ii_!i!_!_i!i_ii_!i!_!_i!i_ii_!i!_!_i!i_ii_!i!_!_ii_i

iiiiiiiiii!;ili_i_ili'iii_i¸i_i_i_i_!i_!i_!i_!i_!i_!_i_i!i_!_!!!_i!i!i_i_i_i_!_!_!_!i!i_ii_ii_i_ii_i_!_!!i_!_!_i_ii!_i_i_iiii!_!i_i;_
Installation
4 Lift the door while adjusting the washer. To raise To adjust the flipper mullion:
!he door, rotate washer clockwise !when viewed 1 Loosen the screw located on the flipper mullion
from [ne bottom), io lower aoor ro[ate wasner hin-e
y .
counterc!ockwlse (when wewed from the bottom).
Flipper
_oOr ..
Door
.. Screw
in e _....... ..
Mullion---] II I |_ I
II I I
Ro_s_°g/Lowo.°gDoor II II I | I
Adjusting Fhpper MulhonScrew
s Ret_ghtenthescrew,whereapplicable,ensuring ....
t s between the spokes of the set washer Screw ........
..... . ........ ' . . 2 AdjustTppermu onneght For proper
will not De tight, just insert untHit is nusn with the ....... :_. :....^ ,,:.... _., ,..... :.,^ ._.^.^
_, £;UIIII_L;I.IUII VVlLII tilt:# lll_|Jlc:_i IIIUlIIUII yUlUt:# I.II_I_
n nge
" should be a separation about the thickness of a
coin(o.oooinches,or_.5mm)betweentheguide
Re-tighten Screw and flipper mullion.

Installation
i!_!_i!i_ii_!i!_!_i!i_ii_!i!_!_i!i_ii_!i!_!_i!i_ii_!i!_!_i!i_ii_!i!_!_i!i_ii_!i!_!_i!i_ii_!i!_!_i!i_ii_!i!_!_i!i_ii_!i!_!_ii_i
Installing Shelves
Your refrigerator was shipped with the shelf hanger
and shelf lockingdip installedin their shipping position.
Below are the instructionsto installthe shelves in your
desired locations.
1 Remove shelf from itslocked position by pulling
the slide mechanism toward you.
2 Lift the hanger directly upwards and pull toward
Relock shelf by pushing the slide mechanism
away from you.
While holding shelf at a 45-degree angle with the
gray handle facing you, push the shelf intothe
back of the hanger.
i!_!_i!i_ii_!i!_!_i!i_ii_!i!_!_i!i_ii_!i!_!_i!i_ii_!i!_!_i!i_ii_!i!_!_i!i_ii_!i!_!_i!i_ii_!i!_!_i!i_ii_!i!_!_i!i_ii_!i!_!_ii_i

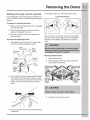
Removing the Doors
Getting through narrow spaces
If your refrigerator will not fit through an entrance area,
you can remove the doors. Check first by measuring the
entrance.
To reinstall the right door, reverse the above steps.
Lower Hinge Removal
To prepare for removing the doors:
1 Make sure the electrical power cord is unplugged
from the wall outlet.
2 Open the freezer drawer and remove the toe
grille (see "installation" section).
3 Remove any food from the door shelves and
close the doors.
To remove the refrigerator doors:
1 Trace lightlyaround the door's top hinges with a
pencil. This makes reinstallation easier.
Once both doors are in place, ensure they are aligned
with each other and level (please see the "Installation"
section for more details), and replace the top hinge
cover.
Front
, Rear
Top Hinge
Cover \
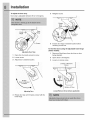
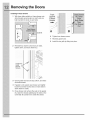
Removing Freezer Drawer
Hinge. Ground 1 Open freezer drawer.
Screws
• . // 2 Remove drawer screws on right and left sides
{,woscrewsooeochs "e/
Hinge /-
Leave _ Remove Hex !_,_.,-'/_ _%_-__,j_w F_emove Hex
,. _/ Head Drawer /_h_//_ _'_JF.. Head Drawer
Hi.nge/ ° Screw /_/'_ _'_-_,_--_ Screw ,
vvl[n "_ _ A_.._ _#_./__ __ Im...,_ I
| _ _ .... /I_Do Not_- o '--Remcve__l_
2 Disconnect the harness by grasping both sides of I Hlli;
the connector firmly, depress the latch, and pull __ _tHIIll Remove
• Hex Head Hex Head
apart. Remove the two screws from the top hinge. _'_ HexwHea€
• . • Drawer urawer
L ft the door off of the bottom h nge and set t Screw Screw
aside.
_ 3 Lift drawer up and out to remove.
3 Unscrew the three lower hinge screws and hinge
if necessary.

moving the Doors
installing Freezer Drawer
1 With lower slides pulled out, hang drawer onto
slide brackets ensuring pins on each side are
fully inserted into slots on each side.
Cabinet
Drawer
6 Tighten four drawer screws.
7 Recheck gasket seal.
8 Install the toe grille by fitting into place.
i!_!_i!i_ii_!i!_!_i!i_ii_!i!_!_i!i_ii_!i!_!_i!i_ii_!i!_!_i!i_ii_!i!_!_i!i_ii_!i!_!_i!i_ii_!i!_!_i!i_ii_!i!_!_i!i_ii_!i!_!_ii_i
Reinstall four drawer screws (two per side),
tighten down, and close drawer (C).
i!_!_i!i_ii_!i!_!_i!i_ii_!i!_!_i!i_ii_!i!_!_i!i_ii_!i!_!_i!i_ii_!i!_!_i!i_ii_!i!_!_i!i_ii_!i!_!_i!i_ii_!i!_!_i!i_ii_!i!_!_ii_i

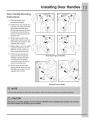
installing Door Hanq _s
Door Handle Mounting
1 Remove handles from
protective packaging.
2 Position fresh food handle end
caps (A) over upper and lower
pre-installed shoulder bolts
(B) that are fastened into door,
ensuring the holes for the set
screws are facing towards the
opposite door.
3 While holding handle firmly
against door, fasten upper and
lower Allen set screws (C) with
supplied Allen wrench.
4 Repeat steps 2 and 3to install
opposite handle. Ensure the
holes for the set screws are
facing towards the first door.
5 Position freezer handle end
caps over left and right pre-
installed shoulder bolts that
are fastened to the drawer,
Mounting Refrigerator Handles
ensuring the holes for the set
screws are facing down.
6 While holding handle firmly
against drawer, fasten left and
right Allen set screws (C) with
supplied Allen wrench.
_End __
"" Cap
MountingFreezer Handl
tl
):
li !iIi Iiii!iiiiili
li _ i i:

_:_i!_!_i!_i_!_i_!}_!;_i_!ii_!_!_i_i%_i_ii_!_!_!_!_!i!_!_!;_ii_i_ii!ii!_i!i!_!_!!ii_!_i!_!_iiii
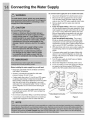
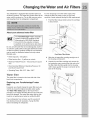
"14 Connectin theWater upply
1. Disconnect refrigeratorfrom electric power source.
2. Placeendofwatersupplylineintosinkorbucket.
TurnONwatersupplyandflushsupplylineuntil
waterisclear.TurnOFFwatersupplyatshutoffvalve.
3. aemoveplasticcapfromwatervalveinletand
discardcap.
4. Ifyouusecoppertubing-Slidebrasscompression
nut,thenferrule(sleeve) ontowatersupplyline. Push
watersupplylineintowatervalveinletasfarasitwill
go(_A inch/6 mm).Slideferrule(sleeve)intovalve
inletandfingertightencompressionnutontovalve.
Tightenanotherhalfturnwithawrench;UONOT
overtighten.SeeFigure 1.
Ifyouusestainlesssteeltubing-Thenutand
ferrulearealreadyassembledonthetubing. Slide
compression nutontovalveinletandfingertighten
compression nutontovalve.Tightenanotherhalfturn
withawrench;UONOTovertighten.SeeFigure2.
5. Withsteelclampandscrew, securewatersupplyline
(coppertubingonly) torearpanelofrefrigeratoras
shown.
6. Coilexcesswatersupplyline(coppertubingonly),
about2V2turns, behind refrigeratorasshownand
arrangecoilssotheydonotvibrateorwearagainst
anyothersurface.
7. Turn ON watersupplyat shutoffvalveandtighten
i!_!_i!i_ii_!i!_!_i!i_ii_!i!_!_i!i_ii_!i!_!_i!i_ii_!i!_!_i!i_ii_!i!_!_i!i_ii_!i!_!_i!i_ii_!i!_!_i!i_ii_!i!_!_i!i_ii_!i!_!_ii_i

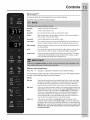
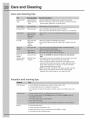
Controls
An indicator light will be illuminated above most active features.
Touch the icon to activate the options below.
fast freeze
fast ice
water filter
air filter
defauJtsettings
on off
vacationmode
Activatesafaster ratefor freezingfood.
Increasesthe production of ice
Pressand hold for three secondsto resetafterfilter change.
Filtercondition status isalways displayedwhen door is open.Pressand hold for
three secondsto resetafter filter change.
Touchto toggle displayfrom Fahrenheitto Celsius.
Tonesemitted by eachkey presscan beturned off basedon userpreference.The
soundsare mutedwhenthe red indicator is lit. Warning signalswill stayactive.
Resetsall refrigerator settings suchastemp, temp display andtonesto their fac-
tory defaultsettings.
Pressand hold for three secondsto turn offthe cooling system to cleanthe refrig-
erator.Italso turns off the ice maker.Thetemperature displayswill readOFE
Conservesenergyby increasingthe time betweenautomaticdefrost. This feature
isautomaticallyactivated duringlong periods betweendoor openings.Vacation
mode is manuallyactivatedwhenthe redindicator is lit.

IQoTouch Sabbath Mode
TheSabbathModeisafeaturethatdisablesportions
oftherefrigeratoranditscontrolsforIQ-Touch TM, in
accordancewithobservanceoftheweeklySabbath
andrelJgious holJdayswJthJntheOrthodoxdewJsh
community.
SabbathModeisturnedONandOFFbypressingand
holdingthefreezertemp - andtherefrigeratortemp
"+" indicatorsforfiveseconds.Thedisplayshows"Sb
while in Sabbath mode.
IntheSabbathMode, theHighTempalarmisactivefor
healthreasons. Ifahightemperaturealarm is
activatedduringthistime, forexampleduetoa
/_ door left ajar, the alarm will sound intermittently
forabouttwo minutes.The alarm will then
silenceon itsownandared hightemperatureicon
wJlldJsplay.The hJghtemp iconwillcontinuetodJsplay,
even ifthe door is closed until the Sabbath mode is
exitedandtheiconreset.Therefrigeratorwillfunction
normallyoncethedoorisclosed, withoutanyviolation
oftheSabbath/Holidays.
Forfurtherassistance, guidelinesforproperusageand
a complete list of models with the Sabbath feature,
i!_!_i!i_ii_!i!_!_i!i_ii_!i!_!_i!i_ii_!i!_!_i!i_ii_!i!_!_i!i_ii_!i!_!_i!i_ii_!i!_!_i!i_ii_!i!_!_i@ii_i

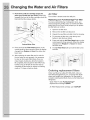
A Ut0 m at iC ICe
Ice maker operation & care
After the refrigerator is installed properly, the ice maker
can produce ice within 24 hours. It can completely fill an
ice bin in about three days.
When using the ice maker for the first time and in order
for the ice maker to work properly, it is necessary to
clear air from water filter tubing. Once ice maker begins
making ice, allow the bucket to fill completely, then
discard the first TWO FULL buckets of ice. It will take at
least two days to completely fill the bucket on regular
ice making mode or 11/2days on fast ice mode.
The ice maker produces approximately four pounds of
ice every 24 hours depending on usage conditions.
• The following sounds are normal when the ice maker
is operating:
Motor running
Ice dropping into ice bin
Water valve opening or closing
Running water
• Ice cubes stored too long may develop an odd flavor.
Empty the ice bin as explained below.
Fast Ice Function
Your refrigerator is equipped with a Smart Fast Ice
Function, that will, if activated at your user interface,
allow an increase in ice production. You do not need to
deactivate it, if not needed, your refrigerator will operate
on normal conditions.
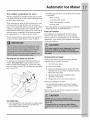
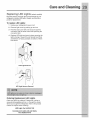
Turning the ice maker on and off
Ice production is controlled by lifting/lowering the ice
maker's wire signal arm. To gain access to the ice
maker, pull the freezer drawer out. Lift the wire signal
arm to turn the ice maker OFF and lower the wire signal
arm to turn it ON.
Ice maker tips
• If your refrigerator is not connected to a water supply
or the water supply is turned off, turn off the ice
maker by lifting wire signal arm.
Cleaning the ice maker
Clean the ice maker and ice bin at regular intervals,
especially prior to vacation or moving.
1 Turn off the ice maker.
2 Remove the ice bin.
3 Empty and carefully clean the ice bin with mild
detergent. Do not use harsh or abrasive cleaners.
Rinse with clean water.
4 Allow the ice bin to dry completely before
replacing in the freezer.
5 Replace the ice bin. Turn the ice maker on.
Remove and empty the ice bin if:
• An extended power failure (one hour or longer)
causes ice cubes in the ice bin to melt and freeze
together.
Remove the ice bin and shake to loosen the cubes or
clean as explained above.

i!_!_i!i_ii_!i!_!_i!i_ii_!i!_!_i!i_ii_!i!_!_i!i_ii_!i!_!_i!i_ii_!i!_!_i!i_ii_!i!_!_i!i_ii_!i!_!_i!i_ii_!i!_!_i!i_ii_!i!_!_ii_i

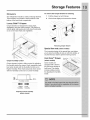
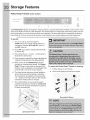
Storage Features
Your refrigerator includesa variety of storage drawers.
These drawers are located in fixed positions at the
bottom of the fresh food compartment.
Luxury Glide TMCrispers
Crisper drawers are designed for storing fruits,
vegetables, and other fresh produce. They feature a
smooth-glide, ball-bearing and soft-dose functionality
so as not to bruise fruits and vegetables.
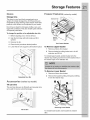
To remove the Crisper Drawer for cleaning:
1 Pull the drawer out until itstops.
2 Lift the front slightly and remove the drawer.
Removing Crisper Drawer
Special item mat (select models)
The innovativedesign of the special item mat allows
you to store four bottles of wine or soft drink bottles, or
any itemthat you want to prevent moving around.
Cool Zone TMDrawer
(select models)
Special item
Mat

i_i!i!i:iil;ii!i_iiii!i_!ii;;j_ii_i¸_i_!:!iii;_i:ii!i_i;i!i_i;i!i_ii_%!!_!_!_!_ii_!_;_!_i_i_!i;i:i!i_i_!i!i_:_!_
Storage Features
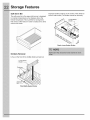
Perfect TempTM Drawer (selectmodels)
) i N
.... eo_tro_
l /X V _ /c @ _ock
,\
The Perfect Temp TM Drawer Jsdesigned to keep food items at a precise temperature whether cooler, warmer, or the
same as the fresh food section of the refrigerator. This drawer features a smooth-glide, ball bearing system and soft-
close functionality so as not to bruise your fruits and vegetables. The thaw setting holds a temperature for thawing
frozen foods for 12 hours. At the end of that time, it then switches to the snacks setting to store the thawed food.
Toopo_to.
Toturnon_doff,p_es_thed_we_s
On/Offbutton.The numericdisplay°willshow a
temperature between 28 F and 42 F when on
and OFF when off.
2 Press F/C if you prefer to display Fahrenheit (F),
or Celsius (C).
3 Press either the up/x or down v scroll buttons to
illuminate the desired item.
4 Once an option isselected, the drawer will adjust and
maintain thetemperature for the setting selected.
i!_!_i!i_ii_!i!_!_i!i_ii_!i!_!_i!i_ii_!i!_!_i!i_ii_!i!_!_i!i_ii_!i!_!_i!i_ii_!i!_!_i!i_ii_!i!_!_i!i_ii_!i!_!_i!i_ii_!i!_!_ii_i
Page is loading ...
Page is loading ...
Page is loading ...
Page is loading ...
Page is loading ...
Page is loading ...
Page is loading ...
Page is loading ...
Page is loading ...
Page is loading ...
Page is loading ...
Page is loading ...
Page is loading ...
Page is loading ...
-
 1
1
-
 2
2
-
 3
3
-
 4
4
-
 5
5
-
 6
6
-
 7
7
-
 8
8
-
 9
9
-
 10
10
-
 11
11
-
 12
12
-
 13
13
-
 14
14
-
 15
15
-
 16
16
-
 17
17
-
 18
18
-
 19
19
-
 20
20
-
 21
21
-
 22
22
-
 23
23
-
 24
24
-
 25
25
-
 26
26
-
 27
27
-
 28
28
-
 29
29
-
 30
30
-
 31
31
-
 32
32
-
 33
33
-
 34
34


Electrolux EI23BC80KS8A Owner's manual
- Category
- Side-by-side fridge-freezers
- Type
- Owner's manual
- This manual is also suitable for
Ask a question and I''ll find the answer in the document
Finding information in a document is now easier with AI
Related papers
-
Electrolux E23BC78IPSH Owner's manual
-
-
Electrolux EW23BC85KS8 Owner's manual
-
-
Electrolux CEI30GF5GSB Owner's manual
-
-
Universal/Multiflex (Frigidaire) RH30WC55GSA Owner's manual
-
Electrolux EW30GF65GBE Owner's manual
-
-
Other documents
-
Marvel MMCFDR23D User guide
-
AGA MELFDR23IVY User guide
-
AGA MMCFDR23BLK Installation guide
-
Viking RVRF3361 Use/Install Manual
-
Viking 1310823 Operating instructions
-
AGA French Door Counter Depth Refrigerator Owner's manual
-
Sears 40180093010 Owner's manual
-
Kenmore 72180593402 User manual
-
LG LMV2015ST/00 Owner's manual
-