Page is loading ...

BAYTOWN II SOLAR LAMP /
PLANTER & EZ Anchor
US Patent # 7172307
Patent Pending DIY Installation
For Solar Lamp Post
Instruction Manual
Model: GS-105PLSG

Introduction
Thank you for your purchase. GAMA SONIC® solar charged accent lighting eliminates
the problems associated with most solar lighting available today. GAMA SONIC® solar
charged lights are brighter and last all night with a typical solar charge. Unique
design, superior light output and numerous installation options confirm the
outstanding value of our product.
GAMA SONIC® has been recognized as a worldwide leader in the lighting industry for
over 20 years. The company also offers unique multi-purpose rechargeable products
that range from party lights to emergency lighting products.
For technical assistance and more information call our Toll Free number:
800-835-4113 (only within the US)
Visit our website or download the latest version of your instruction manual:
www.gamasonic.com Or www.gamasonic.com/user-guides
Please read the instruction manual carefully to obtain the best results from your
purchase.
Tools that are needed, but not supplied with the solar post lamps are: a screw driver.
Solar Lamp Post Location
For optimum light duration throughout the night, it is very important to place your
solar lamp in a spot where it will receive the maximum amount of direct sunlight
throughout the day.
NOTE: For added solar lamp post stability, place rocks in bottom of the planter.
NOTE: For best results, the solar lamp post must be charged for two sunny days on
the “ON” position,
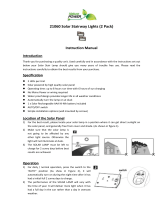
Operation Instructions
1. Remove the top (A) by unscrewing
the 2 screw caps. Turn the
operation switch (Fig. 1) to either
COOL or WARM position
according to your preferences. The
Solar Lamp will automatically
operate at dusk.
2. Reattach top (A) and secure with
the 2 screw caps.
Fig 1
A
COOL
WARM

1. Attach the body (B) to the stem (D)
with the four supplied screws BAG-1.
.
Assembly Instructions:
2. Place the lens and cone(C)
in the body (B).
3. Turn on switch to desired setting.
4. Attach top (A) to the body(B) with
the two supplied screw caps.
5. Attach Side handles provided in
BAG-1.
6. Screw on top ornament.
B
D
C
B
B
A
COOL MODE
WARM MODE

Four easy ways for installation:
A. Flat installation (8.1 - 8.2)
B. EZ Anchor (9.1 - 9.7)
C. PLANTER with EZ Anchor (10.1 - 10.7)
D. PLANTER (11)
Flat installation (Installing the lamp post without planter/anchor):
Cement or deck installation.
EZ Anchor Installation Instructions:
Dirt and soil installation.
8.1.Mark three holes with the base plate as
a template. With an electric drill, drill
the holes into concrete. Assemble with
the hardware provided in BAG-3.
7. Assemble pole (J) by screwing the
four pieces together.
8.2 After assembling attach the three
decorative caps provided in BAG-3,
and screw the fixture to the base.
9.2 Insert the Turning bar (G) in
the hole through the anchor
stake (H) as shown.
9.1 Attach Part (E) to Part (F)
Using the four small screws from
BAG-3, as shown.
E
H
F
G
G
I
J
J
J
J

PLANTER with EZ Anchor Installation Instructions.
9.3 Place anchor in desired location and apply downward pressure while
turning the Turning bar clock wise.
9.4 Occasionally check the anchor Level Tool to ensure your digging is
straight.
H
I
G
9.5 Stop turning once Part (I) is flat with ground level.
9.6 Remove the Turning Bar (G).
9.7 Screw the fixture to the Anchor.
10.1 Put in the four screws that are provided in
BAG-2 through the EZ Anchor and tighten
them with the 4 nuts as shown.
10.2 Use the Turning Bar (G) and Leveling Tool
(in the EZ Anchor) to screw it in the ground
as level as possible.
10.3 Stop turning once Part (J) is flat with ground level.
10.4 Remove the Turning BAR (G).
10.5 Put the planter over the EZ Anchor you assembled.
10.6 Use the four washers and tighten them with the 4 nuts provided.
10.7 Place the metal net (L) over the planter to add stability.
10.8 Place the pole through the net and screw the pole tightly to the
planter.
I

PLANTER Installation Instructions:
11. Place the planter (K) on a flat and sturdy location, Place
the metal net (L) over the planter to add stability.
Place the pole through the net and screw the pole tightly to
the planter.
Place some rocks at the bottom of the planter to add
stability.
J
K
K
F
Hardware
Replacing the Batteries
(After several years of use, the battery may need replacing).
1. Unscrew the two screw caps and detach the TOP. Make sure the
ON/OFF switch is in the OFF (O) position.
2. Unscrew the battery compartment (Fig. 1) screw located on the silver
reflector and remove the compartment door.
3. Unclip the connector and remove the old battery. Make sure the new
battery is a Gama Sonic - 3.2V/1,500mAh, Li-ion Rechargeable battery
with connector.
4. Clip on new battery and install into the battery compartment. Screw
back battery compartment screw.
5. Reattach part the TOP and secure with the 2 screw caps.
BAG- 2
BAG-1
111112
BAG-3
K
F
J
K
L
J

** Batteries are available at www.gamasonicstore.com
WARNING: Do not dispose of Li-Ion battery in the regular trash, municipal waste
stream or by fire as batteries may leak or explode. Do not open, short circuit, or
mutilate batteries as injury may occur. Preserve our environment by recycling Li-Ion
batteries or disposing of them in accordance with local, State and federal regulations.
Do not mix old and new batteries.
Maintenance
Clean the solar panels regularly with a damp towel to guarantee optimum
performance. Do not use any type of solvent for cleaning and be careful not to put too
much pressure on the solar panels while cleaning.
Trouble Shooting
If your solar charged light does not come on at dusk despite observance of all the
instructions, please try the following steps:
1. Make sure that the solar lamp is not being affected by any other light
source.
2. Ensure the solar lamp is not positioned in the shade during the day.
3. Make sure the switch on the lamp head is in either the Low or High
position.
4. Check that the batteries are installed correctly.
NOTE: The performance of the solar lamp will vary with the time of year. It will
deliver more light when it has had a full day in the sun rather than a day in overcast
weather.
WINTERTIME TIPS: For optimal performance, be sure to remove any snow or
debris accumulation from solar panel(s). A solar panel free of debris will charge the
batteries much more efficiently.
WARNING: Please keep out of reach of children.
Model#
Charging
Time
Duration
Time
GS-105PLSG
3 Hours
Approx. 6 hours
6 Hours
Approx. 10 hours
/