Take initial teeth shade;
share with the patient and
enter in chart; photograph
patient’s “before” smile
(with and without matching
shade tab).
Indicates Technique
Sensitive Step
(will impact results)
*
*
Pumice patient’s teeth. Use
only white pumice to clean
the teeth, no prophy paste
or fl uoride.
After the teeth are fully
isolated, apply GLO lip
care on the lips, using a
new cotton swab for each
application.
Squeeze ends of GLO cheek
retractor together, place one
side in mouth, and then the
other side (GLO logo should
be visible inside the mouth,
resting on the tongue). Place
a folded cotton roll under
tongue for added dryness
while building barrier (may
need to be switched out
once saturated).
Start with the upper arch.
Air dry upper gingiva with
air/water syringe; apply
GLO gingival barrier to
gingival margin (and CEJ),
and make sure to cover
all the attached gingiva
4-5mm. Extend distal
at least one tooth.
If recession is present,
cover these areas to prevent
sensitivity. Apply gingival
barrier to incisal edges on
upper and lower anterior
teeth. Light cure immediately
after gingival barrier
placement.
Place folded, 2x2 gauze
in top and bottom lip
vestibules. Gauze is more
easily placed when
slightly wet.
Universal fi t mouthpiece
has a fl exible arch and fi ts
most patients without
adjustment. If needed,
ends can be squeezed
together or pushed apart.
Attach orange mixing tip
to whitening syringe and
ensure it is fi rmly seated
onto dual barrel whitening
gel syringe; prior to initial
use, bleed a small amount
onto bracket tray to ensure
even mix.
Use enough whitening
gel to visibly see 2-3mm of
gel on each tooth surface
isolated for whitening.
Brush gel across bottom
and top teeth.
Proceed with the lower arch.
Air dry lower gingiva with
air/water syringe; apply
GLO gingival barrier to
gingival margin (and CEJ)
and make sure to cover
all attached gingiva 4-5mm
and light cure.
Start the 8-minute whitening
session by pressing the GLO
PRO button twice. The fi rst
tap will turn on the device
and cause the heat indicator
to blink. The second tap
will activate the mouthpiece
which will illuminate and the
heat indicator will glow a
solid orange.
At the end of the 8-minute
application, gently remove
mouthpiece and use a
surgical suction to remove
whitening gel from the
mouthpiece and teeth.
Wipe enamel with clean
dry cotton roll before every
application to ensure
next gel application fully
contacts enamel.
* Optional: Holding the GLO
cheek retractor by the tab,
have the patient gently bite
down as you insert the
small suction between the
GLO mouthpiece and cheek.
The 8 light bands around the
GLO PRO button will count
down the 8-minute session
counter clockwise, with one light
shutting o at each 60-second
interval. The control will blink
and beep when the 8 minutes
are complete. The mouthpiece
light will shut o , although
it will continue warming in
preparation for the next
8-minute session.
Align mouthpiece in mouth,
one side at a time, so the
GLO PRO logo is rightside
up; apply additional lip
treatment and ensure lips
do not come in contact with
mouthpiece or whitening gel.
Ask patient to lightly close
mouth to secure mouthpiece;
patient’s jaw should be closed
but relaxed. Teeth should fi t
directly into mouthpiece for
best whitening results.
After fi nal application,
remove gel, barrier, and
retractor; have patient
rinse thoroughly.
Take fi nal shade of
teeth and note in chart;
photograph patient’s smile
with and without matching
shade tab; compare with
initial shade and share
with the patient.
Give the patient their At Home
Teeth Whitening Kit for
continued whitening and
maintenance at home
between appointments.
Reapply GLO professional
whitening gel to all teeth;
for best results, prior to
reapplying the whitening
gel, always bleed the syringe
tip for freshly mixed gel.
Confi rm gingival barrier is still
intact; wipe mouthpiece of any
residual H2O2 gel. Check soft
tissue/lips and add more lip
treatment. Switch out folded
cotton roll under tongue for
a new dry roll.
Press the GLO PRO button
to start the second 8-minute
whitening session; the
mouthpiece will illuminate.
When the session is
complete, double tap the
GLO PRO button to shut
o the device. It will also
automatically shut o after
5 minutes of no use.
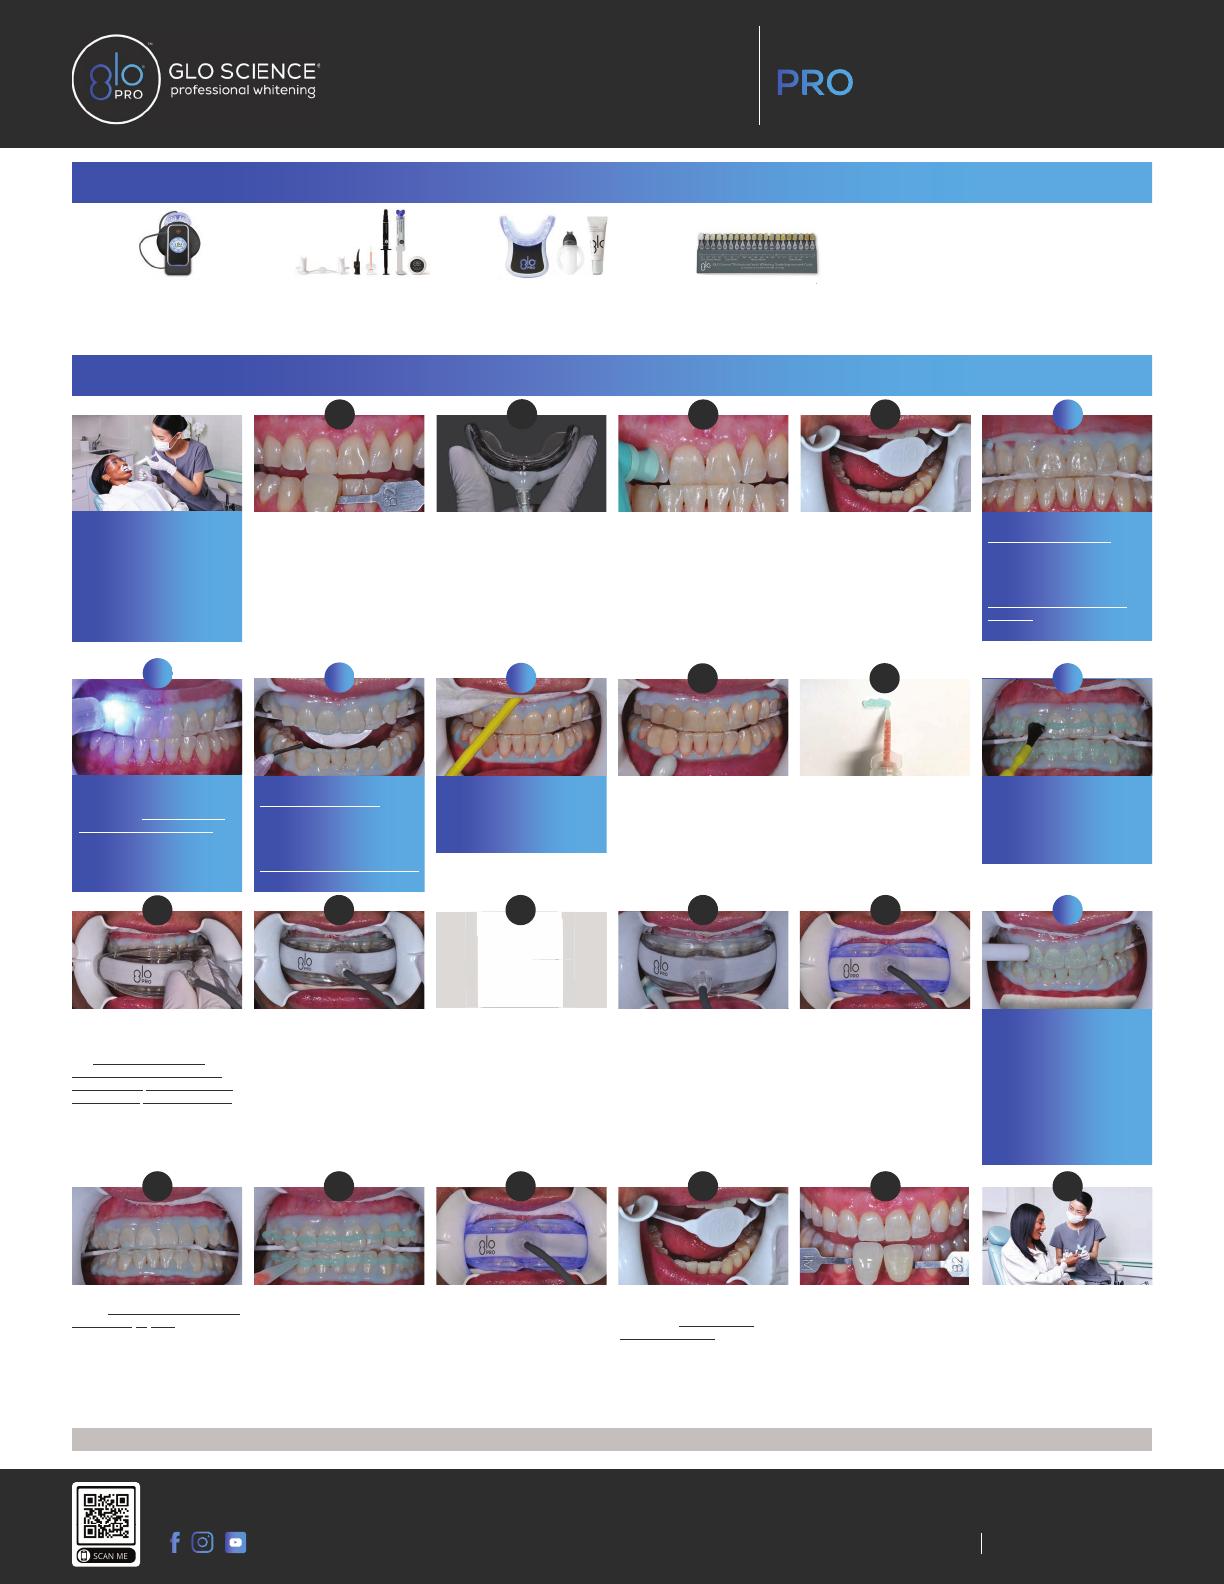
In O ice Teeth Whitening Step by Step Guide
1
7
12
18
3
8
13
19
9
14
20
4
10
15
21
5
11
16
22
6
2
17
23
Hydrogen peroxide whitening gel should not be swallowed. If a small amount is accidentally ingested, patient should rinse mouth thoroughly and drink fl uids.
POWER+
GLO Science
Before you start, you will need
In O ice Teeth Whitening Steps
• hand held mirror
• camera
• prophy angle
• pumice
• cotton swab
• curing light
• 2x2 gauze
• benda brush
• saliva ejector
• surgical suction
• cotton rolls
• mouth mirror
• explorer
• cotton pliers
• air/water syringe tip
• safety goggles
PRO POWER+ In O ice
Teeth Whitening Technology
fully charged control + sterilized
autoclavable mouthpiece
PRO POWER+
In O ice Teeth
Whitening Treatment
PRO POWER At Home
Teeth Whitening Kit
Whitening Shade Guide
arranged from light to dark
See these steps in action and download free marketing tools for your practice at glosciencepro.com
GLOSciencePro #GLOSciencePro info@gloscience.com


