Page is loading ...

Lullaby
®
3-in-1: Bassinet, Playard, Changing Table
Owner's Manual
IS0191E_01
©2020 Artsana USA, INC. 03/20
Read all instructions BEFORE
assembly and USE of product.
KEEP INSTRUCTIONS FOR
FUTURE USE.

2
• PLEASE READ THESE INSTRUCTIONS
CAREFULLY TO ENSURE THE SAFETY
OF YOUR CHILD.
• ALWAYS PROVIDE THE
SUPERVISION NECESSARY FOR
THE CONTINUED SAFETY OF YOUR
CHILD. WHEN USED FOR PLAYING,
NEVER LEAVE CHILD UNATTENDED.
• Playard MUST be fully assembled
with all top rails and center floor hub
locked into position prior to use or
attaching bassinet. Make sure latches
are secure.
• DO NOT place child in playard unless
all top rails and center floor hub are
securely locked into position and
floor pad is in proper place. Infant
may roll into space between pad and
loose mesh sides causing suffocation.
• Stop using this product when your
child reaches 35 inches (89 cm) in
height, weighs more than 30 lbs
(14 kg), or is able to climb out.
• DO NOT use the bassinet when a
child is in the playard.
• FALL HAZARD - To help prevent
falls, do not use bassinet when infant
begins to push up on hands and
knees or weighs over 15 lbs (6.8 kg),
whichever comes first.
• Child can become entrapped and die
when improvised netting or covers are
placed on top of product. Never add
such items to confine child in product.
• DO NOT use bassinet on a bed, floor
or other surfaces.
• The bassinet is designed for use ONLY
with this Chicco Lullaby Playard.
• Stop using the changing table when
your child reaches 25 lbs (11.4 kg).
• Never use this product if there are
any loose or missing fasteners, loose
joints, broken parts, or torn mesh/
fabric. Check before assembly and
periodically during use. Contact
Chicco for replacement parts
and instruction if needed. Never
substitute parts.
• Although Chicco DOES NOT
RECOMMEND refinishing this
product, if you choose to refinish,
use a nontoxic finish specified for
children's products.
SUFFOCATION HAZARDS - Infants
can suffocate:
• In gaps between extra padding and
product side, and
• On soft bedding.
• Use ONLY the mattress provided
by Chicco. Never add a pillow,
comforter, or another mattress for
padding.
• If a sheet is used with the pad, use
only a fitted playard sheet specifically
designed to fit snug with at least 2”
(5 cm) under all sides of the mattress.
The sheet must allow proper use of
the mattress retention straps.
Failure to follow these warnings and the instructions could result in
serious injury or death
WARNING

3
• DO NOT leave child in product with
any side lowered. Be sure all sides
are raised and locked in position
whenever child is in product.
• NEVER use plastic shipping bags as
mattress covers. Do not use plastic
film as mattress cover unless sold and
intended for that purpose. They can
cause suffocation.
• DO NOT use a water mattress with
this product.
STRANGULATION HAZARDS:
• NEVER use additional mattresses,
padding, sheets, or other objects that
will permit your child to climb out,
fall and/or be injured. If you choose
to ignore this warning, then remove
additional padding, large toy, and
other objects that could serve as steps
for climbing out when your child is
able to pull to a standing position.
• STOP using Bassinet when child
can roll over or push up on hands
and knees or reaches 15 lbs (6.8 kg),
whichever comes first.
• Strangulation Hazard: Child can lift
changing table and get neck trapped
between changing table and playard
frame.
• Never leave changing table in place
when child is in the playard.
• Strings can cause strangulation! DO
NOT place items with a string around
child’s neck (hood strings, pacifier
cords,etc.) or attach strings to toys.
• DO NOT suspend strings into the
bassinet or playard.
• DO NOT place the playard near a
window where cords from blinds or
drapes can strangle a child.
OTHER HAZARDS:
• Keep bassinet and playard away from
stoves, heaters, fireplaces and other
hazards which can cause injury to
your child.
• To reduce the risk of SIDS (Sudden
Infant Death Syndrome), pediatricians
recommend healthy infants be
placed on their back to sleep unless
otherwise advised by a physician.
• DO NOT place more than one child in
bassinet or playard.
• DO NOT move or fold bassinet or
playard with child in it - child could be
injured.
Failure to follow these warnings and the instructions could result in
serious injury or death
WARNING

4
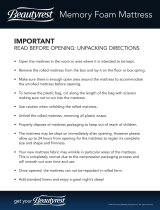
Parts List
A. - Lullaby Frame
B. - Mattress Pad
C. - Bassinet
D. - Changing Pad
A.
B.
C.
D.

5
E.
E. - Changing Table Frame Ends
F. - Changing Table Frame Sides
G. - Parent Organizer
H. - Carry Bag
F.
G.
H.
Parts List

6
1
Setting Up the Playard
1. Remove Lullaby Frame from the
Carry Bag.
WARNING
Before use remove and dispose of any plastic bags and keep them out of reach
of children to avoid the danger of suffocation. Failure to follow these warnings
and instructions could result in serious injury or death. Make sure top rails and
center floor hub are locked and secure before use. This product requires adult
assembly. Keep fingers clear of top corners during setup.

7
2
Setting Up the Playard
2. With the Lullaby Frame standing
upright, pull the corners apart as
shown.
If needed, pull up on the center floor
hub release strap to lift the floor.

8
“CLICK!”
3
“CLICK!”
“CLICK!”
“CLICK!”
Setting Up the Playard
3. The center floor hub must be pulled
up to allow the top rails to lock.
With the center hub even (or level)
with the 4 corners. Pull up on the top
rail center joint to "Click" lock them
into their open position. Both sides of
the center joint must lock for the top
rail to stay open. Repeat for all four
top rails.
This step is very important for the
safety of your child. Make sure the
center hub is still pulled up during
this step or the side rails will not be
able to be latched.

9
4. Push down on the center floor hub
until the bottom of the playard is flat.
For Use as a Playard continue to the
next step.
For Use as a Bassinet go to step 9 on
page 14.
4
Setting Up the Playard

10
5. Install Mattress Pad, padded side
up. Do not use playard without
Mattress Pad and make sure to fold
hook and loop strap underneath
Mattress Pad.
5
Setting Up the Playard

11
Setting Up the Playard
6. Locate 4 Mattress Pad strap holes
on the floor of the playard. Thread
the 4 hook and loop straps through
to the floor of the playard as shown.
6

12
Setting Up the Playard
7. Turn the playard on its side and pull
the straps through the floor of the
playard. Thread the straps through
the slot on the playard foot as shown.
Pull hook and loop strap tight and
then attach together to secure
Mattress Pad. Do this for all 4
mattress corners. Pull up on mattress
pad to make sure it is secure.
7

13
Setting Up the Bassinet
8. Undo the hook and loop straps
from the frame and remove Mattress
Pad from playard.
8

14
Setting Up the Bassinet
9A. Unfold the Bassinet sides as
shown.
9A

15
9B
9B. Unfold the Bassinet ends over
the playard frame. Fit the 4 corners
of the Bassinet over the 4 corner
Bassinet Supports on the Lullaby
playard as shown 9C. Once the
Bassinet is resting on the supports
push down on the center joints on the
long sides of the Bassinet 9D. This
will secure the Bassinet into place.
Push down on Bassinet to be sure it is
secure.
9C
Bassinet Supports
9D
Setting Up the Bassinet

16
10. The Mattress Pad is slightly larger
than the opening of the Bassinet. Do
not fully open the Mattress Pad. Insert
the Mattress Pad on an angle and slide
it towards the side opposite of you.
Adjust the mattress to fit the opposite
corners before inserting the end
closest to you. When the Mattress Pad
is fully inserted on the bottom push it
firmly into place. This will make the
sides taut and remove any slack in the
fabric. Always check to make sure the
hook and loop straps are folded under
the Mattress Pad.
10
Setting Up the Bassinet
WARNING
Do not place Bassinet on unit if a child is in the playard. Make sure playard is
fully assembled.

17
Attaching Parent Organizer
11. Attach the Parent Organizer to the
side top rail of the playard as shown.
Parent organizer can be attached to
either side. For greater convenience,
we recommend the side nearest to the
changing table latches.
11

18
Changing Table Warnings
WARNING
FALL HAZARD : Children have suffered serious injuries after falling from
changing tables. Falls can happen quickly.
• STAY within arm's reach of your child.
• ALWAYS secure this changing table to the playard frame by attaching to the
playard receptacles. See instructions.
SUFFOCATION HAZARD: Babies have suffocated while sleeping on changing
tables. Changing table is not designed for safe sleep.
• NEVER allow baby to sleep on changing table.
• Stop using the changing table when your child reaches 25 lbs (11.4 kg).
• Always remove the changing table when your child is in the playard.
• Do not use changing unit if it is damaged or broken.

19
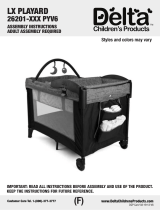
Assembling Changing Table
12. Slide the end of the Changing
Table Frame Side into the groove of
the Changing Table Frame End until it
clicks into place. Make sure the tab is
on the inside when assembling.
Repeat for the other Changing Table
Frame Side as shown.
Do NOT Snap the other end onto the
changer frame. Move to step 13 to
install softgoods before finishing the
changer frame assembly.
12
Tab
“CLICK!”

20
Assembling Changing Table
13A. Insert the Changing Table Frame
Sides into the openings on the back of
the Changing Pad and slide up.
13B. Attach the Changing Table Frame
End to the Changing Table Frame
Sides as shown making sure it clicks
into place.
“CLICK!”
13A
13B
/