
F567560
Model No.
Outdoor Unit
WH-MDF09C3E5
WH-MDF12C6E5
WH-MDF14C6E5
WH-MDF16C6E5
© Panasonic HA Air-Conditioning (M) Sdn. Bhd. 2010.
Unauthorized copying and distribution is a violation
of law.
ENGLISH
ENGLISH
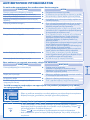
Before operating the unit, read these operating instructions thoroughly and keep them for future reference.
Before operating the unit, make sure the installation has been carried out correctly by authorized dealer correctly and
precisely following the installation instructions given.
2 ~ 9
2 ~ 9
FRANÇAIS
FRANÇAIS
Avant d’utiliser l’appareil, lisez ce mode d’emploi dans son intégralité et conservez-le pour toute référence ultérieure.
Avant de faire fonctionner l’unité, assurez-vous que l’installation a été correctement réalisée par un revendeur agréé
et dans le strict respect des consignes d’installation fournies.
10 ~ 17
10 ~ 17
ESPAÑOL
Antes de utilizar la unidad, sírvase leer atentamente estas instrucciones de funcionamiento y conservarlas como
futuro elemento de consulta.
Antes de operar la unidad asegúrese de que la instalación haya sido realizada correctamente por un instalador
autorizado, siguiendo de forma correcta y precisa las instrucciones de instalación dadas.
18 ~ 25
18 ~ 25
DEUTSCH
Bevor Sie das Gerät in Betrieb nehmen, lesen Sie bitte diese Bedienungsanleitung aufmerksam durch und bewahren Sie
sie für die künftige Verwendung auf.
Vor der Inbetriebnahme dieses Geräts ist sicherzustellen, dass die Montage durch einen autorisierten Händler
fachgerecht entsprechend der Installationsanleitung durchgeführt wurde.
26 ~ 33
26 ~ 33
ITALIANO
Prima di utilizzare l’unità si prega di leggere attentamente le istruzioni e di conservare questo opuscolo per potervi
fare riferimento in futuro.
Prima di far funzionare l’unità, assicurarsi che l’installazione sia stata eseguita correttamente da un rivenditore
autorizzato e seguendo precisamente le istruzioni date per l’installazione
34 ~ 41
34 ~ 41
NEDERLANDS
Lees voor u het apparaat gebruikt deze gebruiksaanwijzing grondig en bewaar deze voor toekomstig gebruik.
Controleer, voor u de unit in gebruik neemt, dat de installatie goed is uitgevoerd door een offi ciële dealer en dat dat
nauwkeurig is gedaan volgens de verstrekte instructies voor de installatie.
42 ~ 49
PORTUGUÊS
Antes de ligar a unidade, leia cuidadosamente este manual de utilização e guarde-o para futura referência.
Antes de colocar a unidade em funcionamento, ceritifque-se que a instalação foi feita correctamente por um
fornecedor autorizado e que seguiu com precisão as instruções de instalação dadas.
50 ~ 57
EΛΛΗΝΙΚΆ
Προτού θέσετε τη μονάδα σε λειτουργία, διαβάστε προσεκτικά αυτές τις οδηγίες χρήσης και φυλάξτε τις για μελλοντική αναφορά.
Πριν θέσετε σε λειτουργία τη μονάδα, βεβαιωθείτε ότι η εγκατάσταση έχει διεξαχθεί κανονικά από εξουσιοδοτημένο
αντιπρόσωπο, ο οποίος έχει ακολουθήσει σωστά και πιστά τις δοθείσες οδηγίες.
58 ~ 65
БЪЛГАРСКИ
БЪЛГАРСКИ
Преди да задействате климатика, прочетете внимателно инструкциите за употреба и ги запазете за бъдещи справки.
Преди да използвате устройството се уверете, че монтажът е извършен правилно и прецизно от оторизиран дилър,
като са спазвани инструкциите за монтаж.
66 ~73
66 ~73
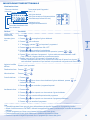
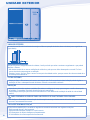
Operating Instructions
Air-to-Water Heatpump System

2
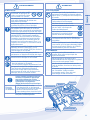
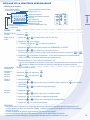
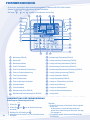
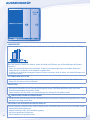
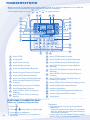
• Panasonic Air-to-Water Heatpump is a system designed for
combination with Panasonic Tank Unit. In case of non-Panasonic
Tank Unit is being used with Panasonic Air-to-Water Heatpump
System, Panasonic cannot guarantee neither good operation nor
reliability of the system.
• This manual describes how to operate the Heatpump system.
•
Other operation such as water tank, radiator, external thermo controller
and underfl oor system, please refer to respective manufacturer
operation manuals.
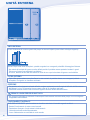
SAFETY PRECAUTIONS
Thank you for purchasing
Panasonic Product
TABLE OF CONTENTS
TABLE OF CONTENTS
SAFETY PRECAUTIONS
2~3
REMOTE CONTROL
4~7
OUTDOOR UNIT
8
TROUBLESHOOTING
9
INFORMATION
74~76
NOTE
NOTE
The illustrations in this manual are for
explanation purposes only and may
differ from the actual unit. It is subjected
to change without notice for future
improvement.
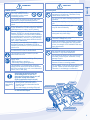
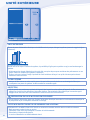
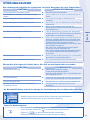
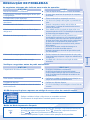
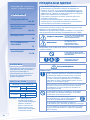
OPERATION CONDITION
OPERATION CONDITION
Water outlet
Temperature (°C)
HEATING
Max. 55
Min. 25
Ambient
Temperature (°C)
HEATING
Max. 35
Min. -20
NOTICE :
When the outdoor temperature
is out of the above temperature
range, the heating capacity will
drop signifi cantly and outdoor
unit might stop for protection
control.
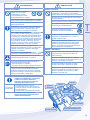
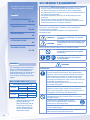
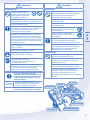
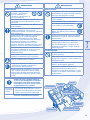
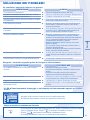
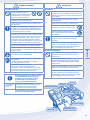
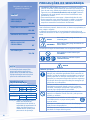
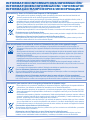
To prevent personal injury, injury to others, or property damage, please
comply with the following.
Incorrect operation due to failure to follow instructions below may cause
harm or damage, the seriousness of which is classifi ed as below:
WARNING
WARNING
This sign warns of death or serious injury.
CAUTION
CAUTION
This sign warns of injury or damage to
property.
The instructions to be followed are classifi ed by the following symbols:
This symbol denotes an action that is
PROHIBITED.
These symbols denote an action that
is COMPULSORY.
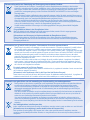
WARNING
WARNING
OUTDOOR UNIT
This appliance is not intended for use by persons (including
children) with reduced physical, sensory or mental
capabilities, or lack of experience and knowledge, unless
they have been given supervision or instruction concerning
use of the appliance by a person responsible for their safety.
Children should be supervised to ensure that they do not
play with the appliance.
Please consult authorized dealer or specialist to repair,
install, remove and reinstall the unit. Improper installation
and handling will cause leakage, electric shock or fi re.
Do not install the unit in a potentially explosive or fl ammable
atmosphere. Failure to do so could result in fi re.
Do not insert your fi ngers or other objects into the
outdoor unit, rotating parts may cause injury.
Do not touch the outdoor unit during lightning, it may cause
electric shock.
Do not attempt to repair the unit by yourself. Otherwise,
it may cause serious injury or electric shock.

ENGLISH
3
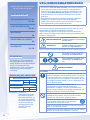
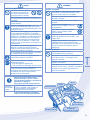
CAUTION
CAUTION
OUTDOOR UNIT
Do not install the unit close to any combustible
equipment or at bathroom. Otherwise, it may
cause electric shock or fi re.
Do not touch the water discharge pipe during
operation.
Do not place anything on top or beneath of the
unit.
Do not sit or step on the unit, you
may fall down accidentally.
Do not touch the sharp aluminium fi n,
sharp parts may cause injury.
Ensure drainage pipe is connected properly.
Otherwise, leakage may occur.
Check the installation rack periodically to make
sure that it is not damaged. After long periods
of use, the strength of the installation rack may
have deteriorated.
REMOTE CONTROL
Do not let the remote control get wet.
Otherwise, it may cause malfunction.
Do not press the buttons on the remote control
with hard, pointed objects. Otherwise, it may
damage the unit.
Do not wash the remote control with water,
benzene, thinner or scouring powder.
Do
not inspect or service the remote control by
not inspect or service the remote control by
yourself. Please consult authorized dealer.
yourself. Please consult authorized dealer.
Otherwise, it can damage or malfunction.
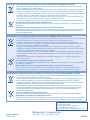
WARNING
WARNING
POWER SUPPLY
Do not use modifi ed cord,
joint cord, extension cord or
unspecifi ed cord to prevent
overheating and fi re.
Do not share the same power outlet with other
equipment to prevent overheating and fi re.
Do not operate with wet hands to prevent electric
shock.
If the supply cord is damage, it must be replaced
by the manufacturer, its service agent or similarly
qualifi ed persons in order to avoid a hazard.
This unit is equipped with Residue Current Circuit
Breaker (RCCB). It is strongly recommended to
check the operation of the RCCB after installation
and periodically after servicing or maintenance by
authorized dealer to ensure it is in good working
order. Otherwise, it may cause electrical shock or
fi re in case of malfunction.
It is strongly recommended to be installed
with Earth Leakage Circuit Breaker (ELCB) or
Residual Current Device (RCD) to prevent electric
shock or fi re.
It is recommended to wear gloves during servicing
or maintenance in order to avoid hazard.
This equipment must be earthed to prevent
electrical shock or fi re.
Prevent electric shock by switching off the power
supply when:
- Before cleaning or servicing.
- Abnormally strong lightning activity.
This appliance is for multiple uses. All power
supply circuits must be turn off before access to
any of the terminals in the unit, to avoid electrical
shock, burn or fatal injury.
Stop using the product when any
abnormality/failure occurs and
disconnect the power plug or turn off
the power switch and breaker.
(Risk of smoke/fi re/electric shock)
Examples of
abnormality/
failure
• The RCCB switches off by itself.
• Burning smell, abnormal noise or
vibration sound is observed when the
unit is in use.
• Hot water keeps on coming off the unit.
Contact immediately your local dealer
for maintenance/repair.
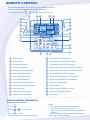
/
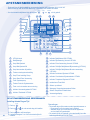
Floor Heating
Panel
Power Supply
Water Tank Unit
Outdoor Unit
Shower
Remote Control

4
REMOTE CONTROL
TIMER OUTDOOR
HEAT
SETTING
STATUS
PUMPDW
BOOSTER
QUIET
TANK
WATER OUTLET
C
C
SET
SELECT
CANCEL
ERROR
RESET
SETTING
STATUS
SEARCH
PUMPDWFORCECLOCK
CHECK
OFF
/
ON
MODE
HEATER
QUIET
OFF/ON
TIMER
HEATER
OPERATION
FORCE
HEATER
ACTUAL
TIMER
1
MON TUEWEDTHU FRI SAT SUN
SOLAR REMOTE
2 3 4 56
ON
OFF
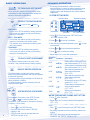
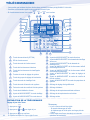
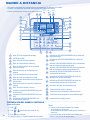
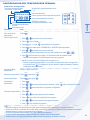
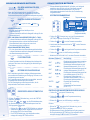
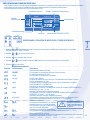
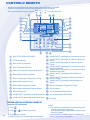
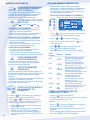
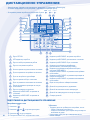
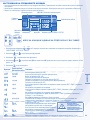
• Some functions described in this manual may not be applicable to your unit.
• Consult your nearest authorized dealer for further information.
• For normal operation, the
ERROR
RESET
,
FORCE
and
PUMPDW
buttons are not in use.
1
OFF/ON Button
14
Quiet Operation OFF/ON Indicator
2
Operation LED
15
Backup Heater Request OFF/ON Indicator
3
Operation Mode Button
16
Force Heater Request OFF/ON Indicator
4
Quiet Operation Button
17
Backup Heater Actual Operation (OFF/ON) Indicator
5
Backup Heater Operation Button
18
Booster Heater Actual Operation (OFF/ON) Indicator
6
System Setting Mode Buttons
19
System Setting Mode OFF/ON Indicator
7
Timer Setting Group Buttons
20
System Status Check Mode OFF/ON Indicator
8
Force Heater Mode Button
21
System Pumpdown Mode OFF/ON Indicator
9
System Pumpdown Mode Button
22
Timer/Clock Setting Display
10
System Status Check Mode Buttons
23
Remote Display
11
Error Reset Button
24
Outdoor Ambient Temperature Display
12
Heat Mode OFF/ON Indicator
25
Water Outlet Temperature Display
13
Tank Mode OFF/ON Indicator
26
Solar Display
Notes:
• The current day and time need to be set when:
- The power is turned on for the fi rst time.
- After a long time has elapsed since the power was last
turned on.
• The current time that has been set will be the standard
time for all the Timer operations.
1. Press
CLOCK
.
2. Press
or to set current day.
3. Press
SET
to confi rm.
4. Repeat steps 2 and 3 to set the current time.
REMOTE CONTROL PREPARATION
Setting Current Day and Time
16
1
22
21
10
17
18
19
20
24
9
5
25
3
8
4
7
2
15
14
12
13
6 11
23
26

ENGLISH
5
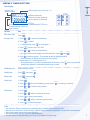
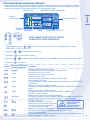
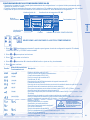
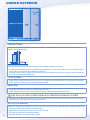
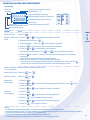
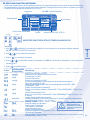
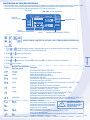
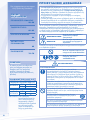
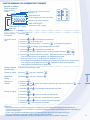
SETTING UP THE SPECIAL FUNCTIONS
SETTING UP THE SPECIAL FUNCTIONS
• After initial installation, you can manually adjust the settings. The initial setting remains active until the user changes it.
• The remote control can be used for multiple installations. Some functions may not be applicable to your unit.
• Ensure the operation LED is in OFF condition before setting.
TIMER OUTDOOR
HEAT
SETTING
STATUS
PUMPDW
BOOSTER
QUIET
TANK
WATER OUTLET
C
C
HEATER
OPERATION
FORCE
HEATER
ACTUAL
MON TUE WEDTHU FRI SAT SUN
SOLAR REMOTE
ON
Day display
YES / NO / Temperature display
SETTING / STATUS indicatorFunctions*
Timer display
Operation
Mode
Actual Operation
SET
SELECT
CANCEL
SETTING
STATUS
SEARCH
CHECK
SELECT FUNCTIONS AND SET YOUR DESIRED TIMER
1. Press
SET
and
CHECK
simultaneously for 5 seconds to enter special setting mode. “SETTING” and “STATUS” indicator is ON.
2. Press
or to browse functions.
3. Press
SELECT
to enter the function.
4. Press
or to enable YES or disable NO function, or set your desired day and time.
5. Press
SET
to confi rm.
Function *
Operation Mode/
Actual Operation
Description
External Thermo Controller (YES / NO)
To set external thermo controller connection.
TANK
Tank Connection (YES / NO)
To set tank connection.
SOLAR
Solar Priority (YES / NO)
To choose the solar use for water tank heat up.
HEAT
Heating Priority (YES / NO)
To choose the heat pump only use for Heating side during HEAT + TANK mode.
HEAT
Heating Heat-up Interval Set
To set timer for Heating during HEAT + TANK mode (0.5hour ~ 10hours).
TANK
Tank Heat-up Interval Set
To set timer for Tank during HEAT + TANK mode (5minutes ~ 1hour 35minutes).
BOOSTER
Booster Heater Delay Time Set
To set delay timer for booster heater to ON if tank temperature is not reached (20minutes ~ 1hour
35minutes).
Sterilization (YES / NO)
To set sterilization, if required.
Sterilization Day & Time Set
To set timer for sterilization (only once a week).
Sterilization Temperature Set
To set temperature for sterilization function (40°C ~ 75°C).
Sterilization Continue Time
To set timer to maintain heating temperature in order to complete the sterilization function
(5minutes ~ 1hour).
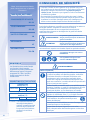
CAUTION
CAUTION
Do not use the system
during sterilization
to prevent burnt or
overheat during shower.

6
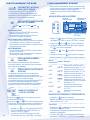
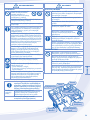
BASIC OPERATION
OFF
/
ON
TO TURN ON OR OFF THE UNIT
• When unit is ON, operation LED is lit and the actual
temperature for water outlet and outdoor ambient are
shown on the remote control display.
MODE
TO SELECT OPERATION MODE
HEAT HEAT +TANK TANK
• HEAT MODE
- To turn ON or OFF the panel/fl oor heating operation.
- In this mode, the outdoor unit will provide heating
capacity to the system.
• HEAT + TANK MODE
- In this mode, the outdoor unit will provide heating
capacity to the sanitary tank and the system.
- This operation is not used when the sanitary water
tank is not installed.
• TANK MODE
- To turn ON or OFF the sanitary tank operation.
- In this mode, the outdoor unit will provide heating
capacity to the sanitary tank.
QUIET
TO ENJOY QUIET ENVIRONMENT
• This operation reduces outdoor unit noise. In this
condition, it may cause decrease in heating capacity.
HEATER
BACKUP HEATER OPERATION
• The backup heater provides extra heating capacity
during cold outdoor temperature and only can operated
at heat mode operation.
• The backup heater will automatically turn ON when the
setting conditions is fulfi lled.
• To cancel the Heater operation manually, press the
respective button again.
STATUS
SEARCH
CHECK
SYSTEM STATUS CHECK MODE
1. Press
CHECK
for 5 seconds to enter STATUS mode.
2. Press or to check the Water Inlet
Temperature, Tank Temperature, Compressor Running
Frequency or Error History.
• Press
C
AN
C
E
L
to exit STATUS mode.
• Once STATUS mode is entered, “STATUS”
indicator is ON.
• STATUS mode cannot be activated when the
“SETTING” indicator is ON.
•
It is strongly recommended to contact the nearest
authorized dealer to change the water temperature range.
• Using the remote control could set the temperature
range for water outlet temperature and outdoor ambient
temperature.
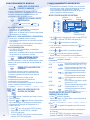
SYSTEM SETTING MODE
SET
SELECT
CANCEL
SETTING
TIMER OUTDOOR
HEAT
SETTING
STATUS
PUMPDW
BOOSTER
QUIET
TANK
WATER OUTLET
C
HEATER
OPERATION
FORCE
HEATER
ACTUAL
ON
Operation Mode Temperature display
SETTING indicator
Parameter *
1. Press
SET
for 5 seconds to enter “SETTING” mode.
“SETTING” indicator is ON.
2. Press
or to choose a parameter.
3. After selecting the desired parameter, press
SELECT
to enter
the parameter.
4. Press
or to set the desired temperature.
5. Press
SET
again to confi rm the setting.
• Repeat steps 2 to 5 to set other parameters.
Operation
Mode
Parameter * Description
HEAT
Outdoor ambient set temperature at low
water outlet temperature (-15°C ~ 15°C).
HEAT
Outdoor ambient set temperature at high
water outlet temperature (-15°C ~ 15°C).
HEAT
Water outlet set temperature at low
outdoor ambient temperature
(25°C ~ 55°C).
HEAT
Water outlet set temperature at high
outdoor ambient temperature
(25°C ~ 55°C).
HEAT
OFF
Set temperature for turning OFF heating
operation (5°C ~ 35°C).
HEATER
ON
Outdoor ambient set temperature for
turning ON heater operation
(-15°C ~ 20°C).
TANK
Sanitary tank set temperature
(40°C ~ 75°C).
WATER TEMPERATURE THERMO SHIFT SETTING
1. Press
SET
within 5 seconds.
• Repeat steps 3 to 5 to set the desired shift temperature
(-5°C ~ 5°C).
Notes:
• Press
C
AN
C
E
L
or wait 30 seconds to exit “SETTING” mode.
• The setting temperature will be stored in the system once
confi rm.
• “SETTING” mode cannot be activated when the
“PUMPDW” and “STATUS” indicator is ON.
ADVANCE OPERATION

ENGLISH
7
Timer Display
TIMER
1
MON TUE WEDTHU FRI SAT SUN
2 3 4 5 6
ON
OFF
Lights up if Timer
operation is selected
Day to be selected
ON Timer
To automatically switch “ON” the unit
6 different programs can be set in a day (1 ~ 6)
Indicates the selected day
Indicates the next timer operation day
Time to be selected (10 minutes step)
OFF Timer
To automatically switch “OFF” the unit
SET
SELECT
CANCEL
SETTING
CLOCK
OFF/ON
TIMER
Function Step
Enter timer mode
Press
TIMER
.
Set day & time
1.
Press or to select your desired day.
2.
Press
SELECT
to confi rm
3.
“1” will be blinking, press
SELECT
to set program 1.
4.
Press
OFF/ON
to select ON or OFF timer.
5.
Press or to select your desired time.
If you want to set the timer together with other operations, press
MODE
and
QUIET
.
6.
Press
SET
to confi rm program 1. The selected day will be highlighted with ▼.
• After 2 seconds, the display will move to the next program.
7.
Repeat steps 4 to 7 to set programs 2 to 6.
• During timer setup, if no button is pressed within 30 seconds, or if the
SET
button is pressed the
setting at that moment is confi rmed and timer setup is ended.
Add/Modify timer
Repeat the steps above.
Disable timer
Press
TIMER
, then press
CANCEL
.
Enable timer
Press
TIMER
, then press
SET
.
Check timer
1. Press
TIMER
.
2. Press or until your desired day is shown, press
SELECT
to confi rm your selection.
3. Press or to check the set programs.
Cancel timer
1. Press
TIMER
.
2. Press or until your desired day is shown.
3. Press
SELECT
to enter program setting.
4. Press
or until your desired program is shown.
5. Press
CANCEL
to cancel the program.
WEEKLY TIMER SETTING
Notes:
• You can set the Timer for each day of the week (Monday to Sunday) with 6 programs per day.
• When the unit is switched on by the ON Timer, it will use the previously set temperature to control the room temperature.
• Same timer program cannot be set in the same day.
• You may also select collective days with same timer setting.
• Promotes energy saving by allowing you to set up to 6 programs in any given day.

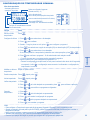
8
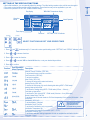
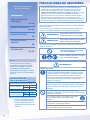
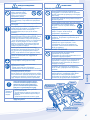
OUTDOOR UNIT
OUTDOOR UNIT
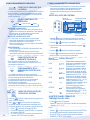
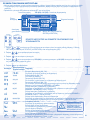
In case of a power supply failure or pump operating failure, drain the system (as suggested in the fi gure below).
H
<H
When water is idle inside the system, freezing up is very likely to happen which could damage the system.
• Do not obstruct the air inlet and air outlet vents, it may cause low performance or breakdown. Please remove obstacles to
assure the ventilation.
• During winter, please clean and remove the snow near outdoor unit so that the snow does no cover the air inlet and air
outlet vents.
EXTERNAL FILTER
• Please clean the external fi lter at least once a year. Fail to do so might cause fi lter clogged, consequent system
breakdown. Please consult authorized dealer.
INSPECTION
• In order to ensure optimal performance of the unit, seasonal inspections on the unit, external fi lter and fi eld wiring have to
be carried out at regular intervals. This maintenance should be carried out by authorized dealer.
• Clear any obstruction at the air inlet and air outlet vents of outdoor unit.
FOR EXTENDED NON-USE
• Do not switch off the power supply. Switching off the power supply will stop the automatic water pump operation and cause
the water pump jammed.
NON SERVICEABLE CRITERIAS
NON SERVICEABLE CRITERIAS
TURN OFF POWER SUPPLY then please consult authorized dealer under the following conditions:
• Abnormal noise during operation.
• Water/foreign particles have entered the remote control.
• Circuit breaker switches off frequently.
• Power cord becomes unnaturally warm.

ENGLISH
9
TROUBLESHOOTING
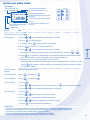
The following symptoms do not indicate malfunction.
The following symptoms do not indicate malfunction.
SYMPTOM
SYMPTOM
CAUSE
CAUSE
Flowing sound during operation. ► • Refrigerant fl ow inside the unit.
Operation is delayed a few minutes after restart. ► • The delay is a protection to the unit’s compressor.
Outdoor unit emits water/steam. ► • Condensation or evaporation occurs on pipes.
Outdoor unit emits steam during heating mode. ► • This is due to defrost operation happens at the heat
exchanger.
Outdoor unit does not operate. ► • When the outdoor temperature is out of the operation
condition range, the heatpump system enter protection
control.
Air-to-water Heatpump system operation will turn off. ► • If outdoor unit water inlet temperature is lower than 20°C.
Backup heater power will turn on to heat up the water.
System diffi cult to heat-up. ► • When heating is operated together with fl oor heating or
panel heater simultaneously, there may be case where
warm water temperature is getting lower and cause fl oor
heating or panel heater heat-up is weaken.
• When outdoor air temperature is low, it may be diffi cult to
get warm.
• Is the snow pile blocking the discharge outlet or intake
inlet of outdoor unit.
• When water outlet set temperature is low, it may be
diffi cult to get warm.
System cannot get warm instantly. ► • Due to the nature of the heatpump system, it may take
some time to heat-up the water if the unit is operated
from cold-start.
Operation starts after power resumes. ► • Unit is operates under auto restart function.
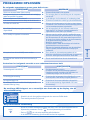
Check the following before calling for servicing.
Check the following before calling for servicing.
SYMPTOM
SYMPTOM
CHECK
CHECK
Heating operation is not working effi ciently. ► • Set the temperature correctly.
• Is the panel heater valve closed.
• Clear any obstruction at the air inlet and air outlet vents
of outdoor unit.
Noisy during operation. ► • Check if the unit has been installed at an incline or the
cover is not closed properly.
The unit does not work. ► • Check if the circuit breaker is tripped.
Operation LED is no lit or remote control display
is blank.
► • Is the power supply off or power failure.
The operation LED blinks and error code appear on remote control display.
The operation LED blinks and error code appear on remote control display.
TIMER
TIMER
1
MON TUE WEDTHU FRI SAT SUN
2 3 4 5 6
ON
OFF
• Turn the unit off and reveal the error code to authorized dealer.
• Timer operation cancel when error code occur.
Force Heater Mode Button
Force Heater Mode Button
FORCE
• In case of a failure of the Air-to-Water Heatpump system, the backup heater can be used to heat
up the heating water. Press
FORCE
to switch on the backup heater.
• Press
OFF
/
ON
to stop the force heater operation.
• During Force Heater mode, all other operations are not allowed.
Page is loading ...
Page is loading ...

12
TÉLÉCOMMANDE
• Il est possible que certaines fonctions décrites dans ce manuel ne soient pas applicables à votre unité.
• Consultez votre revendeur agréé le plus proche pour en savoir plus.
• En fonctionnement normal, les touches
ERROR
RESET
,
FORCE
et
PUMPDW
sont inactives.
1
Touche de marche/arrêt (OFF/ON)
14
Voyant de MARCHE/ARRÊT du mode silencieux
2
DEL de fonctionnement
15
Voyant de MARCHE/ARRÊT de la demande de chauffage
de secours
3
Touche de mode de fonctionnement
16
Voyant de MARCHE/ARRÊT de la demande de
chauffage forcé
4
Touche de fonctionnement silencieux
17
Voyant de MARCHE/ARRÊT de fonctionnement effectif
du chauffage de secours
5
Touche de fonctionnement du chauffage de
secours
18
Voyant de MARCHE/ARRÊT de fonctionnement effectif
du chauffage de démarrage
6
Touches de mode de réglage du système
19
Voyant de MARCHE/ARRÊT du mode de réglage du
système
7
Touche de groupe de réglage de la minuterie
20
Voyant de MARCHE/ARRÊT du mode de contrôle de
l’état du système
8
Touche de mode de chauffage forcé
21
Voyant de MARCHE/ARRÊT du mode de pumpdown du
système
9
Touche de mode d’évacuation du système
22
Affi chage du réglage Horloge/Minuterie
10
Touches de mode de contrôle de l’état du système
23
Affi chage à distance
11
Touche de réinitialisation d’erreur
24
Affi chage de la température ambiante extérieure
12
Voyant de MARCHE/ARRÊT du mode chauffage
25
Affi chage de la température de sortie d’eau
13
Voyant de MARCHE/ARRÊT du mode réservoir
26
Affi chage solaire
Remarques:
• Le jour et l’heure doivent être réglés:
- Au premier démarrage de l’unité.
- Au redémarrage de l’unité après une longue période
d’arrêt.
• L’heure réglée sera l’heure standard pour toutes les
opérations de la minuterie.
1. Appuyez sur
CLOCK
.
2. Appuyez sur
ou pour régler le jour.
3. Appuyez sur
SET
pour confi rmer.
4. Répétez les étapes 2 et 3 pour régler l’heure.
PRÉPARATION DE LA TÉLÉCOMMANDE
Réglage du jour et de l’heure
TIMER OUTDOOR
HEAT
SETTING
STATUS
PUMPDW
BOOSTER
QUIET
TANK
WATER OUTLET
C
C
SET
SELECT
CANCEL
ERROR
RESET
SETTING
STATUS
SEARCH
PUMPDWFORCECLOCK
CHECK
OFF
/
ON
MODE
HEATER
QUIET
OFF/ON
TIMER
HEATER
OPERATION
FORCE
HEATER
ACTUAL
TIMER
1
MON TUEWEDTHU FRI SAT SUN
SOLAR REMOTE
2 3 4 56
ON
OFF
16
1
22
21
10
17
18
19
20
24
9
5
25
3
8
4
7
2
15
14
12
13
6 11
23
26
Page is loading ...
Page is loading ...

FRANÇAIS
15
Affi chage de la minuterie
TIMER
1
MON TUE WEDTHU FRI SAT SUN
2 3 4 5 6
ON
OFF
S’illumine lorsque l’opération
de minuterie est sélectionnée
Jour à sélectionner
Minuterie de démarrage (ON)
Pour démarrer automatiquement l’unité
6 programmes différents peuvent être défi nis
dans une journée (1 ~ 6)
Indique le jour sélectionné
Indique le fonctionnement de la minuterie du
jour suivant
Heure à sélectionner
(incréments de 10 minutes)
Minuterie d’arrêt (OFF)
Pour arrêter automatiquement l’unité
SET
SELECT
CANCEL
SETTING
CLOCK
OFF/ON
TIMER
Fonction Étape
Entrer en mode de
minuterie
Appuyez sur
TIMER
.
Régler le jour et
l’heure
1.
Appuyez sur ou pour sélectionner le jour de votre choix.
2.
Appuyez sur
SELECT
pour confi rmer.
3.
“1” clignotera, appuyez sur
SELECT
pour régler le programme 1.
4.
Appuyez sur
OFF/ON
pour sélectionner la minuterie de DÉMARRAGE ou d’ARRÊT.
5.
Appuyez sur ou pour sélectionner l’heure de votre choix.
Si vous souhaitez régler le minuteur en même temps que d’autres opérations, appuyez sur
MODE
et
QUIET
.
6.
Appuyez sur
SET
pour confi rmer le programme 1. Le jour sélectionné sera mis en évidence avec ▼.
• Après 2 secondes, l’affi chage se déplacera au programme suivant.
7.
Répétez les étapes 4 à 7 pour régler les programmes 2 à 6.
•
Au cours de la confi guration de la minuterie, si aucune touche n’est pressée dans les 30 secondes ou si la touche
SET
est pressé, le réglage à ce moment-là, est confi rmé et la confi guration de la minuterie est terminée.
Ajouter/modifi er
une minuterie
Répétez les étapes ci-dessus.
Désactiver la
minuterie
Appuyez sur
TIMER
, puis appuyez sur
CANCEL
.
Activer la
minuterie
Appuyez sur
TIMER
, puis appuyez sur
SET
.
Vérifi er la
minuterie
1. Appuyez sur
TIMER
.
2. Appuyez sur ou jusqu’à ce que votre jour souhaité s’affi che, appuyez sur
SELECT
pour confi rmer
votre sélection.
3. Appuyez sur ou pour vérifi er les programmes réglés.
Annuler la
minuterie
1. Appuyez sur
TIMER
.
2. Appuyez sur ou jusqu’à ce que votre jour souhaité s’affi che.
3. Appuyez sur
SELECT
pour entrer dans le réglage des programmes.
4. Appuyez sur ou jusqu’à ce que votre programme souhaité s’affi che.
5. Appuyez sur
CANCEL
pour annuler le programme.
RÉGLAGE DE LA MINUTERIE HEBDOMADAIRE
Remarques:
• Vous pouvez régler la minuterie pour chaque jour de la semaine (du lundi au dimanche), avec 6 programmes par jour.
• Lorsque l’appareil est allumé par la minuterie (TIMER), il utilisera la température déjà réglée pour contrôler la température
ambiante de la pièce.
• Le même programme de minuterie ne peut pas être réglé dans la même journée.
• Vous pouvez également sélectionner des groupes de jours avec le même réglage de minuterie.
• Favorise les économies d’énergie en vous permettant de régler jusqu’à 6 programmes tous les jours.
Page is loading ...
Page is loading ...
Page is loading ...
Page is loading ...

20
MANDO A DISTANCIA
• Es posible que algunas funciones descritas en este manual no se apliquen a su unidad.
• Consulte a su distribuidor autorizado más cercano para obtener información.
• Para el funcionamiento normal, no se usan los botones
ERROR
RESET
,
FORCE
y
PUMPDW
.
Notas:
• La fecha y la hora actual se deben fi jar cuando:
- Se enciende por primera vez.
- Si ha pasado mucho tiempo desde que se encendió por
última vez.
• La hora actual que se fi jó será la hora estándar para
todas las operaciones del temporizador.
1. Pulse
CLOCK
.
2. Pulse
o para seleccionar el día de hoy.
3. Pulse
SET
para confi rmar.
4. Repita los pasos 2 y 3 para confi gurar la hora actual.
PREPARACIÓN DEL MANDO A DISTANCIA
Ajuste de día y hora
1
Botón OFF/ON (apagado/encendido)
15
Indicador de APAGADO/ENCENDIDO de la resistencia
eléctrica de apoyo
2
LED de encendido
16
Indicador de APAGADO/ENCENDIDO de calefacción
forzada
3
Botón del modo de funcionamiento
4
Botón de funcionamiento silencioso
17
Indicador (APAGADO/ENCENDIDO) del funcionamiento
real de la resistencia eléctrica de apoyo
5
Botón de funcionamiento de la resistencia
eléctrica de apoyo
18
Indicador (APAGADO/ENCENDIDO) del funcionamiento
real de la resistencia eléctrica acumulador ACS
6
Botones del modo de confi guración del
sistema
19
Indicador de APAGADO/ENCEDIDO del modo de
confi guración del sistema
7
Tecla de confi guración del temporizador
20
Indicador de APAGADO/ENCEDIDO del modo de
verifi cación de estado del sistema
8
Botón de modo de calefacción forzada
9
Botón del modo de recuperación de refrigerante
(Pump Down)
21
Indicador de APAGADO/ENCEDIDO del modo de
recuperación de refrigerante (Pump Down)
10
Botones del modo para verifi car el estado del
sistema
22
Indicación de ajuste del temporizador/reloj
11
Botón de reinicio debido a un error
23
Visualización del mando a distancia
12
Indicador de APAGADO/ENCEDIDO del modo
de calefacción
24
Visualización de la temperatura ambiente exterior
13
Indicador de APAGADO/ENCEDIDO del modo
ACS
25
Visualización de la temperatura de la salida del agua
26
Visualización de regulación solar
14
Indicador de APAGADO/ENCENDIDO del
funcionamiento silencioso
TIMER OUTDOOR
HEAT
SETTING
STATUS
PUMPDW
BOOSTER
QUIET
TANK
WATER OUTLET
C
C
SET
SELECT
CANCEL
ERROR
RESET
SETTING
STATUS
SEARCH
PUMPDWFORCECLOCK
CHECK
OFF
/
ON
MODE
HEATER
QUIET
OFF/ON
TIMER
HEATER
OPERATION
FORCE
HEATER
ACTUAL
TIMER
1
MON TUEWEDTHU FRI SAT SUN
SOLAR REMOTE
2 3 4 56
ON
OFF
16
1
22
21
10
17
18
19
20
24
9
5
25
3
8
4
7
2
15
14
12
13
6 11
23
26

21
ESPAÑOL
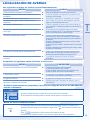
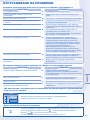
CONFIGURACIÓN DE LAS FUNCIONES ESPECIALES
CONFIGURACIÓN DE LAS FUNCIONES ESPECIALES
• Después de la instalación inicial, puede ajustar manualmente las confi guraciones. Los ajustes iniciales permanecen activos
hasta que el usuario los cambia.
•
El mando a distancia se puede utilizar para varias instalaciones. Es posible que algunas funciones no se apliquen a su unidad.
• Asegúrese de que el LED de funcionamiento se encuentre en estado OFF antes de realizar la confi guración.
Visualización del día
Visualización de la temperatura / SÍ / NO
Indicador de ESTADO / CONFIGURACIÓNFunción*
TIMER OUTDOOR
HEAT
SETTING
STATUS
PUMPDW
BOOSTER
QUIET
TANK
WATER OUTLET
C
C
HEATER
OPERATION
FORCE
HEATER
ACTUAL
MON TUE WEDTHU FRI SAT SUN
SOLAR REMOTE
ON
Visualización del
temporizador
Modo de
funcionamiento
Funcionamiento real
SET
SELECT
CANCEL
SETTING
STATUS
SEARCH
CHECK
SELECCIONE LAS FUNCIONES Y AJUSTE SU TEMPORIZADOR
1. Pulse
SET
y
CHECK
simultáneamente durante 5 segundos para ingresar al modo de confi guración especial. El indicador
“CONFIGURACIÓN” y “ESTADO” está encendido.
2. Pulse o para explorar las funciones.
3. Pulse
SELECT
para entrar en la función.
4. Pulse
o para activar SÍ o desactivar NO la función o ajuste su día y hora deseada.
5. Pulse
SET
para confi rmar.
Función *
Modo de funcionamiento/
Funcionamiento real
Descripción
Regulación termostato externo (SÍ / NO)
Para fi jar la conexión del regulación termostato externo.
TANK
Conexión del acumulador ACS (SÍ / NO)
Para fi jar la conexión del acumulador ACS.
SOLAR
Prioridad solar (SÍ / NO)
Para seleccionar el uso ACS del calentamiento del agua del acumulador ACS.
HEAT
Prioridad de calefacción (SÍ / NO)
Para elegir solo el uso de la bomba de calor para el servicio de calefacción durante el modo CALOR + ACS.
HEAT
Ajuste del intervalo de funcionamiento del servicio para la calefacción
Para ajustar el temporizador para la calefacción durante el modo CALOR + ACS (0,5 horas ~ 10 horas).
TANK
Ajuste del intervalo de funcionamiento del servicio para ACS
Para ajustar el temporizador para el acumulador ACS durante el modo CALOR +
ACS
(5 minutos ~ 1 hora
35 minutos).
BOOSTER
Ajuste del tiempo de retardo de conexión resistencia eléctrica del acumulador ACS
Para fi jar el temporizador de retardo de conexión resistencia eléctrica del acumulador ACS en ON si no se
alcanzó la temperatura del acumulador ACS (20 minutos ~ 1 hora 35 minutos).
Esterilización (SÍ / NO)
Para fi jar la esterilización, si se requiere.
Ajuste del día y la hora de esterilización
Para ajustar el temporizador para la esterilización
(sólo una vez a la semana).
Ajuste de la temperatura de esterilización
Para fi jar la temperatura para la función de esterilización (40°C ~ 75°C).
Tiempo continuo de esterilización
Para fi jar el temporizador para mantener la temperatura de calentamiento a fi n de completar la función de
esterilización (5 minutos ~ 1 hora).
PRECAUCIÓN
PRECAUCIÓN
No utilice el sistema
durante la esterilización
para evitar quemarse o que
se caliente excesivamente
durante la ducha.

22
FUNCIONAMIENTO BÁSICO
OFF
/
ON
CONECTAR O DESCONECTAR
LA UNIDAD
•
Cuando la unidad está en ON, el LED de funcionamiento
está encendido y se muestra la temperatura de salida
de agua y la temperatura ambiente en el indicador del
mando a distancia.
MODE
SELECCIONAR MODO DE
OPERACIÓN
HEAT HEAT +TANK TANK
• MODO DE CALEFACCIÓN
-
Para ENCENDER o APAGAR el funcionamiento de la
calefacción del sistemas de radiadores / suelo radiante.
- En este modo, la unidad exterior proporcionará
capacidad de calefacción al sistema.
• MODO DE CALEFACCIÓN + ACS
- En este modo, la unidad exterior proporcionará
capacidad de calefacción al acumulador ACS y al
sistema de radiadores / suelo radiante.
- Este funcionamiento no se usa cuando el acumulador
ACS no está instalado.
• MODO DEL ACS
- Para ENCENDER o APAGAR el funcionamiento del
acumulador ACS.
-
En este modo, la unidad exterior proporcionará la
capacidad de calefacción sólamente al acumulador ACS.
QUIET
PARA DISFRUTAR DE UN
AMBIENTE TRANQUILO
• Esta operación reduce el ruido de la unidad. En
esta condición, puede causar una disminución en la
capacidad de calefacción.
HEATER
FUNCIONAMIENTO DE LA
RESISTENCIA ELÉCTRICA DE
APOYO
• La resistencia eléctrica de apoyo proporciona
capacidad extra durante la temperatura exterior fría en
el funcionamiento del modo calefacción.
• La resistencia eléctrica de apoyo se encenderá
automáticamente cuando se cumple con las
condiciones de confi guración.
• Para cancelar manualmente el funcionamiento de la
resistencia eléctrica de apoyo, pulse el botón de nuevo.
STATUS
SEARCH
CHECK
MODO DE VERIFICACIÓN DEL
ESTADO DEL SISTEMA
1. Presione
CHECK
durante 5 segundos para ingresar en el
modo STATUS (Estado).
2.
Pulse o para comprobar la temperatura
de agua de entrada, temperatura de acumulador ACS,
frecuencia de trabajo del compresor o historial de errores.
• Pulse
C
AN
C
E
L
para salir del modo ESTADO.
• Cuando se ingresa al modo ESTADO, se enciende
el indicador “STATUS”.
• El modo “ESTADO” no se puede activar cuando el
indicador “SETTING” está encendido.
•
Se recomienda que se comunique con el servicio técnico autorizado
más cercano para cambiar el rango de temperatura del agua.
•
Utilizar el mando a distancia para establecer el rango de
temperatura para de salida de agua y temperatura ambiente
exterior.
MODO DE AJUSTE DEL SISTEMA
SET
SELECT
CANCEL
SETTING
1. Presione
SET
durante 5 segundos para ingresar en el modo
SETTING (Confi guración). Se enciende el indicador “SETTING”.
2. Presione
o para elegir un parámetro.
3. Después de seleccionar el parámetro deseado, presione
SELECT
para acceder.
4. Presione
o para fi jar la temperatura deseada.
5. Presione
SET
nuevamente para confi rmar la confi guración.
• Repita los pasos 2 a 5 para fi jar otros parámetros.
Modo de
funcionamiento
Parámetro *Descripción
HEAT
Temperatura ambiente exterior
fi jada a una temperatura baja de
salida del agua (-15°C ~ 15°C).
HEAT
Temperatura ambiente exterior
fi jada a una temperatura alta de
salida del agua (-15°C ~ 15°C).
HEAT
Temperatura de salida del agua
fi jada a una temperatura baja del
ambiente exterior (25°C ~ 55°C).
HEAT
Temperatura de salida del agua
fi jada a una temperatura alta del
ambiente exterior (25°C ~ 55°C).
HEAT
OFF
Ajuste la temperatura para
APAGAR el funcionamiento de la
calefacción (5°C ~ 35°C).
HEATER
ON
Temperatura ambiente exterior
fi jada para ENCENDER el
funcionamiento de la resistencia
eléctrica de apoyo (-15°C ~ 20°C).
TANK
Temperatura fi jada del
acumulador ACS (40°C ~ 75°C).
AJUSTE DE CAMBIO TÉRMICO DE
TEMPERATURA DEL AGUA
1. Pulse
SET
durante 5 segundos.
• Repita los pasos 3 a 5 para fi jar el cambio de temperatura
deseado (-5°C ~ 5°C).
Notas:
• Presione
C
AN
C
E
L
o espere 30 segundos para salir del modo SETTING.
• La temperatura se almacenará en el sistema cuando se confi rma.
• El modo “SETTING” no se puede activar cuando el indicador
“PUMPDW” y “STATUS” está encendido.
FUNCIONAMIENTO AVANZADO
TIMER OUTDOOR
HEAT
SETTING
STATUS
PUMPDW
BOOSTER
QUIET
TANK
WATER OUTLET
C
HEATER
OPERATION
FORCE
HEATER
ACTUAL
ON
Indicador de
CONFIGURACIÓN
Parámetro *
Modo de
funcionamiento
Visualización de la
temperatura
Page is loading ...
Page is loading ...
Page is loading ...
Page is loading ...
Page is loading ...

28
FERNBEDIENUNG
TIMER OUTDOOR
HEAT
SETTING
STATUS
PUMPDW
BOOSTER
QUIET
TANK
WATER OUTLET
C
C
SET
SELECT
CANCEL
ERROR
RESET
SETTING
STATUS
SEARCH
PUMPDWFORCECLOCK
CHECK
OFF
/
ON
MODE
HEATER
QUIET
OFF/ON
TIMER
HEATER
OPERATION
FORCE
HEATER
ACTUAL
TIMER
1
MON TUEWEDTHU FRI SAT SUN
SOLAR REMOTE
2 3 4 56
ON
OFF
16
1
22
21
10
17
18
19
20
24
9
5
25
3
8
4
7
2
15
14
12
13
6 11
23
26
• Es kann sein, dass einige in dieser Anleitung beschriebenen Funktionen nicht auf Ihr Gerät zutreffen.
• Wenden Sie sich für weitere Informationen an Ihren Fachhändler.
• Die Tasten
ERROR
RESET
,
FORCE
und
PUMPDW
werden im Normalbetrieb nicht benötigt.
1
Betriebstaste (EIN/AUS)
14
Betriebsanzeige Flüsterbetrieb (EIN/AUS)
2
Betriebs-LED
15
Anzeige Anforderung Zusatzheizung (EIN/AUS)
3
Betriebsartenwahltaste
16
Anzeige Anforderung Notheizbetrieb (EIN/AUS)
4
Taste für Flüsterbetrieb
17
Betriebsanzeige Zusatzheizung (EIN/AUS)
5
Taste für den Betrieb der Zusatzheizung
18
Betriebsanzeige Brauchwasser-Zusatzheizung (EIN/AUS)
6
Tasten zur Systemprogrammierung
19
Anzeige Systemprogrammierung (EIN/AUS)
7
Timer-Programmiertasten
20
Anzeige Systemstatus (EIN/AUS)
8
Taste für Notheizbetrieb
21
Anzeige Abpumpbetrieb (EIN/AUS)
9
Taste zum Abpumpen des Systems
22
Anzeige von Timereinstellung und Uhrzeit
10
Systemstatustasten
23
Anzeige externe Steuerung
11
Fehlerrückstelltaste
24
Anzeige der Außentemperatur
12
Betriebsanzeige Heizen (EIN/AUS)
25
Anzeige der Wasseraustrittstemperatur
13
Betriebsanzeige Brauchwasserspeicher (EIN/AUS)
26
Anzeige Solar
Hinweise:
•
Der aktuelle Wochentag und die Uhrzeit müssen eingestellt
werden, wenn:
- die Stromzufuhr zum ersten Mal eingeschaltet wird,
- seit der letzten Unterbrechung der Stromzufuhr eine lange
Zeit vergangen ist.
•
Die eingestellte aktuelle Uhrzeit wird zur Basiszeit für alle
Timerfunktionen.
1. Drücken Sie
CLOCK
.
2. Drücken Sie
bzw. , um den aktuellen Wochentag
einzustellen.
3. Bestätigen Sie die Einstellung mit
SET
.
4. Wiederholen Sie die Schritte 2 und 3, um die aktuelle Uhrzeit
einzugeben.
VORBEREITUNG DER FERNBEDIENUNG
Einstellung von Wochentag und Uhrzeit
Page is loading ...
Page is loading ...
Page is loading ...
Page is loading ...
Page is loading ...
Page is loading ...
Page is loading ...

36
TELECOMANDO
TIMER OUTDOOR
HEAT
SETTING
STATUS
PUMPDW
BOOSTER
QUIET
TANK
WATER OUTLET
C
C
SET
SELECT
CANCEL
ERROR
RESET
SETTING
STATUS
SEARCH
PUMPDWFORCECLOCK
CHECK
OFF
/
ON
MODE
HEATER
QUIET
OFF/ON
TIMER
HEATER
OPERATION
FORCE
HEATER
ACTUAL
TIMER
1
MON TUEWEDTHU FRI SAT SUN
SOLAR REMOTE
2 3 4 56
ON
OFF
16
1
22
21
10
17
18
19
20
24
9
5
25
3
8
4
7
2
15
14
12
13
6 11
23
26
• Alcune funzioni descritte in questo manuale potrebbero non applicarsi all’unità dell’utente.
• Consultare il rivenditore autorizzato più vicino per ulteriori infromazioni.
• Per funzionamento normale, i tasti
ERROR
RESET
,
FORCE
e
PUMPDW
non sono in uso.
1
Tasto OFF/ON
14
Indicatore OFF/ON funzionamento a potenza bassa
2
LED di funzionamento
15
Indicatore OFF/ON richiesta riscaldamento di riserva
3
Tasto modalità funzionamento
16
Indicatore OFF/ON richiesta riscaldamento forzato
4
Tasto funzionamento a potenza bassa
17
Indicatore (OFF/ON) funzionamento riscaldamento di
riserva attivo
5
Tasto funzionamento riscaldatore di riserva
18
Indicatore (OFF/ON) funzionamento riscaldamento
ausiliario attivo
6
Tasti modalità impostazione del sistema
19
Indicatore OFF/ON modalità impostazione sistema
7
Tasto Gruppo impostazione timer
20
Indicatore OFF/ON modalità controllo stato del sistema
8
Tasto modalità riscaldamento forzato
21
Indicatore OFF/ON modalità svuotamento sistema
9
Tasti modalità svuotamento pompa del sistema
22
Visualizzazione impostazioni timer/orologio
10
Tasti modalità controllo stato del sistema
23
Visualizzazione telecomando
11
Tasto di resettaggio errori
24
Visualizzazione temperatura ambiente esterno
12
Indicatore OFF/ON modalità riscaldamento
25
Visualizzazione temperatura uscita acqua
13
Indicatore OFF/ON modalità serbatoio
26
Pannello solare
Note:
• Il giorno e l’ora correnti devono essere impostati quando:
- L’apparecchio viene acceso per la prima volta.
- Quando è passato molto tempo dall’ultima accensione.
• L’ora corrente impostata sarà quella standard per tutte le
operazioni con timer.
1. Premere
CLOCK
.
2. Premere
o per IMPOSTARE il giorno corrente.
3. Premere
SET
per confermare.
4. Ripetere i punti 2 e 3 per impostare l’ora corrente.
TELECOMANDO: OPERAZIONI PRELIMINARI
Impostazione del giorno e dell’ora correnti
Page is loading ...
Page is loading ...

ITALIANO
39
Visualizzazione timer
TIMER
1
MON TUE WEDTHU FRI SAT SUN
2 3 4 5 6
ON
OFF
Si illumina se si seleziona la
funzione timer
Giorno da selezionare
Accensione con timer
Per accendere automaticamente l’unità
Possono essere impostati 6 programmi al
giorno (1 ~ 6)
Indica il giorno selezionato
Indica il giorno successivo per il funzionamento del timer
Ora da selezionare (ad incrementi di 10 minuti)
Spegnimento con timer
Per spegnere automaticamente l’unità
SET
SELECT
CANCEL
SETTING
CLOCK
OFF/ON
TIMER
Funzione Incremento
Accesso alla
modalità timer
Premere
TIMER
.
Impostare giorno
e ora
1.
Premere o per scegliere il giorno desiderato.
2.
Premere
SELECT
per confermare.
3.
“1” lampeggerà, premere
SELECT
per impostare il programma 1.
4.
Premere
OFF/ON
per selezionare timer ON o OFF.
5.
Premere o per scegliere l’ora desiderata.
Se si desidera impostare il timer assieme ad altre operazioni, premere
MODE
e
QUIET
.
6.
Premere
SET
per confermare il programma 1. Il giorno selezionato sarà evidenziato con ▼.
•
Dopo 2 secondi, il display passerà al programma successivo.
7.
Ripetere i punti dal 4 al 7 per impostare i programmi dal 2 al 6.
• Durante l’impostazione del timer, se non si preme alcun tasto entro 30 secondi o se si preme
SET
,
sarà confermata l’impostazione di quel momento e la procedura di confi gurazione del timer termina.
Aggiunta / modifi ca
del timer
Ripetere i punti precedenti.
Disattivazione timer
Premere
TIMER
, poi
CANCEL
.
Attivazione timer
Premere
TIMER
, poi
SET
.
Controllo del timer
1. Premere
TIMER
.
2. Premere o fi no a che non viene visualizzato il giorno desiderato, premere
SELECT
per
confermare la selezione.
3. Premere
o per controllare i programmi impostati.
Annullamento timer
1. Premere
TIMER
.
2. Premere o fi no a quando non viene mostrato il giorno desiderato.
3. Premere
SELECT
per accedere all’impostazione del programma.
4. Premere o fi no a quando non viene mostrato il programma desiderato.
5. Premere
CANCEL
per annullare il programma.
IMPOSTAZIONE TIMER SETTIMANALE
Note:
• È possibile impostare il timer per ogni giorno della settimana (da lunedì a domenica) con 6 programmi giornalieri.
• Quando l’unità è accesa con ON TIMER, utilizzerà la temperatura impostata in precedenza per controllare la temperatura
ambiente.
• Lo stesso programma per il timer non può essere impostato nello stesso giorno.
• È inoltre possibile selezionare giorni collettivi con la medesima impostazione di timer.
• Favorisce il risparmio energetico impostando fi no a 6 programmi per ciascun dato giorno.
Page is loading ...
Page is loading ...
Page is loading ...
Page is loading ...

44
AFSTANDSBEDIENING
• De beschrijving in deze handleiding van sommige functies geldt misschien niet voor uw unit.
• Neem contact op met de offi ciële dealers bij u in de buurt voor nadere informatie.
• Voor de normale bedrijfsstand zijn de knoppen
ERROR
RESET
,
FORCE
en
PUMPDW
niet in gebruik.
Opmerkingen:
• De actuele dag en tijd moeten worden ingesteld wanneer u:
- De apparatuur voor de eerste keer inschakelt.
- Wanneer lange tijd is verstreken sinds de apparatuur
voor het laatst is ingeschakeld.
• De actuele tijd die is ingesteld, is de standaardtijd voor alle
bedieningshandelingen met de Timer.
1. Druk op
CLOCK
.
2. Druk op
of als u de actuele dag wilt instellen.
3. Druk op
SET
als u wilt bevestigen.
4. Herhaal de stappen 2 en 3 als u de actuele tijd wilt
instellen.
DE AFSTANDSBEDIENING GEREEDMAKEN
Instelling Actuele Dag en Tijd
1
UIT/AAN-toets
14
Indicator Bedrijfsstand Stil UIT/AAN
2
Bedrijfslampje
15
Indicator Bijverwarming Verzoek UIT/AAN
3
Knop Bedrijfsstand
16
Indicator Extra Verwarming Verzoek UIT/AAN
4
Knop Bedrijfsstand Stil
17
Indicator Feitelijke Bedrijfsstand Bijverwarming (UIT/AAN)
5
Knop laten werken bijverhitter
18
Indicator Feitelijke Bedrijfsstand Booster-verwarming
(UIT/AAN)
6
Toetsen stand systeeminstelling
19
Indicator Instelstand Systeem UIT/AAN
7
Knop Timer-instelling Groep
20
Indicator Controlestand Systeemstatus UIT/AAN
8
Knop Stand Extra Verwarming
21
Indicator Pompstand Systeem UIT/AAN
9
Toets Systeempomp
22
Instelscherm Timer/Klok
10
Toetsen Controle Systeemstatus
23
Scherm op afstand
11
Toets voor het resetten van een storing
24
Weergave Omgevingstemperatuur Buiten
12
Indicator Verwarmingsstand UIT/AAN
25
Scherm Temperatuur Wateruitlaat
13
Indicator Tankstand UIT/AAN
26
Verwarmingsdisplay
TIMER OUTDOOR
HEAT
SETTING
STATUS
PUMPDW
BOOSTER
QUIET
TANK
WATER OUTLET
C
C
SET
SELECT
CANCEL
ERROR
RESET
SETTING
STATUS
SEARCH
PUMPDWFORCECLOCK
CHECK
OFF
/
ON
MODE
HEATER
QUIET
OFF/ON
TIMER
HEATER
OPERATION
FORCE
HEATER
ACTUAL
TIMER
1
MON TUEWEDTHU FRI SAT SUN
SOLAR REMOTE
2 3 4 56
ON
OFF
16
1
22
21
10
17
18
19
20
24
9
5
25
3
8
4
7
2
15
14
12
13
6 11
23
26
Page is loading ...
Page is loading ...

NEDERLANDS
47
Timer-scherm
TIMER
1
MON TUE WEDTHU FRI SAT SUN
2 3 4 5 6
ON
OFF
Gaat branden als de Timer-
functie wordt geselecteerd
Te selecteren dag
ON-timer
Voor het automatisch inschakelen,
“ON”, van de unit
Er kunnen per dag 6 verschillende
programma’s worden ingesteld (1 ~ 6)
Duidt de geselecteerde dag aan
Duidt de volgende dag aan voor de werking
van de timer
Te selecteren tijd (stappen van 10 minuten)
OFF-timer
Voor het automatisch uitschakelen, “OFF”,
van de unit
SET
SELECT
CANCEL
SETTING
CLOCK
OFF/ON
TIMER
Functie Stap
Timer-stand invoeren
Druk op
TIMER
.
Stel dag & tijd in
1. Druk op
of voor het selecteren van de dag van uw keuze.
2. Druk op
SELECT
als u wilt bevestigen
3. “1” knippert, druk op
SELECT
als u programma 1 wilt instellen.
4. Druk op
OFF/ON
als u ON- of OFF-timer wilt selecteren.
5. Druk op
of voor het selecteren van de tijd van uw keuze.
Als u de timer wilt instellen samen met andere bedieningshandelingen, drukt u op
MODE
of
QUIET
.
6. Druk op
SET
als u programma 1 wilt bevestigen. De geselecteerde dag wordt geaccentueerd met ▼.
• Na 2 seconden zal het scherm verder gaan naar het volgende programma.
7. Herhaal stap 4 tot 7 als u de programma’s 2 tot 6 wilt instellen.
• Wanneer tijdens het instellen van de timer geen knop wordt ingedrukt binnen 30 seconden, of als
de knop
SET
wordt ingedrukt, wordt de instelling van dat moment bevestigd en wordt het instellen
van de timer beëindigd.
Timer Toevoegen/
Wijzigen
Herhaal bovenstaande stappen.
Timer uitschakelen
Druk op
TIMER
, druk daarna op
CANCEL
.
Timer inschakelen
Druk op
TIMER
, druk daarna op
SET
.
Timer controleren
1. Druk op
TIMER
.
2. Druk op of totdat de dag van uw keuze verschijnt, druk op
SELECT
als u uw selectie wilt bevestigen.
3. Druk op of als u de ingestelde programma’s wilt controleren.
Timer annuleren
1. Druk op
TIMER
.
2. Druk op
of totdat de dag van uw keuze verschijnt.
3. Druk op
SELECT
als u de programma-instelling wilt invoeren.
4. Druk op
of totdat het programma van uw keuze verschijnt.
5. Druk op
CANCEL
als u het programma wilt annuleren.
INSTELLING WEEK-TIMER
Opmerkingen:
• U kunt de Timer voor iedere dag van de week instellen (Maandag tot Zondag) met 6 programma’s per dag.
• Als de unit wordt ingeschakeld door de timer, dan zal de unit regelen met de laatst ingestelde temperatuur.
• U kunt niet op een dag twee keer hetzelfde timer-programma instellen.
• U kunt ook gemeenschappelijke dagen instellen met dezelfde timer-instelling.
• Bevordert energiebesparing doordat u iedere dag 6 programma’s kunt instellen.
Page is loading ...
Page is loading ...
Page is loading ...
Page is loading ...

52
CONTROLO REMOTO
• Algumas funções descritas neste manual podem não ser aplicáveis à sua unidade.
• Consulte o seu fornecedor autorizado mais próximo para mais informações.
• Para um funcionamento normal, os botões
ERROR
RESET
,
FORCE
e
PUMPDW
não estão disponíveis.
1
Botão OFF/ON (DESLIGADO/LIGADO)
14
Indicador ON/OFF (ligar/desligar) de Funcionamento Silencioso
2
LED de funcionamento
15
Indicador ON/OFF (ligar/desligar) do Pedido de Aquecedor de
Reserva
3
Botão do Modo Funcionamento
16
Indicador ON/OFF (ligar/desligar) do Pedido de Aquecedor
Forçado
4
Botão Funcionamento Silencioso
17
Indicador ON/OFF (ligar/desligar) de Funcionamento Actual do
Aquecedor de Reserva
5
Botão de Funcionamento do Aquecedor de Reserva
18
Indicador ON/OFF (ligar/desligar) de Funcionamento Actual do
Aquecedor Propulsionador
6
Botões do Modo Defi nição do Sistema
19
Indicador ON/OFF (ligar/desligar) do Modo Defi nição do
Sistema
7
Botão de Confi guração do Temporizador de Grupo
20
Indicador ON/OFF (ligar/desligar) do Modo de Verifi cação do
Estado do Sistema
8
Botão de Modo Aquecedor Forçado
21
Indicador ON/OFF (ligar/desligar) do Modo Bombagem do
Sistema
9
Botões do Modo Bombagem do Sistema
22
Ecrã da Confi guração do Temporizador / Relógio
10
Botões do Modo Verifi cação do Estado do Sistema
23
Ecrã do Comando
11
Botão de Reiniciar Erro
24
Visor da Temperatura Ambiente Exterior
12
Indicador ON/OFF (ligar/desligar) do Modo Aquecimento
25
Visor da Temperatura de Saída da Água
13
Indicador ON/OFF (ligar/desligar) do Modo Reservatório
26
Ecrã solar
Notas:
• O dia actual e hora necessitam ser confi gurados quando:
- A energia é ligada pela primeira vez.
- Após ter passado algum tempo desde a última vez que
a energia foi ligada.
• A hora actual que foi defi nida será a hora padrão para
todas as operações de Temporizador.
1. Prima
CLOCK
.
2. Prima
ou para defi nir o dia actual.
3. Prima
SET
para confi rmar.
4. Repetir os passos 2 e 3 para confi gurar a hora actual.
PREPARAÇÃO DO CONTROLO REMOTO
Confi gurar o dia e hora actuais
TIMER OUTDOOR
HEAT
SETTING
STATUS
PUMPDW
BOOSTER
QUIET
TANK
WATER OUTLET
C
C
SET
SELECT
CANCEL
ERROR
RESET
SETTING
STATUS
SEARCH
PUMPDWFORCECLOCK
CHECK
OFF
/
ON
MODE
HEATER
QUIET
OFF/ON
TIMER
HEATER
OPERATION
FORCE
HEATER
ACTUAL
TIMER
1
MON TUEWEDTHU FRI SAT SUN
SOLAR REMOTE
2 3 4 56
ON
OFF
16
1
22
21
10
17
18
19
20
24
9
5
25
3
8
4
7
2
15
14
12
13
6 11
23
26
Page is loading ...
Page is loading ...
Page is loading ...
Page is loading ...
Page is loading ...
Page is loading ...
Page is loading ...
Page is loading ...
Page is loading ...
Page is loading ...
Page is loading ...
Page is loading ...
Page is loading ...
Page is loading ...
Page is loading ...
Page is loading ...
Page is loading ...
Page is loading ...
Page is loading ...
Page is loading ...
Page is loading ...
Page is loading ...
Page is loading ...
Page is loading ...
-
 1
1
-
 2
2
-
 3
3
-
 4
4
-
 5
5
-
 6
6
-
 7
7
-
 8
8
-
 9
9
-
 10
10
-
 11
11
-
 12
12
-
 13
13
-
 14
14
-
 15
15
-
 16
16
-
 17
17
-
 18
18
-
 19
19
-
 20
20
-
 21
21
-
 22
22
-
 23
23
-
 24
24
-
 25
25
-
 26
26
-
 27
27
-
 28
28
-
 29
29
-
 30
30
-
 31
31
-
 32
32
-
 33
33
-
 34
34
-
 35
35
-
 36
36
-
 37
37
-
 38
38
-
 39
39
-
 40
40
-
 41
41
-
 42
42
-
 43
43
-
 44
44
-
 45
45
-
 46
46
-
 47
47
-
 48
48
-
 49
49
-
 50
50
-
 51
51
-
 52
52
-
 53
53
-
 54
54
-
 55
55
-
 56
56
-
 57
57
-
 58
58
-
 59
59
-
 60
60
-
 61
61
-
 62
62
-
 63
63
-
 64
64
-
 65
65
-
 66
66
-
 67
67
-
 68
68
-
 69
69
-
 70
70
-
 71
71
-
 72
72
-
 73
73
-
 74
74
-
 75
75
-
 76
76


Panasonic WH-MDF09C3E5 Owner's manual
- Type
- Owner's manual
- This manual is also suitable for
Ask a question and I''ll find the answer in the document
Finding information in a document is now easier with AI
in other languages
- italiano: Panasonic WH-MDF09C3E5 Manuale del proprietario
- français: Panasonic WH-MDF09C3E5 Le manuel du propriétaire
- español: Panasonic WH-MDF09C3E5 El manual del propietario
- Deutsch: Panasonic WH-MDF09C3E5 Bedienungsanleitung
- Nederlands: Panasonic WH-MDF09C3E5 de handleiding
- português: Panasonic WH-MDF09C3E5 Manual do proprietário
Related papers
-
Panasonic WH-MDC14C6E5 Owner's manual
-
Panasonic WHMDC14C6E5 Operating instructions
-
-
-
-
Panasonic WHMXF12D9E8 Owner's manual
-
Panasonic WH-MDF12C9E8 Owner's manual
-
-
-
Other documents
-
Mitsubishi Electric PAR-FL32MA User manual
-
Jocel JET-014801 User manual
-
Dyson AM04 Owner's manual
-
Dimplex RTEV21 Owner's manual
-
 Thermo Fisher Scientific Precision Circulating Water Baths User manual
-
 Thermo Fisher Scientific Dry Bath Owner's manual
-
 Thermo Fisher Scientific Precision Water Baths Quick start guide


