Canon Pixma GM-4050 Owner's manual

Category
Ink cartridges
Type
Owner's manual
.
 )(     

Посібник для початку
роботи
Спершу прочитайте документ Інформація щодо
безпеки й важливі відомості )додаток(.
Руководство по началу
работы
В первую очередь прочтите документ Информация
о безопасности и важные сведения )приложение(.
Démarrage
Commencez par lire Sécurité et informations
importantes )addendum(.
Para Começar
Leia Informações Importantes e Sobre
Segurança )adendo( primeiro.
Guía de inicio
Lea primero Información de seguridad
e información importante )apéndice(.
Getting Started
Read Safety and Important Information
)addendum( rst.
Go
 
  
4  .................................................................        
1  .......................................................................................................................................  
Установлення принтера........................................................................................................стор. 1
Підключення до комп’ютера, смартфона або планшета................................стор. 4
Відеоінструкції
Як тримати принтер
Установка принтера ....................................................................................................................стр. 1
Подключение к компьютеру, смартфону или планшету ..................................стр. 4
Видеоинструкции
Удерживание принтера
Installation de l'imprimante ..................................................................................................page 1
Connexion à un ordinateur, un smartphone ou une tablette .........................page 4
Instructions vidéo
Manipulation de l'imprimante
Instalando a impressora ...................................................................................................... página 1
Conectando a um computador, smartphone ou tablet ................................. página 4
Vídeos instrucionais
Segurando a impressora
Instalación de la impresora ...............................................................................................página 1
Conexión con un ordenador, teléfono inteligente o tableta ....................... página 4
Vídeos instructivos
Cómo sujetar la impresora
Installing the Printer ...................................................................................................................page 1
Connecting to a Computer, Smartphone or Tablet ............................................... page 4
Holding the Printer
Instructional Videos
1
ENGLISH
Setting Up the Printer
Online Setup
1. Box Contents
Print head
Ink bottle
Power cord
Setup CD-ROM for Windows
Safety and Important Information
Getting Started (this manual)
2. Removing Packing Materials
1
Remove and dispose of any packing materials
and orange tape.
2
Open the scanning unit / cover, remove and
dispose of the orange tape and protective
material inside.
a
b
3. Installing the Print Head
1
Open the print head locking cover on the right.
2
Take out the print head from the package and
remove the label.
3
Remove the protective tape.
4
Insert the print head into the print head holder.
5
Close the print head locking cover and press
down until it clicks.
6
Press down the joint button completely until it
clicks.
Check!
2
Setting Up the Printer
4. Pouring Ink
Important
This product requires careful handling of ink. Ink may splatter
when the ink tanks are lled with ink. If ink gets on your clothes or
belongings, it may not come o.
1
Open the ink tank cover and the tank cap.
2
Hold the ink bottle upright and gently twist the
bottle cap to remove.
3
Align the nozzle of the ink bottle with the inlet.
4
Slowly stand the ink bottle upside down and
push down to pour the ink.
If the ink does not pour, gently remove the ink bottle
and try again.
a
b
5
Gently remove the ink bottle from the inlet.
Be careful not to spill the ink.
b
a
6
Replace the tank cap securely, and then close
the ink tank cover.
7
Close the scanning unit / cover.
Caution
Watch your ngers.
5. Turning on the Printer
1
Connect the power cord.
Back
Important
At this time, do not connect any other cables.
2
Open the operation panel and press the ON
button.
3
ENGLISH
3
When the following screen appears, use the [
and ] buttons to select a language, and then
press the OK button.
Important
If an error appears on the screen, see "If an error message
(support code) appears on the screen" on page 3 and
follow the instructions.
6. Loading Paper
1
When the following screen appears, use the [
and ] buttons to select Yes, and then press the
OK button.
2
Remove the cassette from the printer.
3
Slide apart the paper guides.
Slide the right paper guide to the right edge. Align
the front paper guide with the Letter or A4 mark.
4
Load paper.
Load 2 or more sheets of Letter or A4 sized plain
paper with the print side facing down.
Place the paper against the front paper guide, and
align the right paper guide to the width of the paper.
a
b
5
Replace the cassette.
6
Pull out the paper output tray.
7
Follow the on-screen instructions, and then
press the OK button.
Check that Ready to connect appears on the
printer's screen.
Check the support code, and then follow the
instructions if the displayed code is written below.
1890
The protective materials are not removed.
"2. Removing Packing Materials" on page 1
1470
The print heads are not installed correctly.
"3. Installing the Print Head" on page 1
1471
No print heads are installed.
"3. Installing the Print Head" on page 1
1642
There may be insucient ink.
"4. Pouring Ink" on page 2
For all other cases, refer to the Online Manual.
If an error message (support code) appears on
the screen
Support code
4
Setting Up the Printer
7-a
Computer Smartphone
Computer and
smartphone
Connecting to a Computer
If you are using multiple computers, perform these steps on each computer.
Using the Setup CD-ROM for Windows
Double click EasySetup.exe in the CD-ROM, and then continue from step 3. If you do not have an
internet connection, open the win folder in the CD-ROM and double click SETUP.exe. This will install
the printer driver.
What device are you connecting?
To use your printer without connecting to any other devices. 7-c
7-a.Connecting to a Computer
1
Access the Canon website from a
computer.
2
Select Set Up.
3
Enter your printer's model name and
click Go.
4
Click Start.
5
Click If you have already prepared
your printer, go to Connect.
Note
The following steps are for Windows (except
Windows 10 in S mode).
6
Click Download.
7
Run the downloaded le.
8
Click Start Setup.
9
Follow the on-screen instructions.
These operations may take some time.
To connect to a smartphone as well, see "7-b.
Connecting to a Smartphone" on page 5.
5
ENGLISH
7-b
1
Install the "Canon PRINT Inkjet/SELPHY"
app on your smartphone.
Scan the QR code shown on
the right to access the Canon
website, and then download
the app.
2
Open your smartphone's Wi-Fi settings.
Tap the network name )SSID( that starts
with "Canon_ij_".
If "Canon_ij_" does not appear, proceed
to step 3.
(Example of iOS screen)
Connecting to a Smartphone
If you are using multiple smartphones, perform these steps on each smartphone.
Prepare the following before starting.
a Enable the Wi-Fi setting on your smartphone.
b Connect your smartphone to the wireless router (if you have a wireless router).
Refer to your smartphone and wireless router manuals for more details.
Once you have added your printer, you can print from your smartphone.
3
Open the installed app.
4
Follow the on-screen instructions in the
app to add your printer.
7-c
Do Not Connect To A Device
1
Press the Stop button.
2
Select Do not connect, and then press the OK button.
3
Select Ye s , and then press the OK button.
7-b.Connecting to a Smartphone
6
Loading Paper into the Rear Tray
1
Open the rear tray cover and extend the paper
support.
b
a
2
Open the feed slot cover and slide the right-
hand side paper guide to the far right.
3
Load several sheets of paper with the print side
facing up.
4
Align the paper guide to the paper, and then
close the feed slot cover.
Follow the on-screen instructions to set information
for the loaded paper.
Transporting Your Printer
When relocating the printer, make sure of the following. Refer to the Online Manual for details.
Check that the joint button is pressed down completely to
avoid ink leaks.
Check that the position of the ink valve lever is closed.
Pack the printer in a plastic bag in case ink leaks.
Pack the printer in a sturdy box so that it is placed with its
bottom facing down, using sucient protective material
to ensure safe transport.
Do not tilt the printer. Ink may leak.
Please handle with care and ensure the box remains at
and NOT turned upside down or on its side, as the printer
may be damaged and ink in the printer may leak.
When a shipping agent is handling transport of the
printer, have its box marked "THIS SIDE UP" to keep the
printer with its bottom facing down. Mark also with
"FRAGILE" or "HANDLE WITH CARE".
2
Congurando a impressora
4. Colocando tinta
Importante
Este produto requer manuseio cauteloso da tinta. A tinta pode
respingar quando cartuchos de tinta estão cheios. Se a tinta entrar
em contato com roupas ou objetos, pode ser que ela não saia.
1
Abra a tampa do cartucho de tinta e a tampa do
cartucho.
2
Segure a garrafa de tinta na posição vertical
e gire cuidadosamente a tampa da garrafa para
removê-la.
3
Alinhe o bocal da garrafa de tinta com a entrada.
4
Levante lentamente a garrafa de tinta de cabeça
para baixo e empurre para baixo para despejar
a tinta.
Se a tinta não for despejada, remova lentamente
a garrafa de tinta e tente novamente.
a
b
5
Remova lentamente a garrafa de tinta da
entrada.
Tenha cuidado para não derramar a tinta.
b
a
6
Substitua a tampa do cartucho com segurança
e feche a tampa do cartucho de tinta.
7
Feche a unidade de digitalização/tampa.
Cuidado
Preste atenção aos seus dedos.
5. Ligando a Impressora
1
Conecte o cabo de alimentação.
Parte traseira
Importante
Não conecte quaisquer outros cabos ainda.
2
Abra o painel de controle e pressione o botão
ATIVADO (ON).
2
Conguration de l'imprimante
4. Versement de l'encre
Important
Ce produit nécessite que l'encre soit manipulée avec précautions.
L'encre risque de provoquer des éclaboussures lorsque les
cartouches d'encre sont remplies. Si de l'encre tache vos vêtements
ou vos eets personnels, vous risquez de ne plus pouvoir l'enlever.
1
Ouvrez le couvercle de cartouche d'encre et le
capuchon de cartouche.
2
Tenez la bouteille d'encre bien droite et exercez
doucement une torsion sur le capuchon de la
bouteille pour le retirer.
3
Alignez la buse de la bouteille d'encre avec
l'arrivée.
4
Renversez lentement la bouteille d'encre et
appuyez pour faire couler l'encre.
Si l'encre ne coule pas, retirez délicatement la
bouteille d'encre et faites une nouvelle tentative.
a
b
5
Retirez doucement la bouteille d'encre de
l'arrivée.
Veillez à ne pas renverser d'encre.
b
a
6
Remettez fermement en place le capuchon
de cartouche, puis fermez le couvercle de
cartouche d'encre.
7
Fermez l'unité de numérisation / capot.
Attention
Surveillez vos doigts.
5. Mise sous tension de
l'imprimante
1
Branchez le cordon d'alimentation.
Arrière
Important
À ce stade, ne branchez aucun autre câble.
2
Ouvrez le panneau de contrôle et appuyez sur le
bouton MARCHE (ON).
2
Настройка принтера
4. Заливка чернил
Внимание!
Этот продукт требует осторожного обращения с чернилами.
При заполнении чернильных контейнеров чернила могут
разбрызгаться. Если чернила попадут на одежду или другие
вещи, они могут не отстираться.
1
Откройте крышку чернильного контейнера
и колпачок контейнера.
2
Держите флакон с чернилами вертикально
и осторожно отверните колпачок флакона,
чтобы снять его.
3
Совместите наконечник флакона с чернилами
со впускным отверстием.
4
Медленно переверните флакон с чернилами
вверх дном и прижмите его вниз, чтобы
вылить чернила.
Если чернила не выливаются, аккуратно достаньте
флакон с чернилами и попробуйте выполнить эту
операцию еще раз.
a
b
5
Осторожно извлеките флакон с чернилами из
впускного отверстия.
Будьте осторожны, чтобы не пролить чернила.
b
a
6
Надежно установите на место колпачок
контейнера, а затем закройте крышку
чернильного контейнера.
7
Закройте модуль сканирования / крышку.
Осторожно!
Берегите пальцы.
5. Включение принтера
1
Подключите кабель питания.
Сзади
Внимание!
На этом этапе не подключайте никаких других кабелей.
2
Откройте панель управления и нажмите
кнопку ВКЛ (ON).
3
РУССКИЙ
3
При появлении показанного ниже экрана
выберите язык с помощью кнопок [ и ],
а затем нажмите кнопку OK.
Внимание!
Если на экране появляется сообщение об ошибке, см.
раздел «Если на экране отображается сообщение об ошибке
(код поддержки)» на стр. 3 и следуйте инструкциям.
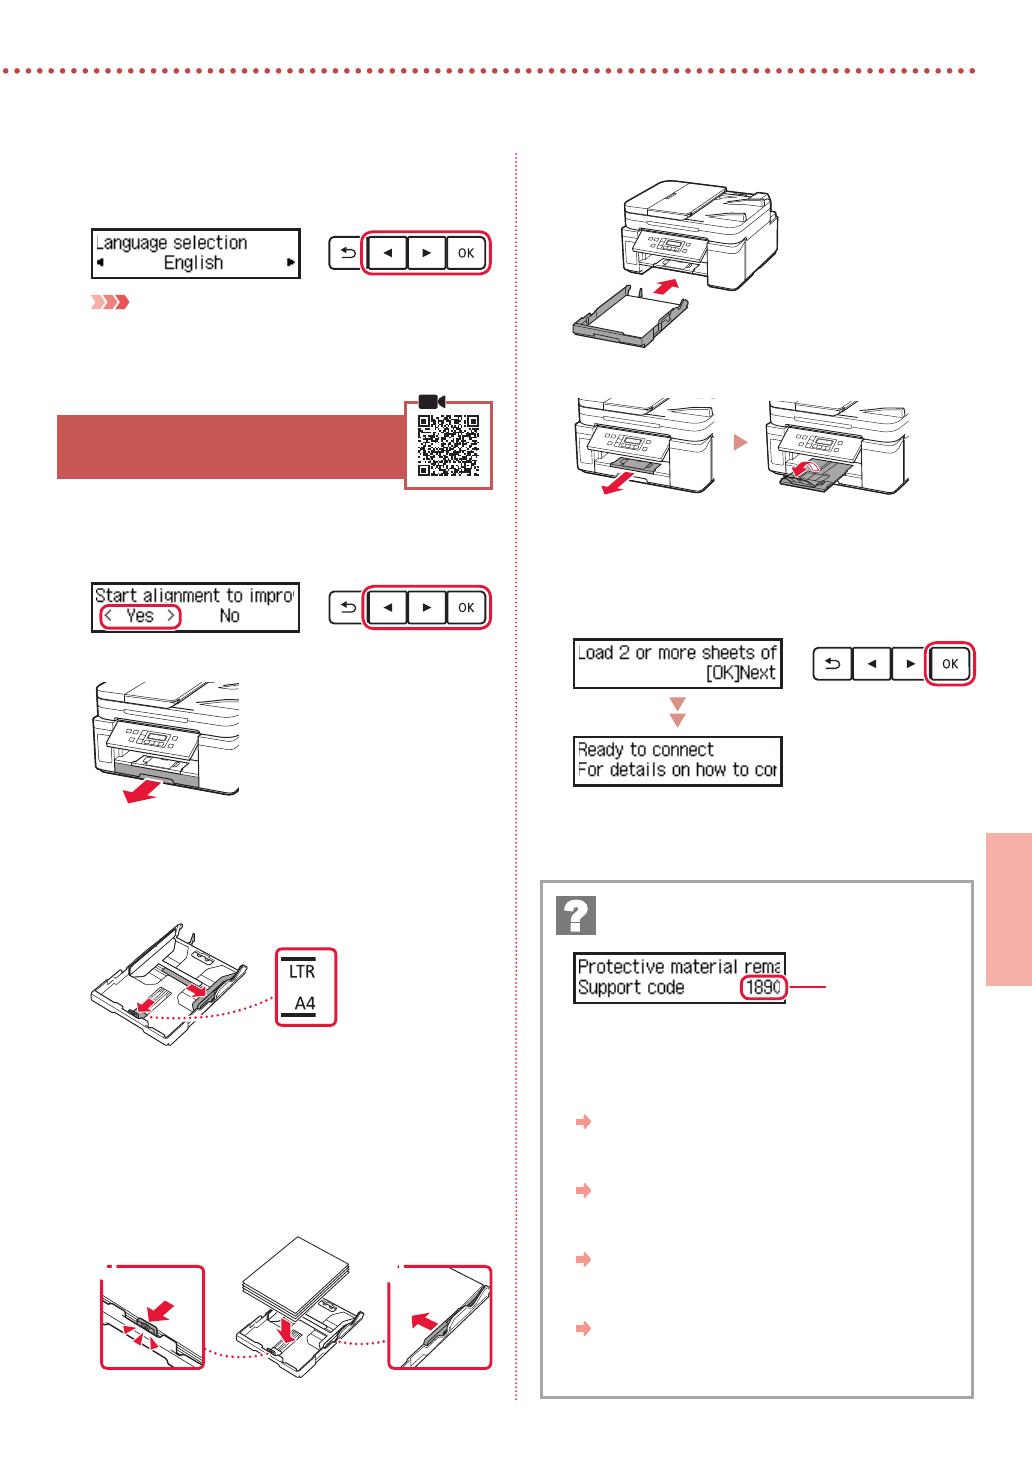
6. Загрузка бумаги
1
При появлении показанного ниже экрана
выберите Да (Yes) с помощью кнопок [ и ],
а затем нажмите кнопку OK.
2
Извлеките кассету из принтера.
3
Раздвиньте направляющие бумаги.
Сдвиньте правую направляющую бумаги к правому
краю. Совместите переднюю направляющую
бумаги с меткой Letter или A4.
4
Загрузите бумагу.
Загрузите не менее 2 листов обычной бумаги
формата Letter или A4 стороной для печати вниз.
Разместите бумагу вплотную к передней
направляющей бумаги и передвиньте правую
направляющую бумаги в соответствии с шириной
бумаги.
a
b
5
Установите кассету на место.
6
Выдвиньте лоток приема бумаги.
7
Следуйте инструкциям на экране, а затем
нажмите кнопку OK.
Убедитесь, что на экране принтера отображается
сообщение Готовы к подключению (Ready to
connect).
Проверьте код поддержки и следуйте инструкциям,
если отображаемый код указан ниже.
1890
Защитные материалы не сняты.
«2. Удаление упаковочных материалов» на стр. 1
1470
Печатающие головки установлены неправильно.
«3. Установка печатающей головки» на стр. 1
1471
Печатающие головки не установлены.
«3. Установка печатающей головки» на стр. 1
1642
Возможно, недостаточно чернил.
«4. Заливка чернил» на стр. 2
В любом другом случае см. Онлайн-руководство.
Если на экране отображается сообщение
об ошибке (код поддержки)
Код поддерж.
)Support code(
5
РУССКИЙ
7-b
1
Установите на смартфон приложение
«Canon PRINT Inkjet/SELPHY».
Для загрузки приложения
перейдите на сайт Canon,
отсканировав QR-код справа.
2
Откройте на смартфоне настройки
Wi-Fi. Коснитесь имени сети )SSID(,
начинающегося с «Canon_ij_».
Если сеть «Canon_ij_» не
отображается, перейдите к шагу 3.
(Пример экрана устройства с ОС iOS)
Подключение к смартфону
Если вы используете несколько смартфонов, выполните эти действия на
каждом смартфоне.
Выполните следующие подготовительные действия, прежде чем начать.
a Включите на смартфоне функцию Wi-Fi.
b В случае наличия маршрутизатора беспроводной сети подключите к нему смартфон.
Дополнительные сведения см. в руководствах по эксплуатации смартфона и маршрутизатора беспроводной сети.
Добавив принтер, вы можете печатать со своего смартфона.
3
Откройте установленное приложение.
4
Следуйте инструкциям приложения
на экране, чтобы добавить принтер.
7-c
Не подключаться к устройству
1
Нажмите кнопку Стоп (Stop).
2
Выберите пункт Не подключаться (Do not connect), а затем нажмите кнопку OK.
3
Выберите пункт Да (Yes), а затем нажмите кнопку OK.
7-b. Подключение к смартфону
1
 
تﻧرﺗﻧﻹا رﺑﻋ دادﻋﻹا
 .1



Windows

( ) 

 .2
1
.         
2
     /    
.      
a
b
 .3
1
.       
2
.       
3
.    
4
.      
5
          
. 
 
6
        
.
!
   
    
Доступ до документа Онлайновий посібник
З вашого браузера
Доступ к документу Онлайн-руководство
Из вашего браузера
Accès au Manuel en ligne
À partir de votre navigateur
Acesse o Manual On-line
Do seu navegador
Acceso al Manual en línea
Desde su navegador
Access Online Manual
From your browser
PRINTED IN XXXXXXXX
QT6-2927-V01 © CANON INC. 2019XXXXXXXX
  • Page 1 1
  • Page 2 2
  • Page 3 3
  • Page 4 4
  • Page 5 5
  • Page 6 6
  • Page 7 7
  • Page 8 8
  • Page 9 9
  • Page 10 10
  • Page 11 11
  • Page 12 12
  • Page 13 13
  • Page 14 14
  • Page 15 15
  • Page 16 16
  • Page 17 17
  • Page 18 18
  • Page 19 19
  • Page 20 20
  • Page 21 21
  • Page 22 22
  • Page 23 23
  • Page 24 24
  • Page 25 25
  • Page 26 26
  • Page 27 27
  • Page 28 28
  • Page 29 29
  • Page 30 30
  • Page 31 31
  • Page 32 32
  • Page 33 33
  • Page 34 34
  • Page 35 35
  • Page 36 36
  • Page 37 37
  • Page 38 38
  • Page 39 39
  • Page 40 40
  • Page 41 41
  • Page 42 42
  • Page 43 43
  • Page 44 44
  • Page 45 45
  • Page 46 46

Canon Pixma GM-4050 Owner's manual

Category
Ink cartridges
Type
Owner's manual

Ask a question and I''ll find the answer in the document

Finding information in a document is now easier with AI