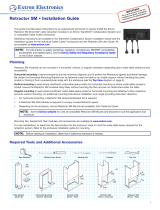
Page is loading ...

The Crestron® CBLR2 Series FlipTop™ Cable Retractors offer a refined
solution for Crestron FlipTop cable management systems. Each cable
pulls out smoothly to a length of 3ft (0.9m) and latches in position. A
second pull of the cable releases the latch and retracts the cable back into
the compartment.
In the Box
1 CBLR2-HD, CBLR2-MDP-DP, CBLR2-VGA, CBLR2-AUDIO,
CBLR2-USB, CBLR2-CAT5E, or CBLR2-VGA-AUDIO
Check the Accessories
Ensure that the mounting bracket received is appropriate for the FlipTop
being modified
NOTE: The following table excludes FlipTop 600 Series models.
Mounting Bracket
Assemblies
FlipTop Models
CBLRA-BRKT-3-FT
3-Position
Domestic Model
FT-PWR-D, QM-FTCC, QM-FTCC-NB, QM-FTDC,
QM-FTDC-NB, and QM-FTMC
CBLRA-BRKT-4-FT
4-Position
Domestic Model
C2N-FTR-TPS4, C2N-FTR-TPS4-U, FT-PWR-D-LG,
QM-FTCC-NB, and QM-FTCC-TPS4
CBLRAI-BRKT-4-FT
4-Position
International Model
FTI-PWR-D, QMI-FTCC, QMI-FTCSC, QMI-FTDC, and
QMI-FTMC
Two spacer insert models, CBLRA-INSERT-BLANK and
CBLRA-INSERT-2WIRE, may be used to fill unpopulated retractor slots in
any of the FlipTops listed above.
1
CBLR2 Series
QuickStart
FlipTop™ Cable Retractors

Prepare the FlipTop Assembly
Attaching the CBLR2 Series retractors requires modification to the
FlipTop assembly, which also includes determining the desired mounting
orientation. The retractors are shipped configured for vertical orientation
but may be easily reconfigured for horizontal orientation.
NOTE: For preparation of the FlipTop 600 Series models, refer to
Modify the FlipTop (FlipTop 600 Series Models).
Modify the FlipTop
(Excludes FlipTop 600 Series Models)
Retractors may be installed in both the left and right sides of the FlipTop
600 Series models.
1. Remove and retain the six screws at the bottom of the assembly,
including the four screws securing the lower bar assembly. The screws
will be used to attach the mounting bracket assembly.
2. Remove and discard the lower bar assembly. The lower bar assembly is
used with pass-through cables only.
3. Remove and retain the four screws securing the cable guide. The
screws will be used to install the side filler plates.
4. Remove and discard the cable guide. The cable guide is used with pass-
through cables only.
2
CBLR2 Series
QuickStart
FlipTop™ Cable Retractors

5. Move the mounting bracket assembly up into position and secure the
assembly using six screws removed in step 1.
6. Position the side filler plates and secure them using four screws
removed in step 3.
3
CBLR2 Series
QuickStart
FlipTop™ Cable Retractors

Modify the FlipTop (FlipTop 600 Series Models)
Retractors may be installed in both the left and right sides of the FlipTop
600 Series models.
1. Remove and discard the following parts:
l The screws securing the cable guides
l The cable guides
l The screws securing the cable pass-through brackets
l The cable pass-through brackets
NOTE:The cable guides and the cable pass-through brackets
are used with pass-through cables only.
2. Remove and retain the shoulder screws from the front of the 600
Series FlipTop. The shoulder screws are used to install the cable
retractors. Refer to Attach the Cable Retractors to the FlipTop
(FlipTop 600 Series Models).
4
CBLR2 Series
QuickStart
FlipTop™ Cable Retractors

Reconfigure the Retractors for Horizontal
Operation
The retractors are shipped configured for vertical orientation. If the
vertical space beneath the table is limited, the retractors may be
reconfigured for horizontal orientation by following the steps below.
1. Remove and retain the four screws, two screws on each side, that
secure the retractor neck to the retractor arm.
2. Pivot the retractor neck so that the neck is perpendicular to the
retractor arm.
3. Using the four screws removed from step 1, secure the retractor neck.
5
CBLR2 Series
QuickStart
FlipTop™ Cable Retractors

Adjust the Retractor
When the retractor arm is in the desired orientation, the retractor arm
tension and the cable retraction speed may be adjusted (vertical
orientation shown below).
Adjust the Retractor Tension
1. Loosen the top thumb screw enough so that the adjacent cable end
may move freely.
2. Align the red screw with the arrow on the label.
Adjust the Cable Retraction Speed
The Cable Retraction Speed Adjust knob may be set in one of four
positions: slowest, slow, fast, and fastest.
When the cable retractor arm is in the vertical orientation, the cable
retracts quickly. When the cable retractor arm is in the horizontal
orientation, the cable retracts slowly as it turns the corner of the
retractor neck to the retractor arm. Refer to Setting the Cable Retraction
Speed on the next page.
6
CBLR2 Series
QuickStart
FlipTop™ Cable Retractors

Setting the Cable Retraction Speed
The cable retraction speed must be set before installing the cable
retractor.
1. Pull the cable (connector end) out so it is fully extended.
2. Pull the cable a second time to initiate retraction, and observe the
speed as the cable retracts back into the arm.
3. If the cable retracts at the desired speed, then no other action is
required. If the cable retraction speed is too fast or too slow, move the
knob to the next position appropriate for the arm orientation.
a. Pull the Cable Retraction Speed Adjust knob outward and move the
knob to the next position appropriate for the arm orientation.
l For a retractor arm in the vertical orientation, the outermost
left position is the slowest speed that the cable will retract. The
inner left position is not as slow.
l For a retractor arm in the horizontal orientation, the outermost
right position is the fastest speed that the cable will retract. The
inner right position is not as fast.
b. Recheck the speed starting from step 1.
Install the Retractors
Cable retractor installation consists of attaching the cable retractors to
the FlipTop assembly.
Attach the Cable Retractors to the FlipTop
(Excludes FlipTop 600 Series Models)
1. Insert the retractor necks and any included spacers up and into the
mounting bracket assembly until the necks and spacers engage the
frame of the FlipTop assembly.
2. Carefully slide the clevis pin through the hole in the side at the bottom
of the mounting bracket assembly and then through each retractor
and spacer being mounted until the clevis pin protrudes through the
opposite side of the assembly.
3. Insert the included cotter pin into the hole in the clevis pin.
7
CBLR2 Series
QuickStart
FlipTop™ Cable Retractors

4. Tighten the set screw in each retractor neck so that the screws are
just snug against the clevis pin.
8
CBLR2 Series
QuickStart
FlipTop™ Cable Retractors

Attach the Cable Retractors to the FlipTop
(FlipTop 600 Series Models)
1. Insert the retractor necks into the FlipTop until they engage the frame
of the 600 Series FlipTop assembly.
2. Insert the shoulder screws into the front of the FlipTop.
3. Tighten the set screw in each retractor neck.
9
CBLR2 Series
QuickStart
FlipTop™ Cable Retractors

Visit the Product Page
Scan the QR code to visit the product page.
CBLR2 Series Retractors
www.crestron.com/model/6507277
Additional Information
Original Instructions
The U.S. English version of this document is the original instructions.
All other languages are a translation of the original instructions.
Crestron product development software is licensed to Crestron dealers and Crestron
Service Providers (CSPs) under a limited nonexclusive, nontransferable Software
Development Tools License Agreement. Crestron product operating system software is
licensed to Crestron dealers, CSPs, and end-users under a separate End-User License
Agreement. Both of these Agreements can be found on the Crestron website at
www.crestron.com/legal/software_license_agreement.
The product warranty can be found at www.crestron.com/warranty.
The specific patents that cover Crestron products are listed at
www.crestron.com/legal/patents.
Certain Crestron products contain open source software. For specific information, visit
www.crestron.com/opensource.
Crestron, the Crestron logo, and FlipTop are either trademarks or registered
trademarks of Crestron Electronics, Inc. in the United States and/or other countries.
Other trademarks, registered trademarks, and trade names may be used in this
document to refer to either the entities claiming the marks and names or their
products. Crestron disclaims any proprietary interest in the marks and names of
others. Crestron is not responsible for errors in typography or photography.
©2020 Crestron Electronics, Inc.
Doc. 7711B
05/05/20
10
CBLR2 Series
QuickStart
FlipTop™ Cable Retractors
/