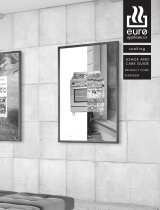
Euro Appliances EMIN110B User manual
- Category
- Hobs
- Type
- User manual

EMBRACE EUROPEAN QUALI+PASSION
www. eu roa ppli a nces.com .au
cooking
USE AND
CARE GUIDE
MODELNO.
EMIN110B

Dear Customer
Thank you for purchasing a Eurostyle Cooktop.
Before we continue telling you about this cooktop, we cordially invite you to become part
of the Eurostyle family by subscribing to ongoing information and invitations.
You will find that the clean lines and modern look of your Eurostyle Cooktop blends
perfectly with your kitchen décor. It is easy to use and performs to a high standard.
There are models to complement your new Eurostyle Cooktop.
Of course we make every effort to ensure that our products meet all your requirements,
and our Customer Relations department is at your disposal, to answer your questions and
to listen to all your suggestions (see back cover of manual).
Please complete the warranty section of this manual and keep your receipt as proof of
purchase. Retain all documents relating to the purchase of this products.
Eurostyle is committed to providing increasingly efficient products that are easy to use,
respect the environment and are attractive and reliable.
Eurostyle
We ask that you carefully read the instructions within this booklet to enable you to abtain quality
results from the outset.
The appliance must be installed only by an authorised person in compliance with the instructions
provided. The manufacturer declines all responsability for improper installation which may harm
persons and animals and damage property.
The appliance must be used for the purpose for which it was expressly designed. Any other use
(eg heating rooms) is considered to be improper and consequently dangerous. The manufacturer
declines all responsability for damage resulting from improper and irresponsible use.
The manufacturer shall not be held responsible for any inaccuracies in this handbook due to
printing or transcription errors. The designs in the figures are purely indicative.
The manufacturer also reserves the right to make any modifications to the products as may be
considered necessary, useful or in the interests of the user, without jeopardizing the main
functional and safety features on the products themselves.
If your cooktop requires service, please contact your local customer service centre or your
nearest Eurostyle agent listed at the back of this booklet.

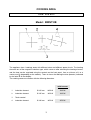
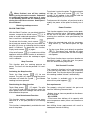
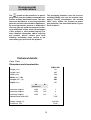
The appliance has 4 cooking areas with different sizes and different power levels. The heating
elements are of the magnetic induction type, which come on after selecting the heating element,
and the heat can be regulated using the controls on the front panel, from a minimum of 1 to a
maximum of 9 (depending on the models). There is also a fast boiling function (booster) indicated
by the letter P on the display.
The cooking zones are crosses with the following diameters.
COOKING AREA
TYPE: PCZ VTCI
Model: EMIN110B
3
with booster
1 Induction element Ø 210 mm 2200 W 3200 W
2 Induction element Ø 145 mm 1400 W 1800 W
3 Touch control
4 Induction element Ø 180 mm 1850 W 2500 W

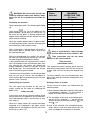
Guide to Using the Instructions Booklet
Safety instructions
Before first use, you should carefully read
the installation and connection instruc-
tions.
For your safety, installation should be
carried out by an authorised technician
and should comply with existing installa-
tion standards. Likewise, any internal work
on the hob should only be done by autho-
rized technical staff, including the change
of the flexible supply cable of the applian-
ce.
Safety warnings:
This appliance is not designed to
work with an external timer (not built
into the appliance) or a separate remo-
te control system.
Do not steam clean this device.
The device and its accessible
parts may heat up during operation.
Avoid touching the heating elements.
Children must stay away from the sto-
vetop unless they are permanently
supervised.
The appliance is not intended for
use by persons (including children)
with reduced physical, sensory or men-
tal capabilities, or lack of experience
and knowledge, unless they have been
given supervision or instruction con-
cerning use of the appliance by a per-
son responsible for their safety. User
cleaning and maintenance may not be
done by unsupervised children.
Children should be supervised to
ensure that they do not play with the
appliance.
Danger of Fire: Do not store items
on the cooking surface.
CAUTION: The cooking process
has to be supervised. A short term coo-
king process has to be supervised con-
tinuously.
Precaution. It is dangerous to cook
with fat or oil without being present, as
these may catch fire. Never try to extin-
guish a fire with water! in this event dis-
connect the device and cover the flames
with a lid, a plate or a fire blanket.
Do not store any object on the
cooking areas of the stovetop. Prevent
a possible fire hazard.
Do not place metal objects, such as
knives, forks, spoons or lids on the surfa-
ce of the hob, as they may get very hot.
The induction generator complies
with all current European standards.
Nonetheless, we recommend that peo-
ple with heart devices, with such as
artificial pacemakers, consult with their
doctor or, if in doubt, refrain from using
the induction zones.
It is advisable not to use the
induction hob during the pyrolitic clea-
ning function in the case of the pyrolitic
In case of hotplate glass
breakage:
●shut immediately off all burners
and any electrical heating element
and isolate the appliance from the
power supply;
●do not touch the appliance surface;
●do not use the appliance.
4

ovens, due to the high temperature rea-
ched by this appliance.
When finished, turn off the coo-
king zone by using the touch controls.
Otherwise an undesired operation
could occur if a pan is accidentally pla-
ced on the cooking zone during the
next three minutes. Avoid possible
accidents!
Do not attempt to change the tech-
nical characteristics of the product
because it can be dangerous.
If you should not to use this
appliance any more (or replace an old
model), before disposing of it, make it
inoperative in conformity with current
law on the protection of health and the
prevention of environmental pollution
by making its dangerous parts harm-
less, especially for children who might
play on an abandoned appliance.
Do not touch the appliance with
wet or damp hands or feet.
Do not use the appliance barefoot.
The manufacturer will not be liable
for any damage resulting from impro-
per, incorrect or unreasonable use.
During, and immediately after ope-
ration, some parts of the cooktop are
very hot: avoid touching them.
Connecting the electricity
The electric connection is made via an
omnipolar switch or plug where accessible,
which is suitable for the intensity to be tole-
rated and which has a minimum gap of 3
mm between its contacts, which will ensure
disconnection in case of emergency or
when cleaning the hob.
In case of failure or cut in the cable, please
move away from the cable and do not
touch it. Moreover the device must be
unplugged and not switched on. Call the
nearest authorized service center to fix the
problem. The input cable should not be in
contact either with the body of the hob or
with the body of the oven, if the oven is ins-
talled in the same unit.
When using the hob for the first
time, please take care not to have
powerful halogen lights, like those of a
hood, shining over the sensor button
area of the hob. These lights may inter-
fere with the starting of the system.
The electrical connection must be
properly grounded, following current
regulations, otherwise the stovetop
may malfunction.
Unusually high power surges can
damage the control system (like with
any electrical appliance).
5
Ensure the appliance is installed by
an authorised person in accordance
with AS/NZS 3000 wiring rules.

INSTALLATION AND SETUP SHOULD
BE CARRIED OUT BY AN AUTHORISED
TECHNICIAN IN LINE WITH CURRENT
INSTALLATION STANDARDS AND THE
MANUFACTURER'S INSTRUCTIONS.
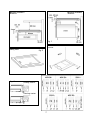
Positioning the hob
To install these models, an opening with
the dimensions shown in figure 1 will be
cut into the unit’s worktop.
The fastening system for the top is desig-
ned for furniture thicknesses of 20, 30 and
40 mm.
The minimum distance between the surfa-
ce supporting the cooking pans and the
lower part of the kitchen unit or the hood
located above the hob should be 650 mm.
If the hood’s installation instructions
recommend that the gap is greater than
this, you should follow this advice.
The unit where the hob and oven will be
located will be suitably fixed.
INSTALLATION WITH FAN OVEN
UNDER THE HOB
The oven should be installed according to
the corresponding manual.
An opening of 20 mm should be made in
the back part of the cabinet in order to
allow cold air to enter (see figure 1).
When hobs are handled before
being installed, care should be taken in
case there is any protruding part or
sharp edge which could cause injury.
When installing units or applian-
ces above the hob, the hob should be
protected by a board so that the glass
cannot be damaged by accidental
blows or heavy weights.
The glues used in manufacturing
the kitchen unit and in the adhesive on
the decorative laminate of the worktop
surface should be made to tolerate tem-
peratures of up to 100 ºC.
Manufacturer assumes no res-
ponsibility for any malfunction or
damage caused by faulty installation.
PLEASE REMEMBER THAT THE GUA-
RANTEE DOES NOT COVER THE
GLASS IF IT SUFFERS A VIOLENT
BLOW OR IF IT IS USED IMPROPERLY.
Fastening the hob
When the gap has been properly sized, the
sealing washer should be put on the lower
face of the glass. Silicone should not be
applied between the glass and the unit
worktop because if it becomes neces-
sary to remove the hob from its position,
the glass could break when trying to
detach it.
To secure the hob to the cabinet, four brac-
kets should be fastened to the existing holes
on the bottom part of the casing (two in the
front and two in the back). There are two
possibilities of where the brackets may be
placed, just as is shown in figure 3.
Depending on the thickness of the cabinet, it
may be necessary to use the self tapping
screws that are provided as compliments for
securing; insert them in the circular holes of
the bracket. The thread of this hole will be
made when the screw is inserted inside of it.
The thread should be made before faste-
ning the bracket to the hob.
6
Installation

fig. 2
Minimum ventilation
distances
Minimum ventilation
distances
Fitting holes
Minimum distance
to wall
7
Sealing washer
Sealing washer
fig. 3
fig. 1

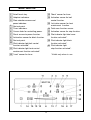
1
On/off touch key.
2
Hotplate indicators.
3
Plate selection sensors and
power indicators.
4
Decimal point.
5
Timer indicators.
6
Cursor slider for controlling power.
7
Direct access to power function.
8
Activaction sensor for block function.
9
Decimal point.
10
Pilot indicator light boil control
function activated*.
11
Pilot indicator light heat control
sustainment function activated*.
12
“Less” sensor for timer.
13 “More” sensor for timer.
14 Activation sensor for boil
control function.
15 Activation sensor for heat
sustainment function.
16 Total zone function sensor.
17 Activation sensor for stop function.
18 Pilot indicator light total zone
function activated*.
19
Pilot indicator light block
function activated*.
20
Pilot indicator light
stop function activated*.
*Visible only when in use.
8
Model: EMIN110B

Installation
9
Installation with cutlery drawer
If you wish to install furniture or a cutlery drawer
under the hob, a separation board must be fitted
between the two. Accidental contact with the hot
surface of the device's housing is thus preven-
ted.
The board must be fitted 20 mm beneath the
under part of the stovetop.
Electrical connection
Before you connect the stovetop to the mains,
check that the voltage and frequency match
those specified on the stovetop nameplate,
which is under-neath it, and on the Guarantee
Sheet, or if applicable on the technical data
sheet, which you must keep together with this
manual throughout the product's service life.
The electrical connection will be via an all-
pole circuit breaker or plug, whenever acces-
sible, in accordance with the current and
with a minimum 3 mm distance between con-
tacts. This ensures disconnection in emer-
gencies and allows stovetop cleaning.
Ensure that the inlet cable does not come
into contact with the induction top housing
or the oven housing, if it is installed in the
same unit.
Warning:
The electrical connection must be pro-
perly grounded, following current legisla-
tion, otherwise the induction hob may mal-
function.
Unusually high power surges can
damage the control system (like with any
electrical appliance).
It is advised to refrain from using the
induction hob during the pyrolytic cleaning
function in the case of pyrolytic ovens, due
to the high temperature that this type of devi-
ce attains.
Only the official technical service can
handle or repair the appliance, including
replacement of the power cable.
Before disconnecting the hob from the
mains, we recommend switching off the cut-
off switch and waiting for approximately 25
seconds before pulling the plug. This time is
required to allow for the complete discharge
of the electronic circuitry and thus preclude
the possibility of electric shock from the
contacts of the plug.
Keep the Guarantee Certificate or the
technical data sheet together with the ins-
tructions manual throughout the product's
service life. These contain important techni-
cal information.
Ensure the appliance is installed by
an authorised person in accordance
with AS/NZS 3000 wiring rules.

10
User instructions
of the Touch Control
Operations are carried out by using the sensors
marked on the control panel.
It's not necessary to push hard on the glass.
Simply place your finger on the sensor to activa-
te the desired function.
Use the cursor slider (6) to adjust power levels
(0 - 9, and P) by sliding your finger over it.
Sliding towards the right increases the value,
whereas sliding towards the left decreases it.
It's also possible to directly select a power level
by placing your finger directly on a desired point
of the cursor slider.
In order to select a plate on these
models, directly touch the POWER INDICA-
TER NUMBER (3).
TURNING THE APPLIANCE ON
The first time the cooktop is plugged in (or after
a power outage), the Block function will appear
as activated (pilot light 19 on). In this case, you
must deactivate the block function in order to
turn the cooktop on. To do this, push sensor (6)
until pilot (19) turns off.
1 Touch sensor (1) for at least one second.
Touch Control is now activated and a 0 appears
in all power indicators (3). If a cooking zone is
hot, the corresponding indicator will show an H
and a 0 alternatively.
Once the Control is on, you must activate a plate
within 10 seconds, otherwise the Touch Control
will automatically turn off.
While the touch control is activated, it can be
disconnected at any moment by touching the
general on/off sensor (1) even if it has been
blocked (see section "Blocking cooktop sen-
sors"). Sensor (1) always has priority in dis-
connecting the touch control.
ACTIVATING PLATES
Once the Touch Control is activated with sensor
(1), any plate can be turned on by following
these steps:
1 Select the plate by using the corresponding
sensor (3). In other words, press with your finger
the NUMBER INDICATOR. If the glass is hot,
the said indicator will go from showing an H to
showing level 0. The decimal point to the bottom
right of the number lights up, indicating that the
plate has been selected.
2 Use the cursor slider (6) to choose a cooking
level between 0 and 9.
As long as the plate is selected, in other words,
with the decimal point lit up, its power level can
be modified.
TURNING A PLATE OFF
A plate can be turned off by decreasing its coo-
king level to 0. In order to do this, the plate must
have been previously selected (decimal point lit
up).
Once a plate has been turned off, an H will
appear on the corresponding power indicator if
the glass surface of the cooking area reaches an
elevated temperature. Burn risk exists. When
the temperature decreases, the indicator turns
off (if the cooktop is disconnected), or it will
show a 0 if it is still on.
TURNING ALL PLATES OFF
All plates can be simultaneously disconnected
by using the general on/off sensor (1). All
plate indicators will turn off.
Pan detector
Induction cooking zones have a built-in pan
detector. This way, the plate will stop working if
there is no pan present or if the pan is not suita-
ble.
The power indicator will show a symbol to desig-
nate "there is no pan" if, while the zone is
on, no pan is detected or the pan is not suitable.
If a pan is taken off the zone while it is running,
the plate will automatically stop supplying
energy and it will show the symbol for "there is
no pan". When a pan is once again placed on
the cooking zone, energy supply will resume at
the same power level previously selected.
The time for pan detection is 3 minutes. If a pan
is not placed within this time period, or the pan
is unsuitable, the cooking zone shuts off. The
power indicator will go from showing the symbol
"there is no pan" to showing 0.
After use, switch off the hob element by its con-
trol and do not rely on the pan detector.
Use and maintenance

11
When finished, turn off the cooking
zone by using the touch controls. Otherwise
an undesired operation could occur if a pan
is accidentally placed on the cooking zone
during the next three minutes. Avoid possi-
ble accidents!
Blocking cooktop sensors
BLOCK FUNCTION
With the Block Function, you can block the other
sensors, except for the on/off sensor (1), in
order to avoid undesired operations. This func-
tion is useful as a childproof safety.
To activate this function, touch sensor (8)
for at least one second. Once you have done so,
the pilot (19) turns on indicating that the control
panel is blocked. To deactivate the function,
simply touch sensor (8) again.
If the on/off sensor (1) is used to turn off the
appliance while the block function is activated, it
won't be possible to turn the cooktop on again
until it unblocks.
Stop Function
This function puts the cooking process on
pause. The timer will also be paused if it is acti-
vated.
Activating the Stop function
Touch the Stop sensor (17) for one
second. The pilot (20) lights up and the power
indicators will show the symbol to indicate
cooking has been paused.
Deactivating the Stop function
Touch Stop sensor (17) again. The pilot
(20) turns off and cooking resumes under the
same power and timer settings that were esta-
blished before the pause.
Heat Sustainment Function
This function makes it possible to keep warm
food that is in the pan placed on the cooking
area.
This function is independently available for each
one of the plates.
To activate it, select the plate. The decimal point
will light up. Then push sensor (15). The
symbol "A" will appear in the indicator and the
corresponding pilot (11) will turn on.
To disconnect this function, all you have to do is
modify the power of the plate or directly turn it
off.
Power Function
This function supplies "extra" power to the plate,
above the nominal value. Said power depends
on the size of the plate, with the possibility of
reaching the maximum value permitted by the
generator.
1 Select the desired plate with the correspon-
ding sensor (3). The decimal point will light
up.
2 On the cursor Slider, push directly on position
(7). The power level indicator will show
the symbol P, and the plate will start to supply
extra power.
The Power function has a maximum duration as
specified in table 1. After this time, the power
level will automatically adjust to 9.
Boil Control Function
This innovative function is of an enormous help
if you want to cook pasta, rice, eggs, or boil any
kind of food. This function allows you to perform
this cooking method "almost" automatically.
This function is available only in the plates
where this symbol appears .
Pot requirements
For properly using boil control, the pot must
have the following characteristics:
- Bottom size as close as possible to the diame-
ter of the plate.
- NO COVER.
- Filled more than halfway of its capacity with
room temperature water (never use lukewarm or
hot water).
Not fulfilling these requirements will result in
inadequate control of boiling.

WARNING: do not use this function for
cooking methods other than boiling water.
Never use oil. It can overheat and create fla-
mes.
Activating the function:
Select the proper plate. The decimal point lights
up.
Push sensor (14). An A will appear on the
plate indicator and the pilot (10) will turn on. In
the timer for this plate, a moving segment will
appear which indicates that the system has star-
ted to monitor cooking.
When the system detects that it is about to boil,
an initial beep will go off. Take this time to prepa-
re the food you want to boil or cook.
After 30 seconds, a second beep will go off. If
you haven't done it already, now is time to put
the food into the pot.
After the second beep, the system will activate
the timer as a chronometer so that you can con-
trol how long the food has been boiling.
A few seconds after the chronometer is activa-
ted, a third beep will go off indicating that, from
this moment on, the system will reduce the
energy supplied in order to maintain a gentle
and steady boil. The chronometer will remain
active until cooking has finished.
If desired, the chronometer can be deactivated
and you can set a time for the countdown to
occur and the plate to automatically turn off (see
section Timer Function).
Deactivating the function
You can cancel the function at any time by
simply turning off the plate or modifying the
power level.
Safety shut off
If due to an error one or several heating zones
do not switch off, the appliance will be automati-
cally disconnected after a set amount of time
(see table 1).
When the "safety switch off" function has been
triggered, a 0 is displayed if the glass surface
temperature is not dangerous for the user or an
H if there is a burn risk.
Keep in mind that this safety function
turns on even when the touch control is off!
Take precaution and do not place
objects on the touch control!
Timer function
(countdown clock)
This function facilitates cooking given that you
don't have to be present: You can set a timer for
a plate, and it will turn off once the desired time
is up.
For these models, you can simultaneously pro-
gram each plate for durations ranging from 1 to
90 minutes.
Setting a timer on a plate
To set a timer on a plate, you should take the
following steps.
1 Select the desired plate by directly touching its
corresponding indicator (3) and choose a
power level with the cursor slider (6).
2 The two digits of the timer for the plate selec-
ted will turn on, showing "- - ". You can set the
amount of time desired with sensors (12)
and (13).
3 After a few seconds, the countdown begins.
When there is less than one minute left, the
clock will begin to count down in seconds.
12
Table 1
0
8
8
5
4
4
3
2
2
1
10 minutes, readjust to 9
0
1
2
3
4
5
6
7
8
9
P
Power
selected
MAXIMUM
OPERATION TIME
(in hours)

13
Once the countdown has finished, the timed
plate will turn off and a series of beeps will be
heard. They can be stopped by touching either
of the sensors (12) or (13) associated
with the clock.
Disconnecting the clock
If you wish to stop the clock before the program-
med time is up, this can be done at any time by
simply adjusting its value to '--'.
1 Select the plate you wish to stop the timer on
by directly touching its corresponding indica-
tor (3).
2 Adjust the value of the clock to "--" by using the
"less" sensor (12). This can also be done
more quickly by pushing the "less" and "more"
sensors (12) and (13) at the same time.
Total Zone Function
By using this function it is possible to achieve
that two plates, as shown in the screen, function
at the same time, both for selecting a power
level as well as for activating the timer function.
To activate this function you should press the
sensor or (16). Upon doing so, the deci-
mal points (9) of the plates light up and both turn
to power level 5.
The timer (5) of the lower plate will turn off, and
from then on it will be the upper one that indica-
tes the values of the clock for both.
To deactivate this function you should press the
sensor again or (16). cal service can
handle or repair the appliance, including repla-
cement of the power cable.
Do not step on the glass or lean on it as
it could break and cause injury. Do not use
the glass as a surface for placing objects.
The Manufacturer reserves the right to make
changes to its manuals that it deems necessary
or useful, without affecting the product's essen-
tial features.
Synchro function
(depending on model)
Using this function, it is possible that two hotpla-
tes, identified in the screen printing, work jointly,
both to select a power level as well as to activa-
te the timer function.
To activate this function simultaneously press
the two related selection touch keys (2). On
doing this, the two decimal points (9) of the hot-
plates will light up and they will both be set to
power level 0.
To deactivate this function, again simultaneously
press the two related selection touch keys (2).

Cleaning and maintenance
14
* Use pots or pans with thick, completely flat
bottoms.
* Pots/pans with a smaller diameter than the
shown heating area are not recommended.
* Do not slide pots and pans over the glass
because they could scratch it.
* Although the glass can take knocks from
large pots and pans without sharp edges, try
not to knock it.
* To avoid damaging the ceramic glass surface,
do not drag pots and pans over the glass and
keep the undersides of them clean and in
good condition.
Try not to spill sugar or products con-
taining sugar on the glass as while the surfa-
ce is hot these could damage it.
To keep the appliance in good condition, clean it
using suitable products and implements once it
has cooled down. This will make the job easier
and avoid the build-up of dirt. Never use harsh
cleaning products or tools that could scratch the
surface, or steam-operated equipment.
Light dirt not stuck to the surface can be cleaned
using a damp cloth and a gentle detergent or
warm soapy water. However, for deeper stains
or grease use a special cleaner for ceramic hot
plates and follow the instructions on the bottle.
Dirt that is firmly stuck due to being burned repe-
atedly can be removed using a scraper with a
blade.
Slight tinges of colour are caused by pots and
pans with dry grease residue underneath or due
to grease between the glass and the pot during
cooking. These can be removed using a nickel
scourer with water or a special cleaner for cera-
mic hot plates. Plastic objects, sugar or food con-
taining a lot of sugar that have melted onto the
surface must be removed immediately using a
scraper.
Metallic sheens are caused by dragging metal
pots and pans over the glass. These can be
removed by cleaning thoroughly using a special
cleaner for ceramic glass hot plates, although
you may need to repeat the cleaning process
several times.
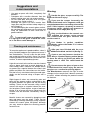
Warning:
Handle the glass scraper carefully. The
blade could cause injury!
If you use the scraper incorrectly, the
blade could break and a fragment could get
caught between the surrounding trim and the
glass. If this happens, do not try to remove it
using your hands, carefully use tweezers or
a knife with a fine edge (See fig. 4).
Only use the blade on the ceramic sur-
face, avoiding the scraper casing coming
into contact with the glass because this
could scratch it.
Use blades in perfect condition.
Immediately replace the blade if it is dama-
ged in any way.
After you have finished with the scra-
per, withdraw the blade and lock it (See fig. 5).
A pot or pan may become stuck to the
glass due to a product having melted betwe-
en them. Do not try to lift the pot while the
heating zone is cold! This could break the
glass.
Do not step on the glass or lean on it as
it could break and cause injury. Do not use
the glass as a surface for placing objects.
The Manufacturer reserves the right to make
changes to its manuals that it deems necessary
or useful, without affecting the product's essen-
tial features.
fig. 5
Protected blade Unprotected blade
Using the scraper
fig. 4
Suggestions and
recommendations

15
The symbol on the product or its packa-
ging means that this product cannot be trea-
ted like ordinary household waste. This pro-
duct must be taken to a recycling collection
point for electrical and electronic appliances.
By ensuring that this product is disposed of
correctly, you will avoid harming the environ-
ment and public health, which could happen
if this product is not handled properly. For
more detailed information about recycling
this product, please contact your local
authority, household waste service or the
store where you purchased the product.
The packaging materials used are environ-
mentally-friendly and can be recycled com-
pletely. Plastic components are marked
>PE<, >LD<, >EPS<, etc. Dispose of packa-
ging materials, like household waste, in your
local container.
Environmental
considerations
EMIN110B
Height (mm) 60
Lenght (mm) 400
Width (mm) 1100
Width (mm) (W) 380
Lenght (mm) (L) 860
Depth (mm) 55
W Ø
with booster
Induction hotplate 1800 145 1
Induction hotplate 2500 180 2
Induction hotplate 3200 210 1
Nominal Power (W) for 230V 7400
Supply voltage (V) 220/240
Frequency (HZ) 50/60
Technical details
Class 3 hob.
Dimensions and characteristics

16
Before calling the technical service, perform the
verifications described below.
The appliance does not work:
Ensure that the power cable is plugged in.
The induction zones do not produce heat:
possible cause: the container is not appropriate
(it does not have a ferromagnetic bottom or is
too small).
Possible solution: check that the bottom of the
container attracts a magnet, or use a larger con-
tainer.
A humming is heard when starting to cook in
the induction zones:
possible cause: with containers which are not
very thick or not of one piece, the humming
results from the transmission of energy directly
to the bottom of the container.
Possible solution: the humming is not a defect,
but if you wish to avoid it anyway, reduce the
power level slightly or use a container with a
thicker bottom, and/or of one piece.
The touch control does not light up or, des-
pite lighting, does not respond:
possible cause: no heating zone has been
selected.
Possible solution: be sure to select a heating
zone before operating it.
Possible cause: there is humidity on the sen-
sors, and/or your fingers are wet.
Possible solution: keep the touch control surfa-
ce and/or your fingers clean and dry.
Possible cause: The locking function is activa-
ted.
Possible solution: unlock the controls.
The sound of a fan is heard while cooking,
which continues even after cooking has
ended:
possible cause: the induction zones have a fan
to keep the electronics cool.
Possible solution: this only operates when the
electronic circuits get hot. It stops again when
the circuits cool whether the hob is turned on or
not.
When frying or cooking stew, it seems as
though the energy of the induction zones
decreases ("the induction element heats
less"):
possible cause: If the temperature of the glass
or of the electronic system becomes too high
while cooking, an auto-protection system will
begin working which regulates the power of the
heating elements so that the temperature does
not continue increasing.
Possible solution: excess temperature problems
during cooking only occur in extreme situations
(an extended period of time cooking at maxi-
mum power) or when installation is inadequate.
Verify that installation has been done in accor-
dance with the indications in the instructions
manual.
A heating element goes off and the message
C appears.
Possible cause: the glass is too hot.
Possible solution: remove the cookware and let
the glass cool down.
The hob suddenly starts to bleep.
Possible cause: there is a cloth, container or
liquid on the Touch Control.
Possible solution: remove any object covering
the Touch Control and/or clean any liquid that
might have been spilt on it.
Possible cause: the timer was activated and the
preset time has finished.
Possible solution: touch the clock sensor to
deactivate the bleep.
If something does not work

The hob (or any of the hotplates) powers off
during cooking and the messages C81 or
C82 appears.
Possible cause: there is a container, cloth or
liquid covering the Touch Control.
Possible solution: remove any object that might
be covering the Touch Control.
Possible cause: one or several of the hotplates
has overheated.
Possible solution: allow the overheated hotpla-
tes to cool down for a few minutes before powe-
ring them up again.
A timed hotplate failed to power off at the
end of the set time.
Possible cause: the hotplate had not been set
correctly.
Possible solution: make sure that the time was
set following the instructions manual.
When cooking at a level below 9, there are
fluctuations in the power.
The induction generator of the cooker turns on
and off alternately in order to keep the chosen
cooking level.
This is not a defect.
After a power outage (or the first time the
hob is connected), the control panel remains
blocked.
Possible cause: there is a powerful light affec-
ting the control panel.
Possible solution: Don’t apply powerful lights (for
example, halogen spotlights) over the control
panel when connecting the hot to the electrical
current. A very powerful light may cause the
sensor buttons not to calibrate correctly after a
power outage.
C85 appears on the indicator of one of the
hotplates:
Possible cause: the pot or pan used is of an
unsuited type.
Possible solution: switch of the hob, switch it on
again and try with another pot or pan.
The symbol will appear on the power indi-
cator of a hotplate:
The induction system does not find a pot or pan
on a hotplate or it is of an unsuited type.
17

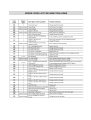
ERROR CODE LIST FOR INDUCTION HOBS


TECHNICAL ASSISTANCE AND SPARES
Before leaving the factory, this appliance was tested and regulated by specially qualified experts in
order to guarantee the best operating results. The original spare parts can be found only in our
Technical Assistance Centres and authorised shops. Every repair or regulation operation which
should become subsequently necessary must be carried out with the utmost care and attention by
qualified personnel. This is why we recommend that you always contact the Dealer who sold the
appliance or our nearest Assistance Centre, specifying the brand, the model, the serial number
and the type of problem affecting your appliance. The pertinent data is stamped on the label
applied to the underside of the appliance and on the label applied to the packing box. This
information enables the technical assistance department to acquire the appropriate spare parts
and consequently guarantee prompt and targeted intervention. We recommend that you write this
data in the spaces below and keep it to hand at all times:
BRAND: ...............................................................................
MODEL: ...............................................................................
SERIES: ..............................................................................
-
 1
1
-
 2
2
-
 3
3
-
 4
4
-
 5
5
-
 6
6
-
 7
7
-
 8
8
-
 9
9
-
 10
10
-
 11
11
-
 12
12
-
 13
13
-
 14
14
-
 15
15
-
 16
16
-
 17
17
-
 18
18
-
 19
19
-
 20
20


Euro Appliances EMIN110B User manual
- Category
- Hobs
- Type
- User manual
Ask a question and I''ll find the answer in the document
Finding information in a document is now easier with AI