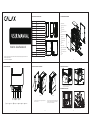
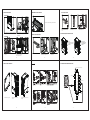
GALAX Revolution 02 is a mid-tower ATX case with tempered glass side panel and support for EATX motherboards. It comes with two pre-installed 120mm fans in the front and one 120mm fan in the rear, and can accommodate up to six additional fans. The case also supports liquid cooling, with space for a 240mm or 280mm radiator in the front or top, and a 120mm radiator in the rear. Other features include a built-in fan controller, two USB 3.0 ports, two USB 2.0 ports, and HD audio jacks.
GALAX Revolution 02 is a mid-tower ATX case with tempered glass side panel and support for EATX motherboards. It comes with two pre-installed 120mm fans in the front and one 120mm fan in the rear, and can accommodate up to six additional fans. The case also supports liquid cooling, with space for a 240mm or 280mm radiator in the front or top, and a 120mm radiator in the rear. Other features include a built-in fan controller, two USB 3.0 ports, two USB 2.0 ports, and HD audio jacks.


-
 1
1
-
 2
2


GALAX Revolution 02 is a mid-tower ATX case with tempered glass side panel and support for EATX motherboards. It comes with two pre-installed 120mm fans in the front and one 120mm fan in the rear, and can accommodate up to six additional fans. The case also supports liquid cooling, with space for a 240mm or 280mm radiator in the front or top, and a 120mm radiator in the rear. Other features include a built-in fan controller, two USB 3.0 ports, two USB 2.0 ports, and HD audio jacks.
Ask a question and I''ll find the answer in the document
Finding information in a document is now easier with AI
Other documents
-
Chieftec AS-01B-OP User manual
-
Thermaltake CTE T500 Air User manual
-
Genesis Irid 400 RGB Quick Installation Manual
-
Rosewill RMI-SB25I Datasheet
-
Cougar MX660-T RGB L User manual
-
Cougar MX620 User manual
-
Thermaltake H570 TG User manual
-
InWin 915 User manual
-
Phanteks Enthoo Evolv mATX Tempered Glass Owner's manual
-