
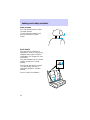
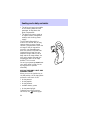
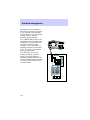
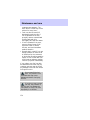
BEFORE DRIVING
Introduction 2
Instrumentation 4
Controls and Features 15
Seating and Safety restraints 53
STARTING AND DRIVING
Starting 85
Driving 93
Roadside Emergencies 107
SERVICING
Maintenance and Care 124
Capacities and Specifications 179
Reporting Safety Defects 186
Index 187
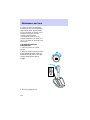
Contents
1

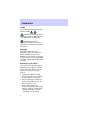
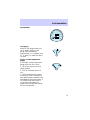
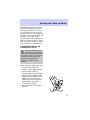
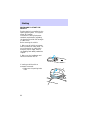
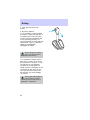
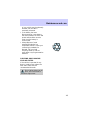
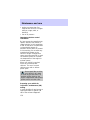
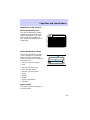
ICONS
The following icons appear in this
Owner Guide:
indicates a warning. Read the
following section on Warnings for
a full explanation of warnings.
indicates that vehicle
information related to recycling
and other environmental concerns
will follow.
Warnings
Warnings remind you to be
especially careful in those areas
where carelessness can cause
damage to your vehicle or personal
injury to yourself, your passengers,
or others. Please read all warnings
carefully.
Breaking-in your vehicle
Your new vehicle goes through an
adjustment or breaking-in period
during the first 1,600 km (1,000
miles) of driving. During this
period:
• change your vehicle’s speed
often as you drive. Do not drive
at one speed for a long time.
• use only the type of engine oil
Ford recommends. Do not use
special “break-in” oils.
• avoid sudden stops. The
break-in period for brake linings
lasts for 1,600 km (1,000 miles)
of highway driving or 160 km
(100 miles) of city driving.
Introduction
2

Information about this guide
This guide describes equipment
and gives specifications for
equipment that was in effect when
this guide was approved for
printing. Ford may discontinue
models or change specifications or
design without any notice and
without incurring obligation.
Introduction
3

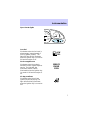
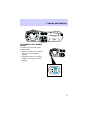
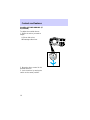
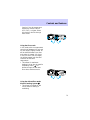
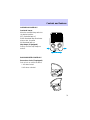
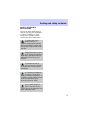
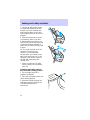
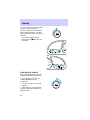
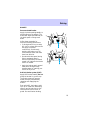
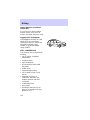
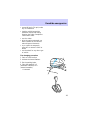
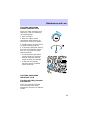
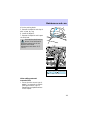
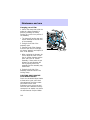
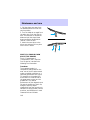
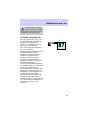
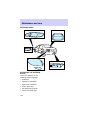
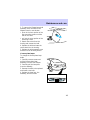
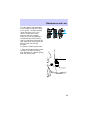
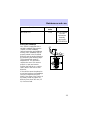
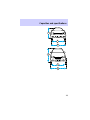
MIRRORS
0000
000000
20
30
40
50
60
70
80
90
10 0
11 0
20
40
60
80
100
120
160
180
140
200
FUEL FILL
C H
E F
1
/
2
2
1
3
RPM x 1000
RSM
SET
ACC
CST
OFF
ON
RL
OFF
2
INT
1
OFF
MIST
Exterior lamps and
turn signal lever
(pg. 26 and
pg. 9)
Foglamp switch
(if equipped)
(pg. 27)
Fuel gauge
(pg. 13)
Engine coolant
temperature gauge
(pg. 13)
Speedometer
(pg. 13)
Tachometer (if
equipped)
(pg. 14)
Warning lights
(pg. 6)
Wiper/washer
lever (pg. 30)
Rear wiper/washer
(if equipped) (pg.
30)
Speed control
(if equipped)
(pg. 27)
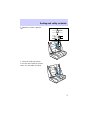
Power mirrors
control (if
equipped)
(pg. 16)
Instrument panel
dimmer switch
(pg. 15)
Instrumentation
4

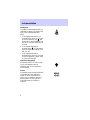
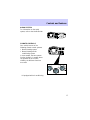
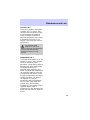
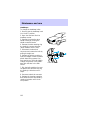
* if equipped with air conditioning
HI
LO
OFF
A/C
MAX
A/C
TUNE
SEEK
SCAN
EJ REW FF
H
M
BAL
BASS
TREB
FADE
TAPE
AM
FM
–+
1
SIDE 1-2
2
34
5
6
VOL
PUSH ON
R.DEF
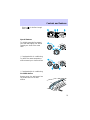
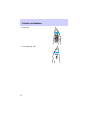
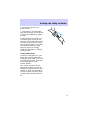
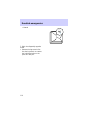
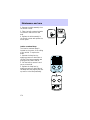
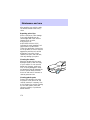
Vents (pg. 18)
Refer to Audio Guide
(electronic stereo radio with
cassette shown; others
available) (pg. 17)
Rear window
defroster (if
equipped) (pg. 24)
Climate controls
(pg. 17)
Instrumentation
5

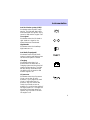
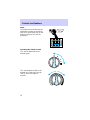
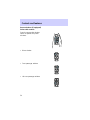
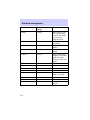
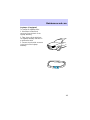
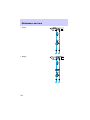
INSTRUMENT CLUSTERS
Instrument cluster lights
Base cluster lights
Sport cluster lights
Base cluster lights
0000
000000
MPH
km/h
10
20
30
40
50
60
70
80
90
100
120
110
20
40
60
80
100
120
160
180
140
200
CHECK
COOLANT
THEFT
FUEL FILL
E F
1
/
2
C H
SERVICE
ENGINE
SOON
ABS
P!
BRAKE
0000
000000
MPH
km/h
10
20
30
40
50
60
70
80
90
100
120
110
20
40
60
80
100
120
160
180
140
200
FUEL FILL
C H
E F
1
/
2
2
1
3
4
5
6
7
8
RPM x 1000
CHECK
COOLANT
SERVICE
ENGINE
SOON
LOW
FUEL
THEFT
ABS
P
BRAKE
0000
000000
MPH
km/h
10
20
30
40
50
60
70
80
90
100
120
110
20
40
60
80
100
120
160
180
140
200
FUEL FILL
C H
E F
1
/
2
CHECK
COOLANT
SERVICE
ENGINE
SOON
LOW
FUEL
THEFT
ABS
! P
BRAKE
C H
Instrumentation
6

Sport cluster lights
Low fuel
Illuminates when the fuel tank is
almost empty (approximately 8
liters [2 gallons] remain). The
lights will also briefly illuminate
when the ignition key is turned to
ON and the engine is off.
Service engine soon
Illuminates when the engine’s
emissions control system requires
service. The light will also
illuminate, and will remain
illuminated, when the ignition key
is turned to ON and the engine is
off.
Air bag readiness
Illuminates when the air bag
system requires servicing. The
light will also briefly illuminate
when the ignition key is turned to
ON.
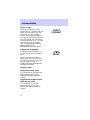
0000
000000
MPH
km/h
10
20
30
40
50
60
70
80
90
100
120
110
20
40
60
80
100
120
160
180
140
200
FUEL FILL
C H
E F
1
/
2
2
1
3
4
5
6
7
8
RPM x 1000
SERVICE
ENGINE
SOON
LOW
FUEL
THEFT
ABS
! P
BRAKE
CHECK
COOLANT
LOW
FUEL
SERVICE
ENGINE
SOON
Instrumentation
7

Safety belt
The safety warning light/chime is a
reminder to fasten your safety belt.
One of the following will take
place:
• If the lap/shoulder belt is not
buckled before the key is turned
to the ON position, the
will
illuminate for approximately one
minute or until the safety belt is
buckled.
• If the lap/shoulder belt is
buckled while
is illuminated
and the chime is sounding, both
will turn off.
• If the lap/shoulder belt is
buckled before the key is turned
to the ON position, neither light
or chime will activate.
Upshift (if equipped)
Illuminates when it is best to shift
to the next highest manual
transaxle gear for the maximum
fuel economy.
Brake
Illuminates when the parking brake
is activated and the ignition is
keyed to ON or the brake fluid
level is low. In addition, with the
parking brake off, the light will
illuminate when the engine is
cranked.
!P
BRAKE
Instrumentation
8

Anti-lock brake system (ABS)
Illuminates when the ABS needs
service. The light will also briefly
illuminate when the ignition key is
turned to ON and the engine is off.
Turn signal
Illuminates when the left hand or
right hand turn signal or the
hazard lamps are illuminated.
High beams
Illuminates when the headlamp
high beams are on.
Anti-theft (if equipped)
Illuminates when the anti-theft
system is arming and flashes when
the anti-theft system is armed.
Charging
Illuminates when there is a
problem with the alternator or
charging system and the electrical
system requires service. The light
will also briefly illuminate when
the ignition key is turned to ON
and the engine is off.
Oil pressure
Illuminates when the oil pressure
is low, not the low oil level.
However, if your engine’s oil level
is low, it could affect the oil
pressure. Stop the vehicle and
check the oil level as soon as
possible. Do not drive the vehicle if
the light remains on. The light will
also briefly illuminate when the
ignition key is turned to ON and
the engine is off.
ABS
THEFT
Instrumentation
9

Engine coolant
Illuminates when there is low
coolant level or a problem with the
engine coolant system. Stop the
vehicle and check the engine
coolant level as soon as possible.
The light will also briefly illuminate
when the ignition key is turned to
ON and the engine is off. For more
information on engine coolant,
refer to Checking and adding
engine coolant in the
Maintenance and care chapter.
Liftgate ajar (if equipped)
Illuminates when the ignition is in
the ON position and the liftgate is
open.
Many of the lights illuminate
briefly when you start the vehicle.
For more information on warning
light illumination, refer to
Preparing to start the vehicle in
the Starting chapter.
Warning chimes
Safety belt warning chime
For information on the safety belt
warning chime, refer to the
Seating and safety restraints
chapter.
Supplemental restraint system
(SRS) warning chime
For information on the SRS
warning chime, refer to the
Seating and safety restraints
chapter.
CHECK
COOLANT
Instrumentation
10

Key-in-ignition warning chime
A warning chime sounds when the
key is left in the ignition and any
door is opened.
Headlamps-on warning chime
A warning chime sounds when the
headlamps are on, the ignition is
off, and a door is opened.
Instrumentation
11

Instrument cluster gauges
Base cluster gauges
Sport cluster gauges
0000
000000
MPH
km/h
10
20
30
40
50
60
70
80
90
100
120
110
20
40
60
80
100
120
160
180
140
200
FUEL FILL
E F
1
/
2
C H
0000
000000
MPH
km/h
10
20
30
40
50
60
70
80
90
100
120
110
20
40
60
80
100
120
160
180
140
200
FUEL FILL
C H
E F
1
/
2
2
1
3
4
5
6
7
8
RPM x 1000
Instrumentation
12

Speedometer
Fuel gauge
When the fuel gauge needle is on
the E (empty) portion of the
gauge, there are between
approximately 2 L (.6 gallons) and
4 L (1 gallon) of usable fuel left in
the tank.
Engine coolant temperature
gauge
If the engine coolant temperature
gauge moves into the H zone:
1. Pull off the road as soon as is
safely possible.
2. Turn off the engine and let it
cool.
3. Check and add engine coolant
as necessary. Refer to Checking
and adding engine coolant in the
Maintenance and care chapter. If
the coolant level and mixture is
not properly maintained, the
engine coolant temperature gauge
will not read properly.
0000
000000
MPH
km/h
10
20
30
40
50
60
70
80
90
100
120
110
20
40
60
80
100
120
160
180
140
200
E F
1
/
2
C H
Instrumentation
13

Odometer
The odometer gives a six digit
reading of how many kilometers
(miles) your vehicle has traveled.
Trip odometer
The trip odometer gives a four
digit reading of how many
kilometers (miles) your vehicle has
traveled in an individual trip.
Press the reset button to begin an
individual trip odometer record.
Tachometer
0000
000000
MPH
km/h
10
20
30
40
50
60
70
80
90
100
120
110
20
40
60
80
100
120
160
180
140
200
2
1
3
4
5
6
7
8
RPM x 1000
Instrumentation
14

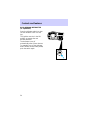
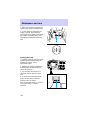
INSTRUMENT PANEL DIMMER
SWITCH
To adjust the instrument panel
dimmer switch:
• Rotate the switch to the right to
dim the instrument panel
lighting.
• Rotate the switch to the left to
brighten the instrument panel
lighting.
HI
LO
OFF
*
A/C
*
MAX
A/C
TUNE
DISCS
SEEK
TUNE
SCAN
EJ REW FF
BAL
BASS
TREB
FADE
TAPE
CD
AM
FM
–+
1
SIDE 1-2
2
34
5
COMP
1
SIDE 1-2
VOL–
PUSH ON
L
MIRROR
R
0000
000000
20
30
40
50
60
70
80
90
100
110
20
40
60
80
100
120
160
180
140
200
FUEL FILL
C H
E F
1
/
2
2
1
3
RPM x 1000
RSM
SET
ACC
CST
OFF
ON
OFF
INT
1
OFF
MIST
HI
LO
OFF
*
A/C
*
MAX
A/C
TUNE
DISCS
SEEK
TUNE
SCAN
EJ REW FF
BAL
BASS
TREB
FADE
TAPE
CD
AM
FM
–+
1
SIDE 1-2
2
34
5
COMP
1
SIDE 1-2
VOL–
PUSH ON
L
MIRROR
R
000
000000
20
30
40
50
60
70
80
90
100
110
20
40
60
80
100
120
160
180
140
FUEL FILL
C H
E F
1
/
2
2
1
3
RPM x 1000
RESET
SET
ACC
SET
XXXX
XXX
OFF
2
INT
1
OFF
MIST
Controls and features
15

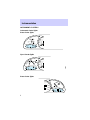
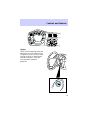
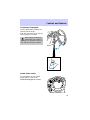
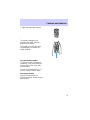
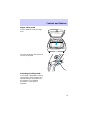
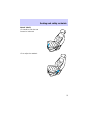
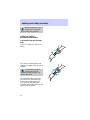
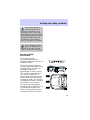
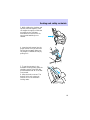
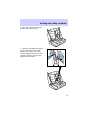
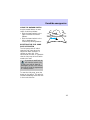
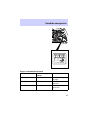
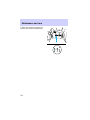
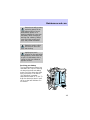
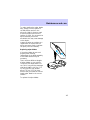
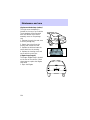
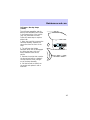
POWER OUTSIDE MIRRORS (IF
EQUIPPED)
To adjust the outside mirrors:
1. Select the mirror you want to
adjust.
L Driver side mirror
R Passenger side mirror
2. Move the mirror control in the
desired direction.
3. Lock the mirror by moving the
switch to the center position.
RL
MIRRORS
HI
LO
OFF
*
A/C
*
MAX
A/C
TUNE
DISCS
SEEK
TUNE
SCAN
EJ REW FF
BAL
BASS
TREB
FADE
TAPE
CD
AM
FM
–+
1
SIDE 1-2
2
34
5
COMP
1
SIDE 1-2
VOL–
PUSH ON
L
MIRROR
R
000
000000
20
30
40
50
60
70
80
90
100
110
20
40
60
80
100
120
160
180
140
FUEL FILL
C H
E F
1
/
2
2
1
3
RPM x 1000
RESET
SET
ACC
SET
XXXX
XXX
OFF
2
INT
1
OFF
MIST
Controls and features
16

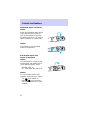
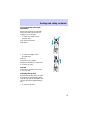
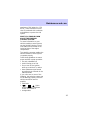
AUDIO SYSTEM
For information on the audio
system, refer to the Audio Guide.
CLIMATE CONTROLS
Your vehicle has one of the
following climate control systems:
• Manual heating system
• Manual heating and air
conditioning system
In some modes, the two systems
function similarly; in modes where
the systems do not function
similarly, the different functions
are noted.
* If equipped with air conditioning
HI
LO
OFF
*
A/C
*
MAX
A/C
TUNE
DISCS
SEEK
TUNE
SCAN
EJ REW FF
BAL
BASS
TREB
FADE
TAPE
CD
AM
FM
–+
1
SIDE 1-2
2
34
5
COMP
1
SIDE 1-2
VOL–
PUSH ON
L
MIRROR
R
000
000000
20
30
40
50
60
70
80
90
100
110
20
40
60
80
100
120
160
180
140
FUEL FILL
C H
E F
1
/
2
2
1
3
RPM x 1000
RESET
SET
ACC
SET
XXXX
XXX
OFF
OFF
HI
LO
*
A/C
*
MAX
A/C
HI
LO
OFF
*
A/C
*
MAX
A/C
TUNE
DISCS
SEEK
TUNE
SCAN
EJ REW FF
BAL
BASS
TREB
FADE
TAPE
CD
AM
FM
–+
1
SIDE 1-2
2
34
5
COMP
1
SIDE 1-2
VOL–
PUSH ON
L
MIRROR
R
000
000000
20
30
40
50
60
70
80
90
100
110
20
40
60
80
100
120
160
180
140
FUEL FILL
C H
E F
1
/
2
2
1
3
RPM x 1000
RESET
SET
ACC
SET
XXXX
XXX
OFF
2
INT
1
OFF
MIST
Controls and features
17

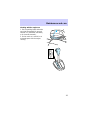
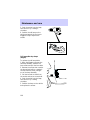
Vents
The airflow from the vents may be
adjusted by moving the horizontal
lever or by moving the vent up and
down according to your airflow
preference.
Operating the climate control
Turn the fan speed dial to the
desired speed.
Turn the temperature dial to the
desired mix of warm and cool air
(left for cooler and right for
warmer).
HI
LO
OFF
*
A/C
*
MAX
A/C
TUNE
DISCS
SEEK
TUNE
SCAN
EJ REW FF
BAL
BASS
TREB
FADE
TAPE
CD
AM
FM
–+
1
SIDE 1-2
2
34
5
COMP
1
SIDE 1-2
VOL–
PUSH ON
SET
ACC
SET
HI
LO
Controls and features
18

Turn the air distribution dial to the
desired airflow position. For
vehicles with manual heating
systems, the modes can only be
used for heating or ventilating
(except OFF).
To prevent humidity buildup inside
of the vehicle, always drive with
the climate control system turned
on.
Do not put objects under the front
seats that interfere with the flow
of air to the back seat area.
* If equipped with air conditioning
Using the MAX A/C mode
• MAX A/C mode (if equipped)
can be used for air conditioning
or heating. This mode is noisier
but more economical than A/C;
it will only function if the air
temperature outside the vehicle
is about 10°C (50°F) or higher.
Select MAX A/C and turn the
temperature dial to the left for
recirculated, cooled airflow
through these vents:
Using the A/C mode
• A/C mode (if equipped) can be
used for heating, ventilating, or
air conditioning; the air
OFF
*
A/C
*
MAX
A/C
HI
LO
OFF
*
A/C
*
MAX
A/C
TUNE
DISCS
SEEK
TUNE
SCAN
EJ REW FF
BAL
BASS
TREB
FADE
TAPE
CD
AM
FM
–+
1
SIDE 1-2
2
34
5
COMP
1
SIDE 1-2
VOL–
PUSH ON
L
MIRROR
R
000
000000
20
30
40
50
60
70
80
90
100
110
20
40
60
80
100
120
160
180
140
FUEL FILL
C H
E F
1
/
2
2
1
3
RPM x 1000
RESET
SET
ACC
SET
XXXX
XXX
OFF
Controls and features
19

conditioning can only function if
the air temperature outside the
vehicle is about 10°C (50°F) or
higher. Select A/C and turn the
temperature dial to the left for
recirculated, cooled airflow
through these vents:
Using the panel mode
• This brings in outside air and
can be used for heating and
ventilating. Select
for airflow
through these vents:
Using the floor mode
In the OFF mode, outside air is
shut out and the fan will not
operate.
Using the panel/floor mode
Manual heating system
• This mode brings in outside air
and can be used for heating and
ventilating.
Manual heating and air
conditioning system
• This mode brings in outside air
and can be used for heating,
ventilating, or air conditioning;
the air conditioning can only
HI
LO
OFF
*
A/C
*
MAX
A/C
TUNE
DISCS
SEEK
TUNE
SCAN
EJ REW FF
BAL
BASS
TREB
FADE
TAPE
CD
AM
FM
–+
1
SIDE 1-2
2
34
5
COMP
1
SIDE 1-2
VOL–
PUSH ON
L
MIRROR
R
000
000000
20
30
40
50
60
70
80
90
100
110
20
40
60
80
100
120
160
180
140
FUEL FILL
C H
E F
1
/
2
2
1
3
RPM x 1000
RESET
SET
ACC
SET
XXXX
XXX
OFF
Controls and features
20
Page is loading ...
Page is loading ...
Page is loading ...
Page is loading ...
Page is loading ...
Page is loading ...
Page is loading ...
Page is loading ...
Page is loading ...
Page is loading ...
Page is loading ...
Page is loading ...
Page is loading ...
Page is loading ...
Page is loading ...
Page is loading ...
Page is loading ...
Page is loading ...
Page is loading ...
Page is loading ...
Page is loading ...
Page is loading ...
Page is loading ...
Page is loading ...
Page is loading ...
Page is loading ...
Page is loading ...
Page is loading ...
Page is loading ...
Page is loading ...
Page is loading ...
Page is loading ...
Page is loading ...
Page is loading ...
Page is loading ...
Page is loading ...
Page is loading ...
Page is loading ...
Page is loading ...
Page is loading ...
Page is loading ...
Page is loading ...
Page is loading ...
Page is loading ...
Page is loading ...
Page is loading ...
Page is loading ...
Page is loading ...
Page is loading ...
Page is loading ...
Page is loading ...
Page is loading ...
Page is loading ...
Page is loading ...
Page is loading ...
Page is loading ...
Page is loading ...
Page is loading ...
Page is loading ...
Page is loading ...
Page is loading ...
Page is loading ...
Page is loading ...
Page is loading ...
Page is loading ...
Page is loading ...
Page is loading ...
Page is loading ...
Page is loading ...
Page is loading ...
Page is loading ...
Page is loading ...
Page is loading ...
Page is loading ...
Page is loading ...
Page is loading ...
Page is loading ...
Page is loading ...
Page is loading ...
Page is loading ...
Page is loading ...
Page is loading ...
Page is loading ...
Page is loading ...
Page is loading ...
Page is loading ...
Page is loading ...
Page is loading ...
Page is loading ...
Page is loading ...
Page is loading ...
Page is loading ...
Page is loading ...
Page is loading ...
Page is loading ...
Page is loading ...
Page is loading ...
Page is loading ...
Page is loading ...
Page is loading ...
Page is loading ...
Page is loading ...
Page is loading ...
Page is loading ...
Page is loading ...
Page is loading ...
Page is loading ...
Page is loading ...
Page is loading ...
Page is loading ...
Page is loading ...
Page is loading ...
Page is loading ...
Page is loading ...
Page is loading ...
Page is loading ...
Page is loading ...
Page is loading ...
Page is loading ...
Page is loading ...
Page is loading ...
Page is loading ...
Page is loading ...
Page is loading ...
Page is loading ...
Page is loading ...
Page is loading ...
Page is loading ...
Page is loading ...
Page is loading ...
Page is loading ...
Page is loading ...
Page is loading ...
Page is loading ...
Page is loading ...
Page is loading ...
Page is loading ...
Page is loading ...
Page is loading ...
Page is loading ...
Page is loading ...
Page is loading ...
Page is loading ...
Page is loading ...
Page is loading ...
Page is loading ...
Page is loading ...
Page is loading ...
Page is loading ...
Page is loading ...
Page is loading ...
Page is loading ...
Page is loading ...
Page is loading ...
Page is loading ...
Page is loading ...
Page is loading ...
Page is loading ...
Page is loading ...
Page is loading ...
Page is loading ...
Page is loading ...
Page is loading ...
Page is loading ...
Page is loading ...
Page is loading ...
Page is loading ...
Page is loading ...
Page is loading ...
Page is loading ...
Page is loading ...
-
 1
1
-
 2
2
-
 3
3
-
 4
4
-
 5
5
-
 6
6
-
 7
7
-
 8
8
-
 9
9
-
 10
10
-
 11
11
-
 12
12
-
 13
13
-
 14
14
-
 15
15
-
 16
16
-
 17
17
-
 18
18
-
 19
19
-
 20
20
-
 21
21
-
 22
22
-
 23
23
-
 24
24
-
 25
25
-
 26
26
-
 27
27
-
 28
28
-
 29
29
-
 30
30
-
 31
31
-
 32
32
-
 33
33
-
 34
34
-
 35
35
-
 36
36
-
 37
37
-
 38
38
-
 39
39
-
 40
40
-
 41
41
-
 42
42
-
 43
43
-
 44
44
-
 45
45
-
 46
46
-
 47
47
-
 48
48
-
 49
49
-
 50
50
-
 51
51
-
 52
52
-
 53
53
-
 54
54
-
 55
55
-
 56
56
-
 57
57
-
 58
58
-
 59
59
-
 60
60
-
 61
61
-
 62
62
-
 63
63
-
 64
64
-
 65
65
-
 66
66
-
 67
67
-
 68
68
-
 69
69
-
 70
70
-
 71
71
-
 72
72
-
 73
73
-
 74
74
-
 75
75
-
 76
76
-
 77
77
-
 78
78
-
 79
79
-
 80
80
-
 81
81
-
 82
82
-
 83
83
-
 84
84
-
 85
85
-
 86
86
-
 87
87
-
 88
88
-
 89
89
-
 90
90
-
 91
91
-
 92
92
-
 93
93
-
 94
94
-
 95
95
-
 96
96
-
 97
97
-
 98
98
-
 99
99
-
 100
100
-
 101
101
-
 102
102
-
 103
103
-
 104
104
-
 105
105
-
 106
106
-
 107
107
-
 108
108
-
 109
109
-
 110
110
-
 111
111
-
 112
112
-
 113
113
-
 114
114
-
 115
115
-
 116
116
-
 117
117
-
 118
118
-
 119
119
-
 120
120
-
 121
121
-
 122
122
-
 123
123
-
 124
124
-
 125
125
-
 126
126
-
 127
127
-
 128
128
-
 129
129
-
 130
130
-
 131
131
-
 132
132
-
 133
133
-
 134
134
-
 135
135
-
 136
136
-
 137
137
-
 138
138
-
 139
139
-
 140
140
-
 141
141
-
 142
142
-
 143
143
-
 144
144
-
 145
145
-
 146
146
-
 147
147
-
 148
148
-
 149
149
-
 150
150
-
 151
151
-
 152
152
-
 153
153
-
 154
154
-
 155
155
-
 156
156
-
 157
157
-
 158
158
-
 159
159
-
 160
160
-
 161
161
-
 162
162
-
 163
163
-
 164
164
-
 165
165
-
 166
166
-
 167
167
-
 168
168
-
 169
169
-
 170
170
-
 171
171
-
 172
172
-
 173
173
-
 174
174
-
 175
175
-
 176
176
-
 177
177
-
 178
178
-
 179
179
-
 180
180
-
 181
181
-
 182
182
-
 183
183
-
 184
184
-
 185
185
-
 186
186
-
 187
187
-
 188
188
-
 189
189
-
 190
190
-
 191
191


Ask a question and I''ll find the answer in the document
Finding information in a document is now easier with AI
Related papers
-
Mercury 1997 User manual
-
-
-
Ford 1999 Escort User manual
-
-
-
-
-
-
Other documents
-
 Z'Fogless ZW10 Operating instructions
-
 4MODERNHOME T107 User manual
-
-
-
Lincoln 1999 Town Car User manual
-
-
-
-
-

