Dell OptiPlex 5250 All In One Quick start guide

Type
Quick start guide

This manual is also suitable for

Dell OptiPlex 5250 All In One: Experience seamless computing with a sleek and versatile all-in-one desktop, designed to enhance productivity and collaboration in various business environments.

Dell OptiPlex 5250 All In One: Experience seamless computing with a sleek and versatile all-in-one desktop, designed to enhance productivity and collaboration in various business environments.

OptiPlex 5250 All-in-One
Quick Start Guide
Snelstartgids
Guide d'information rapide
Schnellstart-Handbuch
Guida introduttiva rapida
1 Connect the power cable and other devices
Sluit de stroomkabel en andere apparaten aan
Brancher le câble d'alimentation et les autres périphériques
Stromkabel und andere Geräte anschließen
Collegare il cavo dell'alimentazione e altri dispositivi
2
Connect the keyboard and mouse
Sluit het toetsenbord en de muis aan.
Connecter le clavier et la souris
Tastatur und Maus anschließen
Collegare la tastiera e il mouse
NOTE: If you are connecting a wireless keyboard or mouse, see the documentation that
shipped with it.
N.B.: Als u een draadloos toetsenbord of draadloze muis aansluit, raadpleeg dan de meegeleverde
documentatie.
REMARQUE : si vous connectez un clavier ou une souris sans fil, consultez la documentation fournie.
ANMERKUNG: Wenn Sie eine Wireless-Tastatur oder eine Maus anschließen, finden Sie weiter
Informationen in der Dokumentation, dieser beilagen.
N.B.: se si utilizza una tastiera o un mouse senza fili, visualizzare la documentazione fornita.
5 Install the stand
De standaard installeren | Installer le socle
Standrahmen installieren | Installare il piedistallo
6 Press the power button
Druk op de aan-uitknop | Appuyer sur le bouton d'alimentation
Betriebsschalter drücken | Premere il pulsante Accensione
7 Finish operating system setup
Voltooi de installatie van het besturingssysteem
Terminer la configuration du système d'exploitation
Betriebssystem-Setup abschließen
Terminare la configurazione del sistema operativo
Set a password for Windows
Stel een wachtwoord voor Windows in
Définir un mot de passe pour Windows
Kennwort für Windows einrichten
Impostare una password per Windows
Connect to your network
Maak verbinding met uw netwerk
Se connecter au réseau
Mit dem Netzwerk verbinden
Connettere alla rete
NOTE: If you are connecting to a secured wireless network, enter the password for the
wireless network access when prompted.
N.B.: Als u verbinding maakt met een beveiligd draadloos netwerk, vul dan het wachtwoord voor
het netwerk in wanneer daar om gevraagd wordt.
REMARQUE : si vous vous connectez à un réseau sans fil sécurisé, saisissez le mot de passe
d'accès au réseau sans fil lorsque vous y êtes invité.
ANMERKUNG: Wenn Sie sich mit einem geschützten Wireless-Netzwerk verbinden, geben Sie
das Kennwort für das Wireless-Netzwerk ein, wenn Sie dazu aufgefordert werden.
N.B.: per collegarsi a una rete senza fili protetta, inserire la password di accesso alla rete senza fili
quando richiesto.
Protect your computer
Beveilig de computer
Protéger votre ordinateur
Computer schützen
Proteggere il computer
Ubuntu
Follow the instructions on the screen to finish setup.
Volg de instructies op het scherm om de setup te voltooien.
Suivre les instructions qui s'affichent pour terminer la configuration.
Folgen Sie den Anweisungen auf dem Bildschirm, um das Setup abzuschließen.
Seguire le istruzioni visualizzate sullo schermo per terminare la configurazione.
Windows 7
3
4
Install the cable cover (optional)
Plaats het kabelafdekplaatje (optioneel)
Installer le cache-câbles (en option)
Bauen Sie die Kabelabdeckung ein (optional)
Installare il coperchio del cavo (opzionale)
Remove the Torx screw from the cable cover
(optional)
Verwijder de torxschroef uit het kabelafdekplaatje (optioneel)
Retirer la vistorx du cache-câbles (en option)
Entfernen Sie die Torx-Schraube von der Kabelabdeckung (optional)
Rimuovere la vite Torx dal coperchio del cavo (opzionale)
NOTE: Securing the cable cover by using the Torx screw is optional.
N.B.: Het vastzetten van het afdekplaatje met de Torx-schroef is optioneel.
REMARQUE : la fixation du cache des câbles au moyen de la vis Torx est facultative.
ANMERKUNG: Das Befestigen der Kabelabdeckung mithilfe der Torx-Schraube ist optional.
N.B.: il fissaggio del coperchio del cavo mediante l’uso della vite Torx è opzionale.
Features
Kenmerken | Caractéristiques | Funktionen | Funzioni
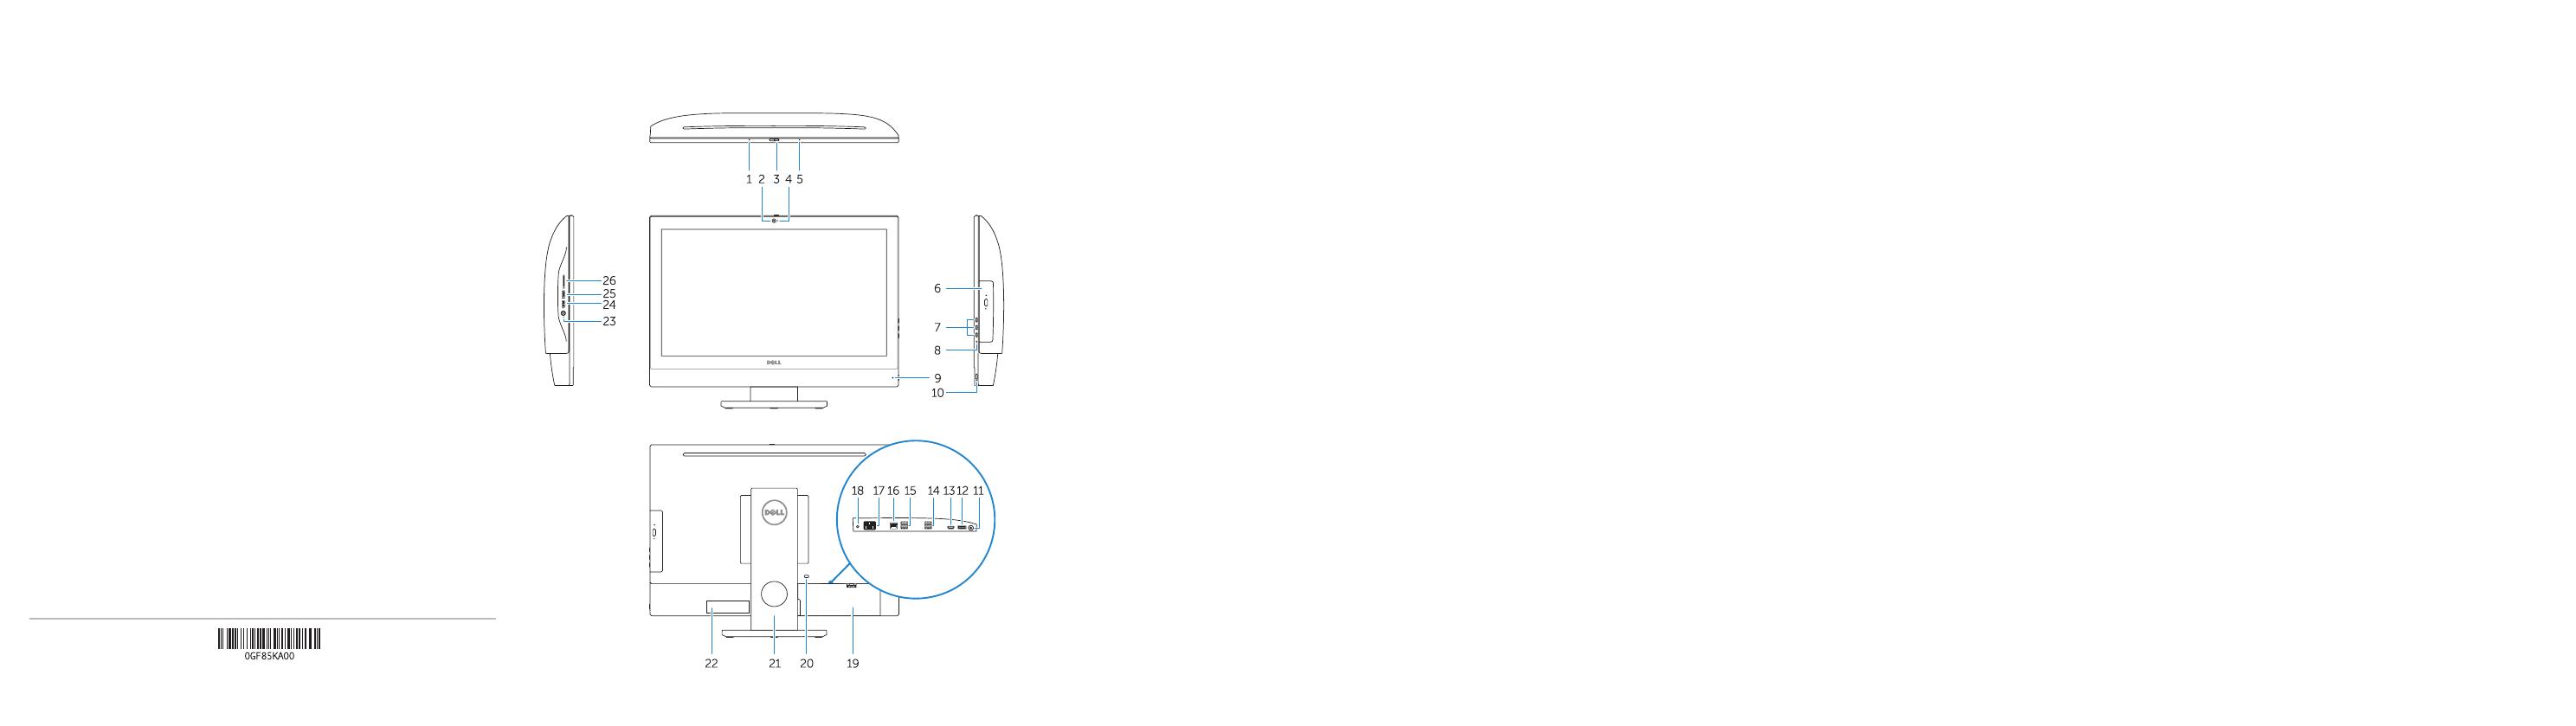
1. Microphone
2. Camera (optional)
3. Camera privacy latch (optional)
4. Camera status light (optional)
5. Microphone
6. Optical drive (optional)
7. On Screen Display (OSD) buttons
8. Hard drive status light
9. Power status light
10. Power button/Power light
11. Audio port
12. DisplayPort
13. HDMI out port
14. USB 3.0 ports
15. USB 2.0 ports
16. Network port
17. Power connector port
18. Power diagnostic light
19. Cable cover
20. Security cable slot
21. Stand
22. Service tag label
23. Headset connector
24. USB 3.0 port
25. USB 3.0 port with PowerShare
26. Media card reader
1. Microfoon
2. Camera (optioneel)
3. Privacyvergrendeling van camera
(optioneel)
4. Camerastatuslampje (optioneel)
5. Microfoon
6. Optisch station (optioneel)
7. On-Screen Display (OSD)-knoppen
8. Statuslampje vaste schijf
9. Statuslampje voeding
10. Aan-uitknop/stroomlampje
11. Audiopoort
12. DisplayPort
13. HDMI-uitgangspoort
14. USB 3.0-poorten
15. USB 2.0-poorten
16. Netwerkpoort
17. Netadapterpoort
18. Diagnostisch voedingslampje
19. Kabelafdekplaatje
20. Sleuf voor beveiligingskabel
21. Standaard
22. Servicetaglabel
23. Headsetconnector
24. USB 3.0-poort
25. USB 3.0-poort met PowerShare
26. mediakaartleesapparaat
1. Microphone
2. Webcam (en option)
3. Loquet du cache de la webcam
(en option)
4. Voyant d'état de la webcam (en option)
5. Microphone
6. Lecteur optique (en option)
7. Boutons de menu à l'écran (OSD)
8. Voyant d'état du disque dur
9. Voyant d'état de l'alimentation
10. Bouton d'alimentation/
voyant d'alimentation
11. Port audio
12. DisplayPort
13. Port de sortie HDMI
14. Ports USB3.0
15. Ports USB2.0
16. Port réseau
17. Port du connecteur d'alimentation
18. Voyant de diagnostic d'alimentation
19. Cache-câbles
20. Passage du câble de sécurité
21. Socle
22. Étiquette du numéro de service
23. Port pour casque
24. Port USB3.0
25. Port USB3.0 avec PowerShare
26. Lecteur de carte mémoire
1. Mikrofon
2. Kamera (optional)
3. Kamera-Privatsphäreriegel (optional)
4. Kamerastatusanzeige (optional)
5. Mikrofon
6. Optisches Laufwerk (optional)
7. OSD-Tasten (On Screen Display)
8. Festplatten-Statusanzeige
9. Netzspannung-Statusanzeige
10. Betriebsschalter/Betriebsanzeige
11. Audioanschluss
12. DisplayPort-Anschluss
13. HDMI-Ausgangsanschluss
14. USB3.0-Anschlüsse
15. USB2.0-Anschlüsse
16. Netzwerkanschluss
17. Netzanschluss-Port
18. Betriebsdiagnoseanzeige
19. Kabelabdeckung
20. Sicherheitskabeleinschub
21. Standrahmen
22. Service-Tag-Etikett
23. Kopfhöreranschluss
24. USB3.0-Anschluss
25. USB3.0-Anschluss mit PowerShare
26. Medienkartenlesegerät
1. Microfono
2. Videocamera (opzionale)
3. Dispositivo di chiusura privacy della
fotocamera (opzionale)
4. Indicatore di stato della fotocamera
(opzionale)
5. Microfono
6. Unità ottica (opzionale)
7. Pulsanti OSD (On Screen Display)
8. Indicatore di stato del disco rigido
9. Indicatore di stato dell'alimentazione
10. Accensione/Indicatore di alimentazione
11. Porta audio
12. DisplayPort
13. Porta di uscita HDMI
14. Porte USB 3.0
15. Porte USB 2.0
16. Porta di rete
17. Porta connettore di alimentazione
18. Indicatore di diagnostica
dell'alimentazione
19. Coperchio del cavo
20. Slot per cavo di sicurezza
21. Piedistallo
22. Etichetta Numero di servizio
23. Connettore auricolare
24. Porta USB 3.0
25. Porta USB 3.0 con PowerShare
26. Lettore di scheda multimediale
Product support and manuals
Productondersteuning en handleidingen
Support produits et manuels
Produktsupport und Handbücher
Supporto prodotto e manuali
Dell.com/support
Dell.com/support/manuals
Dell.com/support/windows
Contact Dell
Contact opnemen met Dell | Contacter Dell
Kontaktaufnahme mit Dell | Contattare Dell
Dell.com/contactdell
Regulatory and safety
Regelgeving en veiligheid
Réglementations et sécurité
Sicherheitshinweise und Zulassungsinformationen
Normative e sicurezza
Dell.com/regulatory_compliance
Regulatory model
Beschreven model | Modèle réglementaire
Muster-Modellnummer | Modello normativo
W14B
Regulatory type
Beschreven type | Type réglementaire
Muster-Typnummer | Tipo di conformità
W14B002
Computer model
Computermodel | Modèle de l'ordinateur
Computermodell | Modello computer
OptiPlex 5250 All-in-One
Printed in China.
2016-11
© 2016 Dell Inc.
© 2016 Microsoft Corporation.
© 2016 Canonical Ltd.
  • Page 1 1
  • Page 2 2

Dell OptiPlex 5250 All In One Quick start guide

Type
Quick start guide
This manual is also suitable for

Dell OptiPlex 5250 All In One: Experience seamless computing with a sleek and versatile all-in-one desktop, designed to enhance productivity and collaboration in various business environments.

Ask a question and I''ll find the answer in the document

Finding information in a document is now easier with AI