Celestron 93648 User manual

Category
Telescopes
Type
User manual

This manual is also suitable for

TITLE I 1
INSTRUCTION MANUAL
MO DEL #93648
OFF-AXIS GUIDER
PARTS LIST
Off-Axis Guider
SCT Adapter
Male M48 Camera Adapter
Male M42 T-thread Camera Adapter
Long T-thread
Spacer Ring
(24.25mm)
Medium T-thread Spacer Ring
(11.55mm)
Short T-thread Spacer
Ring (6mm)
Female M42
T-thread Adapter
Medium M48 Spacer Ring
(11.55mm)
2 I INTRODUCTION
Fig. 1
INTRODUCTION
Your Celestron Off-Axis Guider (OAG) allows you to take accurate, long exposure astroimages when used with an
autoguider. Since the autoguider and imaging camera share the same telescope, you will achieve tracking accuracy
greater than you would with a separate guide scope.
Female M48 Adapter
SYSTEM REQUIREMENTS I 3
TELESCOPE
To attach the front of the OAG to the telescope,
the telescope must have M42 T-threads, M48
threads, or 2” Schmidt-Cassegrain style threads.
If your telescope has a 2” visual back, you will
need to provide a camera adapter to attach the
telescope to the Off-Axis Guider. Camera adapters
are commonly available that adapt from 2” to M42
T-thread (also called T2).
Note that because the OAG consumes a signicant
amount of inward focus travel, some telescopes
will not be able to reach focus with this accessory.
Most Newtonian reectors and some refractors
do not have enough inward focus travel to
accommodate the Off-Axis Guider. Refractors
designed for astroimaging typically have plenty of
focus travel, as do most catadioptric telescopes
such as the Schmidt-Cassegrain or EdgeHD.
OAG BACKFOCUS
You may need to congure the OAG to your
particular telescope, camera, and autoguider
combination. The measurements listed below
refer to the actual length the part consumes when
installed on the telescope.
OAG Body: 29mm
SCT Adaper:25.3mm
Male M42 and M48 camera adapters: 12.5mm
Female M42 and M48 telescope adapters: 4.5mm
Short T-thread Spacer Ring: 6mm
Medium T-thread Spacer Ring: 11.55mm
Long T-thread Spacer Ring: 24.25mm
Medium M48 Spacer Ring: 11.55mm
IMAGING CAMERA
A CCD camera or specialized astroimaging
camera should have female T-threads or 48mm
threads. It will attach to one of the two camera
adapters included with the OAG.
DSLR cameras require a T-ring specic to the make
and model of the camera. Canon and Nikon T-rings
are available from Celestron. Full frame DSLR cameras
should use a wide T-ring with 48mm threads to fully
illuminate the sensor’s eld of view.
Fig. 2
1.25” Holder Thumbscrews
Helical Focus
Adjustment
Pick-Off Prism
Autoguider Camera
Adapter T-threads
Focus Lock
Thumbscrew
Adapter Attachment &
Rotation Thumbscrews
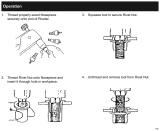
SYSTEM REQUIREMENTS
The Off-Axis Guider (OAG) requires a telescope, imaging camera, autoguider, and a mount tracking
equatorially with autoguiding capability. You should already be familiar with these items before using
the Off-Axis Guider.
Refer to Figure 2 to familiarize yourself with the OAG.
4 I CONFIGURE YOUR OFF-AXIS GUIDER
CONFIGURING THE
OFF-AXIS GUIDER
The included adapters allow you to use the Off-Axis
Guider with popular combinations of autoguiders,
imaging cameras, and telescopes. Some telescopes,
like the EdgeHD series, require a specic backfocus
distance to the detector on the imaging camera.
For this reason, the Spacer Rings must be used to
achieve the correct distance.
Always position the OAG so that the at side of the
pick-off prism faces the telescope (Figure 3).
The imaging camera and autoguider must be parfocal
to one another. That means the optical distance from
the telescope to the autoguider sensor and camera
sensor must be the same. To achieve this, a set of
three T-thread Spacer Rings and one 48mm Spacer
Ring (for full frame cameras) have been provided. In
addition to the Spacer Rings, the Off-Axis Guider also
features a helical focuser with 8mm of focus travel to
allow the autoguider to reach focus.
Adapter Plate
SCT
Adapter
Male
M42
T-thread
DSLR
T-Ring
OR
DSLR Camera
Nightscape CCD Camera
Nightscape
Nosepiece
Medium
11.55mm
T-thread
Spacer
Fig. 4
Pick-off Prism
Flat Faces Telescope
Telescope Side Camera Side
Fig. 3
Off-Axis
Guider
Autoguider
with T-threads
Autoguider
with1.25” Nosepiece
CONFIGURATION FOR SCHMIDT-CASSEGRAIN,
OR EDGEHD 800 TELESCOPES WITH
NIGHTSCAPE OR APS-C DSLR
Refer to Figure 4 for the recommended adapter
conguration. Your camera sensor should be 133mm
away from the Rear Adapter Plate of the EdgeHD 800
telescope. This conguration assumes a camera with
55mm of backfocus to the sensor, which includes
Celestron Nightscape CCD cameras and most
DSLRs. If you are using a CCD camera with a
different backfocus, you need to determine the
distance needed from the OAG to camera to reach
133mm total.
Short 6mm
T-thread Spacer
OR
CONFIGURE YOUR OFF-AXIS GUIDER I 5
CONFIGURATION FOR EDGEHD 925, 1100 AND
1400 TELESCOPES WITH NIGHTSCAPE, DSLR,
OR FULL FRAME DSLR OR CCD CAMERAS
Refer to Figure 5.1 for APS-C sized camera sensors,
such as Celestron Nightscape, Canon Rebels, or
other CCD cameras. Refer to Figure 5.2 for full frame
(35mm format) cameras such as the Canon 5D or
large format CCD cameras.
Your camera sensor should be 146mm away from
the Bafe Lock Nut of the EdgeHD telescope. This
conguration assumes a camera with 55mm of
backfocus to the sensor, which includes Celestron
Nightscape CCD cameras and most DSLRs.
Fig. 5.1
Fig. 5.2 Fig. 6
Adapter Plate
Bafe Lock Nut
SCT
Adapter
Off-Axis Guider
Short 6mm
T-thread Spacer
Male
M42
T-thread
Male
M42
T-thread
DSLR
T-Ring
DSLR
T-Ring
OR
DSLR Camera
Nightscape CCD Camera
Nightscape
Nosepiece
Nightscape
Nosepiece
11.55mm
Medium T-thread
Spacer Ring
11.55mm
Medium M48
Spacer Ring
If you are using a CCD camera with a different
backfocus, you need to determine the spacing required
to achieve a total distance of 146mm from the EdgeHD’s
Bafe Lock Nut to your imaging camera sensor.
Figure 6 shows a setup congured with the EdgeHD
1100 with the Nightscape CCD camera as an imager
and webcam style autoguider.
Autoguider
with T-threads
Autoguider
with1.25” Nosepiece
OR
6 I CONFIGURE YOUR OFF-AXIS GUIDER
CONFIGURATION FOR OTHER TELESCOPES,
USING A CAMERA ADAPTER
Refer to Figure 7 as a possible conguration that
uses a camera adapter. Any telescope with a camera
adapter that uses T-threads or 48mm threads can
attach to the OAG using the supplied female M42
or M48 adapters. Note that you need to supply the
camera adapter if your telescope does not already
have threads build into the focuser.
ATTACHING THE AUTOGUIDER
The OAG can attach to your autoguider using either the
T-threads or the 1.25” holder. If the T-threads are used,
remove the two 1.25” holder thumbscrews (Figure 2).
Autoguiders like the Lodestar or ST-i t into the 1.25”
holder, and others like the StarShoot AutoGuider thread
directly to the T-threads. Use caution when inserting
an autoguider like the Lodestar. The pick-off prism
holder can collide with the front optical window if the
autoguider is pushed in all the way.
ADJUSTING THE PRISM HEIGHT
The prism height can be adjusted to better illuminate
the eld of view of your autoguider. The smaller the
imaging sensor size is for in your camera, the further
“downward” the prism can be set without interfering
with the sensor. This adjustment is normally not
necessary unless the pick-off prism is obstructing
your imaging camera’s sensor, or if you are using the
smaller 42mm telescope adapter which will limit the
illumination to the pick-off prism.
Loosen the 2mm socket head screw using an Allen
wrench (not included), and slide the prism housing up or
down as needed before tightening the screw (Figure 8).
Note: Use caution with this adjustment. Do not touch
the prism. Note that when loosening the set screw, the
prism housing is not captive and can slide off.
Fig. 7
Telescope Focuser with 2” Visual
Back, 42mm T-threads or 48mm
T-threads
Camera Adapter
(if needed)
42mm T-threads or
48mm T-threads
Female M42 T-thread
or M48 T-thread
Male M42 T-thread
or M48 T-thread
Off-Axis
Guider
Autoguider
Imaging Camera
Fig. 8
Prism Height
Adjustment Set Screw
FOCUSING I 7
FOCUSING
Always start by focusing the imaging camera with your
telescope. Then, proceed to focus the autoguider using
the helical focus adjustment. The rst time you use the
OAG, you may need to locate a guide star visually with
a 1.25” eyepiece. The Moon or a bright star cluster
are good targets to start with so you can clearly see
something on the camera side and guider side.
If the imaging camera does not reach focus, determine
if you need more inward or outward focus travel. The
OAG consumes a signicant amount of focus travel, so
some telescopes may not be able to reach far enough
inward focus travel (see System Requirements).
If the autoguider does not reach focus, determine if
you need to add a T-thread spacer ring to move the
autoguider outward, or if you need more focus travel
inward. If more inward travel is needed, additional
spacing will need to be added between the imaging
camera and OAG.
Tighten the Focus Lock Thumbscrew (Figure 2) when
the autoguider is focused.
FINDING A GUIDE STAR
AND ROTATING THE OAG
Finding a guide star can be challenging, depending
on the telescope used and the area of sky you are
imaging in. Fortunately, you can rotate the OAG 360º
to nd a guide star. While carefully supporting the
OAG and camera with your hand, carefully and slightly
loosen the 3 thumbscrews that secure the front of the
OAG to the telescope and rotate the OAG as needed
to locate a guide star in your autoguider. Firmly tighten
the 3 thumbscrews on the telescope side. If needed,
make a similar adjustment to the camera side: loosen
the 3 thumbscrews on the camera side and rotate your
imaging camera to the desired orientation, then rmly
tighten the screws again.
WARRANTY
Your Off-Axis Guider has a two year limited warranty.
Please see the Celestron website for detailed warranty
information at www.celestron.com.
This product is designed and intended for use by
those 14 years of age and older.
2835 Columbia Street • Torrance, CA 90503 U.S.A.
Telephone: 1(800) 421-9649 • Printed in China 2013
© 2013 Celestron • All rights reserved. • www.celestron.com
  • Page 1 1
  • Page 2 2
  • Page 3 3
  • Page 4 4
  • Page 5 5
  • Page 6 6
  • Page 7 7
  • Page 8 8

Celestron 93648 User manual

Category
Telescopes
Type
User manual
This manual is also suitable for

Ask a question and I''ll find the answer in the document

Finding information in a document is now easier with AI