Whirlpool AKP 552 AV Program Chart
- Category
- Barbecues & grills
- Type
- Program Chart
This manual is also suitable for

AKP 552
PRODUCT DESCRIPTION SHEET
FR ES PT
5019 310 53441
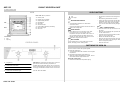
OVEN
First...Last
: Runner positions
1.
Control panel
2.
Cooling fan (not visible)
3.
Upper heating element
4.
Grill element
5.
Oven light
6.
Seat for turnspit
7.
Lower heating element (not visible)
8.
Oven door hinges
9.
Oven door
Accessories:
Grid
Drip tray
CONTROL PANEL
1.
Programmer
2.
Thermostat control knob
3.
Functions selector knob
4.
Thermostat red indicator light
Important:
An optional kit consisting of an oven door
glass and of relevant mounting components, is
available by the After-Sales Service. The use of the kit
reduces the temperature of the outer oven surface and
is strongly recommended if there are kids in the house.
Code N°: 4819 310 39186.
0
Off
Oven light
BOTTOM HEATING FUNCTION
Use:
-
To finish baking fruitcakes or cheesecakes.
-
To thicken sauces.
-
Use the lower heating function for the last 10 or 15
minutes of cooking time.
STATIC FUNCTION
Use when all the food is on the same runner level.
-
Pre-heat the oven to the required cooking
temperature and place the food inside as soon as
the red thermostat indicator light switches off.
-
Ideally, the shelf should be on the second runner
level when using the static function.
GRILL FUNCTION
Use the grill function to cook small pieces of meat
(steaks, sausages) and for making toasts.
-
The oven door must be closed during the cooking
cycle.
-
Pre-heat the grill for about 5 minutes.
-
Arrange the meat on the grid with the drip tray
underneath. Pour water in the drip tray to cover the
bottom to reduce smoke and fat spatters.
-
Turn over the meat about half-way through cooking
time.
GRILL + TURNSPIT FUNCTION
-
Place the food on the spit and secure it with the
two forks.
-
Place the grid supporting the spit inside the oven
on the second runner.
-
Insert the spit in the hole provided on the rear wall,
laying it on the support grid.
-
Remove the handle from the spit.
-
Place the drip tray under the grid. We suggest you
poured some water in the drip tray to reduce
smokes and grease spatters.
-
Close the oven door.
Turn the selector knob to the required symbol.
The oven light switches on.
Turn the thermostat knob clockwise to the required
temperature.
The red thermostat indicator light switches on.
When the required temperature is reached, the red
thermostat indicator light switches off.
End of the cooking cycle:
Return the knobs to the OFF position (
0-
).
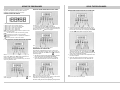
OVEN FUNCTIONS
SWITCHING THE OVEN ON
First
Last

I
mportant: the programmer symbols are given as an indication
only; for correct operation of the programmer, follow the
instructions and illustrations given on these pages.
CONTROL BUTTONS AND SYMBOLS
1. Button used to select minute minder with acoustic signal
2. Button used to set the cooking duration
3. Button used to set the end-of-cooking time
4. Button used to select manual operation
5. Button used to set or change data
6. Button used to set or change data
AUTO:
when permanently alight, indicates operation of the
oven in automatic mode.
AUTO:
will also blink to confirm end-of-cooking, prompt
further programming or indicate a wrong selection.
indicates that the oven is in operation and enabled in
manual mode.
indicates operation of the minute minder.
SETTING THE CLOCK, AND SELECTING MANUAL OPERATION
When the appliance is installed new, or following a power
failure, digits
0:00
and the
AUTO
symbol will blink in the
display. All other functions remain inhibited.
Press and hold buttons
2
and
3
simultaneously, and set the
clock using buttons
5
and
6.
To operate the oven manually, press button
4
: the symbol
will be displayed.
USING THE MINUTE MINDER WITH ACOUSTIC SIGNAL
This function is independent of oven operation
Press button
1
: digits
0:00
are displayed
Press button
5
or
6
to display the desired cooking time.
Having released the buttons, or a few seconds afterwards, the
actual time and the symbol are displayed.
The acoustic signal warns that the set time has elapsed.
Press button
1
to silence the acoustic signal.
PROGRAMMING THE COOKING TIME
Press button
2
: digits
0:00
are displayed; set the desired
cooking time with buttons
5
and
6
. After a few seconds, the
actual time is displayed with
AUTO
and the symbol both
permanently alight.
Set the oven control knob to the temperature required:
the oven will come into operation immediately.
Once the cooking time has elapsed, an acoustic
signal indicates that the oven has switched off.
Return the oven control knob to position
0
, then press
button
4
to silence the acoustic signal.
Note: the time remaining until end-of-cooking can be checked
or altered at any moment by pressing button
2
.
The end-of-cooking time can also be displayed by pressing button
3.
USING THE PROGRAMMER
PROGRAMMING DURATION AND END OF COOKING TIME
Press button
2
: digits
0:00
are displayed; set the
desired cooking time with buttons
5
and
6
. After a
few seconds, the actual time is displayed with
AUTO
and the symbol both permanently alight.
Press button
3
to set the end of cooking time,
which is selected using buttons
5
and
6
. The
symbol will now go out, and reappear again when
the oven comes into operation automatically at the
start of the programmed duration.
Set the oven control knobs to the temperature and
functions required.
Once the cooking time has elapsed, an acoustic
signal indicates that the oven has switched off.
Return the oven control knob to position
0
, then press
button
4
to silence the acoustic signal.
USING THE PROGRAMMER
-
 1
1
-
 2
2


Whirlpool AKP 552 AV Program Chart
- Category
- Barbecues & grills
- Type
- Program Chart
- This manual is also suitable for
Ask a question and I''ll find the answer in the document
Finding information in a document is now easier with AI
Related papers
-
Whirlpool AKP 542 WH Program Chart
-
-
-
-
-
-
-
-
-
Other documents
-
Bauknecht BMZS 4000 IN Program Chart
-
-
-
Zanussi ZOB668X User manual
-
Zanussi ZBM763X User manual
-
-
-
-
-