Page is loading ...

MPS150
WARNING: ONLY FOR DOMESTIC OUTDOOR USE.
THIS PLAYSET SATISFIES ALL THE REQUIREMENTS OF THE EUROPE STANARD EN71/ASTM1291/CPSC AND HAS BEEN
CERTIFIED BY AN INDEPENDENT LABORATORY. TO GUARANTEE SAFETY, PLEASE GIVE SPECIAL ATTENTION TO THE
ASSEMBLY, SAFETY, AND CARE INSTRUCTONS DETAILED IN THIS DOCUMENT.
IMPORTANT NOTICE FOR TIMBER CARE & MAINTENANCE
THIS PRODUCT CONTAINS TIMBER COMPONENTS THAT ARE NATUTALLY SUBJECT TO DETERIORATION IN THE OUTDOOR
ELEMENTS AFTER YEARS OF EXPOSURE.
TO COMBAT THE EFFECTS OF OUTDOOR EXPOSURE AND GREATLY INCREASE THE LIFESPAN OF YOUR PLAY SET OR CUBBY,
WE STRONGLY RECOMMEND THAT YOU APPLY A PROTECTIVE COAT OF EXTERIOR GRADE LACQUER OR OIL TO ALL TIMBER
PARTS UPON FIRST ASSEMBLY. IN ORDER TO BEST MAINTAIN THE TIMBER WE RECOMMEND REAPPLYING PROTECTIVE COATS
EVER 3-6 MONTHS.
FALURE TO CARE FOR YOUR TIMBER PARTS BY APPLYING PROTECTIVE LACQUER OR OIL WIIL GREATLY REDUCE THE LIFES-
PAN OF YOUR PRODUCT. FOR INFORMATION ON THE MOST SUITABLE EXTERIOR LACQUER OR OIL, PLEASE CONSULT YOUR
HARDWARE SPECIALIST.

TOOLS REQUIRED FOR ASSEMBLY
Tape Measure 610mm Level Angle Square
Phillips Screw Driver Cordless Drill Or Electric Drill 10mm Drive Ratchet Or Electric Impact Gun
Claw Hammer Or Rubber Mallet Pliers Or Vise Grips 11mm Deep Well Socket
14mm Deep Well Socket 19mm Deep Well Socket 3mm,6mm,14mm,And Drill Bits
Phillips Head Screw Bits An Adult With Two Adult Helpers
WEIGHT LIMITS
Fort Platform:360 Kg Total Weight SWING BELTS:80 KG TRAPEZE:55 KG
Full Bucket Swing:22kg TODDLER BUCKET SWING:22KG SLIDE:55KG
Rope Ladder:34Kg ROCK WALL:68 KG
PRE-ASSMBLY HINTS
PLEASE FAMILIARIZE YOURSELF WITH THE INSTALL MANUAL,PARTS/COMPONENTS AND GENERAL
CONSTRUCTION PROCESS OF YOUR NEW SWING SET BEFORE GETTING STARTED.APPROXIMATE
ASSEMBLY TIME:6 TO 8 HOURS.6 FOOT UNOBSTRUCTED SAFETY PERIMETER AROUND SWING SET
RECOMMENDED.
THIS PLAY SET IS DESIGED FOR CHILDEN 3-14 YEARS OLD,AND FOR THE USE OF 4 OCCUPANTS
WHO HAVE A COMBINDE WEIGHT NOT EXCEEDING 800 POUNDS/363 KGSON THE ELEVATED
FLOOR;3 OCCUPANT WHO HAVE A COMBINED WEIGHT OF 525 POUNDS/ 238 KG ON THE SWING
AREA;FOR A TOTAL UNIT CAPACITY OF 5 OCCUPANTS WHO HAVE A COMBINED WEIGHT OF 1325
POUNDS/600KG.WE RECOMMENDS THAT THE WEIGHT LIMITS FOR ALL COMPONENTS MUST NOT
BE EXCEEDED.FAILURE TO ADHERE TO THESE AND OTHER SAFETY GUIDELINES COULD RESULT IN
DAMAGE TO THE PLAY SET AND INJURY TO THE USERS.
Depending on your experience, asse d you set aside a full two days for assembly.
Identify all of the part for your play set. Empty each box and lay out boards so you can see each part. Your instruction
book will have detailed drawings that will make it easy for you to recognize individual parts .Keep all hardware and
metal parts separate from wooden pieces.
After everything is laid out, check carefully to ensure all parts are present. Make sure there are no broken boards.
Find an area to sort your hardware. It is best to open the hardware on a solid surface so that you do not lose any
pieces in the grass. This will save time and familiarize you with all the different pieces in the hardware bag.
As fresh lumber acclimates to its new environment, the natural tendencies of the tree can show itself in the form of
checks, or “crack“in the lumber. In almost all cases this is normal and it will not affect the structural integrity of your
play set.
Cosmetic defects that do not affect the structural integrity of the product, or natural defects of wood such as warping,
checking or any other physical properties of wood that do not present a safety hazard, are not covered by this warran-
ty.
Defects that develop because the products is exposed to extreme climate conditions are not covered by this warranty.
Defect that develop as a results of fault of faulty or improper installation of the product are also not covered by this
warranty.
Most cracks are not warrantable, however if you believe that the integrity of your play set is compromised by this
natural occurrence ,please contact the Dealer that you purchased your swing set from.We appreciate your purchase
and know that you will enjoy your play system for many years to come.

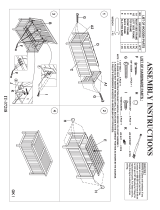
LEVELLING YOUR SWING SET DURING ASSEMBLY
Complete the steps which will be the basic frame of the fort {i.e. four corner posts with base (sand box boards) and
deck supports}
Position in the most level area chosen for the play set, keeping in mind the location and size of the swing beam,
ladder, slides, etc. That extend off the fort.
Once the frame is in the final position, check for vertical and horizontal levelness to determine which side(s) will need
to be dug into the ground tolevel the play set.
With a shovel, score the ground around the outside edges of the sandbox boards on the ‘high’ side of the fort. This is
the area that will be dug in. Make sure to score deep enough; the scored lines will be your digging template.
Push the frame off and away from the scored area, far enough to dig and remove dirt to reach the appropriate depth.
Dig a channel along the scored line(s) for the base of the fort (corner post and sandbox boards) to rest into. Dig the
channel(s) to the same level depth.The bottom of the channel(s) should be level to each other so your frame doesn’t
teeter or rock because the channel(s) are uneven.
Once you have removed enough grass and dirt, slide/push the frame into the channel(s). Place a level on the vertical
and horizontal boards of the frame to determine if enough soil, or too much, was removed.
Repeat this process until the basic frame is plumb and level and in its final position before completing the rest of the
assembly.Measure to make sure fort is square.
**Important: if you require a channel depth of more than 150mm, then we recommend you have your play set area
professionally graded before completing assembly.**
**Important note: Wood has some natural defects such as knots, surface cracks, e tc…We reject parts that are struc-
turally defective. We use a high quality timber in our structures; however, you should inspect each part for splinters or
rough spots and sand them smooth to prevent injury.**
After familiarizing yourself with all of the components, read all instructions thoroughly.Reading instructions after you
have studied the parts will help you understand more clearly the installation process, and help to eliminate unnecess-
arymistakes.
Pay close attention to the diameter and length of each bolt and screw.
Never tighten hardware completely at first. It help to have some adjustment for bolt alignment while you are attaching
parts together. After everything is square, tighten each joint.
After the main unit is assembled it is critical that the floor is level and square. If the main frame is not level, the walls
and floor will be out of square.After you complete installation, make sure every bolt, screw, and nut is tight, and ever
board is secure. Wood will expand and contract with the seasons.
Place the set on lever ground, not less than 6ft from any structure or obstruction such as a fence, garage, house,
overhanging branches, laundry lines,or electrical wires.
All 6mm and 10mm lag bolts must have pre-drilled holes 38mm to 50mm deep. Use a 3.175mm drill bit for the 6mm
drill bit for 100mm lag bolt. Use pre-drilled holes in facias as a reference for placing lag bolt pilot holes.
If a board lifts or rises causing a gap between boards when running in lag bolt or screws, back out the screw or lag
bolt and press or apply pressure(but not enough to crack or break board) while re-running in the lag bolt or screw in
the same hole.
Do not over tighten bolts, lag bolts or screws. You can damage boards, break hardware, and/or strip out the hardware.
When using hammer do not beat on the hardware, but gently tap it in. Never beat on the wood as it will leave marks.


PCH-SWG12-
#8x63.5 Phillips Woodscrew
PCH-SWA08
M6 x 76 Lag Bolt
PCH-SWA12
M10 x 63.5 Lag Bolt
PCH-SWA14
M10x89
Lag Bolt
PCH-SWE02-
M6x32 Phillips Pan Head Machine Screw
QTY:49
QTY:36
QTY:36
QTY:11
QTY:14 QTY:46
QTY:6
QTY:4
QTY:2
QTY:1

QTY:2
QTY:80
QTY:35
QTY:3
QTY:3
QTY:10
QTY:12 QTY:3
QTY:6
QTY:10
QTY:3
QTY:2
QTY:2
PCH-BTD54
M10x108 Hex Head Bolt
PCH-BTD39
M10x38 Hex Head Bolt
PCH-BTD55
M10x114 Hex Head Bolt
QTY:4
QTY:2

PCH-MSC01 PCH-MSA01QTY:1 QTY:8
QTY:18
QTY:3
QTY:14
QTY:5
QTY:10
QTY:3
QTY:8

FLINDERS ACCESSORIES
QTY.4
PC-HG02
Swing hanger
QTY.1
PC-SB04
Swing belt
PC-DT12
QTY.1
Binocular
QTY.1
PC-DT02
12" ship's wheel
QTY.1PC-RE07
Tarp
QTY.1
PC-SL01
Slide
QTY.6
PC-RE01
Climbing rocks
QTY.1
PC-BRA01
Swing beam bracket
QTY.3
PC-BRC15
90 Degree climbing wall bracket
QTY.1PC-BRA02
A frame bracket
QTY.6
PC-BH10
Spiral ground anchor
QTY.1
PC-TZ05
Trapeze bar swing
PCH-BH04 QTY:4

040004
040004
x1
040009
040009
x1
040011
040011
x1
040016
040016
x2
x2
040012
040012
x1
PCH-BTD55
PCH-BTD55
x10
PCH-SWA08
PCH-SWA08
x2
PCH-NTB02
PCH-NTB02
x2
PCH-NTC02
PCH-NTC02
x10
PCH-WRC01
PCH-WRC01
x2
PCH-MSD01
PCH-MSD01
x2
PCH-WRC03
PCH-WRC03
x2
PCH-WRE03
PCH-WRE03
1pc
1pc
1pc
1pc
1pc 2offs
PCH-SWA08
2pcs 2offs
PCH-SWA08
1pc 2offs
PCH-SWA08
1pc 2offs
1pc 2offs
1pc 2offs
1pc 2offs
1pc 2offs
1pc 2offs
PCH-WRC01
1pc 2offs
1pc 2offs
1pc 2offs
1pc 2offs
1pc 2offs
PCH-WRC01
PCH-WRC01
2pcs 2offs

040004
x1
040009
040009
x1
040012
x1
040014
x1
040017
040017
x1
040021
040021
x2
PCH-BTD55
x2
x2
PCH-BTD62
PCH-BTD62
x10
PCH-SWA08
PCH-SWA08
x4
PCH-MSD01
PCH-MSD01
x4
PCH-WRC03
x10
PCH-WRC01
PCH-WRC01
PCH-WRC03
x4
PCH-NTB02
PCH-NTB02
x4
PCH-NTC02
PCH-NTC02
x4
PCH-WRE03
PCH-WRE03
1pc
1pc
040014
1pc
040004
1pc
040012
1pc
1pc 2offs
1pc 2offs
PCH-NTB02
1pc 2offs
1pc 2offs
PCH-SWA08
1pc 2offs
PCH-SWA08
2pc 2offs
PCH-SWA08
1pc 2offs
1pc 2offs
PCH-WRC01
1pc 2offs
PCH-WRC01
PCH-WRC01
1pc 2offs
1pc 2offs
PCH-NTC02
1pc 2offs
1pc 2offs
PCH-WRE03
1pc 2offs
1pc 2offs
PCH-WRC03
1pc 2offs
1pc 2offs
1pc 2offs
PCH-BTD55
PCH-MSD01
1pc 2offs
1pc 2offs
2pc 2offs

3
Connect two sidewalls and add deck boards
040002
040002
x3
040001
040001
x2
040006
040006
x1
040010
040010
x4
040011
040011
x2
PCH-SWA08
PCH-SWA08
x9
x8
PCH-SWG07
PCH-SWG07
x36
PCH-SWG11
PCH-SWG11
x8PCH-WRC01
PCH-WRC01
1pc
1pc
4pcs
3pcs
040001
1pc
9pcs
2pc 18offs
2pc 4offs
2pc 4offs
pc 2offs

0400011
0400011
0400011
x2
x8
PCH-SWA08
x8
PCH-WRC01
PCH-SWA08
PCH-WRC01
1pc
1pc
2pcs 4offs
2pcs 4offs

5
Assembling the climbing wall
70mm
040013
040013
x6
040015
040015
x2
PCH-NTA01
PCH-NTA01
x12
x12
PCH-SWE02
PCH-SWE02
x24PCH-SWG12
PCH-SWG12
x12
x6
PCH-WRC01
PCH-WRC01
PC-RE01
1pc 2offs
1pc 6offs
2pc 6offs
2pc 6offs
2pc 6offs
2pc 12offs

6
Attach climbing wall and add blank side bracket
040015
x1
PCH-BTD39
PCH-BTD39
x2
x3
PCH-BTD46
PCH-BTD46
x5
PCH-NTA03
PCH-NTA03
x9
PCH-WRC01
PCH-WRC01
x5
PCH-WRC03
PCH-WRC03
x9
PCH-SWF11
PCH-SWF11
040015
x3
PC-BRC15
PC-BRC15
1pc 3offs
PCH-NTA03
1pc 2offs
1pc 2offs
1pc 3offs
3pcs 3offs
3pcs 3offs
1pc 3offs
PCH-WRC03
1pc 2offs
1pc 3offs
1pc
5

7
Assemble canopy bracket
PCH-SWA08
PCH-SWA08
x4
x4
PCH-WRC01
PCH-WRC01
x12
PCH-SWG12
PCH-SWG12
x40
PCH-SWG07
PCH-SWG07
040004
040004
x2
040005
040005
x1
040007
040007
x2
040008
040008
x2
040003
040003
x8
4pcs 10offs
4pcs 2offs
2pcs 2offs
2pcs 2offs
2pcs 2offs
PCH-SWG12
2pcs 4offs
1pc 2offs
1pc 2offs
1pc 2offs
1pc

8
040018
x1
PCH-BTC43
PCH-BTC43
x10
x10
PCH-SWA14
PCH-SWA14
x1
PCH-NTB02
PCH-NTB02
PCH-NTB02
x2
PCH-NTC02
PCH-NTC02
x8
PCH-NTD03
PCH-NTD03
PCH-WRD01
PCH-WRD01
x11
x10
PCH-WRC03
PCH-WRC03
PCH-WRC03
PCH-WRC03
x2
PCH-WRE03
PCH-WRE03
x1
PC-BRA02
x4
PC-HG02
PC-HG02
2pcs 5offs
2pcs 4offs
1pc 4offs
2pcs 4offs
1pc 2offs
1pc 2offs
1pc 2offs
1pc 2offs
1pc
1pc
2pcs 4offs
2pcs 5offs
040018
1pc
PC-BRA02
1pc

040020
040020
x1
040019
040019
x2
PCH-BTD54
PCH-BTD54
x2
x2
PCH-NTB02
PCH-NTB02
x2
PCH-NTC02
PCH-NTC02
x6
PCH-SWA12
PCH-SWA12
PCH-SWA12
x2
PCH-SWA14
PCH-SWA14
x12
PCH-WRC03
PCH-WRC03
PCH-WRC03
PCH-WRE03
PCH-WRC03
PCH-WRC03
x2
PCH-WRE03
1pc 2offs
1pc 2offs
1pc 2offs
1pc 2offs
PCH-WRC03
1pc 2offs
1pc 2offs
1pc 2offs
1pc 2offs
1pc 2offs
2pcs 2offs
2pcs 2offs
1pc 2offs
1pc 2offs
1pc

x8
PCH-MSA01 PCH-SL01
PCH-RE07
PCH-MSA01
x2
PCH-SWF11
PCH-SWF11
1pc 2offs
1pc
1pc
4pcs 2offs
PCH-RE07
PCH-SL01
x1
x1

11
Attach the swing beam
PCH-BTC02
PCH-BTC02
x1
x2
PCH-BTC13
PCH-BTC13
PCH-NTB03
PCH-NTB03
x3
x3
PCH-NTC03
PCH-NTC03
x1
PCH-SWA14
PCH-SWA14
x1
PCH-WRC03
PCH-WRC03
PCH-WRC04
PCH-WRC04
x3
x3
PCH-WRC06
PCH-WRC06
x3
PCH-WRE04
PCH-WRE04
x1
PC-BRA01
PC-BRA01
1pc 3offs
1pc 3offs
1pc 3offs
1pc 3offs
1pc 3offs
1pc 2offs
1pc
1pc
1pc
1pc
/