CD/MP3/WMA Receiver / CeNET & Touch Panel Control
Récepteur CD/MP3/WMA / CeNET et écran de contrôle tactile
CD/MP3/WMA-Receiver / CeNET & Touch Panel Bedienfeld
Lettore CD/MP3/WMA / Comando pannello a tocco CeNET
CD/MP3/WMA Ontvanger / CeNET & Aanraakbedieningspaneel
Receptor de CD/MP3/WMA / Control en panel táctil y CeNet
CD/MP3/WMA-mottagare / CeNET & Pekskärm
CD/MP3/WMA Receiver / CeNET & Touch Panel Control
DXZ868RMP
Owner’s manual
Mode d’emploi
Bedienungsanleitung
Istruzioni per l’uso
Gebruiksaanwijzing
Manual de instrucciones
Bruksanvisning
Manual de instruções
Clarion Co., Ltd.
All Rights Reserved. Copyright © 2005: Clarion Co., Ltd.
Printed in China / Imprimé en Chine / Gedruckt in China / Stampato in Cina
Gedrukt in China / Impreso en China / Tryckt i Kina / Impresso na China
2005/12 (Abe·Abe)
PE-2698E
280-8337-00

280-8337-00
280-8337-00
English
2 DXZ868RMP
Thank you for purchasing this Clarion product.
∗ Please read this owner’s manual in its entirety before operating this unit.
∗ After reading this manual, be sure to keep it in a handy place (e.g., glove compartment).
∗ Check the contents of the enclosed warranty card and keep it carefully with this manual.
∗ This manual includes the operating procedures of the CD changer, DAB and TV tuner connected via
the CeNET cable. The CD changer and TV tuner have their own manuals, but no explanations for
operating them are described.
CAUTIONS:
This appliance contains a laser system and is
classified as a “CLASS 1 LASER PRODUCT”.
To use this model properly, read this Owner’s
Manual carefully and keep this manual for
your future reference. In case of any trouble
with this player, please contact your nearest
“AUTHORIZED service station”. To prevent
direct exposure to the laser beam, do not try
to open the enclosure.
!CAUTIONS
USE OF CONTROLS OR ADJUSTMENTS OR
PERFORMANCE OF PROCEDURES OTHER
THAN THOSE SPECIFIED IN THE OWNER’S
MANUAL MAY RESULT IN HAZARDOUS
RADIATION EXPOSURE.
ADVARSEL.
Denne mærking er anbragt udvendigt på
apparatet og indikerer, at apparatet arbejder
med laserstråler af klasse 1, hvilket betyder,
at der anvendes laserstråler af svageste
klasse, og at man ikke på apparatets yderside
kan blive udsat for utilladelig kraftig stråling.
APPARATET BØR KUN ÅBNES AF FAGFOLK
MED SÆRLIGT KENDSKAB TIL APPARATER
MED LASERSTRÅLER!
Indvendigt i apparatet er anbragt den her
gengivne advarselsmækning, som advarer
imod at foretage sådanne indgreb i apparatet,
at man kan komme til at udsaætte sig for
laserstråling.
OBS!
Apparaten innehåller laserkomponenten som
avger laserstrålning överstigande gränsen för
laserklass 1.
VAROITUS
Suojakoteloa si saa avata. Laite sisältää
laserdiodin, joka lähettää näkymätöntä
silmille vaarallista lasersäteilyä.
Bottom View of Main Unit
CE DECLARATION OF CONFORMITY
We
Clarion Europa GmbH
(supplier's name)
Hessenring 19-21, 64546 Mörfelden-Walldorf, GERMA
NY
(address)
declare under our sole responsibility that the product
CAR RADIO with CD PLAYER
and REMOTE CONTROLLER
MODEL:DXZ868RMP and RCB176
Product code: PE2698 and RCB176300
TYPE: 1042825
(name, type or model, possibly sources and numbers of items)
to which this declaration relates is in conformity with the following
standard(s) or other normative document(s)
EN 55013:2001 + A1, EN 55020:2002 + A1
(title and/or number and date of issue of the standard(s) or
other normative document(s))
(if applicable) following the provisions of
89/336/EEC
Directive.
And following the provisions of 2004/104/EC
Directive,
according to paragraph 3.2.9 of Annex I,
meets the limits defined in paragraph 6.5, 6.6, 6.8 and 6.9 of Annex I
(supplier's comment)
M
örfelden-Walldorf GERMANY Susumu Yamakawa
01 JAN 2006 President
(Place and date of issue) (name and signature or equivalent
marking of authorized person)
RefNo 05RCNV002 D.F.DQC05A116

280-8337-00
DXZ868RMP 3
English
Contents
1. PRECAUTIONS .............................................................................................................................. 3
Sloping Console .............................................................................................................................. 4
Handling Compact Discs ................................................................................................................ 4
2. CONTROLS .................................................................................................................................... 5
3. NOMENCLATURE ......................................................................................................................... 6
Names of the Buttons and their Functions ..................................................................................... 6
Operations when External Equipment is Connected to this Unit ..................................................... 7
Touch Panel Buttons ....................................................................................................................... 8
Touch Panel Operations .................................................................................................................. 9
4. DCP .............................................................................................................................................. 10
5. REMOTE CONTROL ..................................................................................................................... 11
Inserting the Battery ....................................................................................................................... 11
Functions of Remote Control Unit Buttons ................................................................................... 12
6. OPERATIONS ............................................................................................................................... 13
Basic Operations .......................................................................................................................... 13
Radio Operations ........................................................................................................................... 16
RDS Operations ............................................................................................................................ 19
CD/MP3/WMA Operations ............................................................................................................ 24
Sound Adjustment ......................................................................................................................... 29
Common Operations ..................................................................................................................... 32
7. OPERATIONS OF ACCESSORIES ............................................................................................. 41
CD Changer Operations ............................................................................................................... 41
TV Operations .............................................................................................................................. 44
Digital Radio/DAB Operations ....................................................................................................... 47
8. IN CASE OF DIFFICULTY ........................................................................................................... 50
9. ERROR DISPLAYS ....................................................................................................................... 52
10. SPECIFICATIONS ......................................................................................................................... 53
1. When the inside of the car is very cold and
the player is used soon after switching on the
heater, moisture may form on the disc or the
optical parts of the player and proper
playback may not be possible. If moisture
forms on the disc, wipe it off with a soft cloth.
If moisture forms on the optical parts of the
player, do not use the player for about 1 hour.
The condensation will disappear naturally
allowing normal operation.
1. PRECAUTIONS
2. Driving on extremely bumpy roads may
cause severe vibration and cause the sound
to skip.
INFORMATION FOR USERS:
CHANGES OR MODIFICATIONS TO THIS
PRODUCT NOT APPROVED BY THE
MANUFACTURER WILL VOID THE
WARRANTY.
WARNING
For your safety, do not watch or operate the touch panel while driving.

4 DXZ868RMP
280-8337-00
English
This unit uses a SLOPING CONSOLE to make
large screen displays possible.
When you use the SLOPING CONSOLE, be
sure to close it.
CAUTION
BE CAREFUL NOT TO GET YOUR FINGERS
CAUGHT WHEN OPENING AND CLOSING
THE SLOPING CONSOLE.
1. For safety’s sake, always close the SLOPING
CONSOLE before leaving this unit unused for
a prolonged period or switching OFF the
ignition key.
If you switch OFF the ignition key with the
SLOPING CONSOLE tilted, the SLOPING
CONSOLE does not close.
Sloping Console
2. Before the SLOPING CONSOLE closes,
there may be a braking sound from the safety
mechanism. This is normal.
3. If you move the SLOPING CONSOLE by
hand, this may start play. To correct this play,
with the power for the unit ON, press the [
QQ
QQ
Q]
button to close the SLOPING CONSOLE.
4. After a disc is ejected, the SLOPING
CONSOLE automatically returns to the tilted
or closed state. If there is any obstruction
when the SLOPING CONSOLE tries to close,
the safety mechanism is triggered and the
SLOPING CONSOLE returns to the open
state. If this happens, remove the
obstruction, then press the [
QQ
QQ
Q] button.
5. To avoid scratching the compact disc, keep
the 12 or 8 cm CD level when loading or
removing it.
Use only compact discs bearing the or
mark.
Do not play heart-shaped, octagonal, or other
specially shaped compact discs.
Some CDs recorded in the CD-R/CD-RW mode
may not be usable.
Handling
• Compared to ordinary music CDs, CD-R and
CD-RW discs are both easily affected by high
temperature and humidity and some CD-R and
CD-RW discs may not be playable. Therefore,
do not leave them for a long time in the car.
• New discs may
have some
roughness
around the
edges. If such discs
are used, the player
may not work or the sound
may skip. Use a ball-point pen
or the like to remove any
roughness from the edge of the disc.
• Never stick labels on the surface of the
compact disc or mark the surface with a pencil
or pen.
• Never play a compact disc with any cellophane
tape or other glue on it or with peeling off
marks. If you try to play such a compact disc,
you may not be able to remove it from the CD
player or it may damage the CD player.
Handling Compact Discs
• Do not use compact discs that have large
scratches, are misshapen, cracked, etc. Use of
such discs may cause misoperation or
damage.
•To remove a compact disc from its storage
case, press down on the center of the case
and lift the disc out, holding it carefully by the
edges.
• Do not use commercially available CD
protection sheets or discs equipped with
stabilizers, etc. These may damage the disc or
break the internal mechanism.
Storage
• Do not expose compact discs to direct sunlight
or any heat source.
• Do not expose compact discs to excess
humidity or dust.
• Do not expose compact discs to direct heat
from heaters.
Cleaning
•To remove fingermarks and dust, use a soft
cloth and wipe in a straight line from the center
of the compact disc to the circumference.
• Do not use any solvents, such as commercially
available cleaners, anti-static spray, or thinner
to clean compact discs.
• After using special compact disc cleaner, let
the compact disc dry off well before playing it.
Ball-point pen
Roughness

English
280-8337-00
DXZ868RMP 5
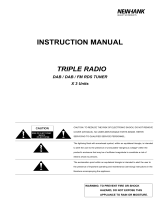
2. CONTROLS
[TA][SRC]
Display
[MODE]
[ ] (SOUND)
[
ADJ
]
IR-Receiver
[
ROTARY
]
[Q] (OPEN/EJECT)
Photo Sensor
DCP Detaching Slider
[CD SLOT]
Main unit
With the SLOPING CONSOLE opened

6 DXZ868RMP
280-8337-00
English
3. NOMENCLATURE
Names of the Buttons and their Functions
IR-Receiver
• Receiver for remote control unit. (Operating
range: 30° in all directions)
[ADJ] button
• Use this button to set or adjust the various
settings in the adjust mode.
[Q] (OPEN/EJECT) button
• Open/closes the control panel.
To eject a disc, open the control panel first, and
then press this button once again.
Photo Sensor
• This sensor detects the brightness inside your
car. When the auto-dimmer function is set to
“AUTO”, the brightness of the display is
dimmed according to the brightness detected
by this sensor.
[MODE] button
• Use this button to play in scan, repeat, or
random mode.
• Press and hold this button for 2 seconds or
longer to switch between standard and simple
operation displays.
[ ] (SOUND) button
• Use this button for setting or adjusting various
settings such as ADF.
[TA] button
• Use this button to turn on/off TA (Traffic
Announcement).
[SRC] button
• Switches among sound sources as shown
below.
Radio ➜ (DAB) ➜ CD/MP3 ➜ (CD changer) ➜
(DVD changer) ➜ (TV) ➜ AUX ➜ Radio...
Note:
External equipment not connected with CeNET is
not displayed.
[ROTARY] knob
• Press the knob to turn the power ON.
• Press the knob to turn the power OFF.
•Turn the knob to adjust the volume.
[CD SLOT]
• CD insertion slot.
DCP Detaching Slider
• Removes the DCP.
Display
• Displays the various information that indicates
the operating state of this unit such as tuning/
play state and indicators.
•You can operate the display by touching or
touching the surface. (cf. page 9)

280-8337-00
DXZ868RMP 7
English
Operations when External Equipment is Connected to this Unit
● When the CD/DVD changer is
connected
∗ For details, see the section “CD changer
operations” (cf. page 41). For the DVD
changer, refer to the Owner’s Manual
provided with the DVD changer.
● When the TV/DAB is connected
∗ For details, see the section “TV
operations” (cf. page 44) or “Digital
Radio/DAB operations” (cf. page 47).

8 DXZ868RMP
280-8337-00
English
Touch Panel Buttons
● Standard operation display
98.10
FM1
SEEK
PRESET BAND DISPPS
/
AS
P3
P.CH
2:45
CT
Left slide button
•Touch this button for seek up/down or track up/
down operations.
•Touch and hold this button for fast-forward/fast-
rewind operations.
Right slide button
•Touch this button for preset channel up/down,
folder up/down, and disc up/down operations.
Sub buttons
• Shows functions available in a certain context.
● Simple operation display
(To switch to the simple operation display, press
and hold the [MODE] button for 2 seconds or
longer.)
98.10
FM1
2:45
SEEK
PRESET BAND DISPPS
/
AS
P3
P.CH
CT
Left button
•Touch this button for seek down or track down
operations.
•Touch and hold this button for fast-rewind
operation.
Right button
•Touch this button for seek up or track up
operations.
•Touch and hold this button for fast-forward
operation.
Sub buttons
• Shows functions available in a certain context.
Left slide
button
Right slide
button
Sub buttons
Left button Right button
Sub buttons

280-8337-00
DXZ868RMP 9
English
A touch panel display is used as the display on
this unit. You can operate this display just by
touching it with your fingertip. There are four
main display operations as follows:
Touch
Touch the display with your fingertip and take it
away within 1 second. This is the most basic
operation when operating the display.
Touch and hold
Touch the display with your fingertip and hold it
on the display for 1 or 2 seconds or longer. Do
not move your finger while you are touching the
display.
Touch
Touch the display with your fingertip, and move
your finger to the up ( ) or down ( ) with your
fingertip still touching the display, and take your
fingertip away within 1 second. This operation is
used, for example, selecting tracks or discs.
98.10
MANU
Touch Panel Operations
Touch
Touch the display with your fingertip, and move
your finger to the up ( ) or down ( ) with your
fingertip still touching the display, and keep your
fingertip on the display. The current operation
continues for the time your fingertip is held on
the display. This operation is used, for example,
for fast-forwarding/fast-rewinding tracks.
FM1
DISP
P3
P.CH
2:45
CT

10 DXZ868RMP
280-8337-00
English
4. DCP
The control panel can be detached to prevent
theft. When detaching the control panel, store it
in the DCP (DETACHABLE CONTROL PANEL)
case to prevent scratches.
We recommend taking the DCP with you when
leaving the car.
Removing the DCP
1. Turn off the power.
2. Press the [Q] button to open the DCP.
3. Move the DCP detaching slider to the
“RELEASE” side.
4. Push and slide the DCP upward to remove.
∗ The SLOPING CONSOLE without DCP
closes automatically in a few seconds.
CAUTION
• Do not try to remove or attach while
driving.
• The DCP can easily be damaged by shocks.
After removing it, be careful not to drop it
or subject it to strong shocks.
• This DCP is equipped with a highly
advanced device. In order to make the best
performance, it is required to get an
electrical calibration by authorised service
shop. Please consult with your Clarion
dealer or distributor.
Attaching the DCP
1. Place the DCP to the SLOPING CONSOLE,
adjusting the metal connecters on DCP and
the SLOPING CONSOLE.
2. Press the DCP until it clicks into the
SLOPING CONSOLE.
CAUTION
• If the slider is on the [RELEASE] side and
the DCP is not locked into place, it may fall
out from vibration of the car. This can break
the DCP, so after removing it, either firmly
reattach it on the unit or put it in its DCP
case.
• The connector connecting the unit and the
DCP is an extremely important part. Be
careful not to damage it by pressing on it
with fingernails, screwdrivers, etc.
Note:
• If the DCP is dirty, wipe off the dirt with a soft, dry
cloth only.

English
280-8337-00
DXZ868RMP 11
5. REMOTE CONTROL
[
SRC
]
[
BND
]
[
]
[
MUTE
]
[
TA
]
[
PS/AS
]
[
a
], [
d
]
[
DISP
]
[
PTY
]
[
AF
]
[
], [ ]
Remote control unit
Receiver for remote control unit
Operating range : 30° in all directions
Signal transmitter
1. Turn over the remote control unit and slide the
cover in the direction indicated by the arrow in the
illustration.
2. Insert the battery (CR2025) into the insertion
guides, with the printed side (+) facing upwards.
3. Press the battery in the direction indicated by the
arrow so that it slides into the compartment.
4. Replace the cover and slide in until it clicks into
place.
Notes:
Misuse may result in rupture of the battery, producing
leakage of fluid and resulting in personal injury or damage
to surrounding materials. Always follow these safety
precautions:
• Use only the designated battery .
• When replacing the battery, insert properly, with +/-
polarities oriented correctly.
• Do not subject battery to heat, or dispose of in fire or
water. Do not attempt to disassemble the battery.
• Dispose of used batteries properly.
Inserting the Battery
1
Insertion guide
C
R
2
0
2
5
2
3

English
12 DXZ868RMP
280-8337-00
[SRC]
[BND]
[ ] , [ ]
[ ] , [ ]
[ ]
[MUTE]
[TA]
[DISP]
[PS/AS]
[AF]
[PTY]
Functions of the Remote Control Unit Buttons
Mode
Button
Radio (RDS)/DAB
CD/MP3/WMA
CD changer
DVD changer
TV
Switches among radio, DAB tuner, CD/MP3/WMA, CD changer, DVD changer, TV and
AUX.
Switches reception
band.
Returns to the first
track.
Moves the next disc
in increasing order.
Switches reception
band.
Increases and decreases volume (in all modes).
Moves preset
channels up and
down.
No function.
Moves tracks up and down.
When pressed and held for 1 second or longer:
Fast-forward/fast-rewind.
Switches between playback and pause.
Moves preset
channels up and
down.
No function.
No function.
Tu r ns mute on and off.
TA on and off.
Press to cancel a traffic announcement broadcast during a TA interrupt.
Switches between the title display and the spectrum analyzer display.
Preset scan.
When pressed and
held for 2 seconds or
longer:
Auto store.
AF function on and
off.
When pressed and
held for 1 second or
longer: REG function
on and off
PTY mode on and
off.
Scan play.
When pressed and
held for 1 second or
longer:
Folder scan play
(MP3/WMA disc).
Repeat play.
When pressed and
held for 1 second or
longer:
Folder repeat play
(MP3/WMA disc).
Random play.
When pressed and
held for 1 second or
longer:
Folder random play
(MP3/WMA disc).
Scan play.
When pressed and
held for 1 second or
longer:
Disc scan play.
Repeat play.
When pressed and
held for 1 second or
longer:
Disc repeat play.
Random play.
When pressed and
held for 1 second or
longer:
Disc random play.
Preset scan.
When pressed and
held for 2 seconds or
longer:
Auto store.
No function.
Switches between TV
and VTR.
∗ Some of the corresponding buttons on the main unit and remote control unit have different functions.
Press to cancel an emergency broadcast during an ALARM interrupt.
Press to cancel a PTY broadcast during a PTY interrupt.
No function.
No function.

English
280-8337-00
DXZ868RMP 13
6. OPERATIONS
Basic Operations
CAUTION
Be sure to lower the volume before
switching the unit off or the ignition key. The
unit remembers its last volume setting. If you
switch the power OFF with the volume up,
when you switch the power back ON, the
sudden loud volume may hurt your hearing
and damage the unit.
Turning ON/OFF the power
Turning on
Note:
• Be careful when using this unit for a long time
without running the engine. If you drain the car’s
battery too far, you may not be able to start the
engine and this can reduce the service life of the
battery.
1. Press the [ROTARY] knob.
The mode that was previously active is
displayed.
Turning off
1. Press the [ROTARY] knob.
CODEMATIC function
When “CODEMATIC” is set to “ON”, and the
power is turned ON with the DCP attached, the
Touch Code display appears. Touch the display
in the order that was set in the adjust mode.
ADJ SETTING
RTN
CODEMATIC OFF
For details on the CODEMATIC function, see
“Using the security function” (cf. page 40).
Selecting a mode
1. Press the [SRC] button to change the
operation mode.
2. Each time you press the [SRC] button, the
operation mode changes in the following
order:
Radio ➜ (DAB) ➜ CD/MP3 ➜
(CD changer) ➜ (DVD changer) ➜ (TV)
➜ AUX ➜ Radio...
∗ External equipment not connected with
CeNET is not displayed.
Adjusting the volume
1. Turning the [ROTARY] knob clockwise
increases the volume; turning it
counterclockwise decreases the volume.
∗ The volume level is from 0 (minimum) to
33 (maximum).
Switching the operation
display mode
There are 2 basic operation displays: standard
operation display and simple operation display.
1. Press and hold the [MODE] button for 2
seconds or longer to switch the operation
display.
98.10
FM1
2:45
SEEK
PRESET BAND DISPPS
/
AS
P3
P.CH
CT
In the simple operation display, the operations of
touching in the radio or CD mode display
screen are not required.
Descriptions given in this manual are mainly for
the standard operation display. For descriptions
for operations in the simple operation display,
refer to the descriptions for the screen displays
in the radio mode or the CD mode.

English
14 DXZ868RMP
280-8337-00
Switching the background
1. Touch [DISP].
98.10
FM1
SEEK
PRESET BAND DISPPS
/
AS
P3
P.CH
2:45
CT
∗ DISPLAY EDIT screen displays.
2. Touch on the left of the display to
choose the background.
BGV
SP
/
ANA
DISPLAY EDIT
RTN
P
02
<<
TITLE
∗ The background includes 12 wallpaper
images and 2 motion pictures.
∗ Choose [SCAN] to automatically display all
the wallpaper.
● Background
M01: WRC
M02: Landscape
P01: Car and Checker Flag
P02: 307WRC from Two View Points
P03: Rally Driver
P04: Driving Scene
P05: Cube
P06: Bubble
P07: Speaker
P08: Digital Image1 (Disc media)
P09: Digital Image2 (Broadcast media such
as satellite)
P10: Mixer
P11: Record Player
P12: Meter
3. Touch [RTN].
■ To change wallpaper color
You can change the colors of the wallpaper
(from P05 to P12).
• It can be set to both “DAY” mode and “NIGHT”
mode.
1. Touch [DISP].
2. Touch [COLOR].
05
DISPLAY EDIT
D
-
BLUE
AUTO
BGV
<<
TITLE
SP/ANA COLOR
SCROLL
P
RTN
∗ The [COLOR] is displayed only when you
choose wallpaper from P05 to P12.
3. Touch on the left of the display to
select [DAY] or [NIGHT].
COLOR SELECT
NIGHT DARK BLUE
RTN
4. Touch on the right of the display to
select the color to set.
● COLOR
• DARK BLUE
• IVORY
• WINE RED
• LIGHT BLUE
• GREEN
Adjusting the spectrum
analyzer
1. Touch [DISP].
01
Don
t
Stop
Be
,
TRACK
DISPTOP
2:45
01:01
CT
∗ Display edit mode appears.
2. Touch [SP/ANA].
05
DISPLAY EDIT
D
-
BLUE
BGV
<<
TITLE
SP/ANA COLOR
INPUT
P
RTN
∗ The display shows the spectrum analyzer
mode.
3. Touch on the right of the display to
select the spectrum analyzer to set.
DISPLAY EDIT
RTNTITLE COLOR SENS
05
BGV
D-BLUE
P
1
MID
SPE/ANA
•You can choose from four types.
• When [SCAN] is selected, each of them is
displayed for about 10 seconds.
4. Touch [SENS] to select the sensitivity.
DISPLAY EDIT
RTNTITLE COLOR SENS
05
BGV
D-BLUE
P
1
LOW
SPE/ANA
•You can choose from [HIGH], [MID], or [LOW].
5. Touch [RTN].
Basic Operations

English
280-8337-00
DXZ868RMP 15
Basic Operations
Switching the title display
You can display stored information such as disc
titles or track titles when playing back music in
CD or CD changer mode.
1. Touch [DISP] while a title is shown.
DISP
TOP
01
TRACK
02:53
2:45
CT
∗ Display edit mode appears.
2. Touch [TITLE].
DISPLAY EDIT
RTNTITLE COLOR SENS
05
BGV
D-BLUE
P
1
LOW
SPE/ANA
∗ Title edit mode appears.
3. Touch on the right of the display to
choose the kind of title to show.
05
DISPLAY EDIT
D
-
BLUE
BGV
<<
TITLE
SP/ANA COLOR
P
RTN
AUTO
SCROLL
TRACK
∗ The title you have chosen is displayed. If it
is too long to fit into the display, it
automatically scrolls.
4. Touch [SCROLL].
• Select [AUTO] to scroll the title repeatedly.
• Select [ONCE] to scroll the title only once.
Notes:
•You cannot set the scroll options in User title.
5. Touch [RTN].
●CD mode (MP3/WMA)
Folder title (when using a folder) ➜ Play
list (when using a play list) ➜ Track title
➜ Album TAG ➜ Artist TAG ➜ Title TAG ➜
Folder title (when using a folder)...
Notes:
• MP3 supports ID3 Tags V2.3 / 2.2 / 1.1 / 1.0.
•Tag displays give priority to V2.3 / 2.2.
• In the case of album Tags for WMA, the
information written into the extension header is
displayed.
• Only ASCII characters can be displayed in Tags.
CT (Clock Time) function
The CT allows you to receive CT data sent from
an RDS station and display the time. To display
the CT screen, touch the centre of the display.
• If CT data is not being received, “--:-- CT”
appears in the display.
Note:
•CT data is not transmitted in some countries and
by some broadcast stations. Also, in some areas,
the CT data may not display accurately.

English
16 DXZ868RMP
280-8337-00
Radio Operations
Screen displays in the radio
mode
● Standard operation display
The standard operation display appears by
pressing the [SRC] button and selecting the
radio mode.
98.10
FM1
SEEK
PRESET BAND DISPPS
/
AS
P3
P.CH
2:45
CT
● Simple operation display
Pressing and holding the [MODE] button for 2
seconds or longer switches the simple operation
display.
98.10
FM1
2:45
SEEK
PRESET BAND DISPPS
/
AS
P3
P.CH
CT
Frequency display
The frequency currently being received is
displayed.
Touching or on the left slide
button in the standard operation display allows
you to perform seek tuning or manual tuning.
Preset No. display
Touching on the right slide button in the
standard operation display selects a preset
memory.
Title display
Displays the name of the broadcast channel
currently being received.
Reception band display
AM: AM band name
FM1: FM band name
PRESET
Touching this displays a preset memory No. list.
BAND
Touching this switches the reception band.
Touching and holding this for 1 second or longer
switches between the manual tuning mode and
the seek tuning mode.
PS/AS
Touching this starts a preset scan.
Touching and holding this for 2 seconds or
longer starts an auto store.
Touching this during the preset scan/auto scan
ends the operation.
DISP
The display contents can be changed.
a/d (only in the simple operation display)
Touching these enables seek tuning or step
tuning (in the manual tuning mode).
Touching and holding these enables quick
tuning (in the manual tuning mode).
Listening to the radio
1. Press the [SRC] button to select the radio
mode.
Each press of the [SRC] button switches the
mode as follows:
Radio ➜ (DAB) ➜ CD/MP3 ➜
(CD Changer) ➜ (DVD Changer) ➜ (TV)
➜ AUX ➜ Radio...
∗ The mode of equipment that is not
connected is not displayed.
2. Touch [BAND] to switch the reception band.
Each touch of [BAND] switches the
reception band as follows:
FM1 ➜ FM2 ➜ FM3 ➜ AM (MW/LW) ➜
FM1...
Tuning
There are 3 types of tuning mode available,
seek tuning, manual tuning and preset tuning.
Seek tuning
There are 2 types of seek tuning: DX SEEK and
LOCAL SEEK.
DX SEEK can automatically tune in to
receivable broadcast stations, while LOCAL
SEEK can tune in to only broadcast stations
with good reception sensitivity.
Preset No.
display
Title display
Frequency
display
Reception
band display
SEEK/MANU
display
PRESET
BAND
PS/AS
DISP
a/d

English
280-8337-00
DXZ868RMP 17
1. Touch [BAND] to select the desired band
(FM or AM (MW, LW)).
2. Tune into a station.
∗ If "MANU" is displayed, touch and hold
[BAND] for 1 second or longer.
Automatic tuning is possible when "SEEK"
is displayed.
∗ If “TA” is lit in the display, TP stations are
automatically sought.
DX SEEK
When is touched on the frequency
display, automatic tuning starts.
When is touched, the station is sought in
the direction of higher frequencies; when is
touched, the station is sought in the direction of
lower frequencies.
∗ When seek tuning starts, “DX SEEK” appears
in the display.
LOCAL SEEK
When is touched on the frequency
display, local seek tuning is carried out.
Broadcast stations with good reception
sensitivity are selected.
∗ When local seek starts, “LO SEEK” appears
in the display.
Manual tuning
There are 2 ways available: quick tuning and
step tuning.
In the step tuning mode, the frequency changes
1 step at a time. In the quick tuning mode, you
can quickly tune the desired frequency.
1. Touch and hold [BAND] for 1 second or
longer if “SEEK” is displayed.
Manual tuning is possible when “MANU” is
displayed.
2. Operate the frequency display to tune to a
frequency on which there is a broadcast.
● Step tuning
Touch on the frequency display.
● Quick tuning
Touch on the frequency display. Tuning
stops when you take your finger away from the
panel.
Recalling a preset station
Recalling a preset station is a function for tuning
pre-stored stations.
Radio Operations
1. Touch [PRESET].
The preset memory No. list is displayed.
2. Touch the preset memory No.
∗ In the standard operation display, preset
No. can also be tuned by touching .
■ To cancel tuning
1. Touch [RTN].
Preset memory
A total of 24 preset positions (6-FM1, 6-FM2, 6-
FM3, 6-AM) exists to store individual radio
stations in memory.
1. Touch [BAND] to switch the reception band.
2. Operate the frequency display to tune to a
frequency to store.
3. Touch [PRESET].
The preset memory No. list is displayed.
4. Touch and hold the preset No. to store the
station to for 2 seconds or longer.
You will hear a long beep, and the station is
stored in memory.
Auto store
Auto store is a function for storing up to 6
stations that are automatically tuned in
sequentially.
1. Touch and hold [PS/AS] for 2 seconds or
longer.
“A-STORE” is displayed.
∗ Stations with good reception are
automatically searched, and are stored to
preset memory (No.1 to No.6) in order
from the station having the lowest
frequency.
Notes:
• When auto store is performed, stations stored to
memory so far are cleared.
• When there are fewer than 6 stations with good
reception in LOCAL SEEK, low frequencies are
automatically returned to, and auto store is
performed again by DX SEEK. If there are fewer
than 6 stations even after auto store is performed
twice, stations stored so far remain in memory.
• If auto store is performed in the FM bands, the
stations are stored in FM3 even if FM1 or FM2
was chosen for storing stations.

English
18 DXZ868RMP
280-8337-00
Preset scan
Preset scan is a function for receiving stations in
the order that they are currently stored to preset
No. so that broadcasts can be checked.
1. Touch [PS/AS].
“P-SCAN” is displayed.
∗ The currently stored stations are received
in order for 7 seconds or longer each.
Stations with poor reception are skipped,
and the next station is received.
■ To cancel preset scan
1. Touch [PS/AS].
“P-SCAN” display disappears and the
stations that were being received when [PS/
AS] was touched are received next.
Radio Operations

English
280-8337-00
DXZ868RMP 19
RDS (Radio Data System)
This unit has a built-in RDS decoder system that
supports broadcast stations transmitting RDS
data.
This system can display the name of the
broadcast station being received (PS), and can
automatically switch to the broadcast station
with the best reception as you move over long
distances (AF switching).
If a traffic announcement or programme type is
broadcasted from an RDS station, this
broadcast is received no matter what mode you
are in.
Also, if EON information is received, this
information enables automatic switching of other
preset stations on the same network and
interruption of the station being received with
traffic information from other stations (TP). This
function is not available in some areas.
When using the RDS function, always set the
radio to the FM mode.
• AF : Alternative Frequency
• PS : Programme Service Name
• PTY : Programme Type
• EON : Enhanced Other Network
• TP : Traffic Programme
• PI : Programme Identification
•TA :Traffic Announcement
∗ RDS interrupt does not function during AM
radio reception.
∗ When this unit receives the RDS signal,
and can read PS data, PS appears in the
display.
AF function
The AF function switches to a different
frequency on the same network in order to
maintain optimum reception.
• The factory default setting is “ON”.
• When the AF function is ON, “AF” blinks in the
display.
■ To switch the AF function ON/OFF
1. Press the [MODE] button.
2. Touch [AF].
“AF” goes off in the display.
To switch the AF function ON, repeat steps 1
and 2.
∗ If the reception of the current broadcast
station deteriorates, “SEARCH” appears in
the display, and the radio searches for the
same programme on another frequency.
■ AF function between RDS and DAB
When the same programme is broadcasted by
both RDS and DAB, and this function is ON, this
unit automatically switches to receive the
broadcast with the better reception.
• This function only operates when the DAH923
or DAH913 DAB unit (Optional) is connected.
• This factory default setting is “ON”.
1. Press the [ADJ] button to set to the adjust
mode.
2. Touch [TUNER].
3. Touch on the left of the display to
select “LINK ACT”.
RTN
LINK ACT
ON
ADJ
TUNER
4. Touch on the right of the display to
select "ON" or “OFF”.
ON:
AF switching between DAB and RDS is
enabled.
OFF:
AF switching between DAB and RDS is
disabled.
5. Press the [ADJ] button to return to the
original mode.
RDS Operations

English
20 DXZ868RMP
280-8337-00
REG (Regional programme)
function
When the REG function is ON, the optimum
regional station can be received. When this
function is OFF, the optimum station for that
region is received if the regional station area
switches as you drive.
• The factory default setting is “OFF”.
Notes:
• This function is disabled when a national station
such as BBC R2 is being received.
• The REG function ON/OFF setting is valid when
the AF function is ON.
■ To switch the REG function ON/OFF
1. Press the [MODE] button.
2. Touch [REG].
“REG” lights in the display.
To switch the REG function OFF, repeat
steps 1 and 2.
Manually tuning a regional
station in the same network
• This function is valid when the AF function is
ON.
• The operation differs according to the ON/
OFF setting of the REG function. When the
REG function is ON, broadcasts having a
perfectly matching PI code can be received.
When the REG function is OFF, broadcasts of
the same type of PI code can be received.
Notes:
• This function can be used when a regional
broadcast of the same network is received.
• The PI code is a coding system that is unique to
each broadcast station.
1. Touch [PRESET].
The preset memory No. list is displayed.
2. Touch the preset memory No. of the
broadcast to be received.
TA (Traffic Announcement)
When a traffic announcement broadcast starts
in the TA standby mode, the traffic
announcement broadcast is received as top
priority regardless of the function mode so you
can listen to it. Traffic programme (TP) automatic
tuning is also possible.
• This function can only be used when “TP” is lit
in the display. When “TP” is lit, this means that
the RDS broadcast station being received has
traffic announcement programmes.
■ To set the TA standby mode
If you press the [TA] button when only “TP” is lit
in the display, “TP” and “TA” light in the display,
and this unit is set to the TA standby mode until
a traffic announcement is broadcast. When a
traffic announcement broadcast starts, “TRA
INFO” appears in the display. If you press the
[TA] button while a traffic announcement
broadcast is being received, the traffic
announcement broadcast reception is cancelled
and this unit enters the TA standby mode.
■ To cancel the TA standby mode
With “TP” and “TA” lit in the display, press the
[TA] button. “TA” in the display goes off and the
TA standby mode is cancelled.
• If “TP” is not lit, pressing the [TA] button
searches for a TP station.
■ To search for a TP station
If you press the [TA] button when “TP” is not lit,
“TA” in the display lights and this unit
automatically receives a TP station.
Note:
• When a TP station cannot be received, “TP
SEEK” is displayed, and the search for the TP
station is continued. When the [TA] button is
pressed again, “TA” and “TP SEEK” in the display
go off, and the search for the TP station ends.
RDS Operations
Page is loading ...
Page is loading ...
Page is loading ...
Page is loading ...
Page is loading ...
Page is loading ...
Page is loading ...
Page is loading ...
Page is loading ...
Page is loading ...
Page is loading ...
Page is loading ...
Page is loading ...
Page is loading ...
Page is loading ...
Page is loading ...
Page is loading ...
Page is loading ...
Page is loading ...
Page is loading ...
Page is loading ...
Page is loading ...
Page is loading ...
Page is loading ...
Page is loading ...
Page is loading ...
Page is loading ...
Page is loading ...
Page is loading ...
Page is loading ...
Page is loading ...
Page is loading ...
Page is loading ...
Page is loading ...
Page is loading ...
Page is loading ...
/