BETCO FiberCAP 20 Operating instructions
- Category
- Floor Machine
- Type
- Operating instructions

1
1001 Brown Avenue • Toledo, Ohio 43607-0127
Customer Service: 888-GO-BETCO • Fax: 800-445-5056 • Technical Service: 877-856-5954 • www.betco.com
Operator Manual
E29975-00
FiberCAP
™
20
20” Carpet
Cleaning Machine

2
TABLE OF CONTENTS
RECEIVING THE MACHINE............................................. 3
TECHNICAL SPECIFICATIONS ........................................ 3
GENERAL SAFETY REGULATIONS ................................. 4
MACHINE PREPARATION ............................................... 5
OPERATION ..............................................................6 - 7
USE OF MAINTENANCE TIPS ......................................... 8
PARTS DIAGRAMS AND LISTINGS .........................9 - 11
WARRANTY ................................................................. 12

3
Immediately check, when receiving the machine, that all the materials indicated on delivery documents have been received and
also that the machine has not been damaged in transit. If it has been damaged, this damage must be immediately reported to
the shipper and also to our customer service department. Only acting promptly in this manner will make it possible to receive
missing material and to be compensated for damage.
INTRODUCTION
This is a carpet cleaning machine which, via the mechanical action
of the rotating brush can clean many types of carpeted flooring.
The machine must be used only for this purpose.
Even the best machines will only work well if used correctly and
kept in good working order. We therefore suggest you read this
instruction booklet carefully and re-read it whenever difficulties
arise while using the machine. Please contact our technical service
department or your dealer if you have any questions about
the machine.
RECEIVING THE MACHINE
Working Width Inches 20
Work Capacity Sq. Ft. / Hour 10,000
Brush Speed RPM 380
Brush Pressure Lbs. 40
Weight of Machine Lbs. 47
Power Supply V / Hz 110 / 120 and 50 / 60
Machine Dimensions (Length/Width/Height) Inches 21.25 / 9.25 / 42.5
TECHNICAL DESCRIPTION Measurement Unit FiberCap
™
20
Specifications

4
The regulations below must be carefully followed in order to avoid harm to the operator and damage to the machine.
• Read all labels on the machine carefully. Do not cover them for any reason and replace them immediately if they become
damaged.
• The machine must be used exclusively by authorized and trained personnel.
• When operating the machine be careful of other people.
• The power cable outlet must be provided with a proper ground.
• Avoid damaging the power cable by crushing, bending, cutting or stressing it.
• Whenever the power cable is damaged, immediately contact a BETCO service center.
• Do not set containers on the machine.
• Machine storage temperature is between -10°F and 130°F, never store outside under humid conditions.
• Operating conditions: room temperature between 33°F and 100°F with relative humidity between 30% to 95%.
• Only use the machine in closed areas and do not expose it directly to rain.
• Never use the machine in an explosive environment.
• Do not use the machine as a means of transport.
• Never use acidic chemicals which could damage the machine.
• Avoid running the brushes with the machine stopped; this could damage the floor.
• Never vacuum up flammable liquids.
• Never use the machine to gather dangerous powders.
• Use a powder fire extinguisher in case of fire. Do not use water.
• Do not hit against shelving or scaffolding. The operator must always be equipped with the appropriate safety device
(gloves, shoes, helmet, glasses, etc.)
• If the machine does not work properly, perform routine maintenance. Otherwise, request the assistance of the BETCO
technical service.
• When replacing parts ask for ORIGINAL spare parts from your Authorized BETCO Dealer and/or Retailer.
• Always turn off the machine and disconnect the power supply whenever maintenance is performed.
• Never use the machine without side guards or dust collection bins secured to the machine.
• Never wash the machine with direct or pressurized jets of water or with corrosive substances.
• Have your BETCO service center check the machine once a year.
• Before using the machine make sure that all doors and covers are positioned as shown in this operating and maintenance
manual.
• When your BETCO machine is ready to be retired, the machine must be disposed of properly. It contain oils and electronic
components. The machine was built using totally recyclable materials.
• Use only brushes furnished with the machine or those specified in the user's manual. Use of other brushes can
compromise safety.
GENERAL SAFETY REGULATIONS

5
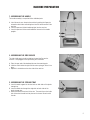
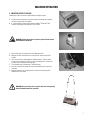
1. ASSEMBLING THE HANDLE
The handle assembly is comprised of four individual parts.
A. Install the main cross bar onto the machine by pulling the finger pins
outward on both sides and locking them into the handle mounts of the
machine.
B. Insert the open end of both handle uprights into the cross bar.
C. Insert the open end of the round handle bar into each of the handle
uprights.
2. ASSEMBLING THE SIDE SHIELDS
The side shields must also be installed on the machine. Be sure the
machine is not plugged in when performing this installation.
A. Place the open end of the teardrop hole over the mounting pins.
B. Slide the side shield to the right until the center spring pin locks it into
place.
C. Repeat this installation on the other side of the machine.
3. ASSEMBLING THE STORAGE TRAY
A. Insert the metal support into the two holes on both sides of the plastic
storage tray.
B. Insert the metal axle through the single hole on both sides of the
plastic storage tray.
C. Attach the wheels to each end of the axle. The metal clip on the inside
hub of the wheel should lock into place on the channel at each end of
the axle.
MACHINE PREPARATION
A
B
C
A
B
C

6
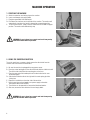
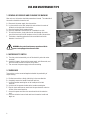
1. STARTING THE MACHINE
A. Attach the extension cord to the plug on the machine.
B. Insert cord through strain relief holder.
C. Plug into a grounded 110V/120V outlet.
D. Push down the start lever on the left side of the machine. The machine will
automatically start when the handle is lowered to an operating position.
E. To turn off the machine, simply raise the handle back to a locked an upright
position. The machine will automatically stop.
2. USING THE SWEEPING FUNCTION
To use the machine as a sweeper, simply remove the side shields from the
machine and install the dust collection bins.
A. Be sure the machine is unplugged from any power source.
B. Press the center locking pin on the side shield and slide the shield to the left.
Then lift the side shield from the mounting pins on the base.
C. Place the open end of the teardrop hole on the dust collection bin over
the mounting pins.
D. Slide the dust collection bin to the right until the center spring pin locks
it into place.
E. Repeat this installation on the other side of the machine.
F. Now the machine can be plugged in to a power supply and used to
sweep loose debris from the floor.
G. The machine can be operated in a forward and backward motion.
H. After use, remove the dust collection bins and empty debris.
WARNING: Be sure to keep loose carpets and cords from passing
under the machine while in operation.
MACHINE OPERATION
WARNING: Be sure to keep loose carpets and cords from passing
under the machine while in operation.

7
3. ENCAPSULATION CLEANING
Follow these steps for interim encapsulation cleaning of carpet:
A. Install the dust collection bins on the machine and sweep the carpet to
remove any large and loose debris.
B. In a spray bottle or pump sprayer dilute the Betco
®
FiberCap™ MP
solution according to the directions on the bottle.
C. Spray a light mist of solution onto the carpeted surface.
D. Remove the dust collection bins on the machine and install the side
shields.
E. Turn on the machine and agitate the carpeted surface. Work in both
a north-south direction as well as an east-west direction to ensure that
all sides of the carpet fibers are agitated.
F. The carpeted surface should dry in 20-30 minutes.
G. Once dry, vacuum the carpet at the next scheduled service interval for
that area.
H. Repeat the process on a regular basis to maintain the best possible
appearance of the carpet.
MACHINE OPERATION
WARNING: Always wear gloves to protect yourself from contact
with hazardous chemicals.
WARNING: Be sure to keep loose carpets and cords from passing
under the machine while in operation.

8
USE AND MAINTENANCE TIPS
1. REMOVAL OF BRUSHES AND CLEANING THE MACHINE
After each use, the brushes should be removed and cleaned. The underside of
the machine should be cleaned as well.
A. Disconnect the power supply from the machine.
B. Lay the machine on the floor and pull the axle out from the center of
the brush on the right side of the machine.
C. Clean the brushes with jet-powered water.
D. Clean the underside of the machine wih a hand brush or cloth.
E. To install the brushes, simply slide the axle back through the center
core of the brush until it locks into place on the left side of the machine.
F. The brushes should be replaced once the overall bristle-to-bristle
diameter is less than 2.75”.
2. MOTOR SAFETY SWITCH
A. The safety switch automatically cuts off the electricity when the motor
overloads.
B. Should this happen, disconnect the power supply, wait 30 seconds, and
press the button inwards to reset the safety switch.
C. Then reconnect the power supply and continue working.
3. TANDEM USE
Two machines can be connected together to double the productivity of
carpet cleaning.
A. Position two machines side-by-side facing in the same direction.
B. Completely remove the handles from both machines.
C. Install the tandem mounting bar on the handle posts for both
machines.
D. Install one of the operator handles to the tandem mounting bar.
E. Plug the short cord from one machine to the open electrical socket on
the rear of the second machine.
F. Connect the power cord from the second machine to the extension
cord.
G. Press the activation lever on both machines to lower the handle and
begin use.
WARNING: Carry out all maintenance operations with the
power cord unplugged from the wall outlet.

9
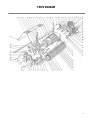
PARTS DIAGRAM
Spare parts TM4
Spare parts TM4

10
PARTS LISTING
10
PARTS LISTING
Item # Part # Description
1 E84600 Snapring
2 E84607 Bearing
3 E84601 Motor Spacer
4 E84602 Roll Pin
5 E84603 Motor Fan
6 E84608 Motor, 1.0 HP
7 E84604 Motor Spacer
9 E84610 Spring
10 E84605 Worm Screw, M3 x 35
11 E84686 Nut, M3
12 E84687 Split Washer, M3
13 E84685 Rectifier
14 E84611 Switch Lever
15 E84606 Worm Screw, M5 x 25
16 E82317 Nut, M5
17 E83879 Washer, M5
18 E84612 Socket Screw, M5 x 12
19 E84622 Bearing
20 E84623 Flange
22 E84613 Retaining Ring
23 E84614 Protective Plate
24 E84615 Motor Stud
25 E84616 Brush Shield
26 E84617 Brush Axle
27 E84618 Handle Connector, Right
28 E84619 Protective Plate
29 E84620 Handle Connector, Left
30 E84621 Screw, M6 x 16
31 E84624 Gear, 48 Right
32 E84625 Gear, 48 Left
33 E84626 Gear Cover
34 E84627 Lock Washer, M5
35 E84631 Gear, 66 Right
37 E84628 Motor Cover
38A E84634 Brush, General Purpose 20" Cylindrical (Carpet)
38B E84633 Brush, Medium Duty 20" Cylindrical (Hard Surface)
39 E84632 Circuit Breaker
40 E84635 Gear, 66 Left
41 E84636 Gear, 73 Right
45 E84629 Grommet
46 E84683 Extension Cord
47 E84637 Bearing Stud
49 E84630 Screw
50 E84638 Run Capacitor, 22 MFD
51 E84639 Start Capacitor, 145 MFD
52 E84640 Screw, Socket Head M5 x 12
53 E84641 Screw, M5 x 45
54 E84642 Clamp Strip
56 E84644 Cable Clamp
57 E84645 Screw, M3 x 16
58 E84646 Wire Fixing Plate
60 E84647 Wire Terminal
61 E84648 V-Ring
62 E84649 Worm Screw
63 E84688 Nut, M4
64 E84650 Lock Washer, M4
68 E84652 Handle Stop
69 E84653 Spring, Handle Stop
70 E84651 Plastic Strip
71 E84654 Snapring
74 E84655 Handle Connector
75 E84656 Flat Bar
77 E84657 Screw, M3 x 5
78 E84658 Locking Pin
96 E84663 Screw, M6 x 30
113 E84664 Screw, M6 x 16
116 E84665 Lock Washer
117 E84666 Screw, M5 x 12
120 E84668 Screw, M6 x 16
121 E84669 Screw, M5 x 12
126 E84677 Cord Wrap Hook
151 E84673 Bolt For Dust Bin
162 E84676 Wiring Cover
165 E84680 Wiring Cover
166 E84681 Rubber Bumper
167 E84682 Wiring Cover

11
11
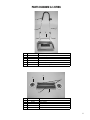
PARTS DIAGRAM & LISTING
Item # Part # Description
1 E84659 Handle Bar, Upper Section
2 E84660 Handle Base Cross Bar
3 E84661 Handle T-Mount, Left
4 E84670 Handle Tube, Lower Left
5 E84671 Handle Tube, Lower Right
6 E84672 Handle T-Mount, Right
1
2
3
4
5
6
Item # Part # Description
1 E84643 Trolley Spring Tab
2 E84674 Trolley Support
3 E84678 Trolley Wheel
4 E84675 Trolley Axle
5 E84679 Trolley Velcro Belt
1
2
3
4
5
PARTS DIAGRAM & LISTING
1
2
3
4
5
6
1
2
3
4
5
11
PARTS DIAGRAM & LISTING
Item # Part # Description
1 E84659 Handle Bar, Upper Section
2 E84660 Handle Base Cross Bar
3 E84661 Handle T-Mount, Left
4 E84670 Handle Tube, Lower Left
5 E84671 Handle Tube, Lower Right
6 E84672 Handle T-Mount, Right
1
2
3
4
5
6
Item # Part # Description
1 E84643 Trolley Spring Tab
2 E84674 Trolley Support
3 E84678 Trolley Wheel
4 E84675 Trolley Axle
5 E84679 Trolley Velcro Belt
1
2
3
4
5

12
92260-92 Sept15B
1001 Brown Avenue • Toledo, Ohio 43607-0127
Customer Service: 888-GO-BETCO • Fax: 800-445-5056 • Technical Service: 877-856-5954 • www.betco.com
10 year coverage
Subject to the conditions stated below,
Betco warrants parts and labor on
rotationally molded polyethylene tanks/
housings and injection molded vacuum
head assemblies to be free from defects
in materials and workmanship for
a period of ten years to the original
purchaser.
3 Year Coverage
Subject to the conditions stated below,
Betco warrants parts and labor on all
other Betco components to be free from
defects in materials and workmanship
for a period of three years to the origi-
nal purchaser.
1 Year Coverage
Subject to the conditions stated below,
Betco offers a limited warranty on parts
and labor on the following equipment:
parts and accessories to be free from
defects in materials and workmanship
for a period of one year to the original
purchaser.
• PowerUp
™
14 Upright Vacuum:
#E29990-00
• Bac Pac Lite Vacuum: #85903-00
• FiberPRO
®
Floor Dryer: #85507-00
• WORKMAN
™
Series Vacuums:
#85024-00, #85025-00, #83012-00,
#85027-00
• All Tools and Accessories
• All Battery Chargers
• All Batteries are pro-rated for 1 year
Allowable Travel Time Warranty Reimbursement:
Eligible equipment: All battery and propane powered equipment products. Warranty period: 90 days from date of sale to the
original purchaser. A maximum 180 mile round trip at 50 cents per mile will be allowed for warranty consideration.
Propane Machine Warranty:
Kawasaki engines are warranted by Kawasaki for a period of 2 years against manufacturer defects. All other components
(except wear items)* are warranted by Betco for a period of 3 years.
*Wear Items exempt from Warranty consideration include but may not be limited to: power cords, transport wheels,
vacuum bags, belts, squeegee blades, pad drivers, clutch plates, handle grips, filters, screens, throttle cables, brushes
and carbon brushes.
Subject to the conditions and exceptions stated in this warranty, Betco warrants the Betco products to be free from defects in
material and workmanship, under normal use and service, for the periods listed under the warranty policy to the original pur-
chaser. At any time during the warranty period, Betco will furnish replacement parts for the Betco parts to the original purchas-
er. Such parts will be furnished and charged including transportation costs, to the original owner through any Betco authorized
Service Distributor. If the original part is returned within the warranty policy period from date of delivery for inspection by
Betco and is found to be defective the owner will be credited for the cost of replacement parts plus shipping and handling.
Replacement parts that have become defective through wear or abuse are not included in this warranty.
This warranty does not apply to damage or defect caused by accident, misuse. Negligence, fire, or to any Betco product which
has been serviced or repaired by other than an authorized Betco Service Distributor or Betco factory personnel. This warranty
is void if products are used for any purpose other than that which was intended. There are no other warranties expressed or
implied. In no event shall Betco be liable for incidental or consequential damages or any damage to person or property. (Please
note some states do not allow the exclusion or limitations for incidental and consequential damages).
BETCO US WARRANTY POLICY
-
 1
1
-
 2
2
-
 3
3
-
 4
4
-
 5
5
-
 6
6
-
 7
7
-
 8
8
-
 9
9
-
 10
10
-
 11
11
-
 12
12


BETCO FiberCAP 20 Operating instructions
- Category
- Floor Machine
- Type
- Operating instructions
Ask a question and I''ll find the answer in the document
Finding information in a document is now easier with AI
Related papers
-
BETCO DM1400T DM1800T 03-2009 Owner's manual
-
-
-
-
-
-
-
-
BETCO E87032-00 StealthDRS24BT Owner's manual
-

