PYLE Audio PT-680A User manual
- Category
- Cassette players
- Type
- User manual
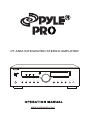
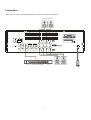
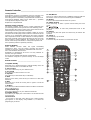
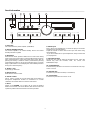
PYLE Audio PT-680A is a versatile and feature-rich integrated stereo amplifier and AV receiver, tailored to enhance your home audio experience. With its comprehensive connectivity options, you can effortlessly connect various audio sources, including turntables, CD players, DVD players, and tape decks. The unit boasts dedicated terminals for graphic equalizers and sound processors, enabling you to customize the sound output to suit your preferences.
The PT-680A offers a range of sound modes, including flat, pop, classic, and rock, allowing you to tailor the audio to match different genres of music. Additionally, it features a surround sound mode, which creates an immersive and cinematic audio experience when paired with compatible speakers.


-
 1
1
-
 2
2
-
 3
3
-
 4
4
-
 5
5
-
 6
6
-
 7
7


PYLE Audio PT-680A User manual
- Category
- Cassette players
- Type
- User manual
PYLE Audio PT-680A is a versatile and feature-rich integrated stereo amplifier and AV receiver, tailored to enhance your home audio experience. With its comprehensive connectivity options, you can effortlessly connect various audio sources, including turntables, CD players, DVD players, and tape decks. The unit boasts dedicated terminals for graphic equalizers and sound processors, enabling you to customize the sound output to suit your preferences.
The PT-680A offers a range of sound modes, including flat, pop, classic, and rock, allowing you to tailor the audio to match different genres of music. Additionally, it features a surround sound mode, which creates an immersive and cinematic audio experience when paired with compatible speakers.
Ask a question and I''ll find the answer in the document
Finding information in a document is now easier with AI