Grundig MPixx 1400 User manual
- Category
- MP3/MP4 players
- Type
- User manual

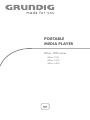
PORTABLE
MEDIA PLAYER
MPixx 1000 series
MPixx 1100
MPixx 1200
MPixx 1400

2
CONTENTS
------------------------------------------------------------------------------------------------------------------------------------------------
4 MPIXX 1000 SERIES
Supplied accessories
Special features
Safety
Environmental note
5 OVERVIEW
Controls
Displays in music playback mode
Main menu pages
9 CONNECTION AND PREPARATION
Power supply
Connecting to a computer
Disconnecting from the computer
Connecting earphones
Inserting the memory card
12 GENERAL FUNCTIONS
Switching on and off
Selecting the menu language
Adjusting the volume
Selecting the operating modes
Menu navigation
Activating and deactivating the key lock
Resetting the player
14 MUSIC PLAYBACK
Basic music playback functions
Functions in the music menu
17 RADIO MODE
Basic radio mode functions
Tuning to radio stations
19 AUDIO PLAYBACK
Playback of audio recordings
Functions in the audio recording menu
20 PICTURE PLAYBACK
Picture playback
Functions in the picture menu
21 VIDEO PLAYBACK
Basic video playback functions
22 TEXT PLAYBACK
Text playback
23 RECORDING
Recording settings
Voice recording
Recording from FM radio
25 DELETING FILES
Opening the internal memory

ENGLISH
3
CONTENTS
------------------------------------------------------------------------------------------------------------------------------------------------
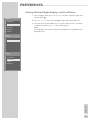
26 PREFERENCES
Selecting the »Setting« menu
Setting the player switch-off time (sleep timer)
Setting the backlight display switch-off time
System tools and settings
Switching between internal and external memory
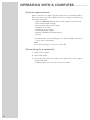
30 OPERATING WITH A COMPUTER
System requirements
Connecting to a computer
MP3/WMA data transfers
Synchronising music and text files
Converting video files to MTV format
Text data transfer
Disconnecting from the computer
34 INFORMATION
Technical data

4
MPIXX 1000 SERIES
----------------------------------------------------------------------------------------------------------------
Supplied accessories
1 Installation CD with operating manual
2 Stereo earphones
3 USB cable
4 Brief instructions
Note:
The accessory components supplied can change.
Special features
MP3/WMA/AD PCM player, player for picture and video files, voice and text
files, recording device, FM radio and USB removable disc in one.
Safety
This device is intended for the reproduction of music, picture, voice and text files
and serves as a removable disc. Any other use is expressly prohibited.
Do not drop the device. Do not press on the TFT display.
Do not place the device near magnetic objects.
Make sure that the equipment is protected from moisture (dripping or splashing
water), sunlight and heat.
Do not expose the batteries to extreme heat, caused for example by direct
sunlight, heaters or fire.
Never open the device casing. No warranty claims are accepted for damage
caused by improper handling.
Note:
Do not use the player if you are a motorist, cyclist or pedestrian etc. in traffic.
This impairs road safety.
Environmental note
This product has been made from high-quality parts and materials which can be
re-used and recycled.
Therefore, do not dispose of the product along with normal household waste at
the end of its service life. Take it to a collection point for the recycling of electri-
cal and electronic equipment. The symbol on the product, in the operating man-
ual or on the packaging indicates that recycling is possible.
Please find out about collection points operated by your local authority.
Help protect the environment by recycling used products.

ENGLISH
5
OVERVIEW
----------------------------------------------------------------------------------------------------------------------------------------------------------------
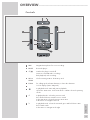
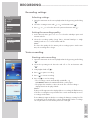
Controls
MIC Integrated microphone for voice recordings.
RESET Resets the player.
8/7 Switches the player on and off.
Starts voice and FM radio recordings.
Ends playback, ends recording.
Micro Slot for inserting a Micro SD memory card.
SDHC
FUNC
For calling up the relevant submenus; to leave the submenus.
1.8” LC display (128 x 160 pixels).
In playback mode: starts and pauses playback.
Opens the main menu. In the main menu: confirms selected operating
modes.
In playback mode: selects the previous track.
Press and hold down: starts the reverse search.
In the main menu: selects the previous menu item.
In the menus: to navigate to the left.
In playback mode: selects the next track; press and hold down: starts
the forward search.
In the menus: to navigate to the right.
V
9
Λ
8
7
6
5
4
3
2
1
5
3
8
6
9
7
4
1 2

6
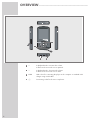
OVERVIEW
----------------------------------------------------------------------------------------------------------------------------------------------------------------
+ In playback mode: increases the volume.
In menu mode: moves the cursor upwards.
– In playback mode: decreases the volume.
In menu mode: moves the cursor down.
USB USB socket for connecting the player to the computer or standard USB
charger using a USB cable.
0 Connecting socket for the stereo earphones.
13
12
11
10
11
10
12
13

ENGLISH
7
OVERVIEW
----------------------------------------------------------------------------------------------------------------------------------------------------------------
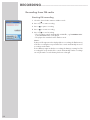
Displays in music playback mode
Playback mode (Normal, Repeat One, Repeat All, Random All, Folder
Normal, Folder Repeat or Folder Random).
Volume display.
Track name, ID3 tag information, song lyrics.
Level display.
Bit rate.
Sampling frequency.
Elapsed playing time of the track.
Button lock on.
Battery status display (» «: the battery is low).
File format.
Current sound setting, e.g. classical.
Current track number, total number of tracks.
Current operating mode, i.e. music.
Operating status (playback
e, pause II, standby
7
or recording
•
).
Overall playing time of track.
Ä
15
14
13
12
11
10
9
8
7
6
5
4
3
2
1
1
2
3
4
5
6
7
8
9
10
11
12
13
14
15

8
OVERVIEW
----------------------------------------------------------------------------------------------------------------------------------------------------------------
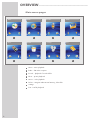
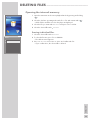
Main menu pages
Music – music playback.
Radio – FM radio reception.
Record – playback of recorded files.
Photo – picture playback.
Movie – video playback.
Delete – navigate within internal memory, delete files.
Settings.
Text – text file playback.
8
7
6
5
4
3
2
1
1
2 3 4
5
6 7 8
Music Radio Record
Photo
Movie
Delete
Settings
Text

ENGLISH
9
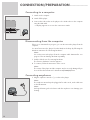
CONNECTION/PREPARATION
----------------------------------------------------------
Power supply
The player operates with the integrated lithium-polymer battery 1 x 3.7 V,
310 mA .
Battery connector
A battery connector is plugged into the earphone jack »
0
« of the player when
supplied. This separates the battery from the circuit and prevents the battery from
deep discharge.
1 Before charging, unplug the battery connector and store it in a safe place.
Note:
The pins on the connector are very sharp. There is a risk of injury. Keep the
connector out of the reach of children.
2 If you do not intend to use the player for some time, plug the connector into
the earphone jack »
0
«.
Note:
The player must be switched off. Never plug the connector into the player
when it is switched on.
Charging the battery
Charge the battery for the player on a computer.
You can also charge the battery by connecting it to a USB-compatible hi-fi
system using a USB cable.
Note:
When charging with a standard USB adapter, the player is still ready for
operation.
1 Connect the USB socket on the player to the USB socket on the computer,
charger or hi-fi system using the USB cable.
2 Switch on the computer or hi-fi or connect the charger to the power supply.
– The display indicates the charging procedure. The charging time is
approximately four hours. »
P
« appears in the display when the battery
is fully charged.
Notes:
The display of the player tells you about the state of the battery. » « in the
display indicates that the battery is running low.
The playing time of the device with batteries is up to seven hours in audio
mode and up to four hours in video mode.
Note:
There is a risk of explosion if the battery is not replaced properly. Only use
the same type of battery or an equivalent.
Note:
If you do not intend to use the player for some time, please ensure that you
insert the battery protection plug into the headphone jack. This prevents deep
discharge of the battery.
Ä

10
CONNECTION/PREPARATION
----------------------------------------------------------
Connecting to a computer
1 Switch on the computer.
2 Switch off the player.
3 Connect the USB socket on the player to the USB socket on the computer
using the USB cable.
– A display appears as soon as the connection is made.
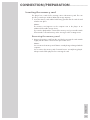
Disconnecting from the computer
If there is no data transfer in progress, you can disconnect the player from the
computer.
You must first remove the player from the Windows desktop by following the
Windows instructions for “Removing hardware”.
Note:
Do not disconnect the player from the computer while data transfer is in
progress. This can damage the data irreparably.
1 Double click the icon for removing hardware.
The “Remove hardware” window appears.
2 To continue, follow the instructions on the screen.
Note:
The circuits of the player and the computer can be seriously damaged if you
do not follow the instructions for Windows ME/2000/XP/Vista.
Connecting earphones
1 Plug the earphones into the »
0
« socket on the player.
Note:
The earphones must always be plugged in for radio mode, as the cable acts
as the FM antenna.
Note:
Prolonged listening at loud volumes with the earphones can damage your
hearing.

ENGLISH
11
CONNECTION/PREPARATION
----------------------------------------------------------
Inserting the memory card
The player has a card slot for inserting a micro SD
TM
memory card. This can
provide you with up to 8 GB of additional storage capacity.
1 Insert the memory card with the label facing upwards into the card slot until
it latches into place.
Notes:
The memory card appears on the computer next to the player as an
additional removable storage device.
If you wish to playback the content of the memory card, you must first switch
from internal to external memory under »Storage« in the »Settings« menu.
Removing the memory card
1 Remove the memory card from the card slot by pressing the card inwards
slightly until the latch is released. Then pull out the card.
Notes:
Do not remove the memory card if data is currently being exchanged with the
computer.
Do not remove the memory card if content from it is currently being played.
Always switch off the player before removing the card.

12
GENERAL FUNCTIONS
--------------------------------------------------------------------------------------------------
Switching on and off
1 Press »8/
7
« briefly to switch on the player.
– After a short while, the logo appears in the LC display.
– The player then switches to the main menu in »Music« mode.
2 Switch the player off by pressing »8/
7
« down until the logo disappears
from the display.
Selecting the menu language
1 Open the main menu by pressing and holding » « down.
2 Select the »Settings« menu with » « or » « and activate with » «.
3 In the »Settings« menu, press »
+
« or »
–
« to select the »Language« option
and activate with » «.
4 Select the menu language (12 are available) with »
+
« or »
–
« and press
» « to confirm.
Adjusting the volume
1 Adjust the volume during music playback by pressing »
+
« or
–
«.
Selecting the operating modes
1 After switching on the device, select the operating mode in the main menu
with » « or » « and press » « to activate.
– »Music«: music playback.
– »Radio«: FM radio reception.
– »Record«: playback of recorded files.
– »Photo«: picture playback.
– »Movie«: video playback.
– »Delete«: navigate within internal memory, delete files.
– »Settings«.
– »Text«: text file playback;
or
Open the main menu in playback mode by pressing and holding » «.
2 Select the desired operating mode with » « or » « and activate with » «.
V
V
V
V
V
Λ
Λ
Λ
7
Sleep Timer
7
Language
7
Display
7
Record
7
Sys Tools
7
Hold Time
7
Storage
Settings

ENGLISH
13
GENERAL FUNCTIONS
--------------------------------------------------------------------------------------------------
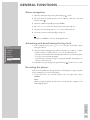
Menu navigation
1 Open the main menu by pressing and holding » « down.
2 Select the desired operating mode, such as »Music«, with » « or » « and
activate with » «.
3 Open the submenu by briefly pressing »FUNC«.
4 Press »
+
« or »
–
« to select the desired option and open with » «.
5 Select the desired setting with »
+
« or »
–
« and confirm with » «.
6 Go back one menu level by briefly pressing » «;
or
Briefly press »FUNC« to return to the playback menu.
Activating and deactivating the key lock
1 In the »Settings« menu, press »
+
« or »
–
« to select the »Hold Time« option
and open with » «.
2 Select the desired starting time for the key lock (»10 Sec«, »30 Sec«, »1 Min«,
»3 Min«, »5 Min« or »Off«) with »
+
« or »
–
« and confirm with » «.
– The key lock is activated automatically after the time selected has elapsed,
if no key is pressed in the meantime.
– If you then press a button, a large icon appears briefly in the display to re-
mind you of the key lock.
3 Deactivate the key lock by pressing and holding » « for about one second.
Resetting the player
In the event of a malfunction during operation or if the player no longer responds
to key commands, you can reset the player.
1 To reset the device, use a pointed object such as a paper clip to press
»
RESET«.
Note:
When resetting, the player should not be connected to the computer or the
USB charging device.
V
V
V
V
V
Λ
Λ
7
Sleep Timer
7
Language
7
Display
7
Record
7
Sys Tools
7
Hold Time
7
Storage
Settings

14
MUSIC PLAYBACK
------------------------------------------------------------------------------------------------------------------------
Basic music playback functions
Starting music playback
1 Open the main menu in the current playback mode by pressing and holding
»«.
2 Select the operating mode »Music« with » « or » « and activate with » «.
3 To start playback, press » « again.
– All the music files are played in succession.
Playback functions
1 Press » « to start playback.
2 Press » « to pause playback.
3 Press » « to resume normal playback.
4 Press »8/
7
« to end playback.
Selecting tracks
1 To select the previous or next track, briefly press » « or » «.
Fast forward and reverse search
1 To search for a passage in a track, press and hold » « or » « during
playback.
– The fast forward or reverse search begins. Release » « or » « at the
position you want.
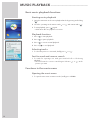
Functions in the music menu
Opening the music menu
1 To open the music menu in »Music« mode, briefly press »FUNC«.
V
V
V
V
Λ
Λ
Λ
Λ

ENGLISH
15
MUSIC PLAYBACK
------------------------------------------------------------------------------------------------------------------------
Selecting playback modes
1 In the music menu, select the »Repeat« option with »
+
« or »
–
« and open with
»«
2 Select the desired playback mode with »
+
« or »
–
« and press » « to confirm:
– »Normal«: all tracks are played once in succession.
– »Repeat One«: the current track is repeated continuously.
– »Repeat All«: all tracks are continuously played.
– »Random All«: all tracks are played in random order.
– »Folder Normal«: all the files in the current folder are repeated one after
another.
– »Folder Repeat«: all tracks in the current folder are repeated continuously.
– »Folder Random«: all tracks in the current folder are played in random
order.
Selecting sound settings
You can choose between different preset sound settings and a user equalizer.
1 In the music menu, select the »Equalizer« option with »
+
« or »
–
« and open
with » «.
2 Select the sound setting (Normal, Pop, Rock, Classic, Jazz, Bass or Custom
EQ) with »
+
« or »
–
« and press » « to confirm.
Note:
You can use »Custom EQ« to select your personal sound settings.
Setting the custom equalizer
1 Press »
+
« or »
–
« to select the »Custom EQ« option and open with » «.
2 Select the desired frequency band with »
+
« or »
–
« and press » « to
confirm.
3 Make the setting with »
+
« or »
–
« and confirm with » «.
4 To set more frequency bands, repeat steps 2 and 3.
5 Press »FUNC« to quit the menu.
Switching the surround sound on and off
1 Select the »3D« option with »
+
« or »
–
« and activate with » «.
2 Press »
+
« or »
–
« to select »On« or »Off« and confirm with » «.
V
V
V
V
V
V
V
7
Repeat
7
Equalizer
7
3D
7
Play Rate
7
Navigation
Music
7
Repeat
7
Equalizer
7
3D
7
Play Rate
7
Navigation
Music
7
Repeat
7
Equalizer
7
3D
7
Play Rate
7
Navigation
Music

16
MUSIC PLAYBACK
------------------------------------------------------------------------------------------------------------------------
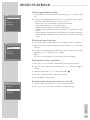
Setting the playback speed
You can increase or decrease the normal playback speed for music tracks.
1 Select the »Play Rate« option with »
+
« or »
–
« and open with » «.
2 Select the playback speed (100 = normal, 105% or 110% = faster, 95% or
90% = slower) with »
+
« or »
–
« and press » « to confirm.
Navigating in the music memory
1 Press »
+
« or »
–
« to select the »Navigation« option and open with » «.
– All music files are displayed.
2 Select the desired music track with »
+
« or »
–
« and press » « to confirm.
– Playback of the track starts.
Note:
Only folders or music files are displayed in the »Navigation« option.
3 Press »FUNC« to quit the menu.
V
V
V
V
7
Repeat
7
Equalizer
7
3D
7
Play Rate
7
Navigation
Music
7
Repeat
7
Equalizer
7
3D
7
Play Rate
7
Navigation
Music

ENGLISH
17
RADIO MODE----------------------------------------------------------------------------------------------------------
Basic radio mode functions
The earphones must always be plugged in for radio mode, as the cable acts as
the FM antenna.
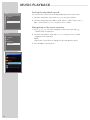
Selecting the radio input source
1 Open the main menu in the current playback mode by pressing and holding
»«.
2 Select the »Radio« operating mode with » « or » « and activate with » «.
Note:
When the player is used in radio mode for the first time, it performs an
automatic station search and stores all available FM stations on presets (up
to 30). Please wait until the search is finished. The station stored at preset
position 01 (CH 01) is played.
Switching between manual and preset mode
In radio operation, the player has two operating modes: Manual tuning and
preset mode, i.e. stored radio stations. A “preset” is a radio station which is saved
on a button.
1 To switch between manual and preset mode, briefly press » «
– Display: the frequency, or the frequency plus the preset number, e.g. »CH
01«.
Tuning to radio stations
... manually
The player must be in manual tuning mode.
1 To set the frequency you want, press » « or » « as often as necessary.
– The frequency changes in steps of 100 kHz.
or
Start the search by pressing » « or » « until »Searching ...« appears in the
display.
– The search stops when a station with a strong signal is found.
... storing with the automatic station search (Auto
Scan)
1 Open the FM menu by briefly pressing »FUNC«.
2 Select the »Auto Scan« option with »
+
« or »
–
« and activate with » «.
– The automatic station search begins and saves up to 30 stations with the
best reception as presets.
V
V
V
V
Λ
Λ
Λ
7
Saving
7
Delete
7
Auto Scan
Radio
Radio

18
RADIO MODE----------------------------------------------------------------------------------------------------------
Storing radio stations manually
The player must be in manual tuning mode.
1 Tune in to the station you want.
2 Open the FM menu by briefly pressing »FUNC«.
3 Press »
+
« or »
–
« to select the »Saving« option and activate with » «.
– The current radio station is saved on the next preset. The player switches to
preset mode and the occupied preset, »CH 15« for example, is displayed.
Opening presets
Preset mode must be activated. The display shows the current preset number.
1 To select the desired preset, press » « or » « as often as necessary.
Deleting individual presets
Preset mode must be activated.
1 Open the FM menu by briefly pressing »FUNC«.
2 Press »
+
« or »
–
« to select the »Delete« option and activate with » «.
– The »Delete« window appears. The frequency and the current preset will
be displayed.
3 Select the desired preset by pressing »
+
« or »
–
« as often as necessary.
4 Confirm deletion with » « to confirm the entry.
– The radio station saved on the selected preset is deleted, and the ones
behind it all move forward by one preset.
Λ
V
V
V
V
7
Saving
7
Delete
7
Auto Scan
Radio
7
Saving
7
Delete
7
Auto Scan
Radio
Radio

ENGLISH
19
AUDIO PLAYBACK --------------------------------------------------------------------------------------
Playback of audio recordings
Starting playback
1 Open the main menu in the current playback mode by pressing and holding
»«.
2 Select the »Record« operating mode with » « or » « and activate with
»«.
3 Press » « to start playback.
– All the available recordings (voice and FM recordings) are played in
succession.
Playback functions
1 Press » « to start playback.
2 Press » « to pause playback.
3 Press » « to resume normal playback.
4 Press »8/
7
« to end playback.
Functions in the audio recording menu
Opening the recording menu
1 To open the menu when playing back a recording, briefly press »FUNC«.
Selecting playback modes
See the description of the music menu on page 15.
Selecting sound settings
See the description of the music menu on page 15.
Setting the custom equalizer
See the description of the music menu on page 15.
Switching the surround sound on and off
See the description of the music menu on page 15.
Setting the playback speed
See the description of the music menu on page 16.
Navigating in the recording memory
See the description of the music menu on page 16.
V
Λ

20
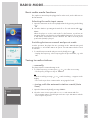
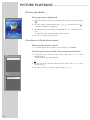
PICTURE PLAYBACK----------------------------------------------------------------------------------
Picture playback
Starting picture playback
1 Open the main menu in the current playback mode by pressing and holding
»«.
2 Select the »Photo« operating mode with » « or » « and activate with » «.
– All folders and files are displayed.
3 Select the photo file or the folder you want with »
+
« or »
–
« and press » « to
open.
– A slide show starts, starting with the picture selected.
4 Press » « to switch back to the file list.
Functions in the picture menu
Opening the picture menu
1 To open the picture menu in »Photo« mode, briefly press »FUNC«.
Switching between slide show and manual mode
1 In the picture menu, select the »Slide Show« option with »
+
« or »
–
« and
activate with » «.
– The slide show starts automatically;
or
1 In the picture menu, select the »Manual Scan« option with »
+
« or »
–
« and
activate with » «.
2 Select the previous or next picture by pressing »
+
« or »
–
«.
V
V
V
V
Λ
Λ
7
Slide Show
7
Manual Scan
Photo
7
Slide Show
7
Manual Scan
Photo
Page is loading ...
Page is loading ...
Page is loading ...
Page is loading ...
Page is loading ...
Page is loading ...
Page is loading ...
Page is loading ...
Page is loading ...
Page is loading ...
Page is loading ...
Page is loading ...
Page is loading ...
Page is loading ...
Page is loading ...
-
 1
1
-
 2
2
-
 3
3
-
 4
4
-
 5
5
-
 6
6
-
 7
7
-
 8
8
-
 9
9
-
 10
10
-
 11
11
-
 12
12
-
 13
13
-
 14
14
-
 15
15
-
 16
16
-
 17
17
-
 18
18
-
 19
19
-
 20
20
-
 21
21
-
 22
22
-
 23
23
-
 24
24
-
 25
25
-
 26
26
-
 27
27
-
 28
28
-
 29
29
-
 30
30
-
 31
31
-
 32
32
-
 33
33
-
 34
34
-
 35
35


Grundig MPixx 1400 User manual
- Category
- MP3/MP4 players
- Type
- User manual
Ask a question and I''ll find the answer in the document
Finding information in a document is now easier with AI
Related papers
Other documents
-
Slick MP517TM-2 User manual
-
Igloo MPK2066UKAB User manual
-
-
takeMS MEM-P3 Player deejay 4GB Weiß User manual
-
Logik L2GMP409 User manual
-
-
-
 PYLE Audio PS-WP3 BK User manual
-
Shiro MA User manual
-
CMX STINGRAY889X Owner's manual
