Page is loading ...

Kanguru QS3 Hard Drive
User Manual
Copyright 2012, All Rights Reserved.

2
NOTICES AND INFORMATION
Please be aware of the following points before using your Kanguru QS3
Copyright © 2012 Kanguru Solutions. All rights reserved.
Windows 2000®, Windows ME®, Windows XP®, Windows Vista®, and Windows 7® are registered
trademarks of Microsoft Inc. All other brands or product names are trademarks of their respective
companies or organizations.
Kanguru Solutions will not be held responsible for any illegal use of this product nor any losses incurred
while using this product. The user is solely responsible for the copyright laws, and is fully responsible
for any illegal actions taken.
Customer Service
To obtain service or technical support for your system, please contact Kanguru Solutions Technical
Support Department at 508-376-4245, or visit www.Kanguru.com for web support.
Legal notice
In no event shall Kanguru Solutions’ liability exceed the price paid for the product from direct, indirect,
special, incidental, or consequential software, or its documentation. Kanguru Solutions offers no refunds
for its products. Kanguru Solutions makes no warranty or representation, expressed, implied, or statutory,
with respect to its products or the contents or use of this documentation and all accompanying software,
and specifically disclaims its quality, performance, merchantability, or fitness for any particular purpose.
Kanguru Solutions reserves the right to revise or update its products, software, or documentation without
obligation to notify any individual or entity.
Export Law Compliance
Regardless of any disclosure made to Kanguru Solutions pertaining to the ultimate destination of the
specific Kanguru product, you warrant that you will not export, directly or indirectly, any Kanguru
product without first obtaining the approval of Kanguru Solutions and the appropriate export license from
the Department of Commerce or other agency of the United States Government. Kanguru Solutions has
a wide range of products and each product family has different license requirements relative to exports.
FCC Compliance Statements
This equipment has been tested and found to comply with the limits for a Class B digital device, pursuant
to Part 15 of the FCC Rules. These limits are designed to provide reasonable protection against harmful
interference in a residential installation. This equipment generates, uses and can radiate radio frequency
energy and, if not installed and used in accordance with the instructions, there is no guarantee that
interference will not occur in a particular installation. If this equipment does cause harmful interference
to equipment off and on, the user is encouraged to try to correct the interference by one or more of the
following measures:
•Reorientorrelocatethereceivingantenna.
•IncreasetheDistancebetweentheequipmentandreceiver.
•Connecttheequipmentintoanoutletonacircuitdifferentfromthattowhichthereceiverisconnected.
•Consultthedealeroranexperiencedradio/TVtechnicianforhelp.
Notices and Information

3
Table of Contents
Table of Contents
1. Introduction ....................................................................................... 4
2. Parts and Functions .......................................................................... 5
3. Specifications ..................................................................................... 5
4. Using Your Kanguru QS3 ................................................................. 6
4.1 Setting up Your Kanguru QS3 ................................................................... 6
4.2 Driver Installation .......................................................................................6
4.3 Disconnecting the Kanguru QS3 ...............................................................7
5. Partitioning and Formatting ............................................................ 8
6. Technical Support ............................................................................. 9

4
Introduction
1. Introduction
Thank you for purchasing the Kanguru QS3 hard drive from Kanguru Solutions!
The Kanguru QS3 features the latest in external hard drive technology with USB3.0 connectivity for
the fastest throughput ever in an external hard drive. The QS3 can take on your most demanding data
transfer tasks with ease! USB 3.0 takes 1.3 hours to backup 1TB compared to nearly 14 hours with USB
2.0 with no impact on your CPU system performance. Video streaming, photo editing and production,
large-scale database access, the QS3 can do it all! The QS3 is also backwards compatible with high
speed USB2.0 for quick and convenient connectivity to virtually and PC.
Package Contents:
• 1 – Kanguru Solutions QS3
• 1 – USB 3.0 Cable
• 1 – Vertical Stand
• 1 – AC Power Supply
• 1 – User Manual CD
• 1 – User Registration Form
If any of the above items are missing, please contact the Kanguru Solutions Technical Support Department
at: (508) 376-4245 and replacement parts will be shipped ASAP.
Features:
• USB3.0 interface
• Full duplex signaling
• SATA 3Gbps HDD
• Various capacity drives available
• Aluminum case for better heat dissipation
• Front status LED
• Able to be set up horizontally or vertically
• Lightweight and durable design
• Plug and play compatible
• Hot swappable
• Cobian Backup Software included (optional)
• SupportsWindowsXP/Vista/7
System Requirements:
• Notebook or desktop computer
• WindownsXP/Vista/7(32and64-bitcompatible)
• 1GB RAM or above
• Pentium 4, 2GHz processor or equivalent
• USB port (USB3.0 port required for maximum transfer rates)
• Available wall outlet for power

5
Specifications
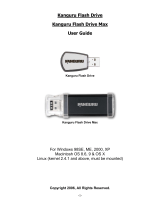
2. Parts and Functions
USB3.0InterfacePowerInputOn/OffSwitch
3. Specifications
Model Number
QS3-3H
Interface
USB3.0 5Gbps
(backwards compatible with USB2.0 and USB1.1)
Capacity
Various
Rotational Speed
Variable (5400-7200)
Hard drive interface
SATA II 3Gbps
Max Read Speed
125MB/s
Max Write Speed
80MB/s
Access Time
8.5 - 11ms (Internal)
Reliability
750,000 Hrs
OS Compatibility
Windows XP, Windows Vista, Windows 7
32 and 64-bit compatible
Size
7-3/4”x5”x1-1/4”
Weight
2lbs.
Power Rating
110-240VAC, 50~60Hz

6
Using Your Kanguru QS3
4. Using Your Kanguru QS3
The Kanguru QS3 operates the fastest when connected through a USB3.0 port. Although the Kanguru
QS3 is backwards compatible with USB2.0 and USB1.1, you will get optimal performance through
USB3.0. If your computer does not have a USB3.0 port, please contact Kanguru Solutions to purchase a
USB3.0 host controller for installation on your PC.
4.1 Setting up Your Kanguru QS3
To setup your Kanguru QS3:
1. Plug in the included AC Power Supply to a eletrical outlet. Connect the other end of the Power
Supply to the QS3’s power input.
2. Connect your QS3 to your PC using the USB3.0 cable that came included with your package.
Note: The USB cable that came with your package is specifically designed for use with USB3.0.
Ifyoudonotusethecableprovidedthenyoumaynotexperiencethefastestread/writetransfer
speeds possible.
3. FliptheOn/OffswitchtotheOnposition.
The Kanguru indicator light on the front of the drive will light up, indicating that the drive is powered
on. Your Kanguru QS3 hard drive is now ready for use.
4.2 Driver Installation
The Kanguru QS3 hard drive does not require any additional driver files to use with Windows XP,
Windows Vista and Windows 7. These operating systems include a USB Mass Storage driver, which will
support the Kanguru QS3 hard drive.
Simply plug in the Kanguru QS3 and connect it to your PC through a USB port and Windows will
automatically detect the new hardware and install the appropriate driver.
Note: If you added a USB3.0 port to your computer by installing a USB3.0 host controller expansion
card, you will need to install a device driver for the host controller. Please refer to your host controller’s
user manual for more information.

7
4.3 Disconnecting the Kanguru QS3
Before disconnecting the Kanguru QS3 from your computer, you should always use the Windows ‘Safely
Remove Hardware’ function to avoid damaging your drive.
Warning! Never attempt to disconnect your Kanguru QS3 while it is transferring data. Doing so can
resultinlossofyourdataand/ordamagetothedrive.
To safely remove your Kanguru QS3:
1. Click on the Safely Remove Hardware icon located in the taskbar. The icon may look different
depending on which version of Windows you are running.
Windows XP
Windows Vista / 7
2. A popup menu appears listing all USB devices connected to your computer. Select the Kanguru
QS3 device from the menu.
3. A message will appear indicating that the portable storage device can be safely removed. You can
now safely disconnec the Kanguru QS3.
Ifamessagesaying“Thedevicecannotbestoppedrightnow”appears,pleasemakesureanywindows
or applications accessing the Kanguru QS3 are closed and then try again.
Note: If you do not properly remove the drive from your system, then you may have to reboot your
computer in order for the drive to be recognized again.
Using Your Kanguru QS3

8
Partitioning and Formatting
5. Partitioning and Formatting
Partitioning
Partitioning allows you to take one large drive and make it into multiple smaller drives. Partitioning
requires formatting the drive and will erase all data if any exists on the drive.
1. To partition the QS3, plug the drive into your computer, then right click on the My Computer icon
on your Desktop (this icon may also be located in the Start Menu). Select Manage from the menu
to open the Computer Management console.
2. Locate and select Disk Management below the Storage submenu on the left side of the window.
The right side of the window will update, showing you a list of all the drives connected to your
system.
3. Locate the Kanguru QS3 in the bottom half of the Window. In order to partition the drive you will
have to delete the current partition by right clicking on the status bar (see below) to the right of the
disk and choosing Delete Partition. Next to create a new partition, right click on the status bar and
choose New Partition.
4. The New Partition Wizard will appear to create the new partition. Follow the on screen instructions
to complete the partition and formatting process.
For detailed instructions with images, please view the following knowledgebase article found on
Kanguru’s support site: http://support.kanguru.com/index.php?action=kb&article=52
Formatting
Formatting the drive will erase all data contained on the drive.
1. To format the Kanguru QS3, plug the drive into your computer, then open My Computer.
2. Right-click on the drive letter associated with the QS3 and then select Format from the menu.
3. Choose the file system that you would like to format the drive in and then enter a Volume Label in
the text box.
4. Check the Quick Format box to perform a quick format. You can leave it unchecked to have it
perform a full format (Full Format will take longer to complete).
5. Click Start to begin the format process. Once the process is complete, you can then resume
accessing the drive.
Note: When formatting with FAT32 on Windows there is a 32GB hard drive size limitation. In order to
format a drive larger than 32GB, you need to use a 3rd party formatting application.

9
The Setup Wizard / Selecting a Setup Language
6. Technical Support
Kanguru Solutions guarantees that every Kanguru QS3 enclosure will be free from defects in workmanship
and materials for 1 year from the date of purchase. It guarantees the Hard Drive installed in the device
for 1-year. This warranty does not apply if, in the judgment of Kanguru Solutions, the product fails due
to damage from handling, accident, abuse, misuse, or if it has been used in a manner not conforming
to the product’s instructions, has been modified in any way, or the warranty labels have been removed.
If the product proves defective during this warranty period, call Kanguru Solutions Technical Support
in order to obtain a Return Material Authorization required for service. When returning a product, mark
the RMA number clearly on the outside of the package, and include a copy of your original proof of
purchase.
If you experience any problems using your Kanguru QS3 or have any technical questions regarding any
of our products, please call our technical support department.
Our tech support is free and available Monday thru Friday, 9am to 5pm EST.
Call 1-508-376-4245 or
Visitourwebsiteathttp://support.kanguru.com/

Legal terms and conditions available at www.kanguru.com. Please review and agree before use. Thank you.
Kanguru Solutions
1360 Main Street
Millis, MA 02054
www.kanguru.com
01.02.12 V 1.1 © 2012 Kanguru Solutions
/