Page is loading ...

Tools and Materials
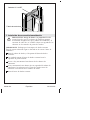
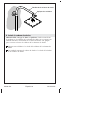
Before You Begin
NOTE: This guide includes the installation sequence for the shower
column only. Install the mixing valve, mixing valve trim, and spout
according to the manufacturer’s instructions.
NOTICE: Risk of product damage. Do not apply excessive weight
or downward force to the shower column.
CAUTION: Risk of property damage. Water leakage may
occur if supply piping allows movement. Ensure the supply
piping and 1/2″-14 NPT elbow fitting are securely fastened to
braces in the stud framing.
NOTE: The showerhead, hose, and handshower are purchased
separately.
Please read all instructions before you begin.
Observe all local plumbing and building codes.
Shut off the water supply.
Inspect the existing supply piping and wall materials. Replace if
necessary.
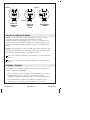
Sealant Tape
3/8"
100% Silicone Sealant
1/2"
Phillips
Screwdriver
1213116-2-A 2 Kohler Co.

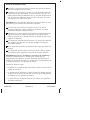
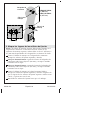
Before You Begin (cont.)
The shower column is supplied with toggle anchor fasteners for
installation onto a finished wall surface. The finished wall
thickness must be a minimum of 5/8″ (16 mm) and must be
adequate in strength. Two toggle anchor fasteners are required
per mounting collar.
IMPORTANT! If the supplied toggle anchor fasteners are not used
to install the shower column:
Ensure that adequate strength wall backing materials and stud
bracing are properly positioned behind the finished wall.
Obtain proper fasteners (not provided) taking into account the
type of stud bracing material and thickness of the mounting
collar, finished wall, wall backing, and stud bracing.
Fasteners must be corrosion-resistant and capable of 300 lbs (136
kg) load bearing per fastener.
A minimum of two fasteners are required per mounting collar.
Fasteners must be securely anchored into the stud bracing to
adequately support the product.
IMPORTANT! For retrofit/remodel installations: Check the existing
shower enclosure for adequate clearances before proceeding with the
shower column installation. Refer to the Roughing-in for the shower
column and showerhead.
Verify the distances between:
•
The ceiling and the center of the existing shower arm at the
finished wall surface.
•
The shower floor and the center of the existing shower arm at the
finished wall surface. Ensure sufficient clearance under the
showerhead.
•
The center of the existing shower arm and the center of the
mixing valve trim.
Kohler Co. 3 1213116-2-A

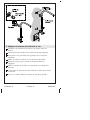
Roughing-In - Upper Supply Connection
Measure the distance between the 1/2″-14 NPT elbow and the
finished wall surface. The distance must be between 1-3/8″ (35
mm) and 2-7/8″ (73 mm).
IMPORTANT! The shower column connection will not seal
properly if the distance exceeds 2-7/8″ (73 mm); see below for the
required deep roughing-in kit.
If the distance is between 2-7/8″ (73 mm) and 4″ (102 mm):
Order the 1194630 Deep Roughing-in Kit.
If the distance is less than 1-3/8″ (35 mm): Order the 1187917
Shallow Roughing-in Kit.
1" (25 mm) Maximum
Wall Surface Offset
1/2"-14 NPT Elbow
1-3/8" (35 mm) –
2-7/8" (73 mm)
1-3/4" (44 mm) Minimum
Escutcheon Clearance
Finished Wall Surface
1213116-2-A 4 Kohler Co.

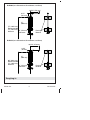
Roughing-In
Backing
Material
3-3/4"
(95 mm)
27"
(686 mm)
18-5/8" (473 mm)
18-5/8" (473 mm)
9-1/2"
(241 mm)
75" (1905 mm)
Recommended
72" (1829 mm)
Minimum
80" (2032 mm)
Recommended
75" (1905 mm)
Minimum
Backing
Material
6" (152 mm)
Minimum
27"
(686 mm)
6" (152 mm)
Minimum
K-45210 (Less Showerhead, Handshower, and Hose)
K-45209 (Less Showerhead, Handshower, and Hose)
Kohler Co. 5 1213116-2-A

Roughing-In
18"
(457 mm)
18-5/8" (473 mm)
Backing
Material
Backing
Material
18"
(457 mm)
9-1/2"
(241 mm)
18-5/8" (473 mm)
75" (1905 mm)
Recommended
72" (1829 mm)
Minimum
3-3/4"
(95 mm)
78" (1981 mm)
Recommended
75" (1905 mm)
Minimum
6" (152 mm)
Minimum
6" (152 mm)
Minimum
K-45212 (Less Showerhead, Handshower, and Hose)
K-45211 (Less Showerhead, Handshower, and Hose)
1213116-2-A 6 Kohler Co.

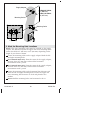
1. Retrofit/Remodel Installation
CAUTION: Risk of property damage. Water leakage may
occur if supply piping allows movement. Ensure the supply
piping and 1/2″-14 NPT elbow fitting are securely fastened to
braces in the stud framing.
IMPORTANT! Check the existing shower enclosure for adequate
clearances as described in section ″Before You Begin.″
Remove the existing showerhead and shower arm escutcheon.
Carefully push the existing shower arm toward the finished wall
surface.
Check for inward movement of the supply piping.
If inward movement is possible, securely fasten the supply piping
to braces in the stud framing before beginning the shower column
installation.
Remove the existing shower arm.
Measure the existing shower arm hole. Ensure that the finished
wall material has an upper supply connection hole diameter
between 1″ (25 mm) minimum and 1-1/4″ (32 mm) maximum,
and the hole is centered on the outlet of the 1/2″-14 NPT elbow
fitting. Repair the wall surfaces if the existing shower arm hole is
not centered or exceeds the recommended dimensions.
Supply Piping
1/2"-14 NPT Elbow
Kohler Co. 7 1213116-2-A

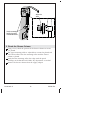
2. Install the Supply Adapter
For New Construction Installations
CAUTION: Risk of property damage. Water leakage may
occur if supply piping allows movement. Ensure the supply
piping and 1/2″-14 NPT elbow fitting are securely fastened to
braces in the stud framing.
IMPORTANT! This guide includes the installation sequence for the
shower column only. Refer to the manufacturer’s instructions for
installation of the mixing valve, mixing valve trim, and spout.
Rough-in the mixing valve, supply piping, and bath spout
connection appropriate for your installation.
Refer to the ″Roughing-in″ section in this guide for proper
location of the 1/2″-14 NPT elbow fitting inside the wall.
Ensure that the supply piping and 1/2″-14 NPT elbow fitting are
securely fastened to the stud framing.
3/8" Hex
Wrench
Supply
Adapter
1" (25 mm)
Minimum –
1-1/4" (32 mm)
Maximum
1/2"-14 NPT Elbow
1/2"-14 NPT Elbow
Supply Piping
1213116-2-A 8 Kohler Co.

Install the Supply Adapter (cont.)
Ensure that the finished wall material has an upper supply
connection hole diameter between 1″ (25 mm) minimum and
1-1/4″ (32 mm) maximum, and the hole is centered on the outlet
of the 1/2″-14 NPT elbow fitting.
If your supply connection hole diameter is between 1-1/4″ (32
mm) and 2-1/4″ (57 mm): Order the 1194302 Large
Escutcheon/Mounting Collar Kit.
Install the finished wall material.
Install the mixing valve trim and bath spout according to the
manufacturer’s instructions.
For New Construction and Retrofit Installations
Apply sealant tape to the supply adapter thread.
The supply adapter has an internal 3/8″ hex socket. Thread the
supply adapter into the 1/2″-14 NPT elbow using a 3/8″ hex
wrench.
Kohler Co. 9 1213116-2-A

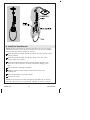
3. Mark the Mounting Hole Locations
NOTE: The upper mounting collar must be centered on the supply
adapter. The distance between the upper and lower mounting collar
centers should be 18″ (457 mm) or 27″ (686 mm) depending on the
length of your shower column.
Center the mounting collar on the supply adapter. Mark the left
and right mounting holes.
For K-45209/K-45210 only: From the center of the supply adapter,
measure down 27″ (686 mm) and mark the horizontal
measurement with a pencil.
For K-45211/K-45212 only: From the center of the supply adapter,
measure down 18″ (457 mm) and mark the horizontal
measurement with a pencil.
Center the mounting collar on the horizontal line. Measure and
mark the left and right mounting holes. Ensure the upper and
lower mounting hole locations are level and plumb to one
another.
Do not drill the mounting holes until instructed to do so.
2" (51 mm)
Supply Adapter
Mounting Collar
Mounting Collar
K-45209, K-45210,
27" (686 mm)
K-45211, K-45212,
18" (457 mm)
1213116-2-A 10 Kohler Co.

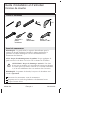
4. Dry Fit the Shower Column
Snap a trim sleeve onto each mounting collar.
Verify that an O-ring is installed in each escutcheon.
Carefully slide an escutcheon onto the upper connection
assembly.
Thread a mounting collar onto the upper connection assembly.
Repeat steps for the lower mounting collar and escutcheon.
Carefully slide the shower column onto the supply adapter.
Ensure the lower mounting collar is tight against the finished
wall.
Proceed to the ″Plumb the Shower Column″ section.
Kohler Co. 11 1213116-2-A

5. Plumb the Shower Column
Using a level, check the position of the shower column to ensure
it is plumb.
The upper mounting collar is adjustable to account for plumb and
wall surface offset. Turn the mounting collar until the shower
column is plumb.
Verify that the mounting collar slots align with the pencil
markings on the finished wall. Make any adjustments as needed.
Remove the shower column from the supply adapter.
Verify mounting
holes align with
marked locations.
Adjust for
level.
1213116-2-A 12 Kohler Co.

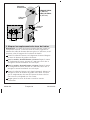
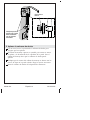
6. Install with Anchors
IMPORTANT! If the supplied toggle anchor fasteners are not used,
refer to ″Before You Begin″ for fastener requirements.
NOTE: Anchor installation requires 1-7/8″ (48 mm) minimum
clearance behind the wall. The finished wall thickness must be a
minimum of 5/8″ (16 mm) and must be adequate in strength.
Install the Anchors
Drill two 1/2″ (13 mm) diameter holes for each mounting collar
at the pencil markings on the finished wall.
Hold the metal channel of the anchor flat alongside the plastic
straps and slide the channel through the drilled holes.
Realign the handles of the straps to straighten the channel behind
the wall.
With one hand, pull the finger grips straight out (do not pull at
an angle) so that the metal channel rests flush behind the wall.
Slide the clip along the straps with your other hand until the
flange of the clip is flush with the wall.
Drill 1/2" (13 mm)
holes at each
marked location.
1-7/8"
(48 mm)
Kohler Co. 13 1213116-2-A

Install with Anchors (cont.)
Place your thumb between the plastic straps. Wiggle the straps up
and down until they snap off at the wall.
Align the mounting collar with the anchor clips.
Insert the bolt through the mounting collar and tighten until it is
flush with the wall.
1213116-2-A 14 Kohler Co.

7. Secure the Shower Column
Reinstall the shower column to the supply adapters.
Secure the shower column with the four fasteners.
Apply a bead of silicone sealant to the back edge of each
escutcheon.
Slide the escutcheons over the mounting collars and press the
escutcheons tight against the finished wall.
Wipe away any excess silicone sealant from the escutcheons and
finished wall.
Apply
silicone
sealant.
Kohler Co. 15 1213116-2-A

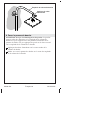
8. Install the Showerhead
CAUTION: Risk of product damage. Product damage could occur
if the shower column overhang is not carefully supported during the
showerhead installation. Do not apply excessive weight or force to
the shower column overhang.
Apply sealant tape to the shower column overhang outlet.
Carefully thread the showerhead onto the shower column
overhang outlet.
Apply sealant tape.
Shower Column Overhang
1213116-2-A 16 Kohler Co.

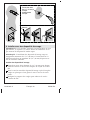
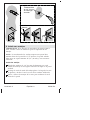
9. Install the Handshower
NOTE: Elbow installation is optional and allows the hose to drape
around the mixing valve trim. The shower hose can also be installed
directly onto the shower column if desired.
With the gasket installed, thread the elbow onto the bottom of the
shower column.
With the gasket installed, thread the check valve end of the
shower hose to the elbow.
Position the handshower holder and the elbow opposite each
other. This allows the hose to drape around the mixing valve
trim.
Thread the hose through the holder.
With the screen washer installed, thread the hose to the
handshower.
Place the handshower into the holder.
Turn on the water.
NOTE: If water does not flow through the handshower or shower
hose, the shower hose was incorrectly installed. To correct, reinstall
Kohler Co. 17 1213116-2-A

Install the Handshower (cont.)
the shower hose ensuring the end of the hose containing the check
valve is attached to the elbow or shower column.
Check for leaks.
1213116-2-A 18 Kohler Co.

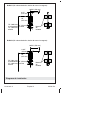
Using Your Shower Column
NOTE: If water does not flow through the handshower or shower
hose, the shower hose was incorrectly installed. To correct, reinstall
the shower hose ensuring the end of the hose containing the check
valve is attached to the elbow or shower column.
NOTE: This product is not designed to stop water flow. Positioning
the handle to the left will result in partial flow from both the
showerhead and handshower.
To use the showerhead, turn the handle to the upward position.
To use the handshower, turn the handle to the downward
position.
Care and Cleaning
For best results, keep the following in mind when caring for your
KOHLER product:
•
Use a mild detergent such as liquid dishwashing soap and warm
water for cleaning. Do not use abrasive cleaners that may scratch
or dull the surface.
•
Carefully read the cleaner product label to ensure the cleaner is
safe for use on the material.
•
Always test your cleaning solution on an inconspicuous area
before applying to the entire surface.
Handle
Handle
Handle
Flow to
Showerhead
Flow to
Handshower
Partial Flow
to Both
Kohler Co. 19 1213116-2-A

Care and Cleaning (cont.)
•
Do not allow cleaners to sit or soak on the surface.
•
Wipe surfaces clean and rinse completely with water immediately
after cleaner application. Rinse and dry any overspray that lands
on nearby surfaces.
•
Use a soft, dampened sponge or cloth. Never use an abrasive
material such as a brush or scouring pad to clean surfaces.
For detailed cleaning information and products to consider, visit
www.kohler.com/clean. To order Care & Cleaning information, call
1-800-456-4537.
Warranty
KOHLER
®
Faucet Lifetime Limited Warranty
Kohler Co. warrants its Faucets* manufactured after January 1, 1997, to
be leak and drip free during normal residential use for as long as the
original consumer purchaser owns his or her home. If the Faucet
should leak or drip during normal use, Kohler Co. will, free of charge,
mail to the purchaser the cartridge necessary to put the Faucet in good
working condition. This warranty applies only to Kohler Faucets
installed in the United States of America, Canada or Mexico (″North
America″).
Kohler Co. also warrants all other aspects of the faucet or accessories
(″Faucet″)*, (except gold, non-Vibrant
®
, non-chrome finishes) to be free
of defects in material and workmanship during normal residential use
for as long as the original consumer purchaser owns his or her home.
This warranty applies only to Kohler Faucets installed in North
America. If a defect is found in normal residential use, Kohler Co. will,
at its election, repair, provide a replacement part or product, or make
appropriate adjustment. Damage to a product caused by accident,
misuse, or abuse is not covered by this warranty. Improper care and
cleaning will void the warranty**. Proof of purchase (original sales
receipt) must be provided to Kohler Co. with all warranty claims.
Kohler Co. is not responsible for labor charges, installation, or other
incidental or consequential costs. In no event shall the liability of
Kohler Co. exceed the purchase price of the Faucet.
If the Faucet is used commercially or is installed outside of North
America, or if the finish is gold, non-Vibrant or a painted or powder
coated color finish, Kohler Co. warrants the Faucet to be free from
defects in material and workmanship for one (1) year from the date the
product is installed, under Kohler Co.’s standard one-year limited
warranty.
1213116-2-A 20 Kohler Co.

Warranty (cont.)
If you believe that you have a warranty claim, contact Kohler Co.,
either through your Dealer, Plumbing Contractor, Home Center or
E-tailer, or by writing Kohler Co., Attn.: Customer Care Center, 444
Highland Drive, Kohler, WI 53044, USA. Please be sure to provide all
pertinent information regarding your claim, including a complete
description of the problem, the product, model number, color, finish,
the date the product was purchased and from whom the product was
purchased. Also include your original invoice. For other information,
or to obtain the name and address of the service and repair facility
nearest you, call 1-800-4-KOHLER (1-800-456-4537) from within the
USA and Canada, and 001-800-456-4537 from within Mexico, or visit
www.kohler.com within the USA, www.ca.kohler.com from within
Canada, or www.mx.kohler.com in Mexico.
KOHLER CO. AND/OR SELLER ARE PROVIDING THESE
WARRANTIES IN LIEU OF ALL OTHER WARRANTIES,
EXPRESSED OR IMPLIED, INCLUDING BUT NOT LIMITED TO
THE IMPLIED WARRANTIES OF MERCHANTABILITY AND
FITNESS FOR A PARTICULAR PURPOSE. KOHLER CO. AND/OR
SELLER DISCLAIM ALL LIABILITY FOR SPECIAL, INCIDENTAL
OR CONSEQUENTIAL DAMAGES. Some states/provinces do not
allow limitations of how long an implied warranty lasts or the
exclusion or limitation of such damages, so these limitations and
exclusions may not apply to you. This warranty gives the consumer
specific legal rights. You may also have other rights that vary from
state/province to state/province.
This is Kohler Co.’s exclusive written warranty.
*Trend
®
faucets, MasterShower
®
tower, BodySpa systems and
components; WaterHaven
®
tower, systems and components; Tripoint
®
faucets, Polished Gold, non-Vibrant and painted or powder coated
finishes, fittings; all items within the ″Fixture Related″ section of the
Kohler Faucets Price Book, drains, Duostrainer
®
sink strainers,
soap/lotion dispensers, MoxieTM Wireless Speaker; and faucets used in
commercial settings, and outside North America, are covered by
Kohler Co.’s one-year limited warranty.
**Never use cleaners containing abrasive cleansers, ammonia, bleach,
acids, waxes, alcohol, solvents or other products not recommended for
chrome. This will void the warranty.
Kohler Co. 21 1213116-2-A
Page is loading ...
Page is loading ...
Page is loading ...
Page is loading ...
Page is loading ...
Page is loading ...
Page is loading ...
Page is loading ...
Page is loading ...
Page is loading ...
Page is loading ...
Page is loading ...
Page is loading ...
Page is loading ...
Page is loading ...
Page is loading ...
Page is loading ...
Page is loading ...
Page is loading ...
Page is loading ...
Page is loading ...
Page is loading ...
Page is loading ...
Page is loading ...
Page is loading ...
Page is loading ...
Page is loading ...
Page is loading ...
Page is loading ...
Page is loading ...
Page is loading ...
Page is loading ...
Page is loading ...
Page is loading ...
Page is loading ...
Page is loading ...
Page is loading ...
Page is loading ...
Page is loading ...
Page is loading ...
Page is loading ...
Page is loading ...
Page is loading ...
Page is loading ...
Page is loading ...
Page is loading ...
Page is loading ...
-
 1
1
-
 2
2
-
 3
3
-
 4
4
-
 5
5
-
 6
6
-
 7
7
-
 8
8
-
 9
9
-
 10
10
-
 11
11
-
 12
12
-
 13
13
-
 14
14
-
 15
15
-
 16
16
-
 17
17
-
 18
18
-
 19
19
-
 20
20
-
 21
21
-
 22
22
-
 23
23
-
 24
24
-
 25
25
-
 26
26
-
 27
27
-
 28
28
-
 29
29
-
 30
30
-
 31
31
-
 32
32
-
 33
33
-
 34
34
-
 35
35
-
 36
36
-
 37
37
-
 38
38
-
 39
39
-
 40
40
-
 41
41
-
 42
42
-
 43
43
-
 44
44
-
 45
45
-
 46
46
-
 47
47
-
 48
48
-
 49
49
-
 50
50
-
 51
51
-
 52
52
-
 53
53
-
 54
54
-
 55
55
-
 56
56
-
 57
57
-
 58
58
-
 59
59
-
 60
60
-
 61
61
-
 62
62
-
 63
63
-
 64
64
-
 65
65
-
 66
66
-
 67
67
-
 68
68


Ask a question and I''ll find the answer in the document
Finding information in a document is now easier with AI
in other languages
- français: Kohler K-45212-BV Guide d'installation
- español: Kohler K-45212-BV Guía de instalación
Related papers
-
Kohler K-12008-AK-CP Installation guide
-
Kohler K-8985 Installation guide
-
-
-
-
-
-
-
Kohler 45906-BN Installation guide
-
Kohler K-2977-K-NA Installation guide
Other documents
-
Delta U4999-SS Installation guide
-
Axor 16560XX1 User manual
-
WaterWorks USA524 Installation guide
-
Glacier Bay SH-72LED-07 Installation guide
-
PULSE Showerspas 1010 Installation guide
-
A&E 240141 Installation guide
-
 A&E Bath & Shower 240142 Installation guide
-
-
Delta Faucet 58810-KS Installation guide
-
