
MODE D'EMPLOI
Armoire à vin
Modèles : RW12EBBB
RW13EBSS
•
Veuillez lire attentivement ce mode d'emploi
avant de mettre l'armoire à vin en marche et
conservez-le pour consultation ultérieure.
•
Ce produit peut faire l'objet de modifications
sans préavis.

Table des matières
Important ................................................................................................................................................ 2
Identification des composants............................................................................................................. 2
Consignes d'utilisation ......................................................................................................................... 3
Panneau de commande ........................................................................................................................ 5
Entretien et nettoyage........................................................................................................................... 7
Installation.............................................................................................................................................. 8
Dépannage ............................................................................................................................................. 9
Avant d'utiliser votre armoire à vin, veuillez lire attentivement ce mode d'emploi et, notamment, les
consignes de sécurité.
Conservez ce mode d'emploi pour consultation ultérieure.
1

IMPORTANT
Veuillez lire ce mode d'emploi.
♦ Veuillez lire attentivement les consignes de sécurité et les instructions d'utilisation avant de
mettre votre armoire à vin sous tension.
Conservez ce mode d'emploi.
♦ Veuillez conserver précieusement ce mode d'emploi afin de le consulter ultérieurement.
Observez les recommandations.
♦ Veuillez suivre les recommandations importantes concernant l'utilisation de l'armoire.
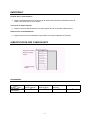
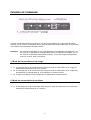
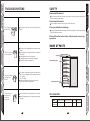
IDENTIFICATION DES COMPOSANTS
Clayette acier petite
capacité
Clayette acier grande
capacité
Panneau de commande
Accessoires
Accessoire
Modèle
Clayette acier
grande capacité
Clayette acier
petite capacité
Couvercle de
l'ampoule
Ampoule interne
RW13EBBB
RW13EBSS
5 1 1 1
2

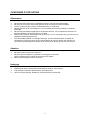
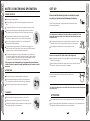
CONSIGNES D'UTILISATION
Alimentation
♦ Ne branchez pas l'armoire sur l'alimentation secteur si la fiche est endommagée.
♦ Ne tirez pas sur la fiche. Ne touchez pas la fiche si vous avez les mains mouillées.
♦ La fiche ne doit pas être courbée ni être placée sous un objet lourd.
♦ Débranchez la fiche en cas d'orage ou si vous n'utilisez pas l'armoire pendant une période
prolongée.
♦ Ne branchez pas d'autres appareils sur la prise de l'armoire. Vous risqueriez de recevoir une
décharge électrique ou de provoquer un incendie.
♦ Vérifiez que la tension d'alimentation est de 220-240 V. Si ce n'est pas le cas, procurez-vous un
régulateur automatique de 500 W.
♦ Il est déconseillé d'utiliser une rallonge électrique. Si vous souhaitez utiliser un boîtier de
raccordement, il doit être conforme aux spécifications de l'armoire et être relié à la terre. Le
connecteur devra être placé en hauteur ou à une distance de plus de 200 mm de l'armoire.
Attention
♦ Ne glissez pas les mains sous l'armoire.
♦ Ne posez pas de mégots de cigarettes ou de bougies sur l'armoire.
Celle-ci doit être tenue à l'écart de toute source de chaleur.
♦ Ne posez pas d'objets lourds sur l'armoire.
Nettoyage
♦ N'utilisez pas d'eau ni de produits chimiques pour nettoyer votre armoire.
♦ Si la fiche est encrassée, débranchez-la, puis nettoyez-la.
♦ Une fois la fiche nettoyée, attendez 5 minutes avant de la rebrancher.
3

Recommandations importantes
♦ Ne démontez pas, ne réparez pas et ne remontez pas l'armoire par vous-même.
♦ Tenez les enfants à l'écart de l'armoire. Par ailleurs, si vous devez jeter votre armoire, retirez la
porte pour éviter qu'un enfant ne risque de s'enfermer à l'intérieur.
♦ Ne conservez pas de produits inflammables à proximité de l'armoire.
♦ En cas de fuite de gaz, ne débranchez pas la fiche de la prise secteur et ne modifiez pas le
réglage de la température avant d'avoir fermé l'arrivée du gaz.
♦ En cas de bruit, de fumée ou d'odeur anormale, débranchez immédiatement l'armoire et
contactez le service d'assistance technique.
♦ Ne posez pas de bouteille isotherme, de médicaments ou d'objets métalliques sur l'armoire.
Précautions à prendre
♦ Veillez à ce que les orifices de ventilation de l'appareil ne soient pas obstrués.
♦ N'utilisez pas d'appareils mécaniques ou d'autres moyens pour accélérer le dégivrage, hormis
ceux recommandés par le fabricant.
♦ N'endommagez pas le circuit de réfrigération.
♦ Si vous utilisez des appareils électriques à l'intérieur de l'armoire, vérifiez qu'ils soient conformes
aux recommandations du fabricant.
Éclairage
Instructions de remplacement de l'ampoule interne
♦ Avant de remplacer l'ampoule, mettez l'armoire hors tension. Dévissez le couvercle de l'ampoule,
retirez-le, puis sortez l'ampoule en la tirant. Installez une ampoule neuve, puis remettez le
couvercle en place.
♦ Remettez l'armoire sous tension.
♦ La puissance nominale maximale de l'ampoule est de 7 Watts.
4

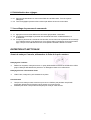
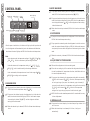
PANNEAU DE COMMANDE
Touche vin rouge Touche vin blanc Réglage personnalisé
Voyant vin rouge Voyant vin blanc
Voyant réglage
p
ersonnalisé
Touche éclairage interne
Lorsque vous mettez l'armoire sous tension, tous les voyants s'allument. Un test automatique est
effectué, puis le mode de conservation du vin rouge est automatiquement sélectionné : le voyant Red
wine s'allume et la température actuelle s'affiche.
Remarque : En mode de conservation du vin rouge (Red wine), la température est réglée sur 13°C.
En mode de conservation du vin blanc (White wine), la température est réglée sur 7°C.
En mode de conservation personnalisé (Custom), vous pouvez régler la température
entre 4°C et 18°C, selon vos besoins.
1. Mode de conservation du vin rouge
♦ 1-1 Si vous appuyez sur la touche Red wine lorsque le mode de conservation du vin rouge est
sélectionné, la température de 13°C s'affiche.
♦ 1-2 Si vous appuyez sur la touche Red wine lorsque le mode de conservation du vin rouge n'est
pas sélectionné, la température de 13°C s'affiche et ce mode est activé.
♦ 1-3 Lorsque vous relâchez la touche Red wine, la température actuelle s'affiche.
2. Mode de conservation du vin blanc
♦ 2-1 Si vous appuyez sur la touche White wine lorsque le mode de conservation du vin blanc est
sélectionné, la température de 7°C s'affiche.
5

♦ 2-2 Si vous appuyez sur la touche White wine lorsque le mode de conservation du vin blanc n'est
pas sélectionné, la température de 7°C s'affiche et ce mode est activé.
♦ 2-3 Lorsque vous relâchez la touche Red wine, la température actuelle s'affiche.
3. Mode de conservation personnalisé
♦ 3-1 Si vous appuyez sur la touche Custom lorsque le mode de conservation personnalisé est
sélectionné, la température réglée s'affiche.
♦ 3-2 Si vous appuyez sur la touche Custom lorsque le mode de conservation personnalisé n'est
pas sélectionné, la température que vous avez réglée s'affiche et ce mode est activé.
♦ 3-3 Lorsque vous relâchez la touche Custom, la température actuelle s'affiche.
4. Réglage de la température
♦ 4-1 Sélectionnez le mode de conservation personnalisé.
♦ 4-2 Appuyez sur la touche Custom pendant environ 3 secondes. L'armoire passe en mode de
réglage de la température. Le voyant Custom clignote et la température s'affiche.
♦ 4-3 Si vous appuyez sur la touche Red wine, la température augmente par pas de 1°C. La
température maximale pouvant être réglée est de 18°C. Si vous appuyez sur la touche White
wine, la température diminue par pas 1°C. La température minimale pouvant être réglée est
de 4°C.
♦ 4-4 Une fois le réglage terminé, la température actuelle s'affiche au bout de 5 secondes.
5. Éclairage interne
♦ 5-1 La touche Interior light permet d'allumer ou d'éteindre l'éclairage interne.
♦ 5-2 L'éclairage s'éteint automatiquement au bout d'une heure.
6

6. Réinitialisation des réglages
♦ 6-1 Appuyez simultanément sur les touches Red wine et White wine. Tous les voyants
s'éteignent.
♦ 6-2 Tous les réglages reprennent leurs valeurs par défaut au bout de 3 secondes.
7. Verrouillage du panneau de commande
♦ 7-1 Appuyez sur les touches White wine et Interior light pendant 3 secondes.
♦ 7-2 Le mode de verrouillage du panneau de commande est activé s'il était désactivé, et
inversement.
♦ 7-3 Lorsque le panneau de commande est verrouillé, les touches sont inopérantes et le message
"LO" s'affiche lorsque vous appuyez sur l'une d'entre elles (à l'exception de la touche Interior
light). Lorsque vous relâchez la touche, la température actuelle s'affiche à nouveau.
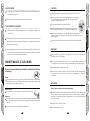
ENTRETIEN ET NETTOYAGE
Avant de nettoyer l'armoire, débranchez la fiche de la prise secteur.
Nettoyage de l'intérieur
♦ Retirez les clayettes, nettoyez-les avec un spray désinfectant et séchez-les à l'aide d'un chiffon
propre. Nettoyez délicatement la porte avec un détergent neutre et un chiffon doux.
Nettoyage du bac d'écoulement d'eau
♦ Videz le bac, nettoyez-le, puis remettez-le en place.
Avertissement
♦ Lorsque vous nettoyez votre armoire ou que vous ne l'utilisez pas pendant une période
prolongée, débranchez la fiche de la prise secteur et ouvrez la porte.
♦ N'utilisez pas d'eau ni de produits chimiques pour nettoyer votre armoire.
7

INSTALLATION
Veuillez lire attentivement les paragraphes ci-dessous. Vous éviterez ainsi de
vous blesser ou d'endommager votre armoire à vin.
Installez l'armoire sur une surface plane, dure et horizontale. Au besoin, réglez la hauteur des pieds.
L'armoire doit être installée dans une pièce bien aérée. Laissez 5 cm d'espace tout autour de
l'appareil et 10 cm au-dessus.
♦ N'installez pas l'armoire dans un endroit directement exposé au soleil, à proximité d'une source
de chaleur (cuisinière à gaz, four) ou dans une pièce humide.
♦ Installez l'armoire à proximité d'une prise d'alimentation électrique.
L'armoire doit être branchée sur une prise séparée alimentée en 220-240 V.
♦ L'armoire doit être correctement reliée à la terre. N'utilisez pas de ligne téléphonique ou de
conduite de gaz pour effectuer ce raccordement.
♦ La réparation du cordon secteur nécessite l'utilisation d'outils spécifiques. Contactez le service
d'assistance technique si le cordon est endommagé.
L'armoire peut émettre des bruits si des objets sont placés devant, derrière ou sur elle.
La température ambiante doit être supérieure à 5°C. Si ce n'est pas le cas, de la glace pourrait
se former à l'intérieure de l'armoire.
Attention
♦ Veillez à ce que l'armoire soit correctement reliée à la terre afin d'éviter tout accident.
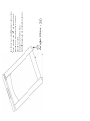
♦ Ne retournez pas l'armoire et ne l'installez pas à l'horizontale. L'armoire doit toujours former un
angle de 45° avec le sol.
8

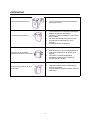
DEPANNAGE
L'armoire ne fonctionne pas.
♦ La fiche n'est pas correctement branchée
sur la prise secteur.
L'armoire émet des bruits.
♦ Les accessoires n'ont pas été correctement
installés à l'intérieur de l'armoire.
♦ L'armoire n'est pas installée sur une surface
dure et plane.
♦ L'armoire est installée trop près d'un mur.
♦ Un objet est coincé derrière ou sous
l'armoire.
♦ Le bruit est dû au compresseur.
La façade et les panneaux
latéraux de l'armoire sont chauds.
♦ Ceci est normal. L'armoire est équipée d'un
tuyau anti-condensation qui produit de la
chaleur.
♦ La chaleur provient d'équipements
chauffants (condenseurs) installés de
chaque côté de l'armoire.
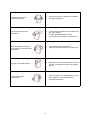
Du givre s'est formé sur le fond
de l'armoire.
♦ L'apparition de givre est normale lorsque
l'armoire fonctionne.
♦ Le givre disparaît lorsque l'armoire cesse de
fonctionner.
9

L'armoire émet un bruit
d'écoulement d'eau.
♦ Ce bruit est normal. Il est dû à la circulation
du liquide réfrigérant.
L'armoire fonctionne sans
discontinuer.
♦ La température ambiante est trop élevée (en
été, par exemple).
♦ La porte est fréquemment ouverte.
♦ La ventilation de l'armoire est insuffisante.
De la condensation se forme
sur la porte et sur les panneaux
de l'armoire.
♦ L'humidité ambiante est élevée.
♦ Essuyez l'armoire à l'aide d'un chiffon doux.
La porte s'ouvre difficilement.
♦ Attendez 5 à 10 secondes après avoir fermé
la porte. La résistance est due à la pression
interne.
L'armoire émet des
craquements.
♦ Ceci est normal. Les craquements sont dus
à la contraction ou à l'expansion des
composants internes.
10

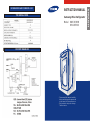
INSTRUCTION MANUAL
Samsung Wine Refrigerator
Please read this manual carefully
before switching on the power and
nicely keep it for future reference.
The product is subject to change
without notice.
ADD: Jinmen Road 221,Suzhou
Jiangsu Province, China
TEL: 86-512-65321234-3550
CABLE:7449
FAX: 86-512-65321234-3555
P.C: 215004
Model RW13EBBB
RW13EBSS
DA68-01096C
ENGLISH
IEC/EN60335-1&IEC/EN60335-2-24
TECHNICAL DATA
CIRCUIT DIAGRAM
RW13EBBB
RW13EBSS

It is the sound arising from the flowing of refrig
-erant.
It is not a fault.
The ambient temperature is too high in summer.
The door is opened frequently.
The ventilation around the refrigerator is not
enough.
The ambient humidity is quite high.
It can be removed with a soft cloth.
Water-flowing
sound is heard.
The refrigerator is
running
continuously
without stop.
Condensation is
found on the
door and frame.
The door is
difficult to open.
Creaks are coming
from the
refrigerator.
Open the door 5~10 seconds after it was closed.
The difficulty comes from pressure.
The creaks arise from the contraction or expan
-sion of internal parts. It is not a fault.
Contents
Please read this manual carefully before
using the refrigerator.
Please read carefully the contents concer
-ning safety before using the refrigerator.
Please keep this manual in a readily acces
-sible place for future reference.
10
Safety.......................................2
Name of parts...........................2
Notes concerning operation ....3
Control panel...........................5
Set up.......................................8
Troubleshooting......................9
Technical data..........Back cover
Maintenance &cleaning.............7
Safety
Name of parts
Notes concerning
operation
Control panel
Maintenance
&cleaning
Set up
Troubleshooting
1

Troubleshooting
2
NAME OF PARTS
Please read this manual.
Please read carefully the contents in this manual concerning safety and operation
before switching on the power.
Please keep this manual.
Please keep this manual nicely for your future reference.
Please pay attention to warnings.
Please pay attention to the warnings on the wine refrigerator concerning operation
and follow their instructions.
Please follow the instructions in this manual concerning
operation.
SAFETY
Top frame
Large steel wire rack
Small steel wire rack
Accessories
TROUBLESHOOTING
The plug has not been nicely inserted into the
outlet.
The things in the refrigerator have not been evenly
placed.
The refrigerator has not been placed on a rigid and
flat surface.
The refrigerator is too close to the wall.
Something is behind or under the refrigerator.
The sound is from the compressor.
The frame is equipped with anti-condensation
pipe, so the refrigerator will become hot when
it is running.
It is not a fault.
There are radiating devices (condensers)
inside both sides of refrigerator.
The refrigerator
doesn't work.
There are noises
in the refrigerator.
The front and sides
of refrigerator
are hot.
There is frost on
the back wall
inside the
refrigerator.
It's normal when the refrigerator is running.
It will disappear when the refrigerator stops
working.
Safety
Name of parts
Notes concerning
operation
Control panel
Maintenance
&cleaning
Set up
Control panel
Maintenance
&cleaning
Set up
Notes concerning
operation
Safety
Name of parts
Troubleshooting
9
5 1 1 1
Model
Name
Large steel wire Rack
RW13EBBB
RW13EBSS
Small steel wire rack
Lamp Cover
Internal lamp

Troubleshooting
Set up
Maintenance
&cleaning
Please use a separate 220~240V outlet for the refrigerator.
Place the refrigerator on a rigid and horizontal surface and flat it
with the adjusting foot.
SET UP
Please read the following section carefully to avoid
any injury of personnel and damage of property.
The refrigerator should be put in a place with good ventilation. There
should be a distance of over 5cm to both sides and the rear and over
10cm to the top.
Do not place the refrigerator in a place with direct sunshine or near
the heat source (such as gas stove and oven) or in a damp place.
The refrigerator should be put in a place near the outlet.
The refrigerator should be nicely grounded. Do not ground it through
phone line or gas pipe.
The replacement of power line needs special tools, so please contact
the service center if your power line is damaged.
The ambient temperature should be over 5 , otherwise the refrigerator
may freeze up.
Noises will arise when something is beside, behind or on
the refrigerator.
ATTENTION
The refrigerator must be correctly grounded, otherwise incident may happen.
Do not put the refrigerator upside down or transversely. The slope between the
refrigerator and the floor should never be more than 45 .
8
Troubleshooting
Safety
Name of parts
Notes concerning
operation
Control panel
Maintenance
&cleaning
Set up
NOTES CONCERNING OPERATION
Do not use a damaged plug.
Do not pull the plug. Do not touch the plug when your hands are
wet.
The plug should not be over-bent or pressed under a heavy thing.
Please remove the plug from the outlet when there are thunders
and lightning or the refrigerator is not to be used for a long time.
The refrigerator should not share the outlet with other
appliances, otherwise electric shock and fire may happen.
Check the voltage of refrigerator if it is in conformity with
that of outlet before plugging.
The permissible voltage range is 98-143V. If the voltage of your
power source is not in this range, you have to use a 500W automatic
regulator, which can easily be found on the market.
The extension of power line is not recommended. If you want to use
a connection plate, it should be in line with the capacity of refrigerator
and nicely grounded. The connection plate should be hung up or put
at a place more than 200mm far from the refrigerator.
Please do not put your hands under the refrigerator.
Do not put cigarette butts or candles on the refrigerator.
The refrigerator should be far away from any heat source.
Please do not put heavy things on the refrigerator.
Do not clean the refrigerator with water or chemicals.
If there is dirt on the plug, please use it after cleaning.
Please wait 5 minutes when you want to insert the plug into
the outlet again after it was removed.
ATTENTION
CLEANING
POWER SOURCE
3
If the supply cord is damaged,it must be replaced by manufacturer,
retailer it s service agent or similar qualified person in order to avoid
a hazard.
Safety
Name of parts
Control panel
Notes concerning
operation

4
7
Please remove the plug from the outlet first before
cleaning.
Please take out the racks, wash them with sterilization spray and dry
them with a clean cloth. The door should be cleaned carefully by using
neutral detergent and a soft cloth.
Pour out the water in the collector and replace it after cleaning.
The plug should be removed from the outlet and the door should be opened
when you are doing the cleaning or the refrigerator is not to be used for a
long time.
Do not clean the refrigerator with water or chemicals.
MAINTENANCE & CLEANING
Inside
Water collector
Attention
6-1 If you press the white wine key and the red wine key simultaneously,
all indicators will go out.
6-2 After 3 seconds, all settings will become ex-factory ones.
7-1 Please press the white wine key and the internal lamp key together for
3 seconds.
7-2 The refrigerator will run in the keyboard lock mode if it was not running in that
mode before the keys are pressed. Otherwise, the refrigerator will exit from
the keyboard lock mode.
7-3.In the keyboard lock mode, no action will happen and DIAPLAY will show "LO"
if any key is pressed (internal lamp key excluded). When the key is released,
DISPLAY will show the actual temperature.
6. RESET MODE
7. KEYBOARD LOCK MODE
Troubleshooting
Safety
Name of parts
Control panel
Set up
Maintenance
&cleaning
Troubleshooting
Safety
Name of parts
Set up
Notes concerning
operation
Control panel
Notes concerning
operation
Maintenance
&cleaning
Keep ventilation openings,in the appliance enclosure or in the built-in
structure, clear of obstruction.
Do not use mechanical devices or other means to accelerate the de
-frosting process,other than those recommended by the manufacturer.
Do not damage the refrigerant circuit.
Do not use electrical appliances inside the food storage compartments
of the appliance ,unless they are of the type recommended by the man
-ufacturer
WARNING
ADDITION
When gas leaking happens, do not remove the plug from the
outlet or adjust the temperature. Please turn off the gas first.
Please remove the plug from the outlet immediately when there are
noises, fumes or abnormal odor in the refrigerator and contact the service
center promptly.
Do not put thermal bottle, medicine or metal chains on the refrigerator.
Do not disassemble, repair and rebuild the refrigerator by yourself.
Do not let children play around the refrigerator. If the refrigerator
is to be discarded, please remove the door in order to prevent
the child from being sealed in it.
Do not put inflammable near the refrigerator.
CAUTION
When the lamp need to be replaced,please power off the wine chiller at first,
then remove the two screws that were used to fix the lamp cover,removing
the lamp cover and then pull the old lamp,replacing a new one,fixing the lamp
cover with screws .
Finally,power on the wine chiller.
Instructions for replacing the illuminating lamps
Max.rated input of lamp:7W

5
6
Safety
Name of parts
Notes concerning
operation
Maintenance
&cleaning
Set up
Troubleshooting
Control panel
Safety
Name of parts
Notes concerning
operation
Maintenance
&cleaning
Set up
Troubleshooting
Control panel
CONTROL PANEL
After the power is switched on, all indicators will light up for self-inspection and
then the refrigerator will be automatically set on the red wine mode. At that time,
the red wine indicator will light up and DISPLAY will show the actual temperature.
Note:
In the red wine mode, the temperature setting is 13 55 F |15 ~12
59 F 54 F ),
Which is suitable mainly for the storage of red wine.
In the white wine mode, the temperature setting is 7 45 F |9 ~5
48 F 41 F ), which is
suitable mainly for the storage of white wine.
In the custom mode, the temperature can be set in the range of 4 ~1
8
40 F
65 F
according to user`s requirement.
1-1 If you press the red wine key when the refrigerator is in the red wine mode,
DISPLAY will show the temperature setting 13 55 F .
1-2 If you press the red wine key when the refrigerator is not in the red wine
mode, the red wine indicator will light up, DISPLAY will show the temper
-ature setting of red wine 13 55 F and the refrigerator will start
running in
the red wine mode.
1-3 When the red wine key is released, DISPLAY will show the actual temper
-ature.
Custom
Interior light key
White wine indicator
Red wine key
White wine key
Red wine indicator
Custom indicator
Red wine
White wine
Custom
Interior light
1.RED WINE MODE
Red wine
White wine
Custom
Interior light
mode, the custom indicator will light up, DISPLAY will show the tempera
3-1 If you press the custom key when the refrigerator is in the custom mode,
DISPLAY will show the temperature setting.
3-2 If you press the custom key when the refrigerator is not in the custom
-ture preset by the user and the refrigerator will start running in the custom
mode.
3-3 When the custom key is released, DISPLAY will show the actual tempera
-ture.
4-1 Please let the refrigerator run in the user setting mode.
4-2 Press the user setting key for 3 seconds and the refrigerator will enter into
the sate for adjustment of temperature. at that time, led will flash and show
the current temperature setting.
4-3 If you press the red wine key, the temperature setting will be increased by
1 (34 F) until it becomes 18 65 F . After that, the temperature setting
will no longer change if you press the red wine key again. alternately, if
you press the white wine key, the temperature setting will be decreased by
1 34 F until it becomes 4 40 F . After that, the temperature
setting will no longer change if you press the white wine key again.
4-4 DISPLAY will show the actual temperature after 5 seconds with the comp
-letion of adjustment.
4. ADJUSTMENT OF TEMPERATURE
3.CUSTOM MODE
5-1 If you press the internal lamp key, the internal lamp will go out when it is lit,
and vice versa.
5-2 When the internal lamp is continuously lit for1 hour, it will go out
automatically.
5. INTERNAL LAMP
2-2 If you press the white wine key when the refrigerator is not in the white wine
mode, the white wine indicator will light up, DISPLAY will show the tempera
-ture
setting of white wine 7 45 F and the refrigerator will start running
in the white wine mode.
2-3 When the white wine key is released, DISPLAY will show the actual temper
-ature.
2-1 If you press the white wine key when the refrigerator is in the white wine
mode, DISPLAY will show the temperature setting 7 45 F .
2.WHITE WINE MODE

Incliner le congelateur des vins
a un angle de 30 ,et entrer les
pieds en caoutchouc sur les
pieds avant.
Ca joue une fonction
antiderapante et antivibratoire.
3
Angle Max
-
 1
1
-
 2
2
-
 3
3
-
 4
4
-
 5
5
-
 6
6
-
 7
7
-
 8
8
-
 9
9
-
 10
10
-
 11
11
-
 12
12
-
 13
13
-
 14
14
-
 15
15
-
 16
16
-
 17
17
-
 18
18


Samsung RW13EBSS User manual
- Type
- User manual
- This manual is also suitable for
Ask a question and I''ll find the answer in the document
Finding information in a document is now easier with AI
in other languages
- français: Samsung RW13EBSS Manuel utilisateur
Other documents
-
CONTINENTAL EDISON CECWC492ZC User manual
-
-
Electrolux ERC38810 User manual
-
-
Haier HBM-686XNFN User manual
-
-
-
Forno FWCDR6628-24S Owner's manual
-
Summit Appliance SWC1966BCSS User manual
-
Zephyr PRW15C01BG Owner's manual