14
USER INSTRUCTIONS
EN
GN I T OOH S E L BUOR T 4
The dishwasher can to signal a number of malfunctions by turning on various
: ) e l ba t gn i wo l l o f ees ( wo l eb deb i r csed sa , s t hg i l r o t ac i dn i
FAULT DESCRIPTION
E1
Acquastop failure
The anti-fl ooding system has tripped (only for models
fi tted with this feature). Activates in case of water leaks.
Contact the technical assistance service.
E2
Safety level
The system limiting the water level in the dishwasher
has tripped. Interrupt the current program. Switch off
the dishwasher, switch it back on again, program a new
cycle and press start. If the problem persists, contact
the technical assistance service.
E3
Water heating malfunction
The water is not heated or is incorrectly heated. Repeat
the washing program; if the problem persists, contact
the technical assistance service.
E4
Water temperature monitoring malfunction
Interrupt the current program. Switch off the dishwasher,
switch it back on again, program a new cycle and press
start. If the problem persists, contact the technical
assistance service.
E5
Water intake malfunction
The appliance does not take in water or does so
incorrectly. Make sure the water connections are
correct, that the water supply tap is open and that the
fi lter is not clogged. If the problem persists, contact the
technical assistance service.
Tab. 4-01a
FAULT DESCRIPTION
E6
Water pump-out malfunction
The appliance does not pump out the water or does so
incorrectly. Make sure the drain hose is not kinked or
crushed and that the siphon and fi lters are not clogged.
If the problem persists, contact the technical assistance
service.
E7
Turbine fl ow-regulator malfunction
(only for models fi tted with this feature)
The appliance is unable to precisely measure the
quantity of incoming water. Interrupt the current program
and switch off the dishwasher. Switch it back on again,
program a new cycle and press start. If the problem
persists, contact the technical assistance service.
E8
Alternate washing system malfunction
Interrupt the current program and switch off the
dishwasher. Switch it back on again, program a new
cycle and press start. If the problem persists, contact
the technical assistance service.
E9
Water intake system malfunction
Contact the technical assistance service.
Tab. 4-01b
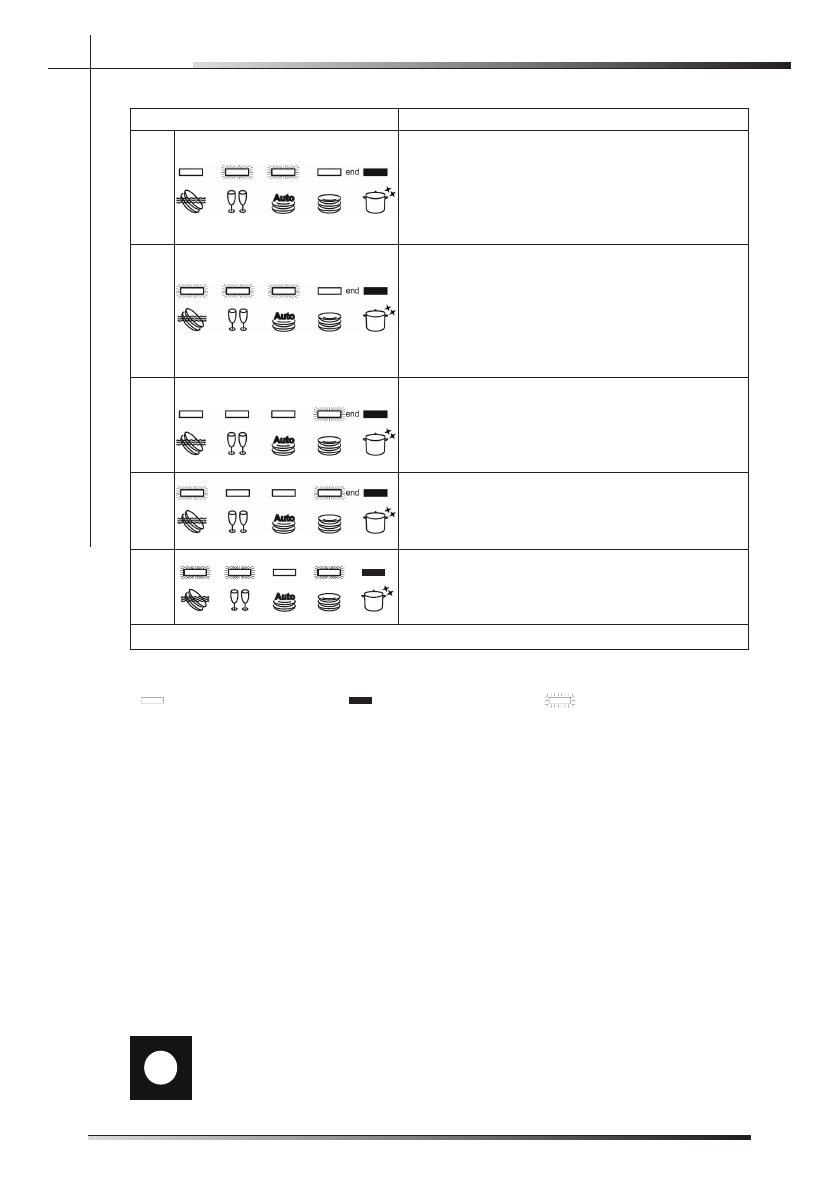
Light off Light on
Light fl ashing
If an alarm situation occurs, the dishwasher interrupts the current program and
signals the fault.
sm r a l A • E1, E2, E3, E4, E8, E9 immediately terminate the current program.
• Alarms E5, E6 interrupt the current program and, after the problem has been
eliminated, resume the cycle.
• Alarm E7 is displayed at the end of the cycle which, however, is completed
given that it does not jeopardize the operation of the dishwasher.
:mr a l a na ” t ese r “ oT
s i h t t A . n i aga f f o kcab dna no ecna i l ppa eh t hc t i ws r o , r ood eh t eso l c r o nepo
•
point, the dishwasher can be programmed again.
- r eS ecna t s i ssA l ac i nhceT dez i r oh t uA eh t t ca t noc , s t s i s r ep t l ua f eh t f I
GN I T OOH S E L BUOR T 4
The dishwasher can to signal a number of malfunctions by turning on various
: ) e l ba t gn i wo l l o f ees ( wo l eb deb i r csed sa , s t hg i l r o t ac i dn i
FAULT DESCRIPTION
E1
Acquastop failure
The anti-fl ooding system has tripped (only for models
fi tted with this feature). Activates in case of water leaks.
Contact the technical assistance service.
E2
Safety level
The system limiting the water level in the dishwasher
has tripped. Interrupt the current program. Switch off
the dishwasher, switch it back on again, program a new
cycle and press start. If the problem persists, contact
the technical assistance service.
E3
Water heating malfunction
The water is not heated or is incorrectly heated. Repeat
the washing program; if the problem persists, contact
the technical assistance service.
E4
Water temperature monitoring malfunction
Interrupt the current program. Switch off the dishwasher,
switch it back on again, program a new cycle and press
start. If the problem persists, contact the technical
assistance service.
E5
Water intake malfunction
The appliance does not take in water or does so
incorrectly. Make sure the water connections are
correct, that the water supply tap is open and that the
fi lter is not clogged. If the problem persists, contact the
technical assistance service.
Tab. 4-01a
15
USER INSTRUCTIONS
FAULT DESCRIPTION
E6
Water pump-out malfunction
The appliance does not pump out the water or does so
incorrectly. Make sure the drain hose is not kinked or
crushed and that the siphon and fi lters are not clogged.
If the problem persists, contact the technical assistance
service.
E7
Turbine fl ow-regulator malfunction
(only for models fi tted with this feature)
The appliance is unable to precisely measure the
quantity of incoming water. Interrupt the current program
and switch off the dishwasher. Switch it back on again,
program a new cycle and press start. If the problem
persists, contact the technical assistance service.
E8
Alternate washing system malfunction
Interrupt the current program and switch off the
dishwasher. Switch it back on again, program a new
cycle and press start. If the problem persists, contact
the technical assistance service.
E9
Water intake system malfunction
Contact the technical assistance service.
Tab. 4-01b
Light off
Light on
Light fl ashing
If an alarm situation occurs, the dishwasher interrupts the current program and
signals the fault.
sm r a l A • E1, E2, E3, E4, E8, E9 immediately terminate the current program.
• Alarms E5, E6 interrupt the current program and, after the problem has been
eliminated, resume the cycle.
• Alarm E7 is displayed at the end of the cycle which, however, is completed
given that it does not jeopardize the operation of the dishwasher.
:mr a l a na ” t ese r “ oT
s i h t t A . n i aga f f o kcab dna no ecna i l ppa eh t hc t i ws r o , r ood eh t eso l c r o nepo
•
point, the dishwasher can be programmed again.
- r eS ecna t s i ssA l ac i nhceT dez i r oh t uA eh t t ca t noc , s t s i s r ep t l ua f eh t f I
Wash motor pump does not work
E11
• E11: Contact the after-sales service.
GN I T OOH S E L BUOR T 4
The dishwasher can to signal a number of malfunctions by turning on various
: ) e l ba t gn i wo l l o f ees ( wo l eb deb i r csed sa , s t hg i l r o t ac i dn i
FAULT DESCRIPTION
E1
Acquastop failure
The anti-fl ooding system has tripped (only for models
fi tted with this feature). Activates in case of water leaks.
Contact the technical assistance service.
E2
Safety level
The system limiting the water level in the dishwasher
has tripped. Interrupt the current program. Switch off
the dishwasher, switch it back on again, program a new
cycle and press start. If the problem persists, contact
the technical assistance service.
E3
Water heating malfunction
The water is not heated or is incorrectly heated. Repeat
the washing program; if the problem persists, contact
the technical assistance service.
E4
Water temperature monitoring malfunction
Interrupt the current program. Switch off the dishwasher,
switch it back on again, program a new cycle and press
start. If the problem persists, contact the technical
assistance service.
E5
Water intake malfunction
The appliance does not take in water or does so
incorrectly. Make sure the water connections are
correct, that the water supply tap is open and that the
fi lter is not clogged. If the problem persists, contact the
technical assistance service.
Tab. 4-01a
15
USER INSTRUCTIONS
FAULT DESCRIPTION
E6
Water pump-out malfunction
The appliance does not pump out the water or does so
incorrectly. Make sure the drain hose is not kinked or
crushed and that the siphon and fi lters are not clogged.
If the problem persists, contact the technical assistance
service.
E7
Turbine fl ow-regulator malfunction
(only for models fi tted with this feature)
The appliance is unable to precisely measure the
quantity of incoming water. Interrupt the current program
and switch off the dishwasher. Switch it back on again,
program a new cycle and press start. If the problem
persists, contact the technical assistance service.
E8
Alternate washing system malfunction
Interrupt the current program and switch off the
dishwasher. Switch it back on again, program a new
cycle and press start. If the problem persists, contact
the technical assistance service.
E9
Water intake system malfunction
Contact the technical assistance service.
Tab. 4-01b
Light off Light on
Light fl ashing
If an alarm situation occurs, the dishwasher interrupts the current program and
signals the fault.
sm r a l A • E1, E2, E3, E4, E8, E9 immediately terminate the current program.
• Alarms E5, E6 interrupt the current program and, after the problem has been
eliminated, resume the cycle.
• Alarm E7 is displayed at the end of the cycle which, however, is completed
given that it does not jeopardize the operation of the dishwasher.
:mr a l a na ” t ese r “ oT
s i h t t A . n i aga f f o kcab dna no ecna i l ppa eh t hc t i ws r o , r ood eh t eso l c r o nepo
•
point, the dishwasher can be programmed again.
- r eS ecna t s i ssA l ac i nhceT dez i r oh t uA eh t t ca t noc , s t s i s r ep t l ua f eh t f I
vice.
QuickTime
end
QuickTime
Sanitized
1131410 6789432 5
½
1112
Auto
end
Auto
end
Auto
end
Auto
end
Auto
end
Auto
end
Auto
end
Auto
end
Auto
end
Auto
end
Auto
end
Auto
end
Auto
E1
E2
E3
E4
E5
E6
E7
E8
E9
E11


