RQT7115
2
Dear customer
Thank you for purchasing this product.
For optimum performance and safety, please read these instructions
carefully.
Table of contents
Parts and supplied accessories ................................................. 2
Caution for AC Mains Lead ......................................................... 4
Safety precautions ....................................................................... 4
Main features ................................................................................ 5
Component part names ............................................................... 6
Platter setup .................................................................................. 7
Setup .............................................................................................. 7
Connections .................................................................................. 8
Connecting with the DJ mixer.................................................... 8
Connecting the control terminals for relay play......................... 9
Connecting with the stereo amplifier (Not using the DJ mixer) ...........
9
Connecting to equipment with digital input terminals................ 9
Inserting-removing a disc or SD Memory Card ...................... 10
Display indicator .........................................................................11
Playing a CD or SD Memory Card (basic play) ....................... 12
Basic function settings.............................................................. 14
Selecting TURNTABLE mode or CD PLAYER mode .............. 14
Instant play (INSTANT CHANGE) ........................................... 14
Using the FREE WHEEL mode ............................................... 14
Adjusting the platter brake ....................................................... 14
Adjusting the auto cue level..................................................... 14
Platter operations ....................................................................... 15
Changing play with your hand ................................................. 15
Basic play for DJ’s ................................................................... 15
Changing tempo and direction of play .................................... 16
Changing tempo....................................................................... 16
Locking the pitch ...................................................................... 16
Reverse play (Reversing the platter)....................................... 16
Playing from memory................................................................. 17
Setting the auto cue point........................................................ 17
Setting the cue point at any point ............................................ 17
Play from the stored point........................................................ 17
Storing to the CUE PADS and playing .................................... 18
Store desired points to memory and play (loop play) ............. 18
Recording to the SAMPLE PADS and playing ........................ 19
Erasing cue pad, sample pad, loop play data ......................... 19
Changing the sound................................................................... 20
Changing sound to simulate analogue .................................... 20
Change sound with combined performance............................ 20
Editing the SAMPLE PADS...................................................... 20
Saving to a SD Memory Card, Recalling.................................. 21
Saving to a SD Memory Card .................................................. 21
Formatting the SD Memory Card............................................. 22
Recalling (loading) data saved on a SD Memory Card........... 22
Regarding MP3 albums and SD audio .................................... 22
Using with other equipment...................................................... 23
Start play using the mixer’s fader ............................................ 23
Using two units for relay play................................................... 23
Using the amplifier and other equipment ................................ 23
Linking different tracks............................................................. 24
Unit’s initialize memory function.............................................. 24
Initializing this unit’s memory................................................... 24
Concerning CDs ......................................................................... 25
Handling SD Memory Cards ...................................................... 25
Maintenance ................................................................................ 25
Q&A (Frequently asked questions) .......................................... 26
Troubleshooting guide............................................................... 26
Error messages .......................................................................... 27
Specifications ............................................................................. 27
AC mains lead ................................................................. 1
F
or the United Kingdom (REZ1496)
For Australia and New Zealand
(REZ1620)
For others (REZ1495)
Note
The included AC mains lead is for use with this unit only.
Do not use it with other equipment.
Stereo phono cable (SFDHBD2N01) .............................. 1
Slip surface (RGK1704-S1) ............................................. 1
www.panasonic.co.uk
(for UK customers only)
•
Order accessory and consumable items for your product with ease and confidence by tele-
phoning our Customer Care Centre Mon–Friday 9:00am–5:30pm.(Excluding public holidays.)
•
Or go on line through our Internet Accessory ordering application.
•
Most major credit and debit cards accepted.
•
All enquiries transactions and distribution facilities are provided directly by Panasonic UK Ltd.
•
It couldn’t be simpler!
Customer Care Centre
For UK customers: 08705 357357
For Republic of Ireland customers: 01 289 8333
Technical Support
For UK customers: 0870 1 505610
This Technical Support Hot Line number is for Panasonic PC software related products only.
For Republic of Ireland, please use the Customer Care Centre number listed above
for all enquiries.
For all other product related enquiries, please use the Customer Care Centre num-
bers listed above.
For United Kingdom and Republic of Ireland
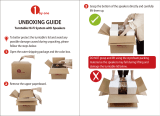
Parts and supplied accessories
Please check and identify the parts and sup-
plied accessories.
For the United Kingdom only:
Use the numbers indicated in parentheses
when asking for replacements parts.