Page is loading ...

E-Motion®
Glider & Bouncer
Owner's Manual
Read all instructions BEFORE
assembly and USE of product.
KEEP INSTRUCTIONS FOR
FUTURE USE.
IS0213E_05 ©2023 Artsana USA, INC. 06/23

3
2
Components
Failure to follow these warnings and the instructions could result
in serious injury or death
Fall and Strangulation Hazards:
Babies have suffered skull fractures
and head injuries while falling in
and from bouncers and swings and
have strangled in straps.
• Use the product ONLY on the floor.
Never use on any elevated surface.
• NEVER lift or carry baby in product.
Suffocation Hazard: Babies have
suffocated when bouncers tipped
over on soft surfaces and/or when
bouncers have been used as a sleep
product.
• NEVER use on a bed, sofa, cushion,
or other soft surface.
• Stay near and watch baby during
use. This product is not safe for
sleep or unsupervised use. If baby
falls asleep, remove baby as soon
as possible and place baby on a
firm, flat sleep surface such as a
crib or bassinet.
To prevent falls and suffocation:
• ALWAYS use restraints and adjust
to fit snugly.
• STOP using product when baby
starts trying to sit up, attempts
to climb out (approximately 9
months), or has reached 20 lbs.,
whichever comes first.
• Do not use the product if any
components are broken or missing.
• This product and all its components
must be assembled by adults only.
• Make sure that the seat cover is
always fitted correctly on the
product frame.
• Do not carry the product with child
in it.
• Periodically check for worn parts,
loose screws, worn or frayed fabrics
and immediately replace any
damaged parts.
• Do not allow children to play
unsupervised near the product.
Strangulation Hazard:
• Do not place the product near
windows or other objects where
strings, curtains or other items with
cords could become entangled with
the child.
• To prevent the risk of fire, never
place the product near electrical
appliances, gas cookers or other
sources of intense heat.
• Do not use accessories or
replacement parts other than
those approved by the Chicco.
A. - Seat Fabric
B. - Top Support Frame
C. - Base Frame
A.
B.
C.
WARNING

4 5
Components
D. - Screws
E. - Rear Legs
F. - Power Cord
D.
E.
F.
1B. Secure the Rear Legs using the
Screws (D) provided. Tighten the
Screws with a Phillips head screw
driver (not included).
How to Assemble Glider
1A
1B
1A. Place the Base Frame upsidedown
on a flat surface. Insert the Rear Legs
(E) into the Base Frame (C), as shown.

6 7
3. Line up and insert both arms of
the Base Frame into the arms of the
Top Support Frame (B). Push down
to make sure the Support Frame is
secure.
How to Assemble Glider
3
How to Assemble Glider
2
2. Turn the Base Frame right side up
and locate the lower support arms.
Lift up on the support arms until they
lock into the open position.
“CLICK!”

8 9
How to use Glider
5B. The safety harness can be released
by pressing the button on the center
of the Crotch Strap Buckle and pulling
both Waist Clips out.
5A. Slide both Waist Clips into the
Crotch Strap Buckle as shown. Pull on
both sides to make sure the Clips are
secured to the Buckle.
WARNING
Avoid serious injury from falls or sliding out. Always secure child in the restraint.
Never leave child unattended in Glider. Always keep child in view.
“CLICK!”
6. The length of the Waist Straps can
be adjusted by pressing the tab at the
end of the Waist Strap Clip and pulling
on the strap to tighten or loosen to
better fit your child.
6
5A
5B
4A. Slide the Seat Fabric (A) onto the
Top Support Frame. Pull the bottom
edge of the Seat Fabric down over the
lower section of the Support Frame.
4B. To secure the Seat Fabric to the
Support Frame, wrap the corners of
the fabric under the bottom of the
Support Frame and attach both snap
buttons.
4C. Locate the center fabric loop on
the back of the Seat Frame, as shown.
Secure the loop over the tab.
How to Assemble Glider
4A
4B4C

10 11
How to use Glider
7B. Press the Glide button on the
front of the base. The button will
light up and the Glider function will
be active for 30 minutes.
To start the movement of the Glider,
gently push on the side of the seat.
7B
How to use Glider
7A. The product may be used in a
bouncer position or glider position.
Bouncer: Press down on the lock
button on the back of the seat base,
as shown. Move the seat side to side
to make sure the locking pin is locked
into the base.
Glider: Lift up on the lock button, as
shown. The seat will be free to move
from side to side.
7A
Bouncer
Glider

12 13
8A. To use the Power Cord (F), make
sure USB end of the Power Cord is
attached to the Adapter.
8B. Insert the Power cord into the
back of the Seat Base, as shown.
Then plug the adapter into electrical
outlet.
8B
How to use Glider
8A
How to use Glider
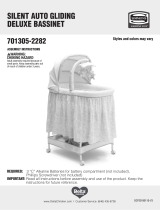
9. The Glider has a function panel on
the side of the base, as shown.
Music (top button):
Press the button to start playing the
music cycle. Press it again to stop/
restart the music.
Keep the button pressed for 2
seconds to lock the track currently
playing. The track will continue to
loop until the power is turned off/
the timer runs out/the next track is
selected.
Volume/Cycle (middle button):
Press and hold the middle button
to change the volume of the music.
While the button is pressed, the
volume will cycle through 3 settings:
low > medium > high > low, etc.
Release the button when the desired
volume is reached. Press the
button once to select a different
song. Keep pressing the button to
cycle through the songs, until desired
tune is reached. The song sequence
will restart from this point.
9
TRACK LIST
1- White noise
2- Birds chirping
3- Ocean waves
4- Rain
5- Melody 1
6- Melody 2
7- Melody 3
Timer (bottom button):
Press button once while the front
button light is lit. The light will start
to blink indicating timer mode is
active. The music and glider
function will be active for 10 minutes.
A movement from the baby or a tap
on the seat will activate another 10
minute cycle (motion only). This can
be repeated twice for a total of three
10 minute cycles.
Skipping to a new track (middle
button) while in timer mode will
reset the timer to 10 minutes.

14 15
10B. Insert the new batteries; check-
ing to make sure the polarity (+/-) on
the batteries matches the markings
on the product. Replace the battery
cover and tighten screw.
Fitting and/or Replacing Batteries
10B
10A. This Glider uses (4)1.5v AA
batteries. To replace the batteries,
loosen the screw holding the battery
cover with a Phillips screwdriver and
remove the battery cover.
10A
Fitting and/or Replacing Batteries
CAUTION
The Glider requires 4 x “AA” 1.5 Volt alkaline type batteries (not included).
• Batteries must only be installed by an adult.
• Always keep batteries and tools out of reach of children.
• Only use alkaline batteries of the same type or equivalent to the type recom-
mended for the correct function of this product.
• The use of rechargeable batteries is not recommended since they could impair
the functionality of the Glider.
• If rechargeable batteries are used, take them out of the Glider before recharg-
ing them. Batteries must always be recharged under adult supervision.
To prevent battery leaks, which can burn skin and eyes:
• Always replace the entire set of batteries at one time.
• Never mix old and new batteries, or batteries of different brands or types.
• Do not mix Alkaline, standard (carbon-zinc), or rechargeable (ni-cad) batteries.
• Make sure batteries are inserted correctly.
• Do not short-circuit the battery terminals.
• Do not attempt to recharge non-rechargeable batteries: they might explode.
• Remove batteries before putting product into storage for a long time.
• Dispose of used batteries immediately.
• Do not burn or dispose of spent batteries into the environment. Dispose of
spent batteries at an appropriate differentiated collection point.

16 17
How to remove the fabric
12. To remove the Seat Fabric, undo
the snap buttons and release the
fabric loop (see step 4C).
12
How to Fold Glider
11. To fold the Glider, lift up on the
seat back then pull back on the
release button while the seat back is
lifted. Allow the seat back to rotate
down flat, as shown. Store for
later use.
11

1918
Cleaning and Maintenance
The cleaning and maintenance of the Rocker must only be carried out by an adult.
CLEANING
The fabric seat can be removed (please refer to the steps 12-13).
Please refer to the care label for instructions on how to clean the fabric seat.
It is recommended to periodically wipe clean plastic parts with a soft damp cloth.
Always dry the metal parts to prevent the formation of rust if the Glider has come
into contact with water. Plastic can be cleaned with mild detergent and warm
water, no bleach or harsh cleaners/abrasives.
MAINTENANCE
This product requires regular maintenance. Periodically check the Glider for wear,
damage, or missing components. Should any parts be missing or damaged, the
Glider must not be used. Please call customer service for assistance.
How to remove the fabric
13. Slide the Seat Fabric off of the
Seat Frame, as shown. To replace the
Fabric, see step 4.
13

20 21
For More Information
For USA customers :
If you have any questions or comments about this product, or are missing any of
the parts, please do not return this product to the store. Contact us in one of the
following ways:
@
(877)-424-4226
1826 William Penn Way
Lancaster, PA 17601
www.chiccousa.com
FCC Information
WARNING
Changes or modifications not expressly approved by the party responsible for
compliance could void the user’s authority to operate the equipment.
NOTE: This equipment has been tested and found to comply with the limits
for a Class B digital device, pursuant to Part 15 of the FCC Rules. These limits
are designed to provide reasonable protection against harmful interference in
a residential installation. This equipment generates, uses and can radiate radio
frequency energy and, if not installed and used in accordance with the
instructions, may cause harmful interference to radio communications.
However, there is no guarantee that interference will not occur in a particular
installation. If this equipment does cause harmful interference to radio or
television reception, which can be determined by turning the equipment off
and on, the user is encouraged to try to correct the interference by one or more
of the following measures:
- Reorient or relocate the receiving antenna.
- Increase the separation between the equipment and receiver.
- Connect the equipment into an outlet on a circuit different from that to which
the receiver is connected.
- Consult the dealer or experienced radio/TV technician for help.

www.chiccousa.com
/