Page is loading ...

TBRA034_REV_A04 © 2023 FRONT RUNNER VEHICLE OUTFITTERS
Drop down tablefront runner
TBRA034
ENG
1
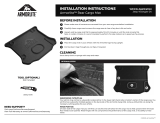
Thank you for purchasing a Front Runner Drop Down Table.
Before you start, take a moment to familiarize yourself with the Fitting Instructions and the included components.
Refer to Page 2 for a list of all the components, quantities and tools required.
READ ME!
IMPORTANT WARNING!
IT IS CRITICAL THAT ALL FRONT RUNNER PRODUCTS BE PROPERLY AND SECURELY ASSEMBLED AND ATTACHED TO YOUR VEHICLE. IMPROPER ATTACHMENT COULD
RESULT IN AN AUTOMOBILE ACCIDENT, AND COULD CAUSE SERIOUS BODILY INJURY OR DEATH. YOU ARE RESPONSIBLE FOR ASSEMBLING AND SECURING ALL FRONT
RUNNER PRODUCTS TO YOUR VEHICLE, CHECKING THE ATTACHMENTS PRIOR TO USE, AND PERIODICALLY INSPECTING THE PRODUCTS FOR ADJUSTMENT, WEAR AND
DAMAGE. THEREFORE, YOU MUST READ AND UNDERSTAND ALL OF THE INSTRUCTIONS AND PRECAUTIONS SUPPLIED WITH YOUR FRONT RUNNER PRODUCT PRIOR TO
INSTALLATION OR USE. IF YOU DO NOT UNDERSTAND ALL OF THE INSTRUCTIONS AND CAUTIONS, OR IF YOU HAVE NO MECHANICAL EXPERIENCE AND ARE NOT THOROUGHLY
FAMILIAR WITH THE INSTALLATION PROCEDURES, YOU SHOULD HAVE THE PRODUCT INSTALLED BY A PROFESSIONAL INSTALLER OR OTHER QUALIFIED PERSONNEL.
NOTE: Front Runner will not be responsible for any damage caused by the failure to install the product according to these instructions.
Please call us if you have any questions about the installation of this product.

TBRA034_REV_A04 © 2023 FRONT RUNNER VEHICLE OUTFITTERS
2
TOOLS NEEDED
FIGURE 1.1
CHECK ONLINE FOR THE LATEST FITMENT GUIDE WWW.FRONTRUNNEROUTFITTERS.COM
GET ORGANIZED
1
IN THE BOX
1 1 X Drop Down Table
2 4 X Spacer 8.2 x 18 x 10
3 4 X Jack Nut M6
4 4 X M6 x 25 Button Head
5 8 X M6 x 19 x 1 Flat Washer
6 4 X M6 Spring Washer
7 4 X M6 x 50 Button Head
8 2 X Spacer 6.2 x 10 x 35
9 2 X Spacer 6.2 x 10 x 30
10 6 X M6 x 12 x 1 Flat Washer
11 3 X M6 x 12 Button Head
12 3 X M6 Nyloc Nut
13 1 X Jack Nut Tool
14 4 X M6 x 30 Button Head
15 1 X Support Bracket For Jeep JL
6mm
4mm
12mm (15/32) 10mm (3/8)
5mm (3/16)
1
1
10
11
5
6
7
13
14
10
12
2
3
8
9
415

Find a suitable flat surface to mount the
table.
Before marking, check that the Drop Down
Table and Sliding Board do not interfere with
anything when opened and extended.
If you are fitting the Drop Down Table to a
Jeep JK, refer to step 2.2 for positioning.
Remove the trim panel if fitted.
Close the rear door and place the table on
the carpet inside the Jeep's cargo area with
the back of the table against the inside of
the door.
Move the Drop Down Table as far to the right
as possible as shown in 2.2
TBRA034_REV_A04 © 2023 FRONT RUNNER VEHICLE OUTFITTERS
3
FIT AND SECURE
2
2.1
2.2
2.3
If your vehicle has a door that opens to the
left side, you need to reposition the Stopper
Screw. Do this by removing it from the left
side of the Sliding Board and refitting it
on the right side as shown in 2.1.
If your vehicle has a door that opens to the
right side, move on to 2.2.
Drill 5mm pilot holes on the marks made,
using light pressure and taking care
only to drill through the interior panel. Widen
the holes to 12mm.
JEEP JK INSTALLATION
6mm
5mm
12mm
Stopper
Screw
Right Hinge
Door
Left Hinge
Door
JK
JK
JK
JK

3
2
10
6
4
1
13 14
3
JEEP JK INSTALLATION
Secure the Drop Down Table using M6 x 25
Button Heads, M6 Spring Washers,
M6 x 12 x 1 Flat Washers and Spacers
(Items 2, 4, 6 & 10) as shown.
TBRA034_REV_A04 © 2023 FRONT RUNNER VEHICLE OUTFITTERS
4
FIT AND SECURE
2
2.4
2.5
2.6
Insert a M6 x 30 Button Head Bolt (Item 14)
into the one side of the Jack Nut Tool
(Item 13).
Loosely tighten a Jack Nut (Item 3) onto the
Button Head Bolt as shown.
Place the assembly into one of the holes
drilled in 2.3. Using a Cordless Drill and a
4mm Allen Key Bit, set the Jack Nut (Item 3)
into the hole while holding the Jack Nut Tool
firmly.
Make sure that the Jack Nut has pulled up all
the way to the inside skin of the door panel.
Remove the trim panel from the rear door
by carefully unclipping it with a panel tool
or other similar tool.
The table may touch the cargo area mat
on models fitted with a floor subwoofer.
TIP: Keep the door closed for 24 hours
to allow the mat to form fit to the table's
shape.
JEEP JL INSTALLATION
4mm
4mm

TBRA034_REV_A04 © 2023 FRONT RUNNER VEHICLE OUTFITTERS
5
FIT AND SECURE
2
2.7
2.8
2.9
If your vehicle has the cargo Rail fitted,
remove it by loosening and removing
the three bolts shown.
Remove the trim panel.
At the inside of the trim panel,
locate the two factory indicator punch marks.
Using a 5mm drill bit, drill pilot holes on
these marks. Open the holes with a 10mm
drill bit.
On the inside of the smaller top trim
panel, locate the two round bosses shown.
Using an 5mm drill bit, drill pilot holes in the
center of each boss. Widen the holes using
a 10mm drill bit.
punch marks
Bosses
10mm
5mm
10mm

5
6
7
5
9
8
5
11
10
12
15
3
TBRA034_REV_A04 © 2023 FRONT RUNNER VEHICLE OUTFITTERS
6
FIT AND SECURE 2
2.10
2.11
2.12
Refit the two trim panels to the rear door.
Insert two 30mm Spacers (Item 9) in the top
two holes and two 35mm Spacers (Item 8) in the
bottom holes drilled earlier in the trim panels.
Secure the Drop Down Table to the rear door using
M6 x 50 Button Head Bolts, M6 Spring Washers
and M6 x 19 x 1 Flat Washers (Items 5, 6 & 7) as
shown.
5mm
12mm
4mm
Secure the Support Bracket (Item 15) to the
back of the Drop Down Table using
M6 x 12 Button Head Bolts, M6 x 12 x 1 Flat
Washers and M6 Nyloc Nuts
(Items 10, 11 & 12) using the holes shown.

TBRA034_REV _A04 © 2023 FRONT RUNNER VEHICLE OUTFITTERS
7
FIT AND SECURE
2
2.13
2.14
2.15
Remove the emergency triangle cover and
relocate the triangle to a safe place.
Take note of the mounting holes.
Remove the OEM Bolts as shown.
DEFENDER INSTALLATION

TBRA034_REV_A04 © 2023 FRONT RUNNER VEHICLE OUTFITTERS
8
2.16
2.17
FIT AND SECURE 2
Place the Spacer (Item 2) behind the Drop
Down table as shown.
Use the M6 x 50 Button Head (Item 7) to fit
the table to the door.
Fully tighten all four M6 x 50 Button Head
Screws (Item 7).
2
7
4mm
Tightening Torque:
M6 : 8-10Nm / 5.9 ft lb - 7.38 ft lb

INSTALL OTHER VEHICLE AND RACK ACCESSORIES
5
Now's the time to visit your favorite Front Runner dealer in person or online.
Be sure to tag us. We love to see our gear in action! #FrontRunnerOutfitters #BornToRoam
Share your adventures on:
FINISH
4
Congratulations! You did it. Take a step back and admire your work!
3.1
3.2
FIT AND SECURE - OPENING TABLE ANGLE 3
If you want the Drop Down Table to open
wider (if the door flex doesnt allow it to open
90 degrees), remove fasteners on both sides.
Refit the table as shown exchanging fasten-
er A and B's location.
A
B
A
B
TBRA034_REV_A04 © 2023 FRONT RUNNER VEHICLE OUTFITTERS
9
/