Toastmaster TFP2 User manual
- Category
- Small kitchen appliances
- Type
- User manual
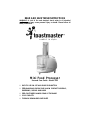
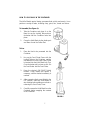
Toastmaster TFP2 is a versatile kitchen appliance that can simplify your food preparation tasks. With its powerful motor and sharp blades, TFP2 makes it easy to chop, shred, slice, and mince a variety of ingredients. The 2-cup capacity container is perfect for small to medium-sized batches, and the top-rack dishwasher-safe parts make cleanup a breeze. Whether you're making a quick snack or preparing a family meal, TFP2 is a valuable tool to have in your kitchen.
Toastmaster TFP2 is a versatile kitchen appliance that can simplify your food preparation tasks. With its powerful motor and sharp blades, TFP2 makes it easy to chop, shred, slice, and mince a variety of ingredients. The 2-cup capacity container is perfect for small to medium-sized batches, and the top-rack dishwasher-safe parts make cleanup a breeze. Whether you're making a quick snack or preparing a family meal, TFP2 is a valuable tool to have in your kitchen.


-
 1
1
-
 2
2
-
 3
3
-
 4
4
-
 5
5
-
 6
6
-
 7
7
-
 8
8
-
 9
9
-
 10
10
-
 11
11
-
 12
12
-
 13
13
-
 14
14


Toastmaster TFP2 User manual
- Category
- Small kitchen appliances
- Type
- User manual
Toastmaster TFP2 is a versatile kitchen appliance that can simplify your food preparation tasks. With its powerful motor and sharp blades, TFP2 makes it easy to chop, shred, slice, and mince a variety of ingredients. The 2-cup capacity container is perfect for small to medium-sized batches, and the top-rack dishwasher-safe parts make cleanup a breeze. Whether you're making a quick snack or preparing a family meal, TFP2 is a valuable tool to have in your kitchen.
Ask a question and I''ll find the answer in the document
Finding information in a document is now easier with AI
Related papers
-
Toastmaster TFP8W User manual
-
-
Maxim RRFP1T User manual
-
-
-
Toastmaster 6122S User manual
-
-
-
-
Other documents
-
Westinghouse WST2025ZE User manual
-
Black & Decker FP1000-FP1011 User manual
-
Black & Decker FP1000 Series Owner's manual
-
Wolfgang Puck BBLFP005 Signature Collection User manual
-
Sage the Kitchen Wizz Peel & Dice User manual
-
Whirlpool FP 1009 AC0 UK User guide
-
Cuisinart LPP User manual
-
-
Catler FP 8010 Specification
-
Wolfgang Puck Bistro BFPR0040 User manual