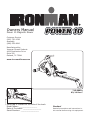
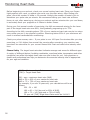
Ironman Fitness Magnetic Rower Power 10 User manual
- Type
- User manual

Owners Manual
Power 10 Magnetic Rower
Customer Service
(800) 750-4766
Assembly
(888) 559-8810
Manufactured by:
Ironman Fitness Products
4009 Distribution Drive
Suite 250
Garland, TX 75041
www.ironmantness.com
Caution!
Read all precautions and instructions in
this manual before using this equipment.
Serial tag is located on the side of the track
Model Name: ________________
Date of Purchase: ________________
Serial Number: ________________
715-00001
03/19 Rev C

2
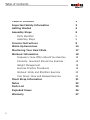
Table of Contents
Table of Contents 2
Important Safety Information 3
Getting Started 4
Assembly Steps 5
Parts Identifier 5
Assembly Steps 5
Console Instructions 9
Warm Up Excercises 14
Monitoring Your Heart Rate 17
Workout Information 19
Frequency: How Often Should You Exercise 19
Intensity: How Hard Should You Exercise 19
Weight Management 18
Exercise Practice Procedures 19
Workout: Brisk and Rhythmic Exercise 20
Cool Down: Slow and Relaxed Exercise 20
Chest Strap Information 21
Notes 22
Parts List 25
Exploded Views 26
Warranty 27

3
Important Safety information
WARNING! Before using this unit or starting any exercise program, consult
your physician. This is especially important for persons over the age of 35 and/or
persons with pre-existing health problems. The manufacturer or distributor assumes
no responsibility for personal injury or property damage sustained by or through the
use of this product.
WARNING! To reduce the risk of electrical shock, burns, re, or other possible
injuries to the user, it is important to review this manual and the following precau-
tions before operation.
SAFETY PRECAUTIONS AND TIPS
1. It is the owner’s responsibility to ensure that all users of this unit have
read the Owner’s Manual and are familiar with warnings and safety pre
cautions.
2. This unit has a user maximum capacity of 275 pounds.
3. The unit should only be used on a level surface and is intended for in
door use only. The unit should not be placed in a garage, patio, or near
water and should never be used while you are wet. Ironman Fitness
recommends a mat be placed under the unit to protect oor or carpet
and for easier cleaning.
4. Follow safety information in regards to plugging in your unit. Do not run
the power cord underneath your unit. Do not operate the unit with a
damaged or frayed power cord.
5. Wear comfortable, good-quality walking or running shoes and appropri
ate clothing. Do not use the unit with bare feet, sandals, socks or stock
ings.
6. Always examine your unit before using to ensure all parts are in working
order.
7. Allow the unit to fully stop before dismounting.
8. Pets should never be allowed near the unit.
9. Do not leave children unsupervised near or on the unit.
10. Never operate the unit where oxygen is being administered, or where
aerosol products are being used.
11. Never insert any object or body parts into any opening.
12. For safety and to prevent damage to your unit, no more than one person
should use the unit at a time.
13. Always unplug the unit before cleaning and/or servicing. Service to your
unit should only be performed by an authorized service representative,
unless authorized and/or instructed by the manufacturer.
14. Failure to follow these instructions will void the unit warranty.

4
Getting Started
Thank you for purchasing the Ironman Fitness Power 10 Magnetic Rower!
The quality product you have chosen was designed to meet your needs for cardiovas-
cular exercise. Before you start, please read the Owner’s Manual and become familiar
with the operation of your new unit. Remember to take time to perform stretching
exercises, provided in this manual, to help avoid injury.
If you are taking medication, consult your physician to see what effect the
medication will have on your exercise heart rate.
If you have heart problems, you are not active, and/or are over the age of 35
years, do not use the pre-set programs or start an exercise program without rst
contacting and receiving approval from your physician.
To avoid the risk of electrical shock, always keep the console dry. Do not spill liquids
on the console. Ironman Fitness recommends a sealed water bottle for beverages
consumed while using the unit.
Console
Seat
Track
Handle bars
Front Stabilizer
Rear Stabilizer
Right Pedal
Left Pedal
Getting Started
The Ironman Fitness Power 10 Magnetic Rower will require some assembly.
Unpack the box in a clear area. Remove packing material. Do not dispose of packing
material until assembly is complete and unit is working properly. Place the unit on a
clean level surface for assembly. Make sure there is easy access to an electrical out-
let. Before assembling, the unit should be placed as close as possible to its nal loca-
tion. If you are missing any parts, please call Ironman Fitness at 1-800-750-4766.
Tools have been provided to assist with product assembly.
(..cont.)

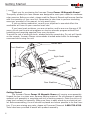
5
(A1)Main Frame
(A2) Front Stabilizer
(A4)Upper Slide Track
(B9)Saddle Set
(1) Screw
(10) Screw
(C1) Knob
- 1 -
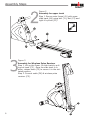
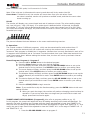
Assembly Steps
Figure 1
Assembly for front stabilizer with
main frame
Step 1. Secure the front stabilizer (A2)
and main frame (A1) using carriage bolts
(1) & Nuts (2), and Washers (27).
(A1)Main Frame
(A2) Front Stabilizer
(A4)Upper Slide Track
(B9)Saddle Set
(1) Screw
(10) Screw
(C1) Knob
- 1 -
(A1)Main Frame
(A2) Front Stabilizer
(A4)Upper Slide Track
(B9)Saddle Set
(1) Screw
(10) Screw
(C1) Knob
- 1 -
(A2) Front Stabilizer
(B3-1) Left Pedal
(B3) Right Pedal
(A1)Main Frame
(A2) Front Stabilizer
(A4)Upper Slide Track
(B9)Saddle Set
(1) Screw
(10) Screw
(C1) Knob
- 1 -
(A1)Main Frame
(A2) Front Stabilizer
(A4)Upper Slide Track
(B9)Saddle Set
(1) Screw
(10) Screw
(C1) Knob
- 1 -
B9) Seat
(A4) Upper Slide track
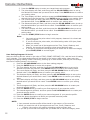
Parts Identier
Assembly Steps
Smaller parts enlarged for view
5
(1) Vis
(10) Vis
(24) Vis
(11) Vis
(2) Écrou
(12) Écrou
(27) Rondelle
(C2) Molette
(C1) Molette
(27) Rondelle
- 1 -
Étapes de montage
Illustration 1
Montage du stabilisateur avant au
cadre principal
Étape 1. Fixer le stabilisateur avant (A2)
et le cadre principal (A1) à l’aide des bou-
lons de carrosserie (1), des écrous (2) et
des rondelles (27).
(A1) Cadre principal
(A2) Stabilisateur avant
(A4) Glissière supérieure
(B3) Pédale droite
(B3-1) Pédale droite
(B9) Ensemble-selle
(1) Vis
(10) Vis
(24) Vis
(11) Vis
(2) Écrou
(12) Écrou
(27) Rondelle
(C2) Molette
(C1) Molette
(27) Rondelle
- 1 -
(A2) Front Stabilizer
(A4)Upper Slide Track
(B9)Saddle Set
(C1) Knob
(A2) Stabilisateur avant
(B3-1) Pédale gauche
(B3) Pédale droite
(A1)Main Frame
(A2) Front Stabilizer
(A4)Upper Slide Track
(B9)Saddle Set
(1) Screw
(10) Screw
(C1) Knob
- 1 -
(A1)Main Frame
(A2) Front Stabilizer
(A4)Upper Slide Track
(B9)Saddle Set
(1) Screw
(10) Screw
(C1) Knob
- 1 -
B9) Selle
(A4) Glissière supérieure
Identificateur de pièces
Étapes de montage
Petites pièces agrandies aux fins d’illustration
Outil
6mm
13/14mm
14mm 21mm
Tool

6
6
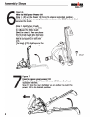
Assembly Steps
Figure 2
Assembly for upper track
Step 1. Secure main frame (A1) with upper
slide track (A4) using bolt (11), Nut (12) and
tight it by knob (C2).
Figure 3
Assembly for Wireless Pulse Receiver
Step 1. Lift up the Power 10 slide track by pull-
ing out knob (C2). Once the slide track is in
place, release knob (C2) to secure it in the elel-
vated position.
Step 2. Connect cable (D8) & wireless pulse
receiver (C5).
5
(1) Vis
(10) Vis
(24) Vis
(11) Vis
(2) Écrou
(12) Écrou
(27) Rondelle
(C2) Molette
(C1) Molette
(27) Rondelle
- 1 -
Étapes de montage
Illustration 1
Montage du stabilisateur avant au
cadre principal
Étape 1. Fixer le stabilisateur avant (A2)
et le cadre principal (A1) à l’aide des bou-
lons de carrosserie (1), des écrous (2) et
des rondelles (27).
(A1) Cadre principal
(A2) Stabilisateur avant
(A4) Glissière supérieure
(B3) Pédale droite
(B3-1) Pédale droite
(B9) Ensemble-selle
(1) Vis
(10) Vis
(24) Vis
(11) Vis
(2) Écrou
(12) Écrou
(27) Rondelle
(C2) Molette
(C1) Molette
(27) Rondelle
- 1 -
(A2) Front Stabilizer
(A4)Upper Slide Track
(B9)Saddle Set
(C1) Knob
(A2) Stabilisateur avant
(B3-1) Pédale gauche
(B3) Pédale droite
(A1)Main Frame
(A2) Front Stabilizer
(A4)Upper Slide Track
(B9)Saddle Set
(1) Screw
(10) Screw
(C1) Knob
- 1 -
(A1)Main Frame
(A2) Front Stabilizer
(A4)Upper Slide Track
(B9)Saddle Set
(1) Screw
(10) Screw
(C1) Knob
- 1 -
B9) Selle
(A4) Glissière supérieure
Identificateur de pièces
Étapes de montage
Petites pièces agrandies aux fins d’illustration
Outil
6mm
13/14mm
14mm 21mm

7
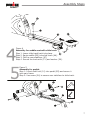
Assembly Steps
Figure 5
Assembly for pedals
Step 1: Insert shaft bolt (10) into pedal (B3) and secure it
into main frame.
Step 2: Use screw (24) to secure rear stabilizer to slide track.
Figure 4
Assembly for saddle seat with slide track
Step 1. Lower slide track back into place.
Step 2. Equip saddle (B9) into slide track (A4).
Step 3. Fold up rear stabilizer (A7)
Step 4. Secure the knob with (C1) and washer (28).
5
(1) Vis
(10) Vis
(24) Vis
(11) Vis
(2) Écrou
(12) Écrou
(27) Rondelle
(C2) Molette
(C1) Molette
(27) Rondelle
- 1 -
Étapes de montage
Illustration 1
Montage du stabilisateur avant au
cadre principal
Étape 1. Fixer le stabilisateur avant (A2)
et le cadre principal (A1) à l’aide des bou-
lons de carrosserie (1), des écrous (2) et
des rondelles (27).
(A1) Cadre principal
(A2) Stabilisateur avant
(A4) Glissière supérieure
(B3) Pédale droite
(B3-1) Pédale droite
(B9) Ensemble-selle
(1) Vis
(10) Vis
(24) Vis
(11) Vis
(2) Écrou
(12) Écrou
(27) Rondelle
(C2) Molette
(C1) Molette
(27) Rondelle
- 1 -
(A2) Front Stabilizer
(A4)Upper Slide Track
(B9)Saddle Set
(C1) Knob
(A2) Stabilisateur avant
(B3-1) Pédale gauche
(B3) Pédale droite
(A1)Main Frame
(A2) Front Stabilizer
(A4)Upper Slide Track
(B9)Saddle Set
(1) Screw
(10) Screw
(C1) Knob
- 1 -
(A1)Main Frame
(A2) Front Stabilizer
(A4)Upper Slide Track
(B9)Saddle Set
(1) Screw
(10) Screw
(C1) Knob
- 1 -
B9) Selle
(A4) Glissière supérieure
Identificateur de pièces
Étapes de montage
Petites pièces agrandies aux fins d’illustration
Outil
6mm
13/14mm
14mm 21mm


9
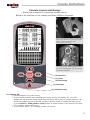
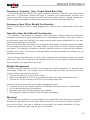
Console Instructions
Console Layout and Design
Take a few moments to review the console layout.
Below is an overview of the console and their different functions.
A. Powering Up:
Connect adapter into power source1.
If the connection cables were installed incorrectly, monitor will display “E1” on matrix 2.
display and will generate a long beeping sound. Before asking service, please examine if all
connection cables are well connected and then reset the power to release the beep sound
or press START / STOP (Hold to reset) button to restart system. If the monitor still show
“E1” message, please call service.
If the monitor shows “ E2 ”message, please call service.3.
(b) Start/Stop
(a) Pulse Recovery
(c) Enter
(d) Increase
(e) Decrease
To change from miles to kilometers and
vice versa, ip the switch highlighted inside
the circle. Once switched, you must restart
the console to activate.
The miles / kilometer switch is located on the
back of the console. To remove the console,
push in the tab of the lower part
of the console and lift up.

10
Console Instructions
B. Button Functions:
Enter
This button is used to confirm desired settings into the console for function
purposes.
- During PAUSE mode, press ENTER key to enter desired program.
Start/Stop
This button is used to start and stop training.
Recovery
This button is used to begin the recovery feature of the console (Heart rate chest strap must be worn
to activate this feature.) When pressed, the recovery button will begin to check pulse from the moni-
toring system located in the chest strap.
F1.0 = Excellent F2.0 = Good F3.0 = Fair F4.0 = Below average
F5.0 = Not Good F6.0 = Poor
Up/Down
When changing settings of a program, these buttons are used to increase/decrease the value of any
setting input, such as: TIME, WEIGHT, and AGE.
C. Console Functions:
TIME
Exercise time will be shown on the display when exercising. If there is no signal detected within 4
minutes the console will shut off.
Count up: Without setting the time value, the monitor will count up the time from 0:00
to 99:59.
Count down: Setting the exercise time, the monitor will count down from your set
values. Once reach setting value, monitor will produce an audible sound. The time will
stop and summary is shown on screen.
COUNT
Count will be shown on the display when exercising. If there is no signal detected within 4 minutes,
the console shuts down.
Count up: Without setting the count value, the monitor will count up the count from 0
to 9999.
Count down: If exercise time is set, the monitor will count down from your set
values. Once set value is reached, monitor will produce an audible sound.
CALORIE
The calories burned will be displayed on the window. It ranges from 0.0 to 999k cal.
Count up: Without setting the calorie value, the monitor will count up the count from
0.0 to 999.
Count down: If calorie consumption is set, the monitor will count down from your
set values. Once set value is reached, monitor will produce an audible sound.
DISTANCE
The distance will be displayed on the window. The monitor begins to calculate from 1 yard to 999 yard
and then the measure unit is 1 yard. After 1000 yards is reached, the measure unit becomes 0.6 mi
(1000 yards). The monitor will display from 0.6 to 99.9 mi.
Count up: Without setting the distance value, the monitor will count up from 1 yard.

11
Console Instructions
Once it reaches 1000 yards, it will convert to 0.6 miles.
Note: If the units are by kilometers the count up and down will be by meters into KM.
Count down: If distance is set, the monitor will count down from your set values. Once
set value is reached, monitor will produce an audible sound, and then the count value
starts counting up.
PULSE
The monitor will display your current heart beat rate in beats per minute. The pulse reading ranges
are: Low (40 bpm) - High (220 bpm). If no pulse signal is detected within 16 seconds, the display
will indicate “P” You can input a desired target heart rate - input value ranges from 90 to 220. Once
your heart rate exceeds set target, the pulse window will blink to inform you that your heart rate has
exceeded your target.
The picture indicates the travel distance on the rower machine during exercise.
D. Operation:
The console contains 12 different programs, which can be customized for total workout time. If
you don’t preset the workout time, the console will count up the workout time in one-second
increment. Each program is divided into 10 segments. Workout time is evenly distributed in each of the
10 segment with the default set at 3 minutes if no total workout time is set. When total workout time
is set, time counts down. Without setting the workout time, the time will count up and each interval
will retain 3 minutes.
Preset Program: Program 1- Program 7
Press the 1. UP or DOWN button to the desired program.
Press the 2. Enter Button to enter your desired program.
The Time display will ash, and then press the 3. UP OR DOWN button to set up the
desired time to do the exercise. Press ENTER button to conrm your setting value.
The count display will ash, and then press the 4. UP OR DOWN button to set up the
desired value. Press ENTER button to conrm your setting value.
The distance display will ash, and then press the 5. UP OR DOWN button to set up the
desired distance you would like to reach. Press ENTER button to conrm your setting
value.
The calorie display will ash, and then press the 6. UP OR DOWN button to set up the
desired calorie you would like to reach. Press ENTER button to conrm your setting
value.
Press the 7. START/STOP to begin exercise.
Note: If you would like to skip the function setting, press the ENTER button to the next
setting function.
When you reach the target, the monitor will produce a beeping sound and stop its 1.
operation. If you set up more than one target and you would like to reach next
target, press start to exercise again.
TARGET HEART RATE PROGRAM: (Program 8) (also refer to program proles on pg. 13)
In this program, the console will adjust the level of loading according to the heart rate detected. For
example, the level of loading may increase while the heart rate detected is lower than TARGET H. R.
Also, the level of loading may decrease while the heart rate detected is higher than TARGET H. R. As a
result, the user’s heart rate will be adjusted to close the TARGET H.R. in the range of TARGET H.R. –5
and TARGET H.R. +5.
Press the 1. UP AND DOWN button to program 8.

12
Console Instructions
Press the 2. ENTER button to enter your target heart rate program.
The pulse display will ash, and then press the 3. UP OR DOWN button to set up
the desired limit heart rate you would like to keep. Press ENTER button to conrm
your setting value.
The Time display will ash, and then press the 4. UP OR DOWN button to set up the
desired time to do the exercise. Press ENTER button to conrm your setting value.
The count display will ash, and then press the 5. UP OR DOWN button to set up
the desired value. Press ENTER button to conrm your setting value.
The distance display will ash, and then press the 6. UP OR DOWN button to set up
the desired distance you would like to reach. Press ENTER button to conrm your
setting value.
The calorie display will ash, and then press the 7. UP OR DOWN button to set up
the desired calorie you would like to reach. Press ENTER button to conrm your
setting value.
Press the 8. START/STOP button to begin exercise.
Note:
You must set up the pulse value in this program, because it is a heart rate 1.
control program.
If you do not set the pulse value, the initial setting value is 90 bpm (heart 2.
beats per minute).
When you reach one of the targets such as Time, Count, Distance, and 3.
Calories, the monitor will produce a beep sound and then stop.
If you set up more than one target and you would like to reach next target, 4.
press START/STOP to exercise again.
User Setting Program: U1 to U4
Users are free to edit the values in the order of TIME, COUNT, DISTANCE, CAL, and the level of loading
in 10 intervals. The values and proles will be stored in the memory after setup. Users may also
change the ongoing loading in each interval by pressing up or down button, and they will not change
the level of loading stored in the memory.
Press the 1. UP AND DOWN button to the User setting program.
Press the 2. ENTER button to enter this program.
The Time display will ash, and then press the 3. UP OR DOWN button to set up the
desired time to do the exercise. Press ENTER button to conrm your setting value.
The count display will ash, and then press the 4. UP OR DOWN button to set up the
desired value. Press ENTER button to conrm your setting value.
The distance display will ash, and then press the 5. UP OR DOWN button to set up the
desired distance you would like to reach. Press ENTER button to conrm your setting
value.
The calorie display will ash, and then press the 6. UP OR DOWN button to set up the
desired calorie you would like to reach. Press ENTER button to conrm your setting
value.
The rst segment will ash, and then press the 7. UP OR DOWN button to create your
personal exercise prole.
Press the 8. ENTER button to conrm your rst segment of your exercise prole.
The second segment will ash, and then press the 9. UP OR DOWN button to create your
personal exercise prole.
Press the 10. ENTER button to conrm your second segment of your exercise prole.
Follow the above descriptions to nish your personal exercise prole.11.
Press the 12. START/ST0P to begin exercise.
NOTE:
1. Your personal exercise prole will be stored in the memory of the monitor.
2. When you reach the one of the targets such as Time, Count, Distance, and
Calories, the monitor will produce a beeping sound and then stop.
3. If you set up more than one target and you would like to reach next target, press

13
Console Instructions
Program Proles
1. Program 1 ( Manual )
6. Program 6 ( Manual )
2. Program 2 ( Rolling )
7. Program 7 ( Intervals )
8. Program 8 ( Mountain )
9. Program 9 ( User setting )
10. Program 10 ( User setting )
11. Program 11 ( User setting )
12. Program 12 ( User setting )
3. Program 3 ( Valley )
4. Program 4 ( Fat Burn )
5. Program 5 ( Ramp )
Program proles

14
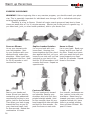
Warm up Excercises
EXERCISE GUIDELINES
WARNING! Before beginning this or any exercise program, you should consult your physi-
cian. This is especially important for individuals over the age of 35 or individuals with pre-
existing health problems.
Flexibility is a key to fitness. Stretch all major muscle groups at least two to three
times per week after a 5 to 10 minute warmup. Stretch just to the point of a gentle tug. If
you have back, joint, or other health problems, talk to your doctor first.
Prone on Elbows
Lie on your stomach with
your feet together. Rest
on your forearms with your
elbows directly under your
shoulders. Relax lower back
and abdomen into oor. Hold
for 30-60 seconds or until
muscles feel looser.
Supline Lumbar Rotation
Lie on your back with your
knees bent. Keeping your
knees together and your shoul-
ders against the oor, roll your
knees to one side until you feel
a stretch in your back or hip.
Hold for 30-60 seconds or until
muscles feel looser. Repeat on
opposite side.
Knees to Chest
Lie on your back. Bend your
knees, and lift your feet off
the oor. Grasp your knees
with your arms and pull your
knees toward your chest.
Hold for 20 seconds. Repeat
three to ve times.
Cat and Camel
Rest on your hands and
knees. Round your back by
contracting your abdominal
muscles and tucking in your
pelvis; hold for ve seconds.
Then allow your back to sag
toward the oor as you lift
your chest and head; hold
for ve seconds. Repeat the
combination 10 times
Cervical Side Bends
Tilt your head gently toward
one shoulder, keeping your
shoulders level and your face
pointed straight ahead. Hold
for ve seconds, then tilt your
head toward the other shoulder
and hold for ve seconds. Re-
peat ve times on each side.
Shoulder Circles
In a smooth, continuous mo-
tion, make a circle with your
shoulders: Raise them up
towards your ears, pull them
together behind you, lower
them to a resting position,
then roll them forward. Re-
peat 10 times.

15
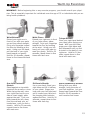
Warm Up Excercises
Wrist Extensor
Extend your right arm in
front of you with your palm
up and your elbow straight.
Point your ngertips toward
the oor by bending at the
wrist. Using your left hand,
pull the back of your right
hand toward you gently.
Hold for 20 seconds; repeat
three to ve times with each
arm.
Triceps Stretch
Place your right hand behind
your head, palm facing your
head. With your left hand,
grasp your right elbow and
pull downward until you feel
a stretch in the back of your
right arm. Hold for 20 sec-
onds; repeat three to ve
times with each arm.
Piriformis Stretch
Lie on your back. Bend your
right knee and lift it halfway
to your chest. Grasp your
knee with your left hand and
pull it toward your left shoul-
der, keeping both buttocks
against the oor. Hold for 20
seconds; repeat three to ve
times with each leg.
Groin (Adductors) Stretch
Sitting with your back
straight, bring the soles of
your feet together. Let your
knees lower toward the oor.
Hold for 30-60 seconds or
until muscles feel looser.
One-Arm Pectoralis
Stretch
Stand against an immobile
structure like a wall or a tree.
While facing the wall, raise
your right hand out to your
side at chest height, palm
against the wall. Turn your
body toward the left, away
from the wall and your ex-
tended arm, until you feel a
stretch. Hold for 20 seconds;
repeat three to ve times
with each arm.
WARNING! Before beginning this or any exercise program, you should consult your physi-
cian. This is especially important for individuals over the age of 35 or individuals with pre-ex-
isting health problems.
Wrist Flexor
Extend your right arm in front
of you, palm down, elbow
straight. Point your ngertips
toward the oor by bending
at the wrist. Using your left
hand, pull your right palm to-
ward you gently. Hold for 20
seconds; repeat three to ve
times with each arm.

16
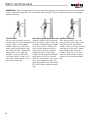
Warm Up Excersises
Standing Quadriceps Stretch
Steady yourself with one hand.
With the other, grab outside leg
at ankle, keeping body straight
from knee to hip. Gently pull
foot up and towards the but-
tocks until you feel a stretch
along the front of the thigh.
Thigh should be pulled straight
back and not drift to outside.
Hold 20-30 seconds. For varia-
tion, grab opposite ankle (i.e.,
grab right ankle with left hand).
Do two to three repetitions per
leg.
Achilles Stretch
Face the wall with your left
foot ahead of your right, toes
straight ahead. Bend both
knees, press your hips forward,
and lean into the wall. Keep
both heels down and both
knees in line with your feet.
Hold for 20 seconds; repeat
three to ve times with each
leg.
Calf Stretch
Face a solid structure such as
a wall with your left foot ahead
of your right, toes straight
ahead. Bend your left knee,
press your hips forward, and
lean into the wall. Keep both
heels down, your right leg
straight, and you left knee
over your ankle. Hold for 20
seconds; repeat three to ve
times with each leg.
WARNING! Before beginning this or any exercise program, you should consult your physician.
This is especially important for individuals over the age of 35 or individuals with pre-existing
health problems.

17
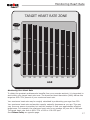
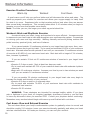
Monitoring Heart Rate
100%
85%
75%
60%
Serious
athletic
training range
Cardiovascular
conditioning
range
Fat burning
range
20 25 30 35 40 45 50 55 60 65
AGE
200
195
190
185
180
175
170
165
160
155
170
166
162
157
153
149
145
140
136
132
150
146
143
139
135
131
128
124
120
116
120
117
114
111
108
105
102
99
96
93
TARGET HEART RATE ZONE
Monitoring Your Heart Rate
To obtain the greatest cardiovascular benefits from your exercise workout, it is important to
work within your target heart rate zone. The American Heart Association (AHA) defines this
target as 60%-75% percent of your maximum heart rate.
Your maximum heart rate may be roughly calculated by subtracting your age from 220.
Your maximum heart rate and aerobic capacity naturally decreases as you age. This may
vary from one person to another, but use this number to find your approximate effective
target zone. For example, the maximum heart rate for an average 40 year-old is 180 bpm.
The target heart rate zone is 60%-75% of 180 or 108-135 bpm.
See Fitness Safety on opposite page.

18
Monitoring Heart Rate
Before beginning your workout, check your normal resting heart rate. Place your fingers
lightly against your neck, or against your wrist over the main artery. After finding your
pulse, count the number of beats in 10 seconds. Multiply the number of beats by six to
determine your pulse rate per minute. We recommend taking your heart rate at these
times; at rest, after warming up, during your workout and two minutes into your cool down,
to accurately track your progress as it relates to better fitness.
During your first several months of exercising, the AHA recommends aiming for the lower
part of the target heart rate zone-60%, then gradually progressing up to 75%.
According to the AHA, exercising above 75% of your maximum heart rate may be too stren-
uous unless you are in top physical condition. Exercising below 60% of your maximum will
result in minimal cardiovascular conditioning.
Check your pulse recovery rate – If your pulse is over 100 bpm five minutes after you stop
exercising, or if it’s higher than normal the morning after exercising, your exertion may
have been too strenuous for your current fitness level. Rest and reduce the intensity next
time.
Fitness Safety The target heart rate chart indicates average rate zones for different ages.
A variety of different factors (including medication, emotional state, temperature and other
conditions) can affect the target heart rate zone that is best for you. Your physician or
health care professional can help you determine the exercise intensity that is appropriate
for your age and condition.
(MHR) = Maximum Heart Rate
(THR) = Target Heart Rate
220 - age = maximum heart rate (MHR)
MHR x .60 = 60% of your maximum heart rate.
MHR x .75 = 75% of your maximum heart rate.
For example, if you are 30 years old, your calculations will be as
follows:
220 - 30 = 190
190 x .60 = 114 (low end or 60% of MHR)
190 x .75 = 142 (high end or 75% of MHR)
30 year-old (THR) Target Heart Rate would be 114-142

19
Workout Information
Frequency, Intensity, Time, Target Heart Rate Zone
The exercise practices include four major variables: frequency, intensity, time, target heart
rate zone. A continuous workout will help to improve your cardiovascular functions and
increase the ability of your muscles to obtain the oxygen and nutrition. A good workout pro-
vides a greater advantage to extend the endurance of muscle and body flexibility.
Frequency: How Often Should You Exercise
Three to five times a week is highly suggested to improve your cardiovascular and muscle
fitness.
Intensity: How Hard Should You Exercise
The intensity of an exercise is reflected in your heart rate. Exercise must be sufficient to
strengthen your heart muscle and condition your cardiovascular system. Only your doctor or
an authorized coach can prescribe the target training heart range appropriate for your par-
ticular needs and physical condition.
Start with exercise that stimulates you to breathe more deeply. Alternate periods of moder-
ate and easy exercise to help your body adapt to new levels of exertion without unneces-
sary strain. The inability to maintain a smooth, rhythmic motion is a sign that your speed or
elevation is too high. If you feel out of breath before you have exercised 12 minutes, you are
probably overdoing it.
As your fitness level improves, you will need to increase your workload to reach your target
heart rate. The first increase may be necessary after two to four weeks of regular exercise.
Never exceed your target heart rate zone.
Weight Management
Consistent aerobic exercise will help you change your body composition by lowering your
percentage of body fat. For weight control, how long and how often you exercise is more
important than how hard you exercise.
Exercise at least four to five times a week.
Reach and maintain 60-75% of your maximum heart rate with moderate exercise.
Exercise for 30-45 minutes at 60-65% of your target heart rate.
Here are some tips to achieve your weight management goal.
Consume most of your dietary calories at breakfast and lunch, and eat a light dinner.
Do not eat anything near the bedtime.
Moderate exercise will help suppress your appetite.
Take regular breaks and rests to help increase metabolism.
Warning!
If you have any questions or concerns about your target heart rate consult your physician
Medications may affect your heart rate. Stop exercise if: you feel faint or dizzy, acute ill-
ness (cold or fever), any pain or tightness in your chest, an irregular heartbeat, of if you
exceed your maximum heart rate set by your physician.

20
Workout Information
Exercise Practice Procedures
Warm-Up Workout Cool Down
A good warm-up will help you perform better and will decrease the aches and pains. The
warm-up prepares your muscles for exercise and allows your oxygen supply to ready itself
for what is to come. Experience tells us that muscles perform best when they are warmer
than normal body temperature. This normally takes about 5-10 minutes when you begin to
perspire on your brow and breathe more deeply.
Note: The older you are, the longer your warm-up period should be.
Workout: Brisk and Rhythmic Exercise
A workout trains your heart, lungs, and muscles to be more efficient. Increase exercise
in response to your heart rate to train and strengthen your cardiovascular system. Concentrate
on moving your arms and legs smoothly. Walking naturally and avoid jerking motions like
pulled muscles, sprained joints, and loss of balance.
If you cannot sustain 12 continuous minutes in your target heart rate zone, then, exer-
cise several times a day to get into habit. Try to reach and maintain 60-65% of your maximum
heart rate. Alternate exercise with periods of rest until you can sustain 12 continuous minutes
of exercise at 60-65% of your maximum heart rate. Best start with a target of 3-4 minutes,
then, increase it gradually.
If you can sustain 12 but not 20 continuous minutes of exercise in your target heart
rate zone:
Exercise 3-5 days a week. Rest at least two days per week.•
Try to reach and maintain 65-70% of your maximum heart rate with moderate rhythmic •
exercises.
Begin with 12 continuous minutes. Increase your time by one to two minutes per week •
until you can sustain 20 continuous minutes.
If you can sustain 20 minutes continuously in your target heart rate zone, begin to
increase the length and intensity of your workout.
Exercise 4-6 days a week or on alternate days.•
Try to reach and maintain 70~85% of your maximum heart rate with moderate to •
somewhat hard exercise.
Exercise 20-30 minutes.•
WARNING: These strategies are intended for average healthy adults. If you have
pain or tightness in your chest, an irregular heartbeat, shortness of breath or you feel faint
or have any discomfort when you exercise STOP. Consult your physician before continuing.
Remember every workout should begin with warm-up and finished with cool-down.
Cool down: Slow and Relaxed Exercise
The cool-down allows your body’s cardiovascular system to gradually return to normal and
should be roughly 5-10 minutes. Lower your exercise intensity gradually, and when your heart
rate has returned below 110 beats per minutes, you can end your workout.
Page is loading ...
Page is loading ...
Page is loading ...
Page is loading ...
Page is loading ...
Page is loading ...
Page is loading ...
Page is loading ...
-
 1
1
-
 2
2
-
 3
3
-
 4
4
-
 5
5
-
 6
6
-
 7
7
-
 8
8
-
 9
9
-
 10
10
-
 11
11
-
 12
12
-
 13
13
-
 14
14
-
 15
15
-
 16
16
-
 17
17
-
 18
18
-
 19
19
-
 20
20
-
 21
21
-
 22
22
-
 23
23
-
 24
24
-
 25
25
-
 26
26
-
 27
27
-
 28
28


Ironman Fitness Magnetic Rower Power 10 User manual
- Type
- User manual
Ask a question and I''ll find the answer in the document
Finding information in a document is now easier with AI
Related papers
-
Ironman Fitness Charger Owner's manual
-
-
-
-
-
-
Ironman Fitness Exploit 100125 User manual
-
-
-
Other documents
-
New Balance Home Gym 3300 User manual
-
Proteus ISS 500 Owner's manual
-
 Body-Solid R300 Assembly Manual
-
Kettler 7861-859.A Computer Manual
-
 Diamondback Fitness Response U6c Owner's manual
-
 Diamondback Fitness Response R8c Owner's manual
-
BH FITNESS S1RIB Owner's manual
-
BLADEZ AEROPRO H930 Owner's manual
-
-


