Page is loading ...

ISTRUZIONI D’USO E DI INSTALLAZIONE
INSTALLATION AND USER’S MANUAL
INSTRUCTIONS D’UTILISATION ET D’INSTALLATION
INSTALLATIONS-UND GEBRAUCHSANLEITUNG
INSTRUCCIONES DE USO Y DE INSTALACION
INSTRUÇÕES DE INSTALAÇÃO
DISSUASORE DI PASSAGGIO E SOSTA
ANTI-TRANSITING AND WAITING RETRACTABLE BOLLARD
BORNE ANTI-ACCES ET ANTI-STATIONNEMENT
VERSENKBARER POLLER ZUR SPERRUNG VON DURCHFAHRTEN UND HALTEZONEN
DISUASOR DE TRANSITO y ESTACIONAMIENTO
CONDICIONADOR DE TRÂNSITO e ESTACIONAMENTO
Attenzione! Leggere attentamente le “Avvertenze” all’interno! Caution! Read “Warnings” inside carefully! Attention! Veuillez lire attentivement les Avertissements qui se trouvent à l’intérieur! Achtung! Bitte lesen Sie
aufmerksam die „Hinweise“ im Inneren! ¡Atención¡ Leer atentamente las “Advertencias”en el interior! Let op! Lees de “Waarschuwingen” aan de binnenkant zorgvuldig!
D811943_02 07-08-12
STOPPY MBB 219 - 500.C
STOPPY MBB 219 - 700.C
STOPPY CASE 500
STOPPY CASE 700
8
027908 422101

A
AL
2x1mm
2
4x1mm
2
16x1mm
2
3x1mm
2
3x1mm
2
3x1mm
2
2x1,5mm
2
RG58
3x1,5mm
2
QR
I
P
Fte
S
M
Fre
T
SF
SM
SM
FONDAZIONE, FOUNDATION, FONDATION,
FUNDAMENT, FOSA, FOSA
B
POSA TUBO IN CEMENTO, LAYING THE CEMENT TUBE,
POSE TUBE EN CIMENT, LEGEN DES ZEMENTROHRS,
COLOCACIÒN TUBO DE CEMENTO, ASSENTAMENTO
TUBO DE CIMENTO
1500
B
C
PREDISPOSIZIONE TUBI, TUBE ARRANGEMENT,
PRÉDISPOSITION DES TUYAUX, VORBEREITUNG DER LEITUNGEN,
DISPOSICIÓN DE TUBOS, DISPOSIÇÃO DOS TUBOS
1500
1500
D
STOPPY MBB 219-500.C STOPPY MBB 219-700.C
200
1100
915
A B
C
D
E
F
G
H
1300
1000
A B
C
D
E
F
G
H
200
1400
1165
1250
INSTALLAZIONE VELOCE-QUICK INSTALLATION-INSTALLATION RAPIDE
SCHNELLINSTALLATION-INSTALACIÓN RÁPIDA - INSTALAÇÃO RÁPIDA
a) Prima di iniziare con l’installazione bisogna leggere le avvertenze.
a) Before commencing installation, make sure you read the warnings.
a) Avant de commencer l’installation lisez les avertissements.
a) Vor der Installation müssen die Hinweise gelesen werden.
a) Antes de comenzar con la instalación es necesario leer las adver-
tencias.
a) Antes de iniciar a instalação é preciso ler as advertências.
b) Oltre alle gure, bisogna seguire le indicazioni date nel paragrafo corrispondente a pag.5
b) In addition to the gures, you must follow the instructions given in the relevant section on page 7
b) Suivez non seulement les gures mais aussi les indications données dans le paragraphe correspondant à
la page 9
b) Außer den Abbildungen müssen die Angaben im entsprechenden Abschnitt auf Seite 6 befolgt werden 11
b) Además de las guras, es necesario seguir las indicaciones dadas en el apartado correspondiente en pág. 13
b) Além das guras, é preciso seguir as indicações dadas no parágrafo correspondente na pág.15
A) Asfalto,
B) Cemento
C) Guaina Ø50
D) Sabbia compatta
E) Ø800 x 1000 H
F) Sabbia ne
G) Ghiaia
H) Drenaggio Ø125
A) Road surface
B) Cement
C) Sheathing Ø50
D) Compact sand
E) Ø800 x 1000 H
F) Fine sand
G) Pebble gravel
H) Drainage Ø125
A) Asphalte
B) Ciment
C) Gaine Ø50
D) Sable compact
E) Ø800 x 1000 H
F) Sable n
G) Gravier
H)
Drainage Ø125
A) Asfalto
B) Cemento
C) Vaina Ø50
D) Arena compacta
E) Ø800 x 1000 H
F) Arena na
G) Gravilla
H) Drenaje Ø125
A) Asfalto
B) Cimento
C) Baínha Ø50
D) Areia compacta
E) Ø800 x 1000 H
F) Areia na
G) Seixo
H) Drenagem Ø125
A) Asphalt
B) Zement
C) Anschluss Ø50
D) Verdichtetetsand
E) Ø800 x 1000 H
F) Feiner sand
G) Kies
H) Drainage Ø125
2 - STOPPY MBB 219-500.C - STOPPY MBB 219-700.C
D811943_02

E
F
G
H
1
2
3
4
~ 200
Sabbia ne
Fine sand
Sable n
Feiner sand
Arena na
Areia na
A) STOPPY MBB 219-500.C 915 mm
A) STOPPY MBB 219-700.C 1165 mm
A
SENSO DI MARCIA
RUNNING DIRECTION
SENS DE MARCHE
FAHRTRICHTUNG
DIRECCIÓN DE MARCHA
SENTIDO DE MARCHA
Filo terra
Ground surface level
Hauteur au sol
Bodenniveau
Nivel del pavimento
Cabo à terra
*
180
**
Ø 219
Ø 225
Ø 295
32
360
360
1 LIVELLARE COL PIANO STRADALE / LEVEL WITH THE ROAD SURFACE
/NIVELER SUR LE PLAN DE LA ROUTE / MIT DER STRASSENEBENE
AUSRICHTEN / NIVELAR CON EL NIVEL DE LA CALZADA/ NIVELAR COM
A SUPERFÍCIE DA ESTRADA
2 RIEMPIRE DI SABBIA FINO A ~200 mm DAL PIANO STRADALE / FILL
WITH SAND TO ~200 MM FROM THE ROAD SURFACE / REMPLIR AVEC
DU SABLE JUSQU’À ~200MM DU PLAN DE LA ROUTE / BIS AUF ~200
MM VON DER STRASSENEBENE MIT SAND BEFUELLEN / LLENAR DE
ARENA HASTA ~200 MM DEL NIVEL DE LA CALZADA/ ENCHER COM
AREIA ATÉ ~200 mm DA SUPERFÍCIE DA ESTRADA
3 POSARE LA RETE ELETTROSALDATA / LAY THE ELECTROWELDED MESH
POSER LA GRILLE ELECTRO-SOUDÉE / DIE BAUSTAHLMATTE VERLEGEN
COLOCAR LA REJILLA ELECTROSOLDADA/ ASSENTAMENTO DA REDE
DE ARMADURA
4 COMPLETARE LA PAVIMENTAZIONE / FLOORING COMPLETION /
COMPLETER LE SOL / DEN BODENBELAG FERTIGSTELLEN / TERMINAR
EL PAVIMENTO/ COMPLETAR A PAVIMENTAÇÃO
* **
STOPPY MBB 219-500.C 490 915
STOPPY MBB 219-700.C 700 1165
ITALIANO ENGLISH
FRANÇAIS
DEUTSCH
ESPAÑOL
PORTUGUÊS
STOPPY MBB 219-500.C - STOPPY MBB 219-700 3
D811943_02

Scatola elettrica
electrical enclosure
boîtier électrique
Elektrikfach
caja eléctrica
Caixa elétrica
Finecorsa/Limit switch/Fin de course/
Endschalter /Final de carrera / Fim-de-curso
Finecorsa/Limit switch/Fin de course/
Endschalter/Final de carrera/Fim-de-curso
Cappello con/senza luci
Top cap with/without lights
Chapeau avec/sans lumières
Kappe mit/ohne Beleuchtung
Sombrerete con/sin luces
Chapéu/sem luzes
GND
Non collegato / Not used
Non utilisé / Nicht verwendet
No utilizado / Não utilizado
Ingresso necorsa apertura/
Opening limit switch input/
Entrée n de course ouverture
Eingang Endschalter Önung
Entrada nal de carrera apertura
Entrada da chave abrindo limite
Elettrofreno/Electric brake/
Electrofrein/Elektrobremse/
Electrofreno/Travão eléctrico
Elettrofreno/Electric brake/
Electrofrein/Elektrobremse/
Electrofreno/Travão eléctrico
Elettrofreno/Electric brake/
Electrofrein/Elektrobremse/
Electrofreno/Travão eléctrico
Luci/lights/lumières/
Beleuchtung/luces/luzes
Luci/lights/lumières/
Beleuchtung/luces/Luzes
Buzzer
Buzzer
Antifurto/anti-theft/antivol
Diebstahlsicherung/antirrobo/
Anti-furto
Cavo 16 poli/
16-wire cable/
Câbles 16 pôles/
Kabel mit
16 Polen/
Cable 16 polos/
Cabo de 16 pólos
Cavo 16 poli/
16-wire cable/
Câbles 16 pôles/
Kabel mit
16 Polen/
Cable 16 polos/
Cabo de 16 pólos
NERO/BLACK/NOIR/SCHWARZ/NEGRO/PRETO
BLU/BLUE/BLEU/BLAU/AZUL/AZUL
MARRONE/BROWN/MARRON/BRAUN/
MARRÓN/MARROM
TERRA/EARTH/TERRE/ERDE/TIERRA/TERRA
VERDE/GREEN/VERT/GRÜN/VERDE/VERDE
BIANCO/WHITE/BLANC/WEIß/BLANCO/BRANCO
GIALLO/YELLOW/JAUNE/GELB/AMARILLO/AMARELO
ROSA/PINK/ROSE/ROSA/ROSA
M
Motore / Motor
moteur/Motor
Eindaanslag/
Motor
Motore / Motor
moteur/Motor
Eindaanslag/
Motor
Motore / Motor
moteur/Motor
Eindaanslag/Motor
24Vac
LED
EF
BZ
FCA
MOTA
COM MOT
MOTB
COM
I
L
88
Antifurto/anti-theft/antivol
Diebstahlsicherung/antirrobo
Anti-furto
ARANCIONE/ORANGE/ORANGE/
ORANGE/ANARANJADO/LARANJA
NC
Antifurto/anti-theft/antivol
Diebstahlsicherung/antirrobo
Anti-furto
ROSSO/RED/ROUGE/ROT/ROJO/VERMELHO
4 - STOPPY MBB 219-500.C - STOPPY MBB 219-700.C
D811943_02

INSTALLAZIONE OPERATORE CON PREDISPOSIZIONE CASSAFORMA
OPERATOR INSTALLATION IN READY INSTALLED FOUNDATION BOX
INSTALLATION DE L’OPÉRATEUR AVEC PRÉDISPOSITION PUISARD
INSTALLATION DES TRIEBS MIT VORBEREITUNG DES KASTENS
INSTALACIÓN OPERADOR CON DISPOSICIÓN ENCOFRADO
INSTALAÇÃO DO OPERADOR COM PREDISPOSIÇÃO DA COFRAGEM
K
L
PREINSTALLAZIONE CASSA DI FONDAZIONE VUOTA
PRE-INSTALLING THE EMPTY FOUNDATION BOX
PRÉINSTALLATION DU PUISARD VIDE
VORINSTALLATION DES LEEREN FUNDAMENTKASTENS
PREINSTALACIÓN CAJA DE CIMENTACIÓN VACÍA
PRÉ-INSTALAÇÃO DA CAIXA DE FUNDAÇÃO VAZIA
PREPARAZIONE CASSA DI FONDAZIONE PER
INSTALLAZIONE OPERATORE / PREPARING THE
FOUNDATION BOX FOR OPERATOR INSTALLATION /
PRÉPARATION DU PUISARD POUR INSTALLER
L'OPÉRATEUR / VORBEREITUNG DES
FUNDAMENTKASTENS FÜR DIE INSTALLATION DES
TRIEBS / PREPARACIÓN CAJA DE CIMENTACIÓN PARA
INSTALACIÓN OPERADOR / PREPARAÇÃO DA CAIXA
DE FUNDAÇÃO PARA INSTALAÇÃO DO OPERADOR
M
PREPARAZIONE DISSUASORE PER L’INSTALLAZIONE NELLA CASSAFORMA / PREPARING THE BOLLARD FOR
INSTALLATION IN THE FOUNDATION BOX / PRÉPARATION DE LA BORNE ESCAMOTABLE POUR L'INSTALLATION DANS LE
PUISARD / VORBEREITUNG DES POLLERS FÜR DIE INSTALLATION IM KASTEN / PREPARACIÓN DISUASOR PARA LA
INSTALACIÓN EN EL ENCOFRADO / PREPARAÇÃO DO DISSUASOR PARA A INSTALAÇÃO NA COFRAGEM
L3
L2
L1
STOPPY MBB 219-500.C - STOPPY MBB 219-700 5
D811943_02

PERSEO CBD 230.P SD
N
POSIZIONAMENTO CAVO DI ALIMENTAZIONE / POSITIONING THE POWER CABLE
MISE EN PLACE DU CÂBLE D'ALIMENTATION / POSITIONIERUNG DES KABELS DER
STROMVERSORGUNG / POSICIONAMIENTO CABLE DE ALIMENTACIÓN
POSICIONAMENTO DO CABO DE ALIMENTAÇÃO
O
O1
O3
O2
INSERIMENTO DISSUASORE NELLA CASSA DI FONDAZIONE / INSERTING THE BOLLARD IN THE FOUNDATION BOX /
INTRODUCTION DE LA BORNE ESCAMOTABLE DANS LE PUISARD / EINSETZEN DES POLLERS IN DEN FUNDAMENTKASTEN
/ INTRODUCCIÓN DISUASOR EN LA CAJA DE CIMENTACIÓN / INTRODUÇÃO DO DISSUASOR NA CAIXA DE FUNDAÇÃO
A circa da 10 cm da terra ruotare in senso antiorario
Approx. 10 cm above the ground, turn anticlockwise
A environ 10 cm du sol faites tourner en sens antihoraire
Auf ca.10 cm vom Boden in Gegenuhrzeigersinn drehen
Aproximadamente 10 cm del suelo girar en el
sentido contrario a las agujas del reloj
A cerca de 10 cm do chão girar no sentido anti-horário
~10 cm
Posizione discesa
Lowered position
position descente
Position Absenkung
Posición bajada
Posição de descida
30°
V1
V1
M8
6 - STOPPY MBB 219-500.C - STOPPY MBB 219-700.C
D811943_02

P
FISSAGGIO DISSUASORE / FASTENING THE BOLLARD / FIXATION DE LA BORNE ESCAMOTABLE
BEFESTIGUNG DES POLLERS / FIJACIÓN DISUASOR / FIXAÇÃO DO DISSUASOR
Q
Q1
Q2
REGOLAZIONE ALTEZZA E CONCENTRICITA’ / ADJUSTING HEIGHT AND CONCENTRICITY / RÉGLAGE DE LA HAUTEUR
ET DE LA CONCENTRICITÉ / EINSTELLUNG DER HÖHE UND DER KONZENTRIZITÄT / REGULACIÓN ALTURA Y
CONCENTRICIDAD / REGULAÇÃO DA ALTURA E CONCENTRICIDADE
1
1
1
1
1
D1
R1
D1
R1
> 1 giro = regolazione a filo terra cappello in ghisa
> 1 turn = cast iron top cap adjustment flush with ground
> 1 tour = réglage au ras du sol chapeau en fonte
> 1 Umdrehung = Einstellung Abschluss Boden Abdeckung
aus Gusseisen
> 1 vuelta = regulación al ras del suelo sombrerete de fundición
> 1 volta = regulação no chão porca de ferro fundido
< 1 giro = regolazione concentricità dello stelo
< 1 turn = adjust rod concentricity
< 1 tour = réglage concentricité de la tige
< 1 Umdrehung = Einstellung Konzentrizität des Schafts
< 1 vuelta = regulación concentricidad del vástago
< 1 volta = regulação da concentricidade do espigão
OK
OK
10 mm
10 mm
STOPPY MBB 219-500.C - STOPPY MBB 219-700 7
D811943_02

ENGLISH
INSTALLER WARNINGS
Anything that is not explicitly provided for in the installation ma-
nual is not allowed. The operator’s proper operation can only be
guaranteed if the information given is complied with. The Firm shall
not be answerable for damage caused by failure to comply with the
instructions featured herein.
While we will not alter the product’s essential features, the Firm re-
serves the right, at any time, to make those changes deemed oppor-
tune to improve the product from a technical, design or commercial
point of view, and will not be required to update this publication
accordingly.
WARNING! Important safety instructions. Carefully read and comply with
all the warnings and instructions that come with the product as incorrect
installation can cause injury to people and animals and damage to property.
The warnings and instructions give important information regarding safety,
installation, use and maintenance. Keep hold of instructions so that you can
attach them to the technical le and keep them handy for future reference.
GENERAL SAFETY
This product has been designed and built solely for the purpose indicated herein.
Uses other than those indicated herein might cause damage to the product and
create a hazard.
- The units making up the machine and its installation must meet the requirements
of the following European Directives, where applicable: 2004/108/EC, 2006/95/
EC, 2006/42/EC, 89/106/EC, 99/05/EC and later amendments. For all countries
outside the EEC, it is advisable to comply with the standards mentioned, in ad-
dition to any national standards in force, to achieve a good level of safety.
- The Manufacturer of this product (hereinafter referred to as the “Firm”) disclaims
all responsibility resulting from improper use or any use other than that for
which the product has been designed, as indicated herein, as well as for failure
to apply Good Practice in the construction of entry systems (doors, gates, etc.)
and for deformation that could occur during use.
- Before installing the product, make all structural changes required to produce
safety gaps and to provide protection from or isolate all crushing, shearing and
dragging hazard areas and danger zones in general in accordance with the
provisions of standards EN 12604 and 12453 or any local installation standards.
Check that the existing structure meets the necessary strength and stability
requirements.
- Before commencing installation, check the product for damage.
- The Firm is not responsible for failure to apply Good Practice in the construction
and maintenance of the doors, gates, etc. to be motorized, or for deformation
that might occur during use.
- Make sure the stated temperature range is compatible with the site in which the
automated system is due to be installed.
- Do not install this product in an explosive atmosphere: the presence of ammable
fumes or gas constitutes a serious safety hazard.
- Disconnect the electricity supply before performing any work on the system.
Also disconnect buer batteries, if any are connected.
- Before connecting the power supply, make sure the product’s ratings match the
mains ratings and that a suitable residual current circuit breaker and overcurrent
protection device have been installed upline from the electrical system. Have
the automated system’s mains power supply tted with a switch or omnipolar
thermal-magnetic circuit breaker with a contact separation that meets code
requirements.
- Make sure that upline from the mains power supply there is a residual current
circuit breaker that trips at no more than 0.03A as well as any other equipment
required by code.
- Make sure the earth system has been installed correctly: earth all the metal parts
belonging to the entry system (doors, gates, etc.) and all parts of the system
featuring an earth terminal.
- Installation must be carried out using safety devices and controls that meet
standards EN 12978 and EN 12453.
- Impact forces can be reduced by using deformable edges.
- In the event impact forces exceed the values laid down by the relevant standards,
apply electro-sensitive or pressure-sensitive devices.
- Apply all safety devices (photocells, safety edges, etc.) required to keep the
area free of impact, crushing, dragging and shearing hazards. Bear in mind the
standards and directives in force, Good Practice criteria, intended use, the instal-
lation environment, the operating logic of the system and forces generated by
the automated system.
- Apply all signs required by current code to identify hazardous areas (residual
risks). All installations must be visibly identied in compliance with the provisions
of standard EN 13241-1.
- Once installation is complete, apply a nameplate featuring the door/gate’s data.
- This product cannot be installed on leaves incorporating doors (unless the motor
can be activated only when the door is closed).
- If the automated system is installed at a height of less than 2.5 m or is accessible,
the electrical and mechanical parts must be suitably protected.
- Install any xed controls in a position where they will not cause a hazard, away
from moving parts. More specically, hold-to-run controls must be positioned
within direct sight of the part being controlled and, unless they are key operated,
must be installed at a height of at least 1.5 m and in a place where they cannot
be reached by the public.
- Apply at least one warning light (ashing light) in a visible position, and also
attach a Warning sign to the structure.
- Attach a label near the operating device, in a permanent fashion, with informa-
tion on how to operate the automated system’s manual release.
- Make sure that, during operation, mechanical risks are avoided or relevant
protective measures taken and, more specically, that nothing can be banged,
crushed, caught or cut between the part being operated and surrounding parts.
- Once installation is complete, make sure the motor automation settings are
correct and that the safety and release systems are working properly.
- Only use original spare parts for any maintenance or repair work. The Firm dis-
claims all responsibility for the correct operation and safety of the automated
system if parts from other manufacturers are used.
- Do not make any modications to the automated system’s components unless
explicitly authorized by the Firm.
- Instruct the system’s user on what residual risks may be encountered, on the
control systems that have been applied and on how to open the system manu-
ally in an emergency. give the user guide to the end user.
- Dispose of packaging materials (plastic, cardboard, polystyrene, etc.) in accord-
ance with the provisions of the laws in force. Keep nylon bags and polystyrene
out of reach of children.
WIRING
WARNING! For connection to the mains power supply, use: a multicore cable with
a cross-sectional area of at least 5x1.5mm
2
or 4x1.5mm
2
when dealing with three-
phase power supplies or 3x1.5mm
2
for single-phase supplies (by way of example,
type H05 VV-F cable can be used with a cross-sectional area of 4x1.5mm
2
). To con-
nect auxiliary equipment, use wires with a cross-sectional area of at least 0.5 mm
2
.
- Only use pushbuttons with a capacity of 10A-250V or more.
- Wires must be secured with additional fastening near the terminals (for example,
using cable clamps) in order to keep live parts well separated from safety extra
low voltage parts.
- During installation, the power cable must be stripped to allow the earth wire
to be connected to the relevant terminal, while leaving the live wires as short
as possible. The earth wire must be the last to be pulled taut in the event the
cable’s fastening device comes loose.
WARNING! safety extra low voltage wires must be kept physically separate from
low voltage wires.
Only qualied personnel (professional installer) should be allowed to access
live parts.
CHECKING THE AUTOMATED SYSTEM AND MAINTENANCE
Before the automated system is nally put into operation, and during maintenance
work, perform the following checks meticulously:
- Make sure all components are fastened securely.
- Check starting and stopping operations in the case of manual control.
- Check the logic for normal or personalized operation.
- For sliding gates only: check that the rack and pinion mesh correctly with 2 mm
of play along the full length of the rack; keep the track the gate slides on clean
and free of debris at all times.
- For sliding gates and doors only: make sure the gate’s running track is straight
and horizontal and that the wheels are strong enough to take the weight of the
gate.
- For cantilever sliding gates only: make sure there is no dipping or swinging
during operation.
- For swing gates only: make sure the leaves’ axis of rotation is perfectly vertical.
- Check that all safety devices (photocells, safety edges, etc.) are working properly
and that the anti-crush safety device is set correctly, making sure that the force
of impact measured at the points provided for by standard EN 12445 is lower
than the value laid down by standard EN 12453.
- Impact forces can be reduced by using deformable edges.
- Make sure that the emergency operation works, where this feature is provided.
- Check opening and closing operations with the control devices applied.
- Check that electrical connections and cabling are intact, making extra sure that
insulating sheaths and cable glands are undamaged.
- While performing maintenance, clean the photocells’ optics.
- When the automated system is out of service for any length of time, activate the
emergency release (see “EMERGENCY OPERATION” section) so that the operated
part is made idle, thus allowing the gate to be opened and closed manually.
-
If the power cord is damaged, it must be replaced by the manufacturer or their
technical assistance department or other such qualied person to avoid any risk .
- If “D” type devices are installed (as dened by EN12453), connect in unveried
mode, foresee mandatory maintenance at least every six months
WARNING!
Remember that the drive is designed to make the gate/door easier to use and
will not solve problems as a result of defective or poorly performed installation
or lack of maintenance
SCRAPPING
Materials must be disposed of in accordance with the regulations in force. There
are no particular hazards or risks involved in scrapping the automated system. For
the purpose of recycling, it is best to separate dismantled parts into like materials
(electrical parts - copper - aluminium - plastic - etc.).
DISMANTLING
If the automated system is being dismantled in order to be reassembled at another
site, you are required to:
- Cut o the power and disconnect the whole electrical system.
- Remove the actuator from the base it is mounted on.
- Remove all the installation’s components.
- See to the replacement of any components that cannot be removed or happen
to be damaged.
AVVERTENZE PER L’INSTALLATORE D811766_06
STOPPY MBB 219-500.C - STOPPY MBB 219-700 11
D811943_02

INSTALLATION MANUAL
12 - STOPPY MBB 219-500.C - STOPPY MBB 219-700.C
D811943_02
1) GENERAL OUTLINE
Underground anti-waiting bollard, compact and sturdy.
Comprises a steel rod driven by an oil-immersed motor. Protected by a steel
cylinder with an electrophoretic coating, to be set in the ground.
The PERSEO CBD.P SD control panel allows up to four bollards to be controlled
simultaneously.
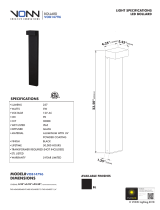
2) TECHNICAL SPECIFICATIONS FOR STOPPY MBB ACTUATOR
MOTOR
Motor
220-230V 50/60Hz (*)
Capacitor 10 µF
Power input 300 W
Limit switch magnetic reed sensor
Absorption 1,4 A (230V) 2,4 A (110V)
Work frequency intensive
Degree of protection
IP 67
Control panel PERSEO CBD.P SD
Electric brake 24Vdc
Working time
6 s (- STOPPY MBB 219-500.C)
9 s (- STOPPY MBB 219-700.C)
Working temperature
–25°C + 60°C (with Termon activate)
Front impact resistance
on rod raised by 350 mm
8,000 Joule (50% breakagepossibility)
Static Load
Max. sustainable weight with raised rod: 300kg
Max. sustainable weight with lowered rod: 15,000 kg
Weight
90 kg (- STOPPY MBB 219-500.C)
110 kg (- STOPPY MBB 219-700.C)
Dimensions see g. H
Manual manoeuvre
If there is no power, it becomes reversible by
cutting o the power
(* other voltages available on request)
3) ELECTRICAL INSTALLATION SET-UP
Lay out the electrical installation as shown in g. A, making reference to the
current CEI 64-8, IEC 364 (HD 384 harmonised) electrical standards, and other
national standards.
WARNING! For connection of the control panel to the mains, use a multico-
lour cable having a minimum 3x1.5 sq mm cross section of the type set out
by the current standards. For example, if the cable is installed outside (in
the open air), it must be at least equal to H07RN-F, whereas, if it is installed
inside (in a raceway), it must be at least equal to H05 VV-F and have a 3x1.5
sq mm cross section.
To connect the bollard to the control panel, use cable supplied as standard and
already wired inside the bollard. Should the cable be too short, join it inside a
watertight box, using two separate cables for low voltage and mains voltage
connections.
Particular attention must be paid in separating and xing the wiring, so that the low
voltage and mains voltage cables are prevented from coming into contact.
Connect the control and safety devices in compliance with the installation techni-
cal standards mentioned previously.
Fig. A shows the number of connections and their cross section for an approxi-
mate length of 100 metres: in case of longer cables, calculate the cross section
for the true automation load.
Example of installation:
I Type-approved omnipolar circuit breaker, which must be adequately
rated and have at least 3,5 mm contact opening, provided with protec-
tion against overloads and short circuits. If not already installed, place
a type-approved dierential switch with a 0.03A threshold just before
the automation system.
QR Control panel and incorporated receiver
S Key selector
AL Blinker with tuned antenna
M Bollard
P Wall-mounted pushbutton panel
Fte, Fre Pair of photocells
T 1-2-4 channel transmitter
SF Red and green trac lights
SM Magnetic coil
NOTE: The choice of the type and number of safety devices to be installed
depends on the particular use and installation location.
4) PRELIMINARY CHECKS
Check that the installation base is stable and level.
For correct operation, the bollard does not require precise verticality; however,
to obtain a good aesthetic result, it is advisable to proceed to levelling the instal-
lation area so as to ensure that the rod stroke is perfectly vertical.
5) FOUNDATION DIGGING AND BOLLARD POSITIONING
• Proceed as shown in g. B .
• Carry out electrical installation (see paragraph 3).
6) MALFUNCTIONS. CAUSES AND REMEDIES
• If the rod fails to raise, check that the mains power is on, that the backup bat-
teries, if any, are in proper working order and that the fuses have not blown.
Also check the motor’s connections to the control panel.
• If the rod does not move down, it is probable that an Open command is
constantly given from the control panel or other external device. Therefore
temporarily disconnect all the external devices in order to identify the cause
of the problem. If the rod still remains raised, proceed to disconnecting the
power supply and then checking the control panel. Anyway, when the power
supply is o, the rod should spontaneously tend to lower; if this does not hap-
pen, proceed to disassembly in order to identify any mechanical problems
preventing the lowering manoeuvre.
7) DISMANTLING
When the automation device is disassembled to be reassembled on another site,
proceed as follows:
• Disconnect the power supply and the entire electrical installation
• Remove the bollard, taking care not to damage the sheath which is to protect
the electric cables during the digging operations.
• Disassemble the control panel and all the installation components.
• In the case where some of the components cannot be removed or are dam-
aged, they must be replaced.
8 HEATING ELEMENT
The Perseo CBD.P SD control unit has the TERMON setting incorporated, which
regulates the temperature dierence between the bollard motor and the
outdoor temperature in degrees centigrade, which passes the current through
the motor windings to keep the temperature constant especially in cold envi-
ronment conditions.
9 ANTITHEFT SYSTEM
A reed sensor is installed under the ange of models designed for this, which ena-
bles connecting an external antitheft system. If there is an attempt to tamper with
the bollard, the sensor activates the alarm system (orange wires, NC contact).
OPERATOR INSTALLATION IN READY INSTALLED FOUNDATION BOX
10 PREINSTALLING THE EMPTY FOUNDATION BOX AND SEALING WITH
RELEVANT COVER FIG.K
11 PREPARING THE FOUNDATION BOX FOR OPERATOR INSTALLATION FIG.L
Remove the cover, unscrew the anchor nuts and remove the four thread
protection screws.
Clean the base and the surface the device will sit on, removing any debris.
12 PREPARING THE BOLLARD FOR INSTALLATION IN THE FOUNDATION
BOX FIG.M
Unscrew the fastening screws and remove the cast iron ange
13 POSITIONING THE POWER CABLE FIG.N
14 INSERTING THE BOLLARD IN THE FOUNDATION BOX FIG.O
Lower STOPPY into the foundation box turned 30°.
With the bollard held approx. 10 cm above the ground, as illustrated in gure
O2, turn it anticlockwise.
To lift STOPPY, use the eyebolts as illustrated in gure O1.
15 FASTENING THE BOLLARDFIG.P
16 ADJUSTING HEIGHT AND CONCENTRICITY FIG.Q
Adjust height by turning the screws shown in gure Q (Ref.1).
Once you have nished adjusting height (ref. Q1), turn the same screws between 0
and 360° until you are happy the bollard sits concentrically in its housing (rif. Q2).
NOTE: the same screws are used to adjust both height and concentricity.
17 FITTING THE CAST IRON FLANGE FIG.R

- Se presente la batteria è necessario interrompere l’alimentazione della batteria
- If a battery is tted, you will need to cut o battery power/
- S’il y a une batterie il faut interrompre l’alimentation de la batterie/
- Falls die Batterie vorhanden ist, muss die Stromversorgung der Batterie unter-
brochen werden.
-
Si estuviera presente la batería, es necesario interrumpir la alimentación de la misma
- Se a bateria é presente, é necessário interromper a alimentação da bateria.
STOPPY MBB 219-500.C - STOPPY MBB 219-700
21
D811943_02
Fig. 1
ON
OFF
ON
AVVERTENZE PER L’UTILIZZATORE ( I )
ATTENZIONE! Importanti istruzioni di sicurezza. Leggere e seguire attentamente le
Avvertenze e le Istruzioni che accompagnano il prodotto poiché un uso improprio può
causare danni a persone, animali o cose. Conservare le istruzioni per consultazioni future
e trasmetterle ad eventuali subentranti nell’uso dell’impianto.
Questo prodotto dovrà essere destinato solo all’uso per il quale è stato espressamente
installato. Ogni altro uso è da considerarsi improprio e quindi pericoloso. Il costruttore
non può essere considerato responsabile per eventuali danni causati da usi impropri,
erronei e irragionevoli.
SICUREZZA GENERALE
Nel ringraziarVi per la preferenza accordata a questo prodotto, la Ditta è certa che da esso otterrete
le prestazioni necessarie al Vostro uso.
Questo prodotto risponde alle norme riconosciute della tecnica e della disposizioni relative alla
sicurezza se correttamente installato da personale qualicato ed esperto (installatore professionale).
L’automazione, se installata ed utilizzata correttamente, soddisfa gli standard di sicurezza nell’u-
so. Tuttavia è opportuno osservare alcune regole di comportamento per evitare inconvenienti
accidentali:
- Tenere bambini, persone e cose fuori dal raggio d’azione dell’automazione, in particolare
durante il movimento.
- Non permettere a bambini di giocare o sostare nel raggio di azione dell’automazione.
- Questa automazione non è destinata all’uso da parte di bambini o da parte di persone con ridotte
capacità mentali, siche e sensoriali, o persone che mancano di conoscenze adeguate a meno che
esse non abbiano potuto beneciare, attraverso l’intermediazione di una persona responsabile
della loro sicurezza, di una sorveglianza o di istruzioni riguardanti l’uso dell’apparecchio.
- I bambini devono essere sorvegliati per sincerarsi che non giochino con l’apparecchio. Non
permettere ai bambini di giocare con i controlli ssi. Tenere i telecomandi lontani dai bambini.
-
Evitare di operare in prossimità delle cerniere o organi meccanici in movimento.
-
Non contrastare il movimento dell’anta e non tentare di aprire manualmente la porta se non è
stato sbloccato l’attuatore con l’apposita manopola di sblocco.
- Non entrare nel raggio di azione della porta o cancello motorizzati durante il loro movimento.
- Non lasciare radiocomandi o altri dispositivi di comando alla portata dei bambini onde evitare
azionamenti involontari.
- L’attivazione dello sblocco manuale potrebbe causare movimenti incontrollati della porta se in
presenza di guasti meccanici o di condizioni di squilibrio.
- In caso di apritapparelle: sorvegliare la tapparella in movimento e tenere lontano le persone
nché non è completamente chiusa. Porre cura quando si aziona lo sblocco se presente, poiché
una tapparella aperta potrebbe cadere rapidamente in presenza di usura o rotture.
-
La rottura o l’usura di organi meccanici della porta (parte guidata), quali ad esempio cavi, molle,
supporti, cardini, guide.. potrebbe generare pericoli. Far controllare periodicamente l’impianto da
personale qualicato ed esperto (installatore professionale) secondo quanto indicato dall’installatore
o dal costruttore della porta.
- Per ogni operazione di pulizia esterna, togliere l’alimentazione di rete.
- Tenere pulite le ottiche delle fotocellule ed i dispositivi di segnalazione luminosa. Controllare
che rami ed arbusti non disturbino i dispositivi di sicurezza.
- Non utilizzare l’automatismo se necessita di interventi di riparazione. In caso di guasto o di mal-
funzionamento dell’automazione, togliere l’alimentazione di rete sull’automazione, astenersi da
qualsiasi tentativo di riparazione o intervento diretto e rivolgersi solo a personale qualicato ed
esperto (installatore professionale) per la necessaria riparazione o manutenzione. Per consentire
l’accesso, attivare lo sblocco di emergenza (se presente).
-
Per qualsiasi intervento diretto sull’automazione o sull’impianto non previsto dal presente manuale,
avvalersi di personale qualicato ed esperto (installatore professionale).
- Con frequenza almeno annuale far verificare l’integrità e il corretto funzionamento
dell’automazione da personale qualicato ed esperto (installatore professionale), in particolare
di tutti i dispositivi di sicurezza.
- Gli interventi d’installazione, manutenzione e riparazione devono essere documentati e la relativa
documentazione tenuta a disposizione dell’utilizzatore.
- Il mancato rispetto di quanto sopra può creare situazioni di pericolo.
Tutto quello che non è espressamente previsto nel manuale d’uso, non è permesso. ll buon
funzionamento dell’operatore è garantito solo se vengono rispettate le prescrizioni ripor-
tate in questo manuale. La Ditta non risponde dei danni causati dall’inosservanza delle
indicazioni riportate in questo manuale.
Lasciando inalterate le caratteristiche essenziali del prodotto, la Ditta si riserva di apportare
in qualunque momento le modiche che essa ritiene convenienti per migliorare tecnica-
mente, costruttivamente e commercialmente il prodotto, senza impegnarsi ad aggiornare
la presente pubblicazione.
USER WARNINGS (GB)
WARNING! Important safety instructions. Carefully read and comply with the Warnings
and Instructions that come with the product as improper use can cause injury to people
and animals and damage to property. Keep the instructions for future reference and hand
them on to any new users.
This product is meant to be used only for the purpose for which it was explicitly installed.
Any other use constitutes improper use and, consequently, is hazardous. The manufacturer
cannot be held liable for any damage as a result of improper, incorrect or unreasonable use.
GENERAL SAFETY
Thank you for choosing this product. The Firm is condent that its performance will meet your
operating needs.
This product meets recognized technical standards and complies with safety provisions when installed
correctly by qualied, expert personnel (professional installer).
If installed and used correctly, the automated system will meet operating safety standards.
Nonetheless, it is advisable to observe certain rules of behaviour so that accidental problems
can be avoided:
- Keep adults, children and property out of range of the automated system, especially while it is
moving.
- Do not allow children to play or stand within range of the automated system.
- This automated system is not meant for use by children or by people with impaired mental,
physical or sensory capacities, or people who do not have suitable knowledge, unless a person
who is responsible for their safety provides them with necessary supervision or instructions on
how to use the device.
- Children must be supervised to ensure they do not play with the device. Do not allow children
to play with the xed controls. Keep remote controls out of reach of children.
- Do not work near hinges or moving mechanical parts.
- Do not hinder the leaf’s movement and do not attempt to open the door manually unless the
actuator has been released with the relevant release knob.
- Keep out of range of the motorized door or gate while they are moving.
- Keep remote controls or other control devices out of reach of children in order to avoid the
automated system being operated inadvertently.
- The manual release’s activation could result in uncontrolled door movements if there are me-
chanical faults or loss of balance.
- When using roller shutter openers: keep an eye on the roller shutter while it is moving and keep
people away until it has closed completely. Exercise care when activating the release, if such a
device is tted, as an open shutter could drop quickly in the event of wear or breakage.
- The breakage or wear of any mechanical parts of the door (operated part), such as cables, springs,
supports, hinges, guides…, may generate a hazard. Have the system checked by qualied, expert
personnel (professional installer) at regular intervals according to the instructions issued by the
installer or manufacturer of the door.
- When cleaning the outside, always cut o mains power.
- Keep the photocells’ optics and illuminating indicator devices clean. Check that no branches or
shrubs interfere with the safety devices.
- Do not use the automated system if it is in need of repair. In the event the automated system
breaks down or malfunctions, cut o mains power to the system; do not attempt to repair or
perform any other work to rectify the fault yourself and instead call in qualied, expert personnel
(professional installer) to perform the necessary repairs or maintenance. To allow access, activate
the emergency release (where tted).
- If any part of the automated system requires direct work of any kind that is not contemplated
herein, employ the services of qualied, expert personnel (professional installer).
- At least once a year, have the automated system, and especially all safety devices, checked
by qualied, expert personnel (professional installer) to make sure that it is undamaged and
working properly.
- A record must be made of any installation, maintenance and repair work and the relevant
documentation kept and made available to the user on request.
- Failure to comply with the above may result in hazardous situations.
Anything that is not explicitly provided for in the user guide is not allowed. The operator’s
proper operation can only be guaranteed if the instructions given herein are complied
with. The Firm shall not be answerable for damage caused by failure to comply with the
instructions featured herein.
While we will not alter the product’s essential features, the Firm reserves the right, at any
time, to make those changes deemed opportune to improve the product from a technical,
design or commercial point of view, and will not be required to update this publication
accordingly.
AVERTISSEMENTS POUR L’UTILISATEUR (F)
ATTENTION ! Instructions de sécurité importantes. Veuillez lire et suivre attentivement
tous les avertissements et toutes les instructions fournis avec le produit sachant qu’un
usage incorrect peut provoquer des préjudices aux personnes, aux animaux ou aux biens.
Veuillez conserver les instructions pour d’ultérieures consultations et pour les transmettre
aux propriétaires futurs éventuels.
Cet appareil ne peut être destiné qu’à l’usage pour lequel il a été expressément installé.
Tout autre usage sera considéré comme impropre et donc dangereux. Le fabricant ne
sera en aucun cas considéré comme responsable des préjudices dus à un usage impropre,
erroné ou déraisonné.
SECURITE GÉNÉRALE
Nous vous remercions d’avoir choisi ce produit qui, nous n’en doutons pas, saura vous garantir
les performances attendues.
Ce produit, correctement installé par du personnel qualié et expérimenté (monteur profes-
sionnel) est conforme aux normes reconnues de la technique et des prescriptions de sécurité.
Si l’automatisation est montée et utilisée correctement, elle garantit la sécurité d’utilisation
prescrite. Il est cependant nécessaire de respecter certaines règles de comportement pour éviter
tout inconvénient accidentel.
- Tenir les enfants, les personnes et les objets à l’écart du rayon d’action de l’automatisation, en
particulier pendant son fonctionnement.
- Empêcher les enfants de jouer ou de stationner dans le rayon d’action de l’automatisation.
- Cette automatisation n’est pas destinée à être utilisée par des enfants, des personnes ayant des
capacités mentales, physiques et sensorielles réduites ou des personnes ne disposant pas des
connaissances nécessaires à moins de disposer, par l’entremise d’une personne responsable de
leur sécurité, d’une surveillance ou d’instructions sur l’usage de l’appareil.
- Les enfants doivent être surveillés an de s’assurer qu’ils ne jouent pas avec l’appareil. Interdire
aux enfants de jouer avec les contrôles xes. Ranger les télécommandes hors de portée des
enfants.
-
Eviter d’opérer à proximité des charnières ou des organes mécaniques en mouvement.
- Ne pas s’opposer volontairement au mouvement du vantail et ne pas tenter d’ouvrir la porte à
la main si le déclencheur n’est pas déverrouillé avec le levier de déverrouillage prévu à cet eet.
- Ne pas entrer dans le rayon d’action du portail/de la porte motorisé/e pendant son mouvement.
- Ranger les radiocommandes ou les autres dispositifs de commande hors de portée des enfants
an d’éviter tout actionnement involontaire.
- L’activation du déverrouillage manuel risque de provoquer des mouvements incontrôlés de la
porte en présence de pannes mécaniques ou de conditions de déséquilibre.
- Avec les ouvre-stores: surveiller le store en mouvement et veiller à ce que les personnes restent
à l’écart tant qu’il n’est pas complètement fermé. Actionner l’éventuel déverrouillage avec
prudence car si un store reste ouvert il peut tomber brutalement s’il est usé ou cassé.
- La rupture ou l’usure des organes mécaniques de la porte (partie guidée), tels que les câbles, les
ressorts, les supports et les gonds peuvent générer des risques. Faire contrôler périodiquement
MANUALE D’USO: MANOVRA MANUALE - USER’S MANUAL: MANUAL OPERATION-
MANUEL D’UTILISATION: MANŒUVRE MANUELLE - BEDIENUNGSANLEITUNG: MANUELLES MANÖVER-
MANUAL DE USO: ACCIONAMIENTO MANUAL - MANUAL DE USO: MANOBRA MANUAL
/