Roche CoaguChek XS Short Guide

Type
Short Guide

Roche CoaguChek XS is a portable coagulation monitoring system that allows patients to conveniently self-test their blood clotting time at home. It features easy-to-use controls, a large display for clear result viewing, and automatic date and time settings. The CoaguChek XS also has a memory function that can store up to 10 test results, making it easy to track your progress over time. With its compact size and carrying case, the CoaguChek XS is a convenient and reliable tool for managing your anticoagulation therapy.

Roche CoaguChek XS is a portable coagulation monitoring system that allows patients to conveniently self-test their blood clotting time at home. It features easy-to-use controls, a large display for clear result viewing, and automatic date and time settings. The CoaguChek XS also has a memory function that can store up to 10 test results, making it easy to track your progress over time. With its compact size and carrying case, the CoaguChek XS is a convenient and reliable tool for managing your anticoagulation therapy.

CoaguChek
®
XS
System
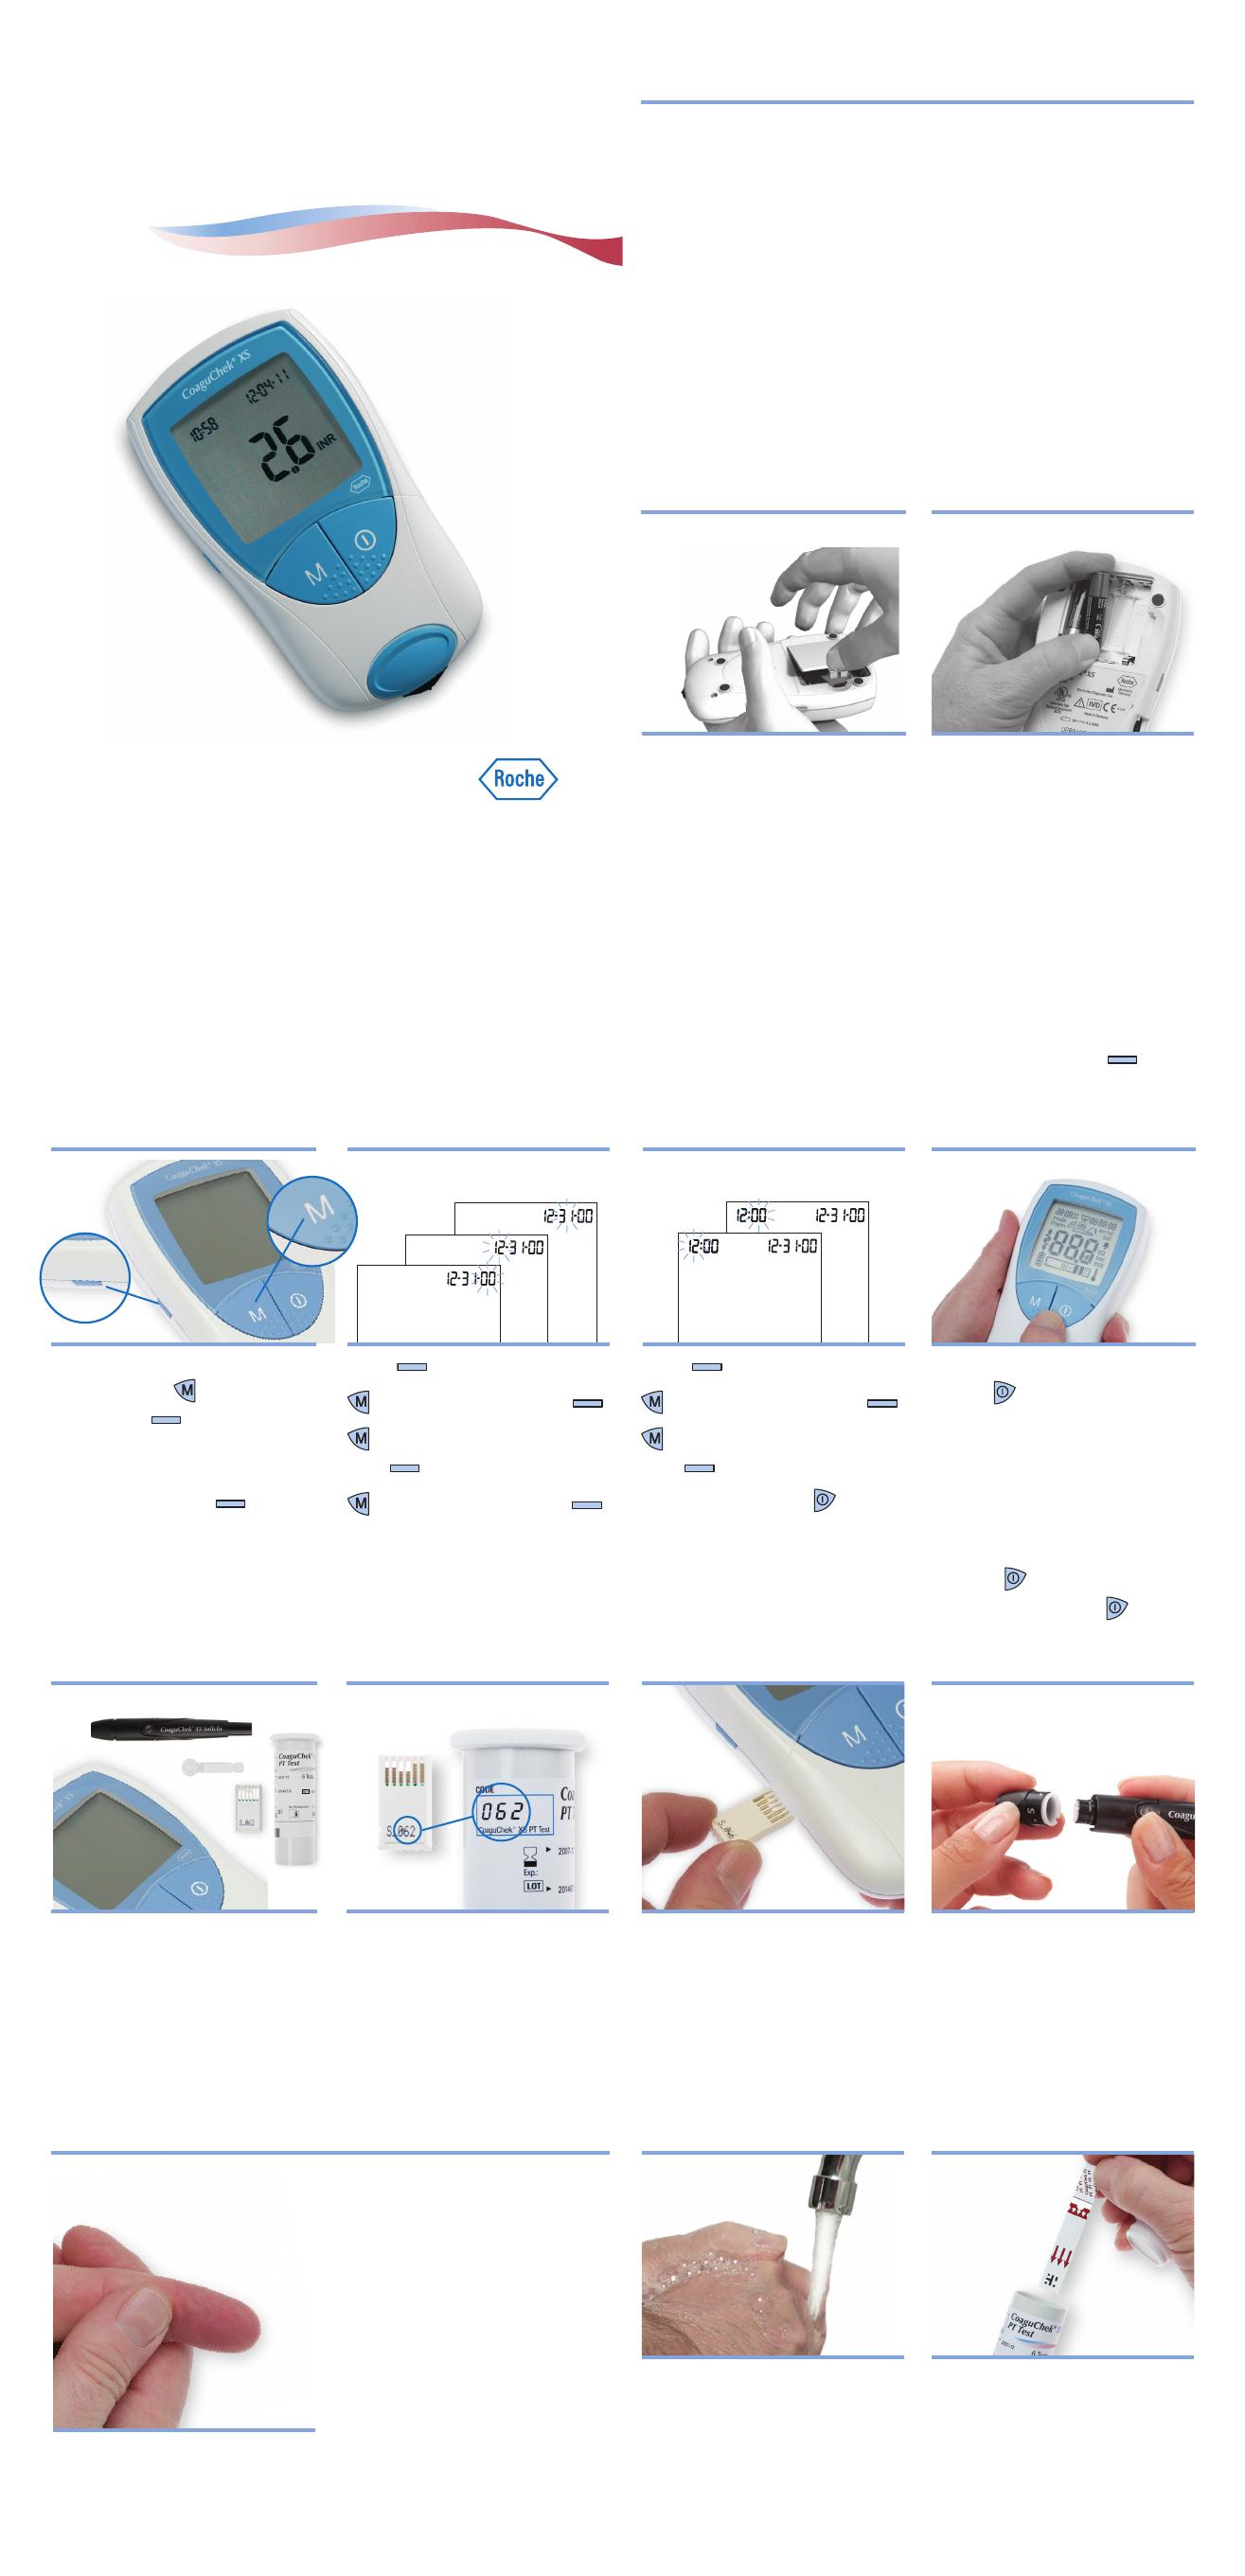
INSTALLING BATTERIES & SETUP
t
GETTING STARTED
t
SETTING DATE & TIME
t
PREPARING FOR A TEST
t
TESTING
t
Open the battery compartment
on the back of the meter.
Insert 4 AAA batteries
according to the diagram
inside the battery
compartment.
1. Open Compartment 2. Insert Batteries
1. Start Setup 2. Set Date 3. Set Time 4. Check Display
• CoaguChek XS Meter
• Container of test strips
• Test strip code chip
CoaguChek XS Softclix
lancet device and white
lancet
The code number on the test
strip container and the code
chip must match.
Each box of test strips comes
with a matching code chip.
Every time you open a new box
of test strips, you must replace
the code chip.
Make sure the meter is off.
With the code number facing
up, insert the code chip into
the code chip slot until it
snaps into place.
Pull the cap off the lancet
device. Insert a new white
lancet. Twist off the lancet’s
protective cap. Put the cap
back on the lancet device.
Line up the notches for the
cap to fit.
Before continuing, review
these tips for getting a good
drop of blood.
Increasing the blood flow in
your finger will help you get a
good drop of blood:
Warm your hand. Hold it
under your arm, use a hand
warmer, and/or wash with
warm water.
Let your arm hang by your side.
Massage your finger from
its base.
Use these techniques until your
fingertip has good color.
To set the date and time, use
these buttons:
to change a
setting and
(SET) to accept
a setting.
If the meter is not already in
Setup mode, press
.
The date format flashes in the
upper right corner.
Press
. The hour flashes.
to change the hour then .
to change the minutes
then .
Power the meter off .
Press and hold the ON-OFF
button
.
Make sure all the letters,
numbers, and symbols on
the display appear correctly.
Review The Meter’s Display
section in the User Manual to
review the full display.
Release
.
Power the meter off
.
Wash your hands in warm,
soapy water.
Make sure your fingertip is
thoroughly dry.
Take a test strip out of the
container.
Close the container tightly.
Note: You have 10 minutes
to use a test strip once you
remove it from the container.
1. Wash Hands 2. Get Ready
Press . The year flashes.
to change the year then .
to change the month
then .
to change the day then .
The time format flashes in the
upper left corner.
Follow these steps to get started using the meter:
1. Watch the CoaguChek XS System Training DVD. It will help you
get comfortable with the CoaguChek XS Meter and the testing
procedure.
2. Read the CoaguChek XS Softclix lancet device package insert.
3. With this CoaguChek XS System Getting Started guide by the
meter, follow the steps to perform your first test.
Then, as necessary, refer to the User Manual or Package Insert:
The CoaguChek XS System User Manual for Patient Self-Testing is a
comprehensive guide to the meter and test strips. It is designed to
provide answers to your questions about the meter’s operation and
use. Also, see the test strip package insert for more information.
Right after you insert the batteries, set the date and time.
The date and time settings are important. Each time you run a
test, the meter compares its date with the test strip’s expiration
date. If the test strip is expired, the meter displays an error
message and prevents you from running a test.
Whenever you put batteries in the meter, it automatically goes to
Setup mode (where you set the date and time). You can also go
to Setup mode at any time by pressing the SET button (
).
Getting Started
For Patient
Self-Testing
1. Gather Items 2. Match Code 3. Insert Code Chip 4. Prepare Lancet Device
Slide the test strip into the test
strip guide in the direction of
the arrows until it stops.
The meter powers on.
The code number of the
inserted code chip flashes on
the display.
Confirm that the number
displayed matches the number
on the test strip container,
then press
.
If the numbers are different,
first make sure that the correct
code chip is inserted. If the
numbers still don’t match,
call the Roche Diagnostics
Technical Service Center at
1-800-428-4674.
An hourglass appears as the
meter warms up. When the
meter is warmed up, a flashing
test strip and blood drop
appear and the meter begins a
countdown.
Set the penetration
depth to 5.
Press the plunger. A yellow
dot appears in the release
button.
Massage your finger until you
see increased color in your
fingertip.
Keeping your hand down,
press the tip of the lancet
device firmly against the side
of your fingertip. Press the
release button.
Gently squeeze from the base
of the finger to develop a
hanging drop of blood.
After sticking your fingertip,
you have 15 seconds to
apply the blood to the side of
the test strip.
3. Insert Test Strip 4. Match Code 5. Collect Sample 6. Get a Good Blood Drop
Find the target area on the
test strip. Apply blood to the
test strip from the side.
It’s important to hold the
blood drop to the test strip
until you hear a beep.
The hourglass appears when
the blood test begins. Then,
pull your finger away from the
test strip.
Remember to apply only one
drop of blood—don’t add
more. Do not touch or remove
the test strip when a test is in
progress.
The result appears in about
1 minute.
Record the result on the
CoaguChek XS System
Prothrombin Time Self-Testing
Log Book.
Call your doctor and/or the
service provider that provides
your test strips and the
handling of your test results.
Note: If during testing the
meter displays an error
message, refer to the Error
Messages section of the User
Manual for what to do next.
Remove the lancet from the
lancet device. Place the used test
strip and lancet in a puncture-
proof container with a lid.
Press . The meter powers off.
If the meter is dirty, wipe it
clean with a lint-free tissue and
an approved cleaning solution.
Note: See Cleaning the Meter
in the User Manual for more
information.
7. Apply Sample Until
Meter Beeps
8. Record Result 9. Clean Up
If you have questions,
call Roche Diagnostics
Technical Service Center at
1-800-428-4674, 24 hours
a day, 7 days a week,
365 days a year.
COAGUCHEK and SOFTCLIX
are trademarks of Roche.
©2007-2016 Roche Diagnostics.
All rights reserved.
Roche Diagnostics GmbH
Sandhofer Strasse 116
68305 Mannheim, Germany
Made in Germany
Manufactured for and distributed in the USA by:
Roche Diagnostics
9115 Hague Road
Indianapolis, IN 46250-0457
Rx Only
www.coaguchek-usa.com
www.usdiagnostics.roche.com
0 4999037001 (05) 2016-12 USA
  • Page 1 1
  • Page 2 2

Roche CoaguChek XS Short Guide

Type
Short Guide

Roche CoaguChek XS is a portable coagulation monitoring system that allows patients to conveniently self-test their blood clotting time at home. It features easy-to-use controls, a large display for clear result viewing, and automatic date and time settings. The CoaguChek XS also has a memory function that can store up to 10 test results, making it easy to track your progress over time. With its compact size and carrying case, the CoaguChek XS is a convenient and reliable tool for managing your anticoagulation therapy.

Ask a question and I''ll find the answer in the document

Finding information in a document is now easier with AI