Philips BDP7200/98 User manual
- Category
- Blu-Ray players
- Type
- User manual

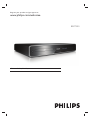
BDP7200
EN Blu-Ray Disc Player 4
Register your product and get support at
www.philips.com/welcome

2
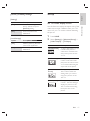
᳝↦᳝ᆇ⠽䋼ܗ㋴
+D]DUGRXV7R[LF6XEVWDQFH
䚼ӊৡ⿄
1DPHRIWKH3DUWV
䪙
3E/HDG
∲+J
0HUFXU\
䬝&G
&DGPLXP
݁Ӌ䫀
&KURPLXP
⒈㘨㣃
3%%
⒈Ѡ㣃䝮
3%'(˅
'9'ORDGHU
'9'ܝⲦ
+RXVLQJ
3:%V
⬉䏃ᵓ㒘ӊ
$FFHVVRULHV
5HPRWHFRQWURO
FDEOHV
䰘ӊ˄䘹఼ˈ
⬉⑤㒓ˈ䖲㒓˅
%DWWHULHVLQ
5HPRWH&RQWURO
=Q&
䘹఼⬉∴
ƻ˖㸼⼎䆹᳝↦᳝ᆇ⠽䋼䆹䚼ӊ᠔᳝ഛ䋼ᴤ᭭Ёⱘ䞣ഛ6-7ᷛޚ㾘ᅮⱘ䰤䞣㽕∖ҹϟDŽ
O: Indicates that this toxic or hazardous substance contained in all of the homogeneous
materials for this part is below the limit requirement in SJ/T11363 – 2006.
h˖㸼⼎䆹᳝↦᳝ᆇ⠽䋼㟇ᇥ䆹䚼ӊⱘᶤϔഛ䋼ᴤ᭭Ёⱘ䞣䍙ߎ6-7̢ᷛޚ㾘ᅮⱘ䰤䞣㽕∖DŽ
X: Indicates that this toxic or hazardous substance contained in at least one of the
homogeneous materials used for this part is above the limit requirement in SJ/T11363 - 2006.
⦃ֱՓ⫼ᳳ䰤Environmental Protection Use Period
ℸᷛ䆚ᣛᳳ䰤˄कᑈ˅ˈ⬉ᄤֵᙃѻકЁ᳝ⱘ᳝↦᳝ᆇ⠽䋼ܗ㋴ℷᐌՓ⫼ⱘᴵӊϟϡӮথ
⫳⊘さবˈ⫼᠋Փ⫼䆹⬉ᄤֵᙃѻકϡӮᇍ⦃๗䗴៤Ϲ䞡∵ᶧᇍ݊Ҏ䑿ǃ䋶ѻ䗴៤Ϲ䞡ᤳᆇ
ⱘᳳ䰤DŽ
This logo refers to the period ( 10 years ) during which the toxic or hazardous substances or elements
contained in electronic information products will not leak or mutate so that the use of these [substances or
elements] will not result in any severe environmental pollution, any bodily injury or damage to any assets.
ℸᷛ䆚ᣛᳳ䰤˄Ѩᑈ˅ˈ⬉∴Ё᳝ⱘ᳝↦᳝ᆇ⠽䋼ܗ㋴ℷᐌՓ⫼ⱘᴵӊϟϡӮথ⫳⊘さ
বˈ⫼᠋Փ⫼䆹⬉∴ѻકϡӮᇍ⦃๗䗴៤Ϲ䞡∵ᶧᇍ݊Ҏ䑿ǃ䋶ѻ䗴៤Ϲ䞡ᤳᆇⱘᳳ䰤DŽ
This logo refers to the period ( 5 years ) during which the toxic or hazardous substances or elements
contained in the battery will not leak or mutate so that the use of these [substances or elements] will not
result in any severe environmental pollution, any bodily injury or damage to any assets.
⦃ֱՓ⫼ᳳ䰤Environmental Protection Use Period
⬉∴ᷛ䆚Battery labeling logo
OOO O O O
XOO O O O
XO
OO OO
XOO O O O
XO
OO OO

3
Manufactured under license from Dolby
Laboratories. Dolby and the double-D symbol
are trademarks of Dolby Laboratories.
HDMI, and HDMI logo and High-Defi nition
Multimedia Interface are trademarks or
registered trademarks of HDMI licensing LLC.
Manufactured under license under U.S. Patent
#’s: 5,451,942; 5,956,674; 5,974,380; 5,978,762;
6,487,535 & other U.S. and worldwide patents
issued & pending. DTS and DTS Digital
Surround are registered trademarks and the
DTS logos and Symbol are trademarks of DTS,
Inc. © 1996-2007 DTS, Inc. All Rights Reserved.
Java and all other Java trademarks and logos are
trademarks or registered trademarks of Sun
Microsystems, Inc. in the United States and/or
other countries.
CLASS 1
LASER PRODUCT
Windows Media and the Windows
logo are trademarks or registered trademarks of
of Microsoft Corporation in the United States
and/or other countries.
“Blu-ray Disc” and
are trademarks.
is a trademark of DVD Format/Logo
Licensing Corporation.
is a trademark of Blu-ray
Disc Association.

4 EN
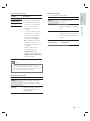
5 Play 20
Information on playback 20
Playable discs and fi les 20
Colour Systems 20
Region codes 21
Hint for disc playback 21
Guide to fi le list 22
Basic playback 23
Play a BD or a DVD 23
Play an audio CD/MP3/WMA/JPEG fi les 24
Access title/disc menu 25
Special playback 25
Fast forward/reverse play 25
Slow forward play 25
Step-by-step play 26
Zoom in/out 26
Repeat play 26
A-B Repeat play 27
Slide show 27
PiP (Picture-In-Picture) (BONUSVIEW)
setting 28
Search 28
Title/Chapter search 28
Time search 29
Change audio and video format 29
Switch subtitles 29
Switch audio soundtrack 30
Switch camera angles 30
Contents
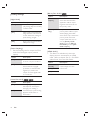
1 Important 6
Safety and important notice 6
Recycle notice 6
Copyright notice 6
2 Your product 7
Features highlight 7
Symbols used in this user manual 8
Product overview 9
Front panel 9
Back panel 10
Remote control 11
Guide to on-screen display 14
3 Connect 15
Connect video cables 15
Option 1: Connect to HDMI socket 15
Option 2: Connect to component video
socket 16
Option 3: Connect to video socket 16
Connect audio cables 16
Route audio to other devices 17
Connect to analogue stereo system 17
Connect to digital amplifi er/receiver 17
Connect to multi channel amplifi er/
receiver 18
Connect to power outlet 18
4 Get started 19
Find the correct viewing channel 19
How to insert a disc 19

English
EN 5
Contents
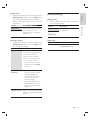
6 Adjust settings 31
List of settings 31
[Language] settings 31
[Video Output] settings 32
[Audio] settings 34
[Parental] settings 35
[Others] settings 36
[Factory Default] settings 37
Set-up 37
Set TV screen display format 37
Set HDMI video resolution 38
Set HDMI audio output format 39
Set digital output format 40
Speaker Setup 41
Set parental lock 42
Activate EasyLink control 43
Reset to factory default 43
7 Additional information 44
Care 44
Specifi cations 45
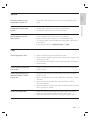
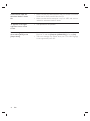
8 Troubleshooting 46
9 Glossary 49

6 EN
Recycle notice
EW!=\!8Y
These symbols on the products, packaging, and/
or accompanying documents mean that used
electrical and electronic products and batteries
should not be mixed with general household
waste. For proper treatment, recovery and
recycling of old products and used batteries,
please take them to applicable collection points,
in accordance with your national legislation and
Directives 2002/96/EC and 2006/66/EC.
By disposing of these products and batteries
correctly, you will help to save valuable
resources and prevent any potential negative
effects on human health and the environment
which could otherwise arise from inappropriate
waste handling.
For more information about collection and
recycling of old products and batteries, please
contact your local municipality, your waste
disposal service or the point of sale where you
purchased the items.
Copyright notice
This product incorporates copyright protection
technology that is protected by method claims
of certain U.S. patents and other intellectual
property rights owned by Macrovision
Corporation and other rights owners. Use of
this copyright protection technology must be
authorised by Macrovision Corporation, and is
intended for home and other limited viewing
uses only unless otherwise authorised by
Macrovision Corporation. Reverse engineering
or disassembly is prohibited.
1 Important
Safety and important notice
Warning!
Risk of fi re or electric shock!
Ensure that air can circulate freely through the •
ventilation holes on this unit. Allow at least 5~10 cm
clearance around the unit.
Never expose this unit to direct sunlight, naked •
fl ames or heat.
Never place this unit on other electrical equipment.
•
Keep away from this unit during lightning storms.•
Never remove the casing of this unit. Please leave all •
maintenance work to qualifi ed personnel.
Keep this unit away from water, moisture and liquid-
•
fi lled objects.
Caution!
Remove batteries if they are exhausted or if the •
remote control is not to be used for a long time.
Do not mix batteries (old and new or carbon and
•
alkaline, etc.).
Batteries contain chemical substances, they should
•
be disposed of properly.
Visible and invisible laser radiation when open.
•
Avoid exposure to beam.
Ensure that the power outlet is always within reach.
•
If abnormal situations occur, fully disconnect power
(unplug power cord from the power outlet).
This product complies with the radio
interference requirements of the European
Community. This product complies with the
requirements of the following directives and
guidelines: 2006/95/EC, 2004/108/EC.

English
EN 7
Your product
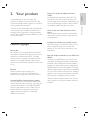
2 Your product
Congratulations on your purchase, and
welcome to Philips! To fully benefi t from the
support that Philips offers, register your product
at www.philips.com/welcome.
This Blu-ray disc player offers full high-defi nition
video playback up to 1080p resolution for an
amazing viewing experience. A highly detailed
picture and increased sharpness delivers a more
true-to-life picture.
Features highlight
Blu-ray disc
Blu-ray Disc is a next generation optical video
disc which is capable of storing fi ve times more
data than a conventional DVD is. The large
capacity makes it possible to benefi t from the
features such as high-defi nition videos, multi-
channel surround sounds, interactive menus and
so on.
BD Java
With some BDs which support Java
applications, you can enjoy the interactive
functions such as games or interactive menus.
Upscale DVD for enhanced picture quality
Your current DVD will look even better than
before thanks to video upscaling. Upscaling will
increase the resolution of standard defi nition
DVD to high defi nition up to 1080p over an
HDMI connection. The picture will be less
jagged and more realistic for a near high
defi nition experience.
Enjoy your content on different kinds of
media
Full backwards compatibility with DVD, CD
ensures that you can continue to enjoy your
current audio-video collection. Additionally, you
can view JPEG digital pictures or listen to MP3
or Windows Media™ Audio music fi les.
Listen to the rich multi-channel surround
sound
Multi-channel surround sound, which realises
real-to-life sound and makes you feel that you
are really there.
Intuitive user interface and remote control
The Philips logical user interface allows you to
easily navigate through your content and
settings, so you can quickly fi nd what you are
looking for.
Easy and simple connection to your HDTV via
HDMI
Connect your BDP7200 to your HDTV with
one single HDMI (High Defi nition Multimedia
Interface) cable. Philips recommends HDMI 1.3
(category 2) cable (also known as High Speed
HDMI cable) for better compatibility. The high
defi nition video output signal will be transferred
to your HDTV without conversion to analogue
signals, so you will get an excellent picture and
sound quality, completely free from noise.
Thanks to other multiple outputs, you can also
easily connect to your home theatre system or
amplifi er.

8 EN
About EasyLink (HDMI Consumer Electronics
Control)
EasyLink (HDMI CEC) allows you to operate
the linked functions of this player with Philips
brand TV with EasyLink feature.
Note
Philips does not guarantee 100% interoperability •
with all HDMI CEC devices.
PiP (Picture-In-Picture) (BONUSVIEW)
Some BD-videos have the PiP function which
enables you to display the secondary video in
the primary video. You can call up the
secondary video by pressing PIP whenever the
scene contains the secondary video.
Pop-up menu
Some BD-videos have pop-up menu which is a
navigation menu that can be called up and be
operated on the screen without interrupting
the playback. You can call up the pop-up menu
by pressing DISC MENU / POP-UP MENU.
Contents in the pop-up menu vary depending
on the disc.
HDMI Deep colour
Deep colour reduces the posterization effect of
the playback image. Refer to chapter ‘Adjust
settings - List of settings’ - [HDMI Deep Colour].
HDMI 1080p/24 Output (BD only)
This unit is equipped with the feature which can
provide the smooth movement in the playback
of fi lm originated material with the frame rate
of 24 frames per second with progressive.
(Available only when the display device is
connected by an HDMI cable). Refer to chapter
‘Adjust settings - List of settings’ - [HDMI
1080p/24].
HDMI 1080p/24 Output (BD only)
This unit supports the high-defi nition audio such
as Dolby Digital Plus, Dolby TrueHD and DTS-
HD. These audio format can provide you with
the higher audio quality than the traditional
DVD does. To make the most of their high
performance, connect this unit to an high-
defi nition audio compatible AV receiver/
amplifi er with an HDMI cable. Refer to chapter
‘Adjust settings - List of settings’, change [HDMI
Audio] to [HDMI Normal].
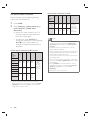
Symbols used in this user manual
To specify for which media type each function
is, we put the following symbols at the
beginning of each item to operate.
Symbol Description
Refer to BD-video
Refer to DVD-video
Refer to audio CD/dts CD
Refer to DVD±RW/±R and
CD-RW/-R with MP3 fi les
Refer to DVD±RW/±R and CD-
RW/-R with Windows Media™
Audio fi les
Refer to DVD±RW/±R and
CD-RW/-R with JPEG fi les,
Kodak Picture CD fi les included.
Note
DVD-RW/-R recorded in VR mode or non •
compatible recording format are not playable.
If you do not fi nd any of the symbols listed above
•
under the function heading, the operation is
applicable to all media

English
EN 9
Your product
Product overview
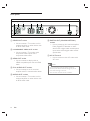
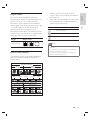
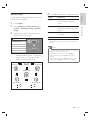
Front panel
a 2
Press to turn the unit on and off.•
b Disc tray
Place a disc when opening the disc tray.•
c Z (Open/Close)
Press to open or close the disc tray.•
d Front panel display
Display playback status icon and various •
kinds of information. Refer to the table
next to it.
e B (Play)
Press to start or resume playback.•
f x (Stop)
Press to stop playback.•
g í (Previous)
Videos, music, pictures - Previous•
h ë (Next)
Videos, music, pictures - Next•
i Infrared sensor window
j OUTPUT
Press to change the resolution of HDMI •
output. (Not available during the
playback of a BD-video or while
displaying the settings menu)
Front panel
display
Mode
Loading a disc.
B
Playback is in progress.
x
Stop mode.
X
Pause mode.
M
Fast forward mode.
m
Fast reverse mode.
Slow forward mode.
Repeat function is set.
Display the home menu.
Title is being played back.
Indicating the current chapter/
track/fi le number and the
elapsed playing time.
Current chapter is in chapter
repeat mode.
Playback is in Resume-On-
Stop mode.
Display the media fi lter
screen.
Dolby Digital audio is being
output.
Dolby TrueHD audio is being
output.
ab c d efg jhi

10 EN
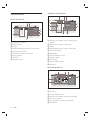
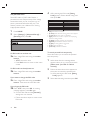
Back panel
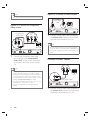
a VIDEO OUT socket
Use to connect a TV monitor, an AV •
receiver/amplifi er or other device with
an RCA video cable.
b COMPONENT VIDEO OUT sockets
Use to connect a TV monitor with •
component video inputs with a
component video cable.
c HDMI OUT socket
Use to connect to display with an •
HDMI compatible port with an HDMI
cable.
d 5.1ch AUDIO OUT sockets
Use to connect to an AV receiver/•
amplifi er with 5.1-channel audio cables.
e AUDIO OUT sockets
Use to connect a TV monitor, an AV •
receiver/amplifi er or other device with
an RCA audio cable.
f DIGITAL OUT (COAXIAL/OPTICAL)
sockets
Use to connect an AV receiver/amplifi er, •
Dolby Digital/DTS decoder or other
device with a digital audio coaxial/optical
input socket with a digital audio coaxial/
optical cable.
g AC IN Terminal
Use to connect to the AC outlet with •
AC cord.
Note
Do not touch the inner pins of the sockets on •
the back panel. Electrostatic discharge may cause
permanent damage to the unit.
This unit does not have the RF modulator.•
HDMI OUT
bc d efa g

English
EN 11
Your product
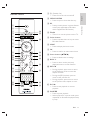
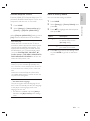
Remote control
z
|
{
y
x
w
v
u
t
s
a
b
d
f
g
h
i
j
l
m
n
o
p
q
r
k
e
c
a 2 (Standby-On)
Press to turn the unit on and off.•
b OPEN/CLOSE Z
Press to open or close the disc tray.•
c PIP
Press to switch picture in picture feature •
on/off. (only applicable to BD-video
which supports the PIP function)
d ZOOM
Zoom in or out the picture on the TV.•
e Colour buttons
Press to activate short cut keys on some •
BD-video function.
f HOME
Press to display the home menu.•
g OK
Press to confi rm or select menu items.•
h Cursor buttons ( )
Press to select items or settings.•
i BACK
Press to return to the previously •
displayed menu or screen function.
j PREV í
During playback, press once to return •
to the beginning of the current title,
chapter or track.
During the JPEG playback, press to •
return to the previous fi le.
During playback, press twice to return •
to the previous title, chapter or track.
k PLAY B
Press to start playback or resume •
playback.
l PAUSE X
Press to pause playback.•
When playback is in pause mode, press •
repeatedly to forward the playback step
by step.

12 EN
m VOL +-
Press to adjust the TV volume (only •
applicable to the PHILIPS brand TV).
n MUTE H
Press to mute the TV volume (only •
applicable to the PHILIPS brand TV).
o REW m
During playback, press to fast reverse •
the playback.
p Numeric buttons
Press to select a chapter during •
playback.
Press to enter values in the input fi eld.•
q SUBTITLE
Press to select subtitles on a disc.•
r REPEAT
Press to toggle between various repeat •
modes.
s REPEAT A-B
Press to play back a defi ned section •
between point A and B repeatedly.
t AUDIO
Press to select the audio channel •
(such as audio languages) on a disc.
u FFW M
During playback, press to fast forward •
the playback.
When playback is in pause, press to •
slow forward the playback.
v TV CH +-
Press to change the channel up and •
down (only applicable to the PHILIPS
brand TV).
w STOP x
Press to stop playback.•
x NEXT ë
During playback, press to skip to the •
next chapter, track or fi le.
y DISC MENU / POP-UP MENU
BD: • Press to display the pop-up menu.
DVD: • Press to display the disc menu.
z INFO
Press to display the information display.•
wj TOP MENU
BD• : Press to display the top menu.
DVD• : Press to display the title menu.
wk ANGLE
Press to select camera angles on a disc.•
Press to rotate a picture (JPEG).•

English
EN 13
Your product
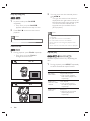
Installing the batteries in the remote control
Install the batteries (R6/AA x2) matching the
polarity indicated inside battery compartment
of the remote control.
1 Open the cover.
2 Insert batteries.
Make sure to match • +and - on the
batteries to the marks indicated in the
battery compartment.
3 Close the cover.
Note
Incorrect use of batteries can result in hazards such •
as leakage and bursting.
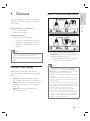
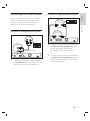
Using a Remote Control
Keep in mind the following when using the
remote control:
Make sure that there are no obstacles •
between the remote control and the
infrared sensor window on the unit.
Remote operation may become unreliable if •
strong sunlight or fl uorescent light is shining
on the infrared sensor window of the unit.
Remote control for different devices can •
interfere with each other. Avoid using
remote control for other device located
close to the unit.
Replace the batteries when you notice a fall •
off in the operating range of the remote
control.
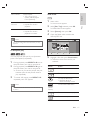
The maximum operable ranges from the •
unit are as follows.
Line of sight:• approx. 7m (23 feet)
Either side of the centre:• approx. 5m
(16 feet) within 30°
Above:• approx. 5m (16 feet) within 15°
Below:• approx. 3m (10 feet) within 30°
30˚ 30˚
5m (16 feet) 7m (23 feet) 5m (16 feet)

14 EN
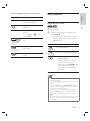
Guide to on-screen display
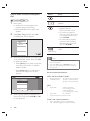
Home menu
When you turn on the unit, home menu
appears automatically. Otherwise, press HOME.
Disc Tray
Settings
Product info
Blu-ray Disc Player
[Disc Tray]
To access the track/fi le list or media •
fi lter screen.
[Settings]
To access the settings menus.•
[Product Info]
To access the product information.•
Tip
You can also download the latest fi rm ware from •
the web site which is displayed in the [Product Info]
screen, and update the fi rm ware by yourself.
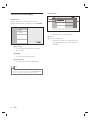
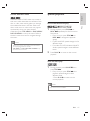
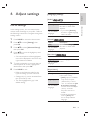
Menu Screen
Settings
Quick Set-up
Advanced Set-up
Factory Default
Player menu
TV Shape
HDMI Video Resolution
BD-Player
23
1
1 Directory
Displays the current hierarchy.•
2
Menus
3
Sub menus/Options
Displays sub menus or options for the •
high-lighted item on the left whenever
available.

English
EN 15
Connect
3 Connect
This section describes the basic connections
required for this Blu-ray disc player before it
can be used.
Basic connections - Connect to TV
Connect• video cables
Connect audio cables•
Optional connections:
Route audio to other devices•
Connect to analogue stereo system•
Connect to digital amplifi er/receiver•
Connect to multi channel amplifi er/ •
receiver
Note
Refer to the type plate at the rear or bottom of the •
product for identifi cation and supply ratings.
Before you make or change any connections, ensure
•
that all the devices are disconnected from the power
outlet.
Connect video cables
Make one of the following connections,
depending on the capabilities of your existing
device.
Option 1:• Connect to HDMI socket
(for a HDMI, DVI or HDCP-compliant TV).
Option 2:• Connect to component video
socket (for a standard TV or Progressive
Scan TV).
Option 3:• Connect to Video socket
(for a standard TV).
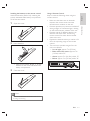
Option 1: Connect to HDMI socket
HDMI OUT
HDMI IN
DVI IN
HDMI OUT
1 Connect a HDMI cable (supplied) to
HDMI OUT socket on this unit and the
HDMI IN socket on your TV.
Use a HDMI-DVI adaptor in case your •
TV has only a DVI connection.
Note
To optimise the video output, refer to chapter •
‘Adjust settings - List of settings’ - [HDMI Video
Resolution] or press OUTPUT repeatedly to select
the best resolution your TV can support.
Analogue audio connection is needed for HDMI-DVI
•
connection.
Philips recommends HDMI category 2 cable, also
•
known as High Speed HDMI cable, for optimal audio
/ video output.
A simple 1-cable connection with a device having an •
HDMI (High-Defi nition Multimedia Interface) socket
allows digital transfer of the digital pictures/sounds of
BD-video, DVD-video and other devices.
To play back the digital video images of a BD-
•
video or DVD-video via an HDMI connection, it is
necessary that both the player and the display device
(or an AV receiver / amplifi er) support a copyright
protection system called HDCP (high-bandwidth
digital content protection system).
HDMI-DVI cable
HDMI cable

16 EN
Tip
This type of connections provide best picture quality.•
Option 2: Connect to component
video socket
COMPONENT
VIDEO OUT
COMPONENT
VIDEO IN
PB/CB
PR/CR
Y
PB/CB
PR/CRY
1 Connect the component video cable
(not supplied) to the
COMPONENT
VIDEO OUT
socket on this unit and the
component video input sockets on your
TV.
Tip
This unit is compatible with the progressive scan •
system. The feature provides you with the higher
quality pictures than traditional output system does.
To utilise this feature, make sure a progressive scan
TV is used. Refer to chapter ‘Adjust settings - List of
settings’ - [Component Output] for details.
The component video input socket on your TV may
•
be labelled as Y Pb/Cb Pr/Cr or YUV.
This type of connections provide good picture
•
quality.
Option 3: Connect to video socket
VIDEO
OUT
VIDEO
IN
1 Connect a RCA video cable (supplied) to
the VIDEO OUT socket on this unit and
the video input socket on your TV.
Tip
The video input socket on your TV may be labelled •
as A/V IN, VIDEO IN, COMPOSITE or BASEBAND.
This type of connections provide standard picture
•
quality.
Connect audio cables
AUDIO IN
LR
AUDIO
OUT
L
R
1 Connect an RCA audio cable (supplied) to
the AUDIO OUT sockets on this unit and
the AUDIO IN sockets on your TV.
Component
video cable
RCA audio cable
RCA video
cable

English
EN 17
Connect
Route audio to other devices
This section describes how you can route the
sound from this Blu-ray disc player to other
devices in order to enjoy sound output or
audio play with surround capabilities.
Connect to analogue stereo system
AUDIO IN
LR
AUDIO
OUT
L
R
1 Connect an RCA audio cable (supplied) to
the AUDIO OUT sockets on this unit and
the audio input sockets on the device.
Connect to digital amplifi er/receiver
DIGITAL OUT
(PCM/BITSTREAM)
COAXIAL OPTICAL
COAXIAL
OPTICAL
DIGITAL AUDIO
INPUT
1 Connect a coaxial cable (not supplied) to
the DIGITAL OUT (COAXIAL) socket
on this unit and the DIGITAL IN
(COAXIAL) socket on the device.
or
1 Connect an optical cable (not supplied) to
the DIGITAL OUT (OPTICAL) socket on
this unit and the DIGITAL IN (OPTICAL)
socket on the device.
RCA audio cable
or

18 EN
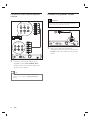
Connect to multi channel amplifi er/
receiver
5.1ch AUDIO OUT
FL SL C
FR SR SW
FRONT SURROUND
CENTRE
SUBWOOFER
1 Connect a 5.1ch audio cables (not
supplied) to the 5.1ch AUDIO OUT
sockets on this unit and the audio input
sockets on the device.
Tip
To set up the speakers, refer to chapter ‘Adjust •
settings - List of settings’ - [Analogue Audio] for
details.
Connect to power outlet
Caution!
Insert the cords securely. Incomplete connections •
will result in the generation of noise.
AC IN
1 After you made all the necessary
connections, connect the AC cord to the
AC IN on this unit and to the AC power
outlet.

English
EN 19
Get started
4 Get started
Find the correct viewing
channel
1 After you have made all the necessary
connections, press 2 (STANDBY-ON) to
turn on the unit.
2 Turn on the TV.
3 Press the button on the TV’s remote
control that accesses the external input
channel.
It may be labelled • SOURCE, AV or
SELECT (refer to your TV’s user
manual).
Or press ‘2’ on the TV’s remote •
control, then press channel down
button repeatedly until you see the
PHILIPS splash screen.
This is the correct viewing channel •
(external input channel).
If a certain amount of time has passed •
since you turned on the unit, you may
see the home menu instead of the
PHILIPS splash screen.
Disc Tray
Settings
Product info
Blu-ray Disc Player
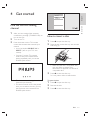
How to insert a disc
1
Press Z to open the disc tray.
2 Place the disc on the disc tray with its label
side facing up.
Make sure the disc is compatible with •
this unit. Refer to chapter ‘Play -
Information on playback’ for the list of
compatible discs.
3 Press Z to close the disc tray.
It may take a while to load the disc.
To eject the disc:
1 Press Z to open the disc tray.
2 Remove the disc.
3 Press Z to close the disc tray.

20 EN
5 Play
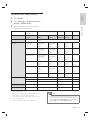
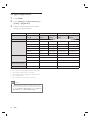
Information on playback
Playable discs and fi les
This unit is compatible to play back the
following discs. To play back a disc, make sure
that it meets the requirements for region codes
and colour systems as described below. You
can play back discs that have the following
logos. Other disc types are not guaranteed to
play back.
Logo
Playable disc
BD Video (Single/Double layer)
BD-RE* ver.2 (Single/Double
layer)
BD-R* (Single/Double layer)
DVD Video
DVD±RW
(Finalised video mode discs only)
DVD±R (Single/Double layer)
(Finalised video mode discs only)
CD-DA (audio CD)
ReWritable
CD-RW
CD-R
Kodak Picture CD
DTS-CD
Media
Playable fi les
CD-RW/-R
MP3
DVD+RW/+R
Window Media
™ Audio
DVD-RW/-R JPEG
Note
This unit cannot play back the following discs:
Due to the intentional progression of the Blu-ray
•
disc format by its standard setting authority, Philips
cannot guarantee or warrant the playability of future
extensions of the Blu-ray disc format with this
product.
*BD-R or BD-RE recorded in BDAV mode or non
•
compatible recording format.
Disc contents protected by Windows Media™
•
Digital Rights Management (DRM).
DVD-R/DVD-RW recorded in VR mode or non
•
compatible recording format.
The sound on the high-density Super Audio CD layer
•
cannot be heard. Only the sound on the CD layer
can be heard.
Playability of dual discs are not guaranteed.•
Colour Systems
BD and DVD are recorded in different colour
systems throughout the world. The most
common colour system, used primarily in the
U.K. and other EU countries, is PAL. This unit
uses the PAL system. However, it is also
possible to play back BD and DVD using other
colour systems, such as NTSC.
Page is loading ...
Page is loading ...
Page is loading ...
Page is loading ...
Page is loading ...
Page is loading ...
Page is loading ...
Page is loading ...
Page is loading ...
Page is loading ...
Page is loading ...
Page is loading ...
Page is loading ...
Page is loading ...
Page is loading ...
Page is loading ...
Page is loading ...
Page is loading ...
Page is loading ...
Page is loading ...
Page is loading ...
Page is loading ...
Page is loading ...
Page is loading ...
Page is loading ...
Page is loading ...
Page is loading ...
Page is loading ...
Page is loading ...
Page is loading ...
Page is loading ...
-
 1
1
-
 2
2
-
 3
3
-
 4
4
-
 5
5
-
 6
6
-
 7
7
-
 8
8
-
 9
9
-
 10
10
-
 11
11
-
 12
12
-
 13
13
-
 14
14
-
 15
15
-
 16
16
-
 17
17
-
 18
18
-
 19
19
-
 20
20
-
 21
21
-
 22
22
-
 23
23
-
 24
24
-
 25
25
-
 26
26
-
 27
27
-
 28
28
-
 29
29
-
 30
30
-
 31
31
-
 32
32
-
 33
33
-
 34
34
-
 35
35
-
 36
36
-
 37
37
-
 38
38
-
 39
39
-
 40
40
-
 41
41
-
 42
42
-
 43
43
-
 44
44
-
 45
45
-
 46
46
-
 47
47
-
 48
48
-
 49
49
-
 50
50
-
 51
51


Philips BDP7200/98 User manual
- Category
- Blu-Ray players
- Type
- User manual
Ask a question and I''ll find the answer in the document
Finding information in a document is now easier with AI
Related papers
-
Philips BDP9100/05 User manual
-
-
-
Philips BDP7310 User manual
-
-
Philips BDP7200/37 User manual
-
Philips BDP3010/F7 User manual
-
-
-
Other documents
-
Sharp BDHP21H User manual
-
LOEWE 69510T00 Datasheet
-
Grundig GBP 6100 2D User manual
-
Grundig GBP 7000 3D User manual
-
Logik LBD2000 User manual
-
 OPPO Digital BDP-83 User manual
-
 OPPO Digital BDP-83 User manual
-
 OPPO Digital BDP-80 User manual
-
CAMBRIDGE CambridAzur 650BD User manual
-
 OPPO Digital BDP-95 User manual


