Philips CLICK&STYLE S728/20 User manual

Category
Shaver accessories
Type
User manual
empty page before TOC
English
Introduction
Congratulations on your purchase and welcome to
Philips! To fully benefit from the support that
Philips offers, register your product at
www.philips.com/welcome.
General description (Fig. 1)
1 Protection cap
2 Shaving unit
3 Shaving unit release button
4 On/off button
5 Charging light
6 Trimmer (S1520, S1510 only)
7 Trimmer release slide (S1520, S1510 only)
8 Cleaning brush
9 Supply unit (adapter, type HQ850)
10 Small plug
Important safety information
Read this important information carefully before
you use the appliance and its accessories and
save it for future reference. The accessories
supplied may vary for different products.
Danger
- Keep the supply unit dry.
6
English
Warning
- The appliance is a Class III
construction.
- To charge the battery, only use
the detachable supply unit
(type HQ850) provided with the
appliance.
- The supply unit contains a
transformer. Do not cut off the
supply unit to replace it with
another plug, as this causes a
hazardous situation.
7
English
- This appliance can be used by
children aged from 8 years and
above and persons with
reduced physical, sensory or
mental capabilities or lack of
experience and knowledge if
they have been given
supervision or instruction
concerning use of the
appliance in a safe way and
understand the hazards
involved. Children shall not play
with the appliance. Cleaning
and user maintenance shall not
be made by children without
supervision.
- Always check the appliance
before you use it. Do not use
the appliance if it is damaged,
as this may cause injury. Always
replace a damaged part with
one of the original type.
- Do not open the appliance to
replace the rechargeable
battery.
8
English
Caution
- This appliance is not
washable. Never immerse the
appliance or the charging stand
in water and do not rinse it
under the tap.
- Only use this appliance for its
intended purpose as shown in
the user manual.
- For hygienic reasons, the
appliance should only be used
by one person.
- Never use compressed air,
scouring pads, abrasive
cleaning agents or aggressive
liquids such as petrol or
acetone to clean the appliance.
- Do not use the supply unit in or
near wall sockets that contain
an electric air freshener to
prevent irreparable damage to
the supply unit.
Electromagnetic fields (EMF)
- This Philips appliance complies with all
applicable standards and regulations regarding
exposure to electromagnetic fields.
9
English
General
- The appliance is suitable for mains voltages
ranging from 100 to 240 volts.
- The supply unit transforms 100-240 volts to a
safe low voltage of less than 24 volts.
Charging
It takes approx. 8 hours to fully charge the
appliance. When you charge the appliance for the
first time or after a long period of disuse, let it
charge until the charging light lights up
continuously. A fully charged appliance provides
up to 45 (S1520), 40 (S1510) or 35 (S1320, S1310)
minutes of shaving time.The shaving time may be
less than 45, 40 or 35 minutes as a result of your
shaving behavior, your cleaning habits or your
beard type.
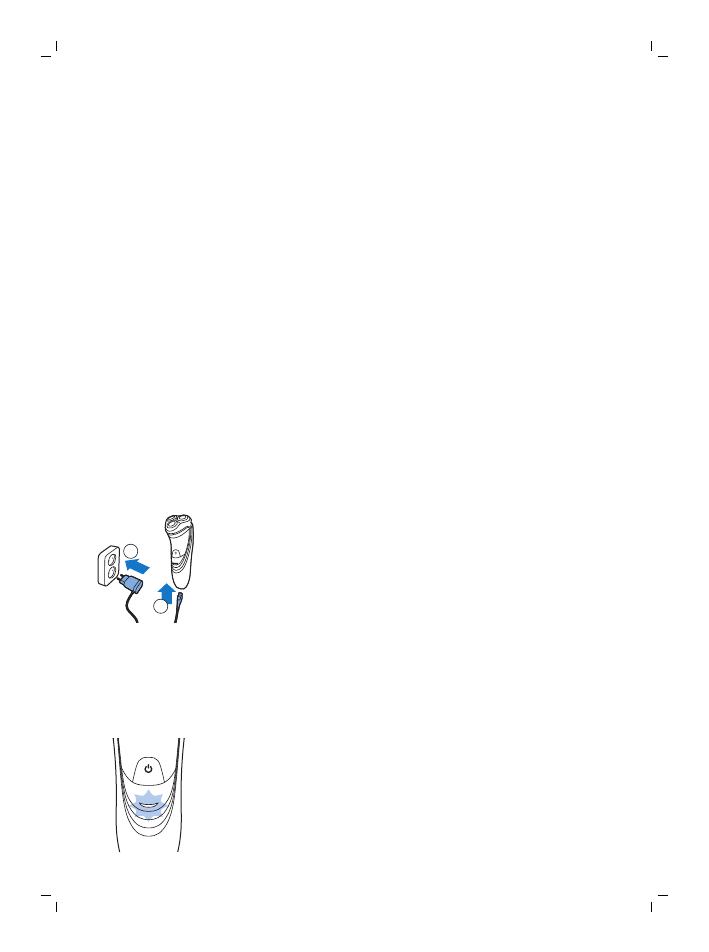
Charging with the adapter
2
1
1 Put the small plug in the appliance.
2 Put the adapter in the wall socket.
- The charging light shows the charging status of
the appliance (see section ‘Charge indications’
in this chapter).
3 After charging, remove the adapter from the
wall socket and pull the small plug out of the
appliance.
Charge indications
Battery low
- When the battery is almost empty (when there
are only 5 or fewer shaving minutes left), the
charging light starts to flash orange.
- When the battery is completely empty, the
charging light starts to flash orange quickly.
10
English
- When you switch off the appliance, the
charging light continues to flash orange for a
few seconds.
Charging
- When the appliance is charging, the charging
light flashes green.
Battery fully charged
- When the battery is fully charged, the charging
light lights up green continuously.
Note: After approx. 30 minutes, the charging light
goes out to save energy.
Note: When you press the on/off button while the
appliance is connected to the wall socket, the
charging light lights up to remind you to unplug the
appliance before use.
Using the appliance
Note: This appliance can only be used without
cord.
Shaving tips & tricks
- Make circular movements during use. Circular
movements provide better shaving results than
straight movements.
- Your skin may need 2 or 3 weeks to get
accustomed to the Philips shaving system.
11
English
Switching the appliance on and off
1 To switch on the appliance, press the on/off
button once.
2 To switch off the appliance, press the on/off
button once.
Shaving
1 Switch on the appliance.
2 Move the shaving heads in circular movements
over your skin.
3 After shaving, switch off the appliance.
4 Clean the appliance (see chapter 'Cleaning and
maintenance').
Trimming (S1520, S1510 only)
You can use the trimmer to groom your sideburns
and moustache.
1 Push the trimmer slide downwards to open the
trimmer.
2 Switch on the appliance.
- You can now start trimming.
3 After trimming, switch off the appliance.
4 Clean the trimmer (see chapter ‘Cleaning and
maintenance’).
12
English
5 Close the trimmer (‘click’).
Cleaning and maintenance
Danger: This appliance is not washable.
Never immerse the appliance in water,
nor rinse it under the tap.
Caution: Never use compressed air, scouring
pads, abrasive cleaning agents or aggressive
liquids such as petrol or acetone to clean the
appliance.
- Clean the appliance after every shave for
optimal shaving performance.
- Regular cleaning guarantees better shaving
performance.
- For the best cleaning results, we advise you to
use the Philips Cleaning spray (HQ110).
- Never clean the shaving unit and the hair
chamber with a towel or tissue, as this may
damage the shaving heads and the coupling
spindles.
Cleaning the shaving unit with the cleaning brush
1 Switch off the appliance and make sure it is
disconnected from the wall socket.
2 Clean the outside of the shaving unit with the
brush supplied.
13
English
3 Press the release button to open the shaving
unit.
4 Clean the inside of the shaving unit and hair
chamber with the brush supplied.
5 Close the shaving unit.
Thorough cleaning
Clean the shaving heads thoroughly once a month
for optimal performance.
1 Switch off the appliance and make sure it is
disconnected from the wall socket.
2 Press the release button to open the shaving
unit. Pull the shaving unit off the appliance.
2
1
3 Turn the lock anticlockwise and remove the
retaining frame.
4 Remove and clean one shaving head at a time.
Each shaving head consists of a cutter and a
guard.
Note: Do not clean more than one cutter and
guard at a time, since they are all matching sets.
If you accidentally put a cutter in the wrong
14
English
shaving guard, it may take several weeks before
optimal shaving performance is restored.
- Remove the cutter from the shaving guard and
clean it with the brush.
- Clean the inside and outside of the shaving
guard with the brush.
5 Put the cutter back into the guard.
6 Put the shaving heads back into the shaving
unit.
Note: Make sure the notches on both sides of
the shaving heads fit exactly onto the
projections in the shaving head holder.
1
2
7 Put the retaining frame back into the shaving
unit and turn the lock clockwise.
8 Insert the lug of the shaving unit into the slot in
the top of the appliance. Then close the shaving
unit ('click').
Note: If the shaving unit does not close
smoothly, check if you have inserted the
shaving heads properly and if the retaining
frame is locked.
15
English
Cleaning the trimmer with the cleaning brush (S1520,
S1510 only)
Clean the trimmer every time you have used it.
1 Switch off the appliance and make sure it is
disconnected from the wall socket.
2 Push the trimmer slide downwards to open the
trimmer.
3 Clean the trimmer with the cleaning brush.
Brush up and down along the trimmer teeth.
4 Close the trimmer (‘click’).
Tip: For optimal trimming performance, lubricate
the trimmer teeth with a drop of sewing machine
oil every six months.
Storage
Put the protection cap on the shaver to prevent
damage.
16
English
Replacement
2yrs
For maximum shaving performance, we advise you
to replace the shaving heads every two years.
Replace damaged shaving heads immediately.
Always replace the shaving heads with original
Philips shaving heads (see 'Ordering accessories').
1 Switch off the appliance and make sure it is
disconnected from the wall socket.
2 Press the release button to open the shaving
unit. Pull the shaving unit off the appliance.
2
1
3 Turn the lock anticlockwise and remove the
retaining frame.
4 Remove the shaving heads from the shaving
unit and throw them away.
5 Place new shaving heads in the shaving unit.
Note: Make sure the notches on both sides of
the shaving heads fit exactly onto the
projections in the shaving head holder.
1
2
6 Put the retaining frame back into the shaving
unit and turn the lock clockwise.
17
English
7 Insert the lug of the shaving unit into the slot in
the top of the appliance. Then close the shaving
unit ('click').
Note:If the shaving unit does not close
smoothly, check if you have inserted the
shaving heads properly and if the retaining
frame is locked.
Ordering accessories
To buy accessories or spare parts, visit
www.shop.philips.com/service or go to your
Philips dealer. You can also contact the Philips
Consumer Care Center in your country (see the
worldwide guarantee leaflet for contact details).
The following accessories and spare parts are
available:
- SH30 Philips Shaving Heads.
- HQ110 Philips shaving head cleaning spray
Recycling
- This symbol means that this product shall not
be disposed of with normal household waste
(2012/19/EU).
- This symbol means that this product contains a
built-in rechargeable battery which shall not be
disposed of with normal household waste
(2006/66/EC). We strongly advise you to take
your product to an official collection point or a
Philips service centre to have a professional
remove the rechargeable battery.
18
English
- Follow your country’s rules for the separate
collection of electrical and electronic products
and rechargeable batteries. Correct disposal
helps prevent negative consequences for the
environment and human health.
Guarantee and support
If you need information or support, please visit
www.philips.com/support or read the separate
worldwide guarantee leaflet.
Guarantee restrictions
The shaving heads (cutters and guards) are not
covered by the terms of the international
guarantee because they are subject to wear.
Troubleshooting
This chapter summarizes the most common
problems you could encounter with the appliance.
If you are unable to solve the problem with the
information below, visit www.philips.com/support for
a list of frequently asked questions or contact the
Consumer Care Center in your country.
Problem Possible cause Solution
The appliance
does not shave as
well as it used to.
The shaving heads
are damaged or
worn.
Replace the shaving heads.
See chapter
'Replacement'.
Long hairs obstruct
the shaving heads.
Clean the shaving heads
one by one (see chapter
'Cleaning and
maintenance').
19
English
Problem Possible cause Solution
You have not
inserted the
shaving heads
properly.
Make sure the notches on
both sides of the shaving
heads fit exactly onto the
projections in the shaving-
head holder (see chapter
'Cleaning and
maintenance').
The appliance
does not work
when I press the
on/off button.
The appliance is
connected to the
wall socket.
This appliance can only be
used without cord.
The rechargeable
battery is empty.
Recharge the battery (see
chapter 'Charging').
The temperature of
the appliance is too
high. In this case,
the appliance does
not work.
As soon as the
temperature of the
appliance has dropped
sufficiently, you can switch
on the appliance again.
20
English
Empty page before back cover
  • Page 1 1
  • Page 2 2
  • Page 3 3
  • Page 4 4
  • Page 5 5
  • Page 6 6
  • Page 7 7
  • Page 8 8
  • Page 9 9
  • Page 10 10
  • Page 11 11
  • Page 12 12
  • Page 13 13
  • Page 14 14
  • Page 15 15
  • Page 16 16
  • Page 17 17
  • Page 18 18
  • Page 19 19
  • Page 20 20
  • Page 21 21
  • Page 22 22
  • Page 23 23
  • Page 24 24
  • Page 25 25
  • Page 26 26
  • Page 27 27
  • Page 28 28
  • Page 29 29
  • Page 30 30
  • Page 31 31
  • Page 32 32
  • Page 33 33
  • Page 34 34
  • Page 35 35
  • Page 36 36
  • Page 37 37
  • Page 38 38
  • Page 39 39
  • Page 40 40
  • Page 41 41
  • Page 42 42
  • Page 43 43
  • Page 44 44
  • Page 45 45
  • Page 46 46
  • Page 47 47
  • Page 48 48
  • Page 49 49
  • Page 50 50
  • Page 51 51
  • Page 52 52
  • Page 53 53
  • Page 54 54
  • Page 55 55
  • Page 56 56
  • Page 57 57
  • Page 58 58
  • Page 59 59
  • Page 60 60
  • Page 61 61
  • Page 62 62
  • Page 63 63
  • Page 64 64
  • Page 65 65
  • Page 66 66
  • Page 67 67
  • Page 68 68
  • Page 69 69
  • Page 70 70
  • Page 71 71
  • Page 72 72
  • Page 73 73
  • Page 74 74
  • Page 75 75
  • Page 76 76
  • Page 77 77
  • Page 78 78
  • Page 79 79
  • Page 80 80
  • Page 81 81
  • Page 82 82
  • Page 83 83
  • Page 84 84
  • Page 85 85
  • Page 86 86
  • Page 87 87
  • Page 88 88
  • Page 89 89
  • Page 90 90
  • Page 91 91
  • Page 92 92
  • Page 93 93
  • Page 94 94
  • Page 95 95
  • Page 96 96
  • Page 97 97
  • Page 98 98
  • Page 99 99
  • Page 100 100
  • Page 101 101
  • Page 102 102
  • Page 103 103
  • Page 104 104
  • Page 105 105
  • Page 106 106
  • Page 107 107
  • Page 108 108
  • Page 109 109
  • Page 110 110
  • Page 111 111
  • Page 112 112
  • Page 113 113
  • Page 114 114
  • Page 115 115
  • Page 116 116
  • Page 117 117
  • Page 118 118
  • Page 119 119
  • Page 120 120
  • Page 121 121
  • Page 122 122
  • Page 123 123
  • Page 124 124
  • Page 125 125
  • Page 126 126
  • Page 127 127
  • Page 128 128
  • Page 129 129
  • Page 130 130
  • Page 131 131
  • Page 132 132
  • Page 133 133
  • Page 134 134
  • Page 135 135
  • Page 136 136
  • Page 137 137
  • Page 138 138
  • Page 139 139
  • Page 140 140
  • Page 141 141
  • Page 142 142
  • Page 143 143
  • Page 144 144
  • Page 145 145
  • Page 146 146
  • Page 147 147
  • Page 148 148
  • Page 149 149
  • Page 150 150
  • Page 151 151
  • Page 152 152
  • Page 153 153
  • Page 154 154
  • Page 155 155
  • Page 156 156
  • Page 157 157
  • Page 158 158
  • Page 159 159
  • Page 160 160
  • Page 161 161
  • Page 162 162
  • Page 163 163
  • Page 164 164
  • Page 165 165
  • Page 166 166
  • Page 167 167
  • Page 168 168
  • Page 169 169
  • Page 170 170
  • Page 171 171
  • Page 172 172
  • Page 173 173
  • Page 174 174
  • Page 175 175
  • Page 176 176
  • Page 177 177
  • Page 178 178
  • Page 179 179
  • Page 180 180
  • Page 181 181
  • Page 182 182
  • Page 183 183
  • Page 184 184
  • Page 185 185
  • Page 186 186
  • Page 187 187

Philips CLICK&STYLE S728/20 User manual

Category
Shaver accessories
Type
User manual

Ask a question and I''ll find the answer in the document

Finding information in a document is now easier with AI