Euromaid WM5 User manual

Category
Washing machines
Type
User manual

Euromaid WM5 is a 5kg capacity front loader washing machine with a variety of features to make laundry day easier. It has 16 different wash programs to choose from, including a quick wash cycle for lightly soiled items and a delicate cycle for more fragile fabrics. The machine also features a time delay function, so you can set it to start washing at a time that's convenient for you. Additionally, the Euromaid WM5 has a child lock to prevent little hands from changing the settings while the machine is running.

Euromaid WM5 is a 5kg capacity front loader washing machine with a variety of features to make laundry day easier. It has 16 different wash programs to choose from, including a quick wash cycle for lightly soiled items and a delicate cycle for more fragile fabrics. The machine also features a time delay function, so you can set it to start washing at a time that's convenient for you. Additionally, the Euromaid WM5 has a child lock to prevent little hands from changing the settings while the machine is running.

MODEL
WM5
5kg
Front Loader
Washing Machine
Manual
Installation and Operation
2 - EN
1 Warnings
General Safety
• Neverplaceyourmachineonacarpet
coveredfloor.Otherwise,lackofairflow
frombelowofyourmachinemaycause
electricalpartstooverheat.Thismaycause
problemswithyourwashingmachine.
• Ifthepowercableormainsplugis
damagedyoumustcallAuthorizedService
forrepair.
• Fitthedrainhoseintothedischarge
housingsecurelytopreventanywater
leakageandtoallowmachinetotakein
anddischargewaterasrequired.Itisvery
importantthatthewaterintakeanddrain
hosesarenotfolded,squeezed,orbroken
whentheapplianceispushedintoplace
afteritisinstalledorcleaned.
• Yourwashingmachineisdesignedto
continueoperatingwhenthepower
restoresafterapowerinterruption.The
machinewillresumeitsprogramwhenthe
powerrestores.Pressthe“Start/Pause/
Cancel”buttonfor3secondstocancelthe
program(See,CancelingaProgram)
• Theremaybesomewaterinyourmachine
whenyoureceiveit.Thisisfromthequality
controlprocessandisnormal.Itisnot
harmfultoyourmachine.
• Someproblemsyoumayencountermay
becausedbytheinfrastructure.Press
“Start/Pause/Cancel”buttonfor3seconds
tocanceltheprogramsetinyourmachine
beforecallingtheauthorizedservice.
First Use
• Carryoutyourfirstwashingprocess
withoutloadingyourmachineandwith
detergentunder“Cottons90°C”program.
• Ensurethatthecoldandhotwater
connectionsaremadecorrectlywhen
installingyourmachine.
• Ifthecurrentfuseorcircuitbreakerisless
than16Amperes,pleasehaveaqualified
electricianinstalla16Amperefuseor
circuitbreaker.
• Whileusingwithorwithoutatransformer,
donotneglecttohavethegrounding
installationlaidbyaqualifiedelectrician.
Ourcompanyshallnotbeliableforany
damagesthatmayarisewhenthemachine
isusedonalinewithoutgrounding.
• Keepthepackagingmaterialsoutofreach
ofchildrenordisposethembyclassifying
accordingtowastedirectives.
Intended use
• Thisproducthasbeendesignedforhome
use.
• Theappliancemayonlybeusedfor
washingandrinsingoftextilesthatare
markedaccordingly.
Safety instructions
• Thisappliancemustbeconnectedto
anearthedoutletprotectedbyafuseof
suitablecapacity.
• Thesupplyanddraininghosesmust
alwaysbesecurelyfastenedandremainin
anundamagedstate.
• Fitthedraininghosetoawashbasinor
bathtubsecurelybeforestartingupyour
machine.Theremaybeariskofbeing
scaldedduetohighwashingtemperatures!
• Neveropentheloadingdoororremovethe
filterwhilethereisstillwaterinthedrum.
• Unplugthemachinewhenitisnotinuse.
• Neverwashdowntheappliancewitha
waterhose!Thereistheriskofelectric
shock!
• Nevertouchtheplugwithwethands.Do
notoperatethemachineifthepowercord
orplugisdamaged.
• Formalfunctionsthatcannotbesolvedby
informationintheoperatingmanual:
• Turnoffthemachine,unplugit,turnoff
thewatertapandcontactanauthorized
serviceagent.Youmayrefertoyourlocal
agentorsolidwastecollectioncenterin
yourmunicipalitytolearnhowtodisposeof
yourmachine.
If there are children in your
house...
• Keepchildrenawayfromthemachine
whenitisoperating.Donotletthem
tamperwiththemachine.
• Closetheloadingdoorwhenyouleavethe
areawherethemachineislocated.
3 - EN
2 Installation
Removing packaging
reinforcement
Tilt the machine to remove the packaging
reinforcement. Remove the packaging
reinforcement by pulling the ribbon.
Opening the transportation locks
A
Transportationsafetyboltsmustbe
removedbeforeoperatingthewashing
machine!Otherwise,themachinewillbe
damaged!
1. Loosenalltheboltswithaspanneruntil
theyrotatefreely(“C”)
2. Removetransportationsafetyboltsby
turningthemgently.
3. Fitthecovers(suppliedinthebagwiththe
OperationManual)intotheholesonthe
rearpanel.(“P”)
C
Keepthetransportationsafetyboltsin
asafeplacetoreusewhenthewashing
machineneedstobemovedagaininthe
future.
C
Nevermovetheappliancewithoutthe
transportationsafetyboltsproperlyfixedin
place!
Adjusting the feet
A
Donotuseanytoolstoloosenthelock
nuts.Otherwise,theycanbedamaged.
1. Manually(byhand)loosenthelocknutson
thefeet.
2. Adjustthemuntilthemachinestandslevel
andfirmly.
3. Important:Tightenalllocknutsupagain.
Connecting to the water supply.
Important:
• Thewatersupplypressurerequiredtorun
themachinemustbe1-10bar(0,1–1
MPa).
• Connectthespecialhosessuppliedwith
themachinetothewaterintakevalveson
themachine.
• Ifyouaregoingtouseyourdoublewater-
inletmachineasasingle(cold)water-inlet
unit,youmustinstallthestopper*,supplied
withyourmachinetothehotwatervalve.
• Ifyouwanttousebothwaterinletsofthe
product,youcanconnectthehotwater
hoseafterremovingthestopperand
gasketgroupfromthehotwatervalve.
* Applies for the products supplied with a blind
stopper group.
• Modelswithasinglewaterinletshouldnot
beconnectedtothehotwatertap.
When returning the appliance to its place after
maintenance or cleaning, care should be taken
not to fold, squeeze or block the hoses.
Connecting to the drain
The water discharge hose can be attached to
the edge of a washbasin or bathtub. The drain
hose should be firmly fitted into the drain as to
not get out of its housing.
Important:
• Theendofthedrainhosemustbedirectly
connectedtothewastewaterdrainorto
thewashbasin.
• Thehoseshouldbeattachedtoaheightof
atleast40cm,and90cmatmost.
• Incasethehoseiselevatedafterlayingit
onthefloorlevelorclosetotheground
(lessthan40cmabovetheground),water
dischargebecomesmoredifficultandthe
laundrymaycomeoutwet.
• Thehoseshouldbepushedintothe
drainageformorethan15cm.Ifitistoo
longyoumayhaveitshortened.
• Themaximumlengthofthecombined
hosesmustnotbelongerthan3.2m.
90
4 - EN
Electrical connection
Connect the machine to an earthed outlet
protected by a fuse of suitable capacity.
Important:
• Connectionshouldcomplywithnational
regulations.
• Thevoltageandtheallowedfuse
protectionarespecifiedinthesection
“TechnicalSpecifications”.
• Thespecifiedvoltagemustbeequalto
yourmainsvoltage.
• Connectionviaextensioncordsormulti-
plugsshouldnotbemade.
B
Adamagedpowercablemustbereplaced
byaqualifiedelectrician.
B
Theappliancemustnotbeoperatedunless
itisrepaired!Thereistheriskofelectric
shock!
3 Initial preparations for
washing
Preparing clothes for washing
Laundry items with metal attachments such
as, bras, belt buckles and metal buttons
will damage the machine. Remove metal
attachments or place the items in a clothing
bag, pillow case, or something similar.
• Sortthelaundryaccordingtotypeoffabric,
color,anddegreeofsoilingandpermissible
watertemperature.Alwaysfollowthe
adviceonthegarmentlabels.
• Placesmallitemslikeinfants’socksand
nylonstockings,etc.inalaundrybag,
pillowcaseorsomethingsimilar.Thiswill
alsosaveyourlaundryfromgettinglost.
• Wash“machinewashable”or“hand
washable”labeledproductsonlywithan
appropriateprogram.
• Donotwashcolorsandwhitestogether.
New,darkcoloredcottonsmayreleasea
lotofdye.Washthemseparately.
• Useonlydyes/colorchangersandlime
removerssuitableformachinewash.
Alwaysfollowtheinstructionsonthe
packaging.
• Washtrousersanddelicateclothesturned
insideout.
Correct load capacity
C
Pleasefollowtheinformationinthe
"ProgramSelectionTable".Washing
resultswilldegradewhenthemachineis
overloaded.
Loading door
The door locks during program operation and
the Door Locked Symbol lights up. The door
can be opened when the symbol fades out.
Detergents and softeners
Detergent Drawer
The detergent dra wer is composed of three
compartments:
The detergent dispenser may be in two
different types according to the model of your
machine.
– (I) for prewash
– (II) for main wash
- (III) siphon
– (
) for softener
Detergent, softener and other cleaning
agents
Add detergent and softener before starting the
washing program.
Never open the detergent dispenser drawer
while the washing program is running!
When using a program without pre-wash, no
detergent should be put into the pre-wash
compartment (Compartment no. I).
Detergent quantity
The amount of washing detergent to be used
depends on the amount of laundry, the degree
of soiling and water hardness.
• Donotuseamountsexceedingthe
quantitiesrecommendedonthepackage
toavoidproblemsofexcessivefoam,
poorrinsing,financialsavingsandfinally,
environmentalprotection.
• Neverexceedthe(>max<)levelmarking;
otherwise,thesoftenerwillbewasted
withoutbeingused.
• Donotuseliquiddetergentifyouwantto
washusingthetimedelayfeature.
5 - EN
Figure 2
4 Selecting a Program and Operating Your Machine
1 - Spin Speed Adjustment Button
2 - Time Delaying Button (+/-)
3 - Temperature Adjustment Button
4 - Start/Pause/Cancel Button
Control panel
Figure 1
7.a - Spin Speed Indicator
7.b - Temperature Indicator
7.c - Spin Symbol
7.d - Temperature Symbol
7.e - Remaining Time and Delaying Time
Indicator
7.f - Programme Indicator Symbols (pre-
wash/main wash/rinse/softener/spin)
7.g - Economy Symbol
7.h - Time Delaying Symbol
7.i - Door Locked Symbol
7.j - Start Symbol
7.k - Standby Symbol
7.l - Auxiliary Function Symbols
7.m - Water cut-off Symbol (According to
your machine’s model)
Display symbols
Turning the machine on
Plug in your machine. Turn the tap on
completely. Check if the hoses are connected
tightly. Place the laundry in the machine. Add
detergent and softener. Press the “On/Off”
button.
Program selection
Turn the Programme Selection Knob to the
program mode that you wish to wash your
laundry.
The recommended temperature and spin
speed for the selected program appear. Press
“Start/Pause/Cancel” button to start the
program.
C
Sortthelaundryaccordingtotypeoffabric,
color,degreeofsoilingandpermissible
watertemperaturewhenchoosinga
program.
Main programs
Depending on the type of textile, the following
main programs are available:
F1
F2
F3
F4
5 - Auxiliary Function Keys
6 - Program Selection Knob
7 - Display
8 - On/Off Button
1 7
2
3
6
5 4
8
6 - EN
• Cotton
You can wash normally soiled durable cotton
clothes with this program. Your laundry will
be washed with vigorous washing movements
during a longer washing cycle.
• Synthetics
You can wash your less durable clothes on
this program. Lighter washing movements
and shorter washing cycle is used compared
to “Cottons” program. It is recommended for
your synthetic clothes (such as shirts, blouses,
synthetic/cotton blended garments, etc.). For
curtains and lace, the “Synthetic 40” program
with pre-wash and anti-creasing functions
selected is recommended.
• Woollens
You can wash your machine-washable woolen
garments on this program. Wash by selecting
the proper temperature according to the labels
of your clothes. It is recommended to use
appropriate detergents for woolens.
Additional programs
For special cases, there are also extra
programs available:
C
Additionalprogramsmaydifferaccording
tothemodelofyourmachine.
• Babycare
Increased hygiene is provided by a longer
heating period and an additional rinse cycle. It
is recommended for baby clothes and clothes
worn by allergic people.
• Delicate
You can wash your delicate clothes on this
program. It has more sensitive washing
movements and does not make intermediate
spinning compared to “Synthetic” program.
• Hand wash
You can wash your woolen/delicate clothes
that bear “not machine- washable” labels for
which hand wash is recommended on this
program. It washes the laundry with very
tender washing movements without damaging
your clothes.
• Mix 40
This program washes for a longer period
at 40°C and gives the same result as the
“Cottons 60°C” program, thus it saves energy.
It is suitable for clothes for which you cannot
use the “Cottons 60°C” program.
• Intensive
You can wash your durable and heavily soiled
clothes on this program. In this program, your
clothes will be washed for a longer time and
an extra rinse cycle will be made compared to
the “Cottons” program.
• Darkcare
Use this programme to wash your dark
coloured laundry, or the coloured laundry
that you do not want them get faded. This
programme washes your laundry with
low mechanical movements and at low
temperature. We recommend you to use
liquid detergent or woolen shampoo for dark
coloured laundry.
• Daily Xpress
This program is used to wash lightly soiled and
unstained cotton garments in a short time.
• Xpress Super Short
You can use this program to quickly wash a
small number of lightly soiled and unstained
cotton garments. E.g.: bathrobes, duvet
covers, sport wear, daily clothes and etc. used
only once.
Economy Symbol
Shows energy saving programs and
temperature selections.
As “Intensive” and “Baby” programs are long
programs with higher temperature selections
to ensure hygiene, “Economy” Symbol will not
light up.
Special programs
For specific applications, you can select any of
the following programs:
• Rinse
This program is used when you want to rinse
or starch separately.
• Spin+Drain
This program spins with maximum possible
rpm in the default setting after the water drains
from the machine.
C
Usealowerspinspeedfordelicate
laundries.
Temperature selection
Whenever a new program is selected, the
temperature anticipated for that program
appears on the temperature indicator.
To change the temperature, press the
“Temperature” button. Temperature decreases
in 10° increments.
Cold selection is shown with “-” symbol.
90˚C
Heavily soiled, white cottons and
linens.
60˚C
Normally soiled, fade proof colored
linens, cottons or synthetic clothes
and lightly soiled white linens
40˚C
30°C
Cold
Blended clothes including synthetics
and woolens as well as delicates.
Spin Speed selection
Whenever a new program is selected, the
maximum spin speed of the selected program
is displayed on the spin speed indicator.
To decrease the spin speed, press the “Spin”
button. Spin speed decreases gradually. Then,
7 - EN
rinse hold and no spin options are shown
respectively.
Rinse hold is shown with “
” and no spin is
shown with “ ” symbols.
If you do not want to unload your clothes
immediately after the program, you may use
the rinse hold function in order to prevent your
clothes become wrinkled in an anhydrous
condition. With this function, your laundry is
kept in the final rinsing water. If you want to
spin your laundry after the rinse hold function:
- Adjustthespinspeed.
- Press“Start/Pause/Cancel”button.
Programresumes.Yourmachinedrainsthe
waterandspinsyourlaundry.
You can use no spin function in order to drain
the water without spinning at the end of the
program.
Program selection and
• Selectable
* Automatically selected, not cancelable.
*** If maximum spin speed of your machine is lower, selection may be made until maximum spin
speed.
Water and power consumption and programme duration may differ from the table shown,
subject to changes in water pressure, water hardness and temperature, ambient temperature,
type and amount of laundry, selection of auxiliary functions, and fluctuations in the supply
voltage.
C
Theauxiliaryfunctionsinthetablemaydifferaccordingtothemodelofyourmachine.
C
Programmedurationwillbedisplayedonthescreenofyourmachineaccordingtoyour
selection.
consumption table
EN
2
Auxiliaryfunctions Temperature
Max.Load(kg)
Water
Consumption(l)
Energy
Consumption
(kWh)
SpinSpeed
(rpm)***
Prewash
QuickWash
RinsePlus
Anti-Creasing
RinseHold
Selectable
temperature
range°C
Cotton 90 5 63 1.80 1600 90-Cold
Cotton 60** 5 61 0.90 1600 90-Cold
Cotton 40 5 61 0.70 1600 90-Cold
Intensive 60 5 61 1.35 1600 * 60-40
Babycare 90 5 61 1.80 1600 * 90-30
Synthetics 60 2.5 40 0.90 1000 60-Cold
Synthetics 40 2.5 35 0.40 1000 60-Cold
Mix 40 3 35 0.45 1000 40-Cold
Darkcare 40 2.5 55 0.45 1000 * 40-Cold
Woollen 40 1.5 40 0.30 1000 40-Cold
Handwash 30 1 30 0.20 1000 30-Cold
XpressSuperShort 30 2 30 0.10 1400 30-Cold
DailyXpress 90 5 50 2.00 1400 90-Cold
DailyXpress 60 5 50 1.20 1400 90-Cold
DailyXpress 30 5 60 0.25 1400 90-Cold
** Energy & Water labelling test programme according to AS/NZS 2040.1
8 - EN
Auxiliary functions
Auxiliary Function Selection Buttons
C
Selecttherequiredauxiliaryfunctions
beforestartingtheprogram.
C
Somecombinationscannotbeselected
together.(Ex.:Pre-wash)(Figure1-5a)and
QuickWash(Figure1-5b).
Auxiliary function selection
If an auxiliary function that should not be
selected together with a previously selected
function is chosen, the first selected function
will be cancelled and the last auxiliary function
selection will remain active.
(Ex.: If you want to select pre-wash first and
then quick wash, pre-wash will be cancelled
and quick wash will remain active.
Auxiliary function that is not compatible
with the program cannot be selected. (see,
“Program Selection Table”)
• Prewash
When you select this function (5a), the display
will indicate “1” symbol. A pre-wash is only
worthwhile for heavily soiled laundry. Without
pre-wash you save energy, water, detergent
and time. Pre-wash without detergent is
recommended for lace and curtains.
• Quick Wash
With this function (5b), the wash time is
shortened. The “2” symbol will light up on the
display. Use this function for smaller amounts
or slightly soiled laundries.
• Rinse Plus
This function (5c) allows your machine to
perform an extra rinsing in addition to the
rinsing cycles performed by your machine after
main washing cycle. Thus, the risk for sensitive
skins (babies, allergic skins and etc.) to be
effected by the minimal detergent remnants on
the laundry is reduced. “3” symbol will light up
on the display.
• Anti-Creasing
With this function (5d), drum movement will
be lessened to prevent creasing and spinning
speed is limited. In addition, washing is carried
out at a higher water level. The “4” symbol will
light up on the display.
C
Wheneveryouselectthisauxiliaryfunction,
loadyourmachinewithhalfofthe
maximumlaundryspecifiedintheprogram
table.
Time display
The display shows the time remaining for
the program to complete while a program is
running. Program duration may differ from the
values in the consumption table subject to the
changes in the water pressure, water hardness
and temperature, ambient temperature, type
and amount of laundry, auxiliary functions
selected, and changes in the supply voltage.
Time delay
With the “Time delay” function you can delay
the program start up to 24 hours. Setting can
be made in intervals of 30 minutes.
1. Press“Timedelaying”buttons“+”and“-”
tosetyourdesiredtimedelay.
2. Press“Start/Pause/Cancel”button.Then
thetimedelaystartstocountdown.
C
Morelaundrymaybeloadedortakenout
duringthetimedelayperiod.
Changing the delay time
If you want to change the time during the
countdown:
1. Press“Start/Pause/Cancel”button.
2. Press“Timedelaying”buttons“+”or“-”to
setthedesiredtimedelay.
3. Press“Start/Pause/Cancel”button.
Canceling the time delay
If you want to cancel the time delay
countdown and start the program immediately:
1. Press“Start/Pause/Cancel”button.
2. Pres“TimeDelaying”“-”buttonto
decreasethetimedelay.Programduration
after30minutesshallbedisplayed.
3. Press“Start/Pause/Cancel”buttontostart
theprogram.
Starting the Program
1. Press“Start/Pause/Cancel”buttontostart
theprogram.
2. Thestartsymbol(Figure2-7j)which
indicatesthattheprogramhasstartedwill
lightup.
3. Thedoorlocksandthedoorlocked
symbol(Figure2-7i)willlightup.
4. TheSymboloftherelevantstep(prewash,
mainwash,rinse,softenerandspin)that
theprogramhasstartedfromwilllightup
(Figure2-7f).
C
Ifthemachineisnotspinning,the
programmaybeinrinseholdmodeorthe
automaticspincorrectionsystemhasbeen
activatedduetoanexcessiveunbalanced
distributionoflaundryinthemachine.
Changing the selections after the
program has started
The selected spin speed and program
temperature fade out. An empty frame
appears.
When the “Program selection” button is
brought to the appropriate position, rpm and
temperature data reappear.
9 - EN
Switching the machine to standby
mode
Press “Start/Pause/Cancel” button
momentarily to switch your machine to the
standby mode. Auxiliary functions can be
cancelled or selected in accordance with
the step the program is at. The door can be
opened if the water level is suitable. Laundry
may be added / taken out by opening the
door.
Door lock
The Door Locked Symbol (Figure 2-7i) lights
up when the loading door is locked. This
symbol will flash until the door is allowed to
open. Do not force the door at this stage. You
may open the door after the symbol fades out.
Child-proof lock
This function protects the appliance from
being tampered by children. In this case, all of
the buttons are inactive except On/Off button;
by On/Off button you can whether stop or
resume (while child-lock on) the program of
your machine.
The machine is switched to child-lock by
pressing the 2nd and 4th auxiliary functions
for 3 sec. “C:on” (Child lock is activated) label
appears on the screen. The same symbol
will also be displayed whenever any button is
pressed while the machine is child-locked.
To deactivate the child-proof lock, press the
2nd and 4th auxiliary function buttons for 3
sec. “C:OFF” (Child lock is deactivated) label
appears on the screen.
Ending the program through
canceling
“Start/Pause/Cancel” button is pressed for 3
seconds to cancel the program. Start symbol
(Figure 2-7j) will flash during cancellation. After
cancellation, the symbol of the corresponding
step at which the cancellation was made will
remain lit and “End” will appear on the screen.
End of program
When the program is finished, the symbols
of the relevant steps will remain lit up and
the auxiliary function, spin and temperature
data selected at the start-up of the program
will remain selected. “End” will appear on the
display.
5 Maintenance and cleaning
Detergent Drawer
Remove any powder residue buildup in the
drawer. To do this;
1. Pressthedottedpointonthesiphoninthe
softenercompartmentandpulltowards
youuntilthecompartmentisremovedfrom
themachine.
C
Ifmorethananormalamountofwater
andsoftenermixturestartstogatherinthe
softenercompartment,thesiphonmustbe
cleaned.
2. Washthedispenserdrawerandthe
siphonwithplentyoflukewarmwaterina
washbasin.
3. Replacethedrawerintoitshousingafter
cleaning.Checkifthesiphonisinits
originallocation.
Inlet water filters
There is a filter at the end of each water intake
valve at the back side of the machine and also
at the end of each water intake hose where
they are connected to the tap. These filters
prevent the foreign substances and dirt in the
water to enter into the machine. Filters should
be cleaned as they get dirty.
• Closethetaps.
• Removethenutsofthewaterintakehoses
tocleanthesurfacesofthefiltersonthe
waterintakevalveswithanappropriate
brush.
• Ifthefiltersareverydirty,youcanpullthem
outbymeansofpliersandcleanthem.
• Takeoutthefiltersontheflatendsof
thewaterintakehosestogetherwith
thegasketsandcleanthoroughlyunder
streamingwater.
• Replacethegasketsandfilterscarefullyto
theirplacesandtightenthehosenutsby
hand.
10 - EN
bypullingouttheplugattheendofthe
hose.Iftheamountofwatertobedrained
offisgreaterthanthevolumeofthe
container,replacetheplug,pourthewater
out,thenresumethedrainingprocess.
• Afterdrainingprocessiscompleted,
replacetheplugintotheendofthehose
andfitthehosebackintoitsplace.
If your product is not supplied with an
emergency drain hose, do the following as
shown in the figure below:
• Placealargecontainerinfrontofthefilter
toreceivewaterflowingfromthefilter.
• Loosenpumpfilter(anticlockwise)until
waterstartstoflowoutofit.Directthe
flowingwaterintothecontaineryouhave
placedinfrontofthefilter.Youcanusea
pieceofclothtoabsorbanyspilledwater.
• Whenthereisnowaterleft,turnthepump
filteruntilitiscompletelylooseandremove
it.
• Cleananyresiduesinsidethefilteras
wellasfibers,ifany,aroundthepropeller
region.
• Ifyourproducthasawaterjetfeature,be
suretofitthefilterintoitshousinginthe
pump.Neverforcethefilterwhilereplacing
itintoitshousing.Fitthefilterfullyintoits
housing;otherwise,watermayleakfrom
thefiltercap.
4- Close the filter cap.
Close the two-piece filter cap of your product
by pushing the tab on it.
Close the one-piece filter cap of your product
by fitting the tabs on the bottom into their
positions and pushing the upper part of it.
Draining any remaining water and
cleaning the pump filter
Your product is equipped with a filter system
which ensures a cleaner water discharge that
extends pump life by preventing solid items
such as buttons, coins and fabric fibers from
clogging the pump propeller during discharge
of the washing water.
• Ifyourmachinefailstodrainthewater,
thepumpfiltermaybeclogged.Youmay
havetocleanitevery2yearsorwhenever
itisplugged.Watermustbedrainedoffto
cleanthepumpfilter.
In addition, water may have to be drained off
completely in the following cases:
• beforetransportingthemachine(e.g.when
movinghouse)
• whenthereisthedangeroffrost
In order to clean the dirty filter and discharge
the water;
1- Unplug the machine to cut off the supply
power.
A
Theremaybewaterat90°Cinthe
machine.Therefore,thefiltermustbe
cleanedonlyaftertheinsidewateris
cooleddowntoavoidhazardofscalding.
2- Open the filter cap. The filter cap may be
composed of one or two pieces according to
the model of your machine.
If it is composed of two pieces, press the tab
on the filter cap downwards and pull the piece
out towards yourself.
If it is composed of one piece, hold it from
both sides and open it by pulling out.
3- An emergency drain hose is supplied with
some of our models. Others are not supplied
with this item.
If your product is supplied with an emergency
drain hose, do the following as shown in the
figure below:
• Pulloutthepumpoutlethosefromits
housing.
• Placealargecontainerattheendofthe
hose.Drainthewateroffintothecontainer
11 - EN
6 Solution suggestions for problems
Cause Explanation / Suggestion
Programcannotbestartedorselected.
• Machinemayhaveswitchedtoself
protectionmodeduetoaninfrastructure
problem(suchaslinevoltage,water
pressure,etc.).
• Resetyourmachinebypressing“Start/
Pause/Cancel”buttonfor3seconds.(see,
CancelingaProgram)
Thereiswatercomingfromthebottomofthemachine.
• Theremightbeproblemswithhosesor
thepumpfilter.
• Besurethesealsofthewaterinlethosesare
securelyfitted.
• Tightlyattachthedrainhosetothetap.
• Makesurethatthepumpfilteriscompletely
closed.
Machinestoppedshortlyaftertheprogramstarted.
• Machinecanstoptemporarilyduetolow
voltage.
• Itwillresumeoperatingwhenthevoltageis
backtothenormallevel.
Itcontinuouslyspins.Remainingtimedoesnotcountdown.(Formodelswithadisplay)
• Theremaybeanimbalanceoflaundryin
themachine.
• Theautomaticspincorrectionsystemmight
havebeenactivatedduetotheunbalanced
distributionofthelaundryinthedrum.
• Thelaundryinthedrummaybeclustered
(bundledlaundryinabag).Laundryshould
berearrangedandre-spun.
• Nospinningisperformedwhenthelaundryis
notevenlydistributedinthedrumtoprevent
anydamagetothemachineandtoits
environment.
Itcontinuouslywashes.Remainingtimedoesnotcountdown.(Formodelswithadisplay)
• Inthecaseofapausedcountdownwhiletaking
inwater:
• Timerwillnotcountdownuntilthemachineis
filledwiththecorrectamountofwater.
• Themachinewillwaituntilthereisasufficient
amountofwatertoavoidpoorwashingresultsdue
tolackofwater.Thenthetimerwillstarttocount
down.
• Inthecaseofapausedcountdownatthe
heatingstep:
• Timewillnotcountdownuntilthe
selectedtemperaturefortheprogramis
reached
• Inthecaseofapausedcountdownatthe
spinningstep:
• Theremaybeanimbalanceoflaundryin
themachine.
 Theautomaticspincorrectionsystemmighthave
beenactivatedduetotheunbalanceddistribution
ofthelaundryinthedrum.
• Thelaundryinthedrummaybeclustered(bundled
laundryinabag).Laundryshouldberearranged
andre-spun.
• Nospinningisperformedwhenthelaundryis
notevenlydistributedinthedrumtopreventany
damagetothemachineandtoitsenvironment.
Thereisfoamingoverthedetergentdrawer
• Toomuchdetergentwasused.
• Mix1tablespoonfulsoftenerand½literwater
andpourintothemainwashcompartmentofthe
detergentdrawer.
12 - EN
WM5
5
84
60
45
60
220-240 V / 50Hz
10
2000-2350
1000
7 Specifications
Specifications of this appliance may change without notice to improve the quality of the product.
Figures in this manual are schematic and may not match your product exactly.
Values stated on the machine labels or in the documentation accompanying it are obtained
in laboratory in accordance with the relevant standards. Depending on operational and
environmental conditions of the appliance, values may vary.
Models
Maximumdrylaundrycapacity(kg)
Height(cm)
Width(cm)
Depth(cm)
NetWeight(±4kg)
Electricity(V/Hz.)
TotalCurrent(A)
TotalPower(W)
Spinningcycle(rpmmax.)
Thisappliance’spackagingmaterialisrecyclable.Helprecycleitandprotecttheenvironmentby
droppingitoffinthemunicipalreceptaclesprovidedforthispurpose.Yourappliancealsocontains
agreatamountofrecyclablematerial.Itismarkedwiththislabeltoindicatetheusedappliances
thatshouldnotbemixedwithotherwaste.Thisway,theappliancerecyclingorganisedbyyour
manufacturerwillbedoneunderthebestpossibleconditions,incompliancewithEuropean
Directive2002/96/EConWasteElectricalandElectronicEquipment.Contactyourtownhalloryour
retailerfortheusedappliancecollectionpointsclosesttoyourhome.Wethankyoudoingyourpart
toprotecttheenvironment.
13 - EN
14 - EN
Congratulations on your new purchase and thank you
for choosing a brand supported by Home Appliances Pty Ltd.
Our friendly Customer Care team will take care of your every enquiry.
Please ring 1800 444 357 or email customercare@hapl.com.au
Please be aware of the terms and conditions following.
PROOF OF PURCHASE
Proof of purchase will be required for the validaon of all warranty claims.
Documents suitable for proof of purchase include, but are not limited to the following:
Delivery dockets;
Retailer or supplier invoices;
Kitchen cabinet invoices that incorporate appliances;
Credit card statements where the purchase of the appliances are clearly depicted.
The inability to provide proof of purchase will lead to the claim being treated as a service call with labour and parts costs being born by the
claimant. It is recommended to aach any supporng documentaon to this warranty card and keep in a safe place for future reference.
NOTE: There is no need to return this or any other warranty card to Home Appliances Pty Limited.
Proof of purchase is the only requirement for warranty claim, please keep a copy of the purchase receipt with this warranty card.
WARRANTY TERMS & CONDITIONS
FOR AUSTRALIA ONLY
This warranty is in addion to your normal statutory
entlements and specic legal rights. Our goods come with
guarantees that cannot be excluded under the Australian
Consumer Law as prescribed and set out in regulaon 90 of the
Compeon and Consumer Act 2010.
1 Home Appliances Pty Limited warrants this appliance to
the original purchaser against defecve materials and
workmanship for a period of 24 months of ownership,
that any part with defecve material be replaced free of
charge, provided that all service work is carried out by Home
Appliances Pty Limited or nearest appointed service agent.
3 months warranty (Non Domesc USE)
Regardless of the product type, warranty of appliances
installed and operated in a non domesc installaon, such as
an oce or factory etc., is limited to Three (3) Months from
date of purchase.
NOTE: Portable Appliances such as Benchtop cook tops are
NOT covered for In House servicing, call Customer Care on
1800 444 357 to discuss servicing of this type of appliance.
2 If the residence housing the appliance is outside of a service
area of Home Appliances Pty Ltd, the owner will bear over and
above associated costs.
These over and above costs relate to:
(i) Travel costs by an authorised service agent for Home
Appliances Pty Ltd.
(ii) Transportaon of the appliance to and from to the nearest
Home Appliances Pty Ltd authorised service agent.
Transportaon of an appliance will be at the owners cost and
risk if not done so by an authorised service agent.
3 If there is a defect in the materials or workmanship during
the period of this warranty, Home Appliances Pty Limited
will, at its discreon and subject to the following terms and
condions, repair or replace free of charge the component
or appliance. Replacement of the appliance under the terms
of this warranty does not give right to extension or a new
beginning of the period of warranty.
4 Home Appliances Pty Limited is not liable for any other loss
other than the appliance itself.
5 This warranty does not cover the following circumstances:
(i) An act or acts of God, any natural occurrence or other
circumstances not within the control of Home Appliances
Pty Limited (such as re, storm or water damage).
(ii) An aempt by any person (other than an employee or
authorised service agent of Home Appliances Pty Limited
to repair or modify the appliance.
(iii) Where the rang plate has been removed or any details
on that plate have been rendered illegible.
(iv)*If the appliances have been installed, operated or
maintained in a manner that is not in accordance with the
instrucons supplied by Home Appliances Pty Limited.
(v) If product failure is the result of connecon to a power
supply that does not correspond to that shown on the
rangs plate or if the power supply is inadequate or faulty.
(vi) Normal wear and tear, misuse or damage to the appliance
or use of the appliance in a manner for which it was not
intended.
(vii) Failure of electrical components due to power surges or
outages.
(vii) Home Appliances Pty Limited will not be obliged to
comply with its obligaons under this Warranty unl you
have paid the full purchase price for the appliances.
* For Washing machines this includes removal of packaging
material and rear packing bolts where applicable.
6 The warranty does not extend to cover:
(i) Discoloured burners or trivets on gas cooktops or chrome
surrounds on electric cooktops
(ii) Discolouraon caused by steam, heat or venng during
normal use
(iii) Plasc or enamel components
(iv) Light globes, lters or any consumables
(v) Insect or vermin infestaon
(vi) Corrosion where the product is located within a corrosive
environment
7 Home Appliances Pty Limited excludes all warranes and
condions that may be implied into this Warranty or the
Contract for Supply and limits its liability for a breach of any
implied condion or warranty that cannot be excluded to the
greater of (at Home Appliances Pty Limited opon):
(i) For goods, repairing or replacing those goods or paying for
the cost of those goods repaired or replaced;and
(ii) For services, resupplying the services or paying for the
cost of having those services resupplied.
8 Proof of purchase will be required for the validaon of all
warranty claims.
9 Our goods come with guarantees that cannnot be excluded
under the Australian Consumer Law. You are entled
to a replacement or refund for a major failure and for
compensaon for any reasonanly forseeable loss or damage.
You are also entled to have the goods repaired if the goods
fail to be of acceptable quality and the failure does not
amount to a major failure.
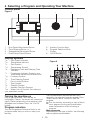
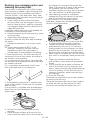
Built-In & Freestanding Appliances
Access must be granted within normal working hours and our
Service Agents must have easy access to these appliances. Any
charges will be the responsibility of the purchaser where the
service technician cannot obtain easy access to remove the
appliances for inspecon prior to repair.
HAPL_2016003 HAPL Warranty Card Update 2YR 11_16
  • Page 1 1
  • Page 2 2
  • Page 3 3
  • Page 4 4
  • Page 5 5
  • Page 6 6
  • Page 7 7
  • Page 8 8
  • Page 9 9
  • Page 10 10
  • Page 11 11
  • Page 12 12
  • Page 13 13
  • Page 14 14
  • Page 15 15
  • Page 16 16

Euromaid WM5 User manual

Category
Washing machines
Type
User manual

Euromaid WM5 is a 5kg capacity front loader washing machine with a variety of features to make laundry day easier. It has 16 different wash programs to choose from, including a quick wash cycle for lightly soiled items and a delicate cycle for more fragile fabrics. The machine also features a time delay function, so you can set it to start washing at a time that's convenient for you. Additionally, the Euromaid WM5 has a child lock to prevent little hands from changing the settings while the machine is running.

Ask a question and I''ll find the answer in the document

Finding information in a document is now easier with AI