Trendnet TV-HC400 Installation guide

Category
Security cameras
Type
Installation guide

This manual is also suitable for

TV-HW400 Wall Mount
TV-HN400 Corner Mount
TV-HP400 Pole Mount
TV-HC400 Ceiling Mount
06.06.2014
TV-HN400 Corner Mount
Ÿ Quick Installation Guide
Ÿ Wall mount bracket
Ÿ Corner adapter
Ÿ Mounting accessories
Package Contents
1. Before You Start
1
TV-HW400 Wall Mount
Ÿ Quick Installation Guide
Ÿ Wall mount bracket
Ÿ Mounting accessories
TV-HC400 Ceiling Mount
Ÿ Quick Installation Guide
Ÿ Ceiling mount bracket
Ÿ Mounting accessories
TV-HP400 Pole Mount
Ÿ Quick Installation Guide
Ÿ Wall mount bracket
Ÿ Pole adapter
Ÿ Pole mount hoops
Ÿ Mounting accessories
Note:
Ÿ For masonry walls, the included expansion screws must be used to secure the wall mount.
Ÿ For wood/metal stud walls, self-tapping screws (not included) can be used to secure the wall
mount without the use of expansion screws.
Ÿ Masonry walls must be thick enough to install expansion screws.
Ÿ Ensure that the wall is strong enough to withstand more than 8 times the weight of the IP
camera and the mount.
2
2. TV-HW400 Wall Mount
Components
Wall Mount Bracket
5 expansion screws with nuts and washers
1. Place the arm bracket at mounting location and use it to mark screw hole locations.
2. Mark Ethernet cable hole location.
Optional: The Ethernet cable (and other cables) can be run through the indentation at the
bottom of the mounting bracket. For this installation, there is no need to mark an Ethernet
cable hole.
Mounting Accessories
Mounting
3. Drill screw holes in the wall according to the holes of the mount and a hole for cables
(optional), and then insert expansion screws into the mounting holes.
3
5. Mount bracket to the wall by aligning the 4 screw holes of the mount with the expansion
screws on the wall.
6. Secure the wall mount with 4 hex nuts and washers.
4. Pass Ethernet cable through the wall or through the indentation on the bottom of the mount.
Leave enough slack so that the cable can pass through the bracket. If you passed cables
through the wall, seal the hole with exterior grade caulking.
7. Install the speed dome to the mount. Please refer to Section 6 camera installation details.
4
3. TV-HN400 Corner Mount
Components
Wall Mount
The corner adapter must be used together with the wall mount for corner mounting
applications.
Corner Adapter
Note: Corner mounting is applicable to indoor/outdoor 90° corners with solid construction.
5 pan head screws and 5 expansion screws with nuts and washers.
Mounting Accessories
5
1. Install the corner adapter.
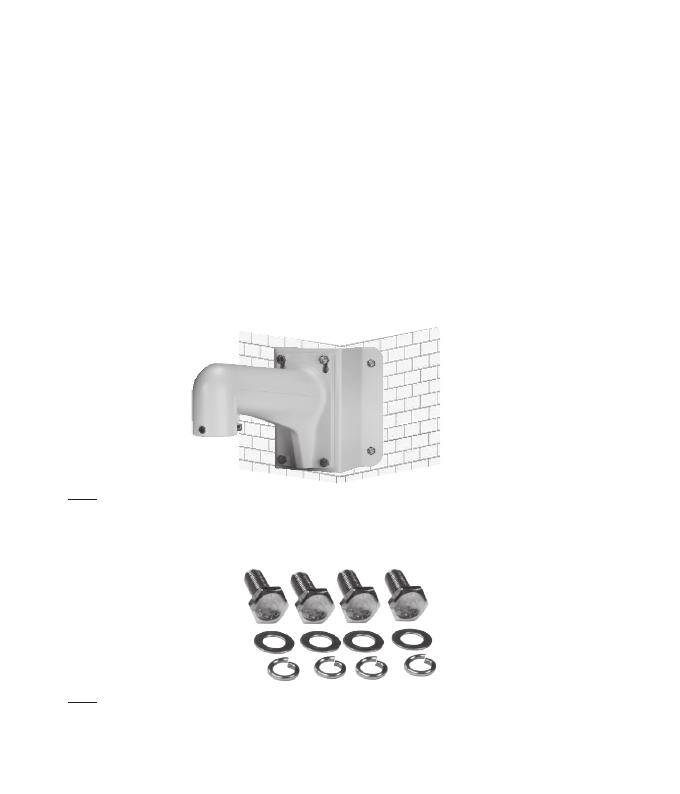
2. Place the corner adapter at mounting location and use it to mark screw hole locations.
Mounting
3. Mark Ethernet cable hole location (optional).
4. Drill screw holes in the wall according to the holes of the mount and a hole for cables
(optional), and then insert expansion screws into the mounting holes.
5. Pull the cables through the center hole of the corner adapter. Leave enough slack so that the
cable can pass through the bracket. If you passed cables through the wall, seal the hole with
exterior grade caulking.
6. Attach the corner adapter to the corner by aligning the 4 screw holes of the corner adapter
with the expansion screws on the corner.
7. Secure the corner adapter to the corner with nuts and washers to tighten the four expansion
screws.
Nuts and Washers
8. Secure the wall mount to the corner adapter with 4 hex screws and spring washers.
Note: When tightening the screws, it is better to compress the spring washer firmly and then
rotate it 180° to waterproof it without damaging the threads.
9. Install the dome to the mount. Please refer to Section 6 for camera installation details.
Note: For outdoor applications, please waterproof tape around the center hole for waterproofing.
water
6
4. TV-HP400 Pole Mount
Components
Wall Mount
The pole adapter must be used together with the wall mount for pole mounting applications.
Pole Adapter
Pole mounting hoops are used for securing the pole mount adapter to the pole.
Pole Mounting Hoops
7
5 pan head screws and spring washers.
Mounting Accessories
Mounting
1. Loosen the three pole mounting hoops with a flathead screwdriver.
2. Loop the hoops through the rectangular holes on the pole adapter.
3. Pull cables through the center hole. Leave enough slack so that the cable can pass through
the bracket.
4. Secure the three pole mounting hoops to the pole (5 in. or 127mm max. pole diameter), and
tighten the screws of the hoops with a flathead screwdriver.
8
5. Install the wall mount arm by securing the wall mount arm to the pole adapter with 4 hex
screws and spring washers.
6. Install the speed dome to the mount. Please refer to Section 6 for camera installation details.
Note: For outdoor applications, please use proper waterproofing measures.
9
5. TV-HC400 Ceiling Mount
Components
Ceiling Mount
Mounting Accessories
5 expansion screws with nuts and washers.
Mounting
1. Place the ceiling mount at mounting location and use it to mark screw hole locations.
2. Mark Ethernet cable hole location (optional).
Optional: The Ethernet cable (and other cables) can be run through the hole in the corner
adapter. For this installation, there is no need to mark an Ethernet cable hole.
3. Drill holes in the ceiling according to the screw holes of the mounting base, and then insert
expansion screws into the holes (masonry construction only).
4. Pull cables through the cable hole of the mounting base. Leave enough slack so that the
cable can pass through the bracket. If you passed cables through the wall, seal the hole with
exterior grade caulking.
10
5. Attach the mounting base to the ceiling by aligning the screw holes of the mounting base
with the expansion screws on the ceiling.
6. Secure the mounting base by using nuts and washers to tighten the four expansion screws.
Note: For outdoor applications, please apply waterproof tape between the ceiling surface and
mounting base and around the cable hole. Ceiling mounting is not recommended for locations
with direct exposure to the elements.
7. Install the speed dome to the mount. Please refer to Section 6 for camera installation details.
11
6. Camera Installation
Before you start:
Ÿ Do not hold the waterproof cables as shown in the picture below, otherwise the waterproof
performance will be affected.
Ÿ Check the camera package contents and make sure that the device in the package is in good
condition and all the assembly parts are included.
Ÿ Make sure the Ethernet cable doesn't have live PoE power during camera installation.
x
12
Installation for TV-HW400 / TV-HN400 / TV-HP400
Safety Rope
Lock Screw
1. Remove the protective sticker from the dome drive.
2. Hang the safety tether to the speed dome and then hook to the mount as shown in the figure
below.
5. Route the cables of the speed dome into the mount braket.
6. Loosen the two lock screws on the mount braket.
3. Connect Ethernet cables (and others, if applicable).
4. Apply water resistant tape to Ethernet connection terminal.
7. Install the speed dome to the mount.
8. Fasten the two lock screws with the provided Hex key.
9. Power the connected PoE ethernet cable.
13
TV-HC400 Installation
Lock Screw
Safety Rope
Product Warranty Registration
Please take a moment to register your
product online. Go to TRENDnet’s website at:
http://www.trendnet.com/register
TRENDnet
20675 Manhattan Place, Torrance, CA 90501. USA
Copyright © 2014. All Rights Reserved. TRENDnet.
Technical Support
If you have any questions regarding the product
installation, please contact our Technical Support.
Toll free US/Canada: 1-866-845-3673
Regional phone numbers available
at www.trendnet.com/support
TV-HW400 Wall Mount /
TV-HN400 Corner Mount /
TV-HP400 Pole Mount /
TV-HC400 Ceiling Mount
  • Page 1 1
  • Page 2 2
  • Page 3 3
  • Page 4 4
  • Page 5 5
  • Page 6 6
  • Page 7 7
  • Page 8 8
  • Page 9 9
  • Page 10 10
  • Page 11 11
  • Page 12 12
  • Page 13 13
  • Page 14 14
  • Page 15 15
  • Page 16 16

Trendnet TV-HC400 Installation guide

Category
Security cameras
Type
Installation guide
This manual is also suitable for

Ask a question and I''ll find the answer in the document

Finding information in a document is now easier with AI