LG 55EA980V User guide

Type
User guide
Drawn Approved
Signature
Danbi.Park Jongok.kim
MMM/DD/YYYY
Jun/26/2013 Jun/26/2013
EA98 LG MBM63877304
EU/BG/PI EA9800-ZA (1306-REV00)
:LGEAK :LGEKR :LGERS
:LGEAZ :LGEMA :LGESY
:LGEEG :LGEMX :LGETH
:LGEIL :LGEND :LGEVN
1. Model Description
Printing specification
:Brand name
Printed in Mexico
Printed in Poland
Printed in Kazakhstan
Printed in Brazil
:4. Bindery
:5. Language
:6. Number of pages
Printed in Korea
ENG/GER/FRE/ITA/SPA/RUS (6)
:1. Trim size (Format)
2. Printing colors
: • Cover
Suin.Kim
:Model name
Checked
Jun/26/2013
160 mm x 85 mm
:Part number
(Revision number)
2. Printing Specification
:2nd, 3rd Suffix
3. Stock (Paper)
:Product name
Printed in India
4 Color (Cyan, Magenta, Yellow, Black)
Coated, Snow white paper 150 g/㎡, Laminating coated - Matt
Uncoated, wood-free paper 60 g/
Perfect binding
: • Inside
: • Cover
: • Inside
Printed in China
120
3. Origin Notification
Printed in MexicoPrinted in Egypt
Printed in China
Printed in Thailand
Printed in Vietnam
N
O
T
E
“This part contains Eco-hazardous substances (Pb, Cd, Hg, Cr6+, PBB, PBDE, etc.) within LG standard level,
Details should be followed Eco-SCM management standard[LG(56)-A-2524].
Especially, Part should be followed and controlled the following specification.
(1) Eco-hazardous substances test report should be submitted when Part certification test and First Mass Production.
(2) Especially, Don’t use or contain lead(Pb) and cadmium(Cd) in ink.
:LGEIN :LGERA :LGEWR
Rev. Number MMM/DD/YYYY
Printed in Indonesia
4. Changes
Signature Change ContentsECO Number
Printed in PolandPrinted in Russia
1
10
9
8
7
6
5
4
3
2
ENGLISH
SMART TV Quick Setup Guide
Network Connection
* Image shown may differ from your TV.
* Image shown on a PC or mobile phone may vary depending on the OS(Operating System).
Wireless Network Connection Wired Network Connection
wireless router
Internet connection
Wired router
Internet connection
ENGLISH
Network Setting
* Premium Apps are pre-installed on the TV. These may vary by country.
1
Press the SMART button to
access the Smart Home menu.
Select Settings and press
Wheel(OK).
2
Select the NETWORK
Network Connection
menu.
3
Select the Start Connection.
Settings
More
More
Settings
Network Connection
Network Status
Wi-Fi Direct
Miracast
TM
/Intel's WiDi
NETWORK
My TV Name : 55EA9800-ZA
Connect to your wired or wireless network.
Network Connection
To connect to a wired network:
Connect a LAN cable to the back of TV.
To connect to a wireless network:
Requires a wireless router or access point.
Start Connection
or
Enjoy various Smart TV features through network.
ENGLISH
SMART TV Quick Setup Guide
4
The device automatically tries to connect to the network available(wired
network first).
Cancel
Connecting to the network.
Network Connection
5
The connected network is
displayed.
Select Complete to confirm the
network connection.
If you select the Other Network
List, the network list available is
displayed.
If you select Cancel or it fails to connect
to the network, the network list available is
displayed. Choose the network you want.
If you want to connect your TV to a
wireless router, select the network you
want and enter the password.
Network is connected.
Wireless:AAA
Select [Other Network List] to connect to another network.
Complete
Other Network List
Network Connection
Choose the network you want.
Wired Network
Wireless : AAA
Wireless : BBB
Wireless : CCC
Wireless : 11111
Wireless : 22222
Manual Setup
Refresh List
Network Connection
Network Connection
Wireless : AAA
Forgot your password? Contact your AP manufacturer.
Enter security key of network.
ENGLISH
Troubleshooting Network Problems
1
Press the SMART button to
access the HOME munu.
2
Select the NETWORK
Network Status
menu.
Follow the instructions below that correlate to
your network status.
Settings
More
More
Settings
Network Connection
Network Status
Wi-Fi Direct
Miracast
TM
/Intel's WiDi
NETWORK
My TV Name : 55EA9800-ZA
Check the TV or the router.
Network Status
TV Gateway DNS Internet
When an
appears TV.
1
Check the connection status of TV, AP and
cable modem.
2
Power off and power on TV, AP and cable
modem.
3
If you are using a static IP, enter IP directly.
4
Contact internet companies or AP
companies.
ENGLISH
SMART TV Quick Setup Guide
< Additional points to check when using a wireless connection>
1
Check the password for the wireless connection in the
router settings window.
Network Status
TV Gateway DNS Internet
2
Change the router SSID (network name) or the wireless
channel.
Check the router or
consult your Internet service provider.
Network Status
TV Gateway DNS Internet
When an appears TV, Gateway and DNS.
1
Unplug the power cord of the AP, cable modem and try to con-
nect after 5 seconds.
2
Initialize(Reset) the AP or cable modem.
3
Check that the MAC address of the TV/router is registered
with your Internet service provider. (The MAC address dis-
played on the right pane of the network status window should
be registered with your Internet service provider.)
When an appears TV and Gateway.
1
Unplug the power cord of the AP, cable modem and try to
connect after 5 seconds.
2
Initialize(Reset) the AP or cable modem.
4
Check the router manufacturer’s website to make sure your
router has the latest firmware version installed.
3
Contact internet companies or AP companies.
ENGLISH
SMART TV Quick Setup Guide
SmartShare PC SW Installing & Setting
Install the programme on your PC.
1
Go to . Then, select your region.
2
Select SUPPORT. Then, Search for your model.
3
Select Drivers & Software or SOFTWARE UPDATE. Then, select .
4
You can run the programme when installation is complete.
NOTE
DLNA service is only available if TV and other devices are connected via a single router.
!
ENGLISH
SMART TV Quick Setup Guide
DLNA Connection to Smartphone
1
Check that Wi-Fi is enabled on your smartphone.
2
Install/run the app for sharing content on your smartphone (It's called SmartShare on LG phones).
3
Enable your smartphone to share content files with other devices.
4
Select the file type you want to play (movie, audio or photo).
5
Select a movie, music or photo file to play on the TV.
6
Add the selected file to the playlist.
7
Select a TV model name on which to play the files. (The TV model name is labelled on the rear side of the panel.)
8
Play the media file to view and enjoy it on your TV.
ENGLISH
SMART TV Quick Setup Guide
Updating the TV Firmware
SMART
Settings
SUPPORT
Software Update
Use Software Update to check and obtain the latest version. If not updated, certain functions may not work properly. It is also
possible to check manually for available updates.
Software Update
Set it to On.
If an update is available, a prompt will appear to perform the update.
Automatic update mode If an update is available, the update automatically starts without prompting.
Check Update Version
Checks the latest update version installed. When a new update is available, the
download process can be performed manually.
NOTE
!
When the update starts, the update progress window appears for a short time and disappears.
The latest version can be obtained via the digital broadcast signal or an internet connection.
Changing the programme while downloading the software via a digital broadcast signal interrupts the
download process. Returning to the initial programme allows downloading to resume.
If software is not updated, certain functions may not work properly.
[For Finland/Sweden/Denmark/Norway models.]
If the software update is performed via the broadcasting signal, you will be prompted to continue the update
regardless of whether the Automatic update mode is enabled or not.
Please call LG Customer Service if you experience any problems.
ENGLISH
SMART TV Quick Setup Guide
Tag On
Tag On
(This item is not included for all models.)
*This function is supported only on a smartphone with Android 4.0 (ICS) or later.
Tag On is a data transmission technology that can be used on smartphones with NFC (Near Field
Communication).
Simply by tapping your smartphone to a Tag On sticker, you can share content between your
smartphone and TV.
To connect your smartphone to the TV using Tag On, they must be connected on the same Wi-Fi
network or Miracast™/Intel’s WiDi of the smart TV is set to On.
ENGLISH
SMART TV Quick Setup Guide
WiFi Direct Setting
SMART
Settings
NETWORK
Wi-Fi Direct
The Wi-Fi Direct function supports wireless connection technology. With
SmartShare
TM
, you can share files or screens of devices
connected to Wi-Fi Direct.
[TAAAA]
Do you want to request a connection?
Automatically connect without asking
Yes No
Connection
Wi-Fi Direct
Device Name
Connection
TAAAA
BBBB
Wi-Fi Direct
a
On
1
If Wi-Fi Direct is set to On, a list of available devices appears.
»
To use
Wi-Fi Direct
, go to Settings NETWORK and
set
Wi-Fi Direct
(
a
) to
On
.
2
When you are prompted to request connection, select
Yes
.
Wi-Fi Direct
is now connected to your TV.
*If you are not using Wi-Fi Direct to minimize the interference between Wi-Fi devices, it is recommended to set
Wi-Fi Direct(
a
) to Off. You can only use devices that support Wi-Fi Direct.
ENGLISH
SMART TV Quick Setup Guide
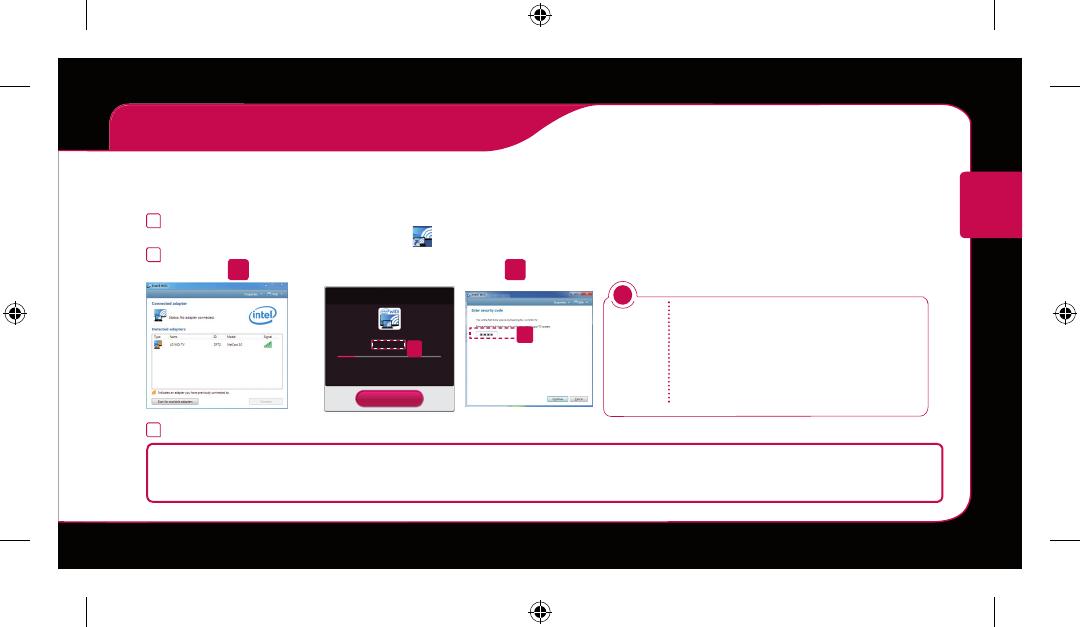
WiDi (Wireless Display) Setting
WiDi represents Wireless Display. Intel’s WiDi (Wireless Display) technology enables easy and fast connection without wires or
internet network for mirrored and dual monitor display on your TV. You can sit back and experience your favorite movies, videos,
photos, online shows and more in full HD on your TV with great image clarity and sound.
1
Intel’s WiDi
is set to On. Connect your laptop to AP. (Without AP, it is possible to this function; it is recommended to connect
to AP.) Your laptap runs the Intel WiDi(
) programme.
2
It detects LG Smart TVs available, which supports WiDi. In the list, select the TV you want and click Connect. Enter the PIN
number(
a
) shown on the screen into the input field(
b
) on your laptop and then click Continue.
a
[Intel's WiDi] Request connection
Enter the following Security keys.
* When WiDi is connected, devices
connected
with Wi-Fi Direct are disconnected.
MY PIN : ****
Cancel
Remain: 92 second(s)
b
!
NOTE
When you connect the TV and
laptop, you should set up TV
mode for “Live TV” and “external
input”. If not, your computer
cannot detect LG Smart TV.
3
The wireless environment may affect the screen display. If the connection is poor, the Intel WiDi connection may be lost.
* LG TV is not need to register.
* For more information on Intel WiDi, visit http://intel.com/go/widi
* A list of Intels WiDi devices does not appear on the TV screen. Please check the list on your laptop.
ENGLISH
Time Machine II
Ready
Take Control of Time with Time Machine II
Ready
With your removable USB storage devices, Timeshift allows you to stop and rewind live TV, and record or set the timer for your
favourite TV programmes.
* Time Machine II
Ready
can record any programme in analogue and digital format, and can also record AV input.
* You can still use other services while recording a TV programme.
* Requires external data storage device (not included).
*
If you are watching an HbbTV broadcast, use the 123 button to use the (Smart Remote) Time Machine II
Ready
function.
1
Press
a
on the Remote Control while watching TV.
2
Press
b
. The progress bar appears and you can use Time
Machine’s various functions.
Time Machine II
a
a
a
a
or
P
A
G
E
TV/
RAD
RATIO INPUT
FAV
MUTE
OK
1
.,;@
2
abc
3
def
4
ghi
5
jkl
6
mno
7
pqrs
8
tuv
0
9
wxyz
LIST
Q.VIEW
a
a
Time Machine II
b
ENGLISH
SMART TV Quick Setup Guide
Live
Recorded TV
Schedule
You can select the point you
want to play.
You can return to a live TV
programme when using
the Timeshift function.
REC
Live
Recorded TV
Option
Schedule List
Schedule
REC
REC Live
Recorded TV
Schedule List
Option
High Quality
On
On
Initialize
Close
Recording Quality
Timeshift
Auto deleting
USB device initialization
>
<
* You may obtain space by deleting old videos for more space.
<
<
>
>
The REC icon appears
at the top right of the
screen when recording
starts.
You can use these but-
tons to go to the time/
location position you want
to playback.
You can view a list of re-
corded TV programmes.
You can change the Time
Machine settings.
ENGLISH
Universal Control
To use the Universal Control function (for Magic Remote Control only)
(This feature is not available in all countries.)
With the Magic Remote Control, you can easily control your set-top box, Blu-ray player, home theater system, and Sound Bar.
1
Check if the device is connected to the TV.
2
After pressing the ‘
Time Machine II
button on the Magic Remote Control, select the device you want to control in the Change Device
tab. The Screen Remote that can control the device appears.
Time Machine II
ENGLISH
SMART TV Quick Setup Guide
3
You can control external devices using the Screen Remote on the screen.
(This may not work with the ‘
Time Machine II
button for some models.)
4
Control external devices using the navigation
keys, wheel (OK), or BACK button on the
Magic Remote Control.
a
b
d
e
c
Time Machine II
Time Machine II
External Device Menu
»
a
: Change Device tab
»
b
: Device control buttons
»
c
: Expand the ScreenRemote
»
d
: Exits the Screen Remote
»
e
: Moves the position of the
ScreenRemote to left or right
ENGLISH
SMART TV Quick Setup Guide
Miracast
TM
Setting
Miracast
TM
allows a portable device to securely send video and sound to TV wirelessly.
Connection
Miracast
TM
/ Intel's WiDi
Device Name
Connection
TAAAA
The device which is applied Miracast
TM
and intel's WiDi
technology can be shown on the TV.
Miracast
TM
/ Intel's WiDi
On
1
Miracast
TM
is set to On on your TV and portable device.
Go to the Network settings to set the Miracast
TM
.
2
When your portable device is detected, select the device.
3
For more information about how to connect the portable device, refer to the portable
device manual.
P/NO: MBM63877304 (1306-REV00)
  • Page 1 1
  • Page 2 2
  • Page 3 3
  • Page 4 4
  • Page 5 5
  • Page 6 6
  • Page 7 7
  • Page 8 8
  • Page 9 9
  • Page 10 10
  • Page 11 11
  • Page 12 12
  • Page 13 13
  • Page 14 14
  • Page 15 15
  • Page 16 16
  • Page 17 17
  • Page 18 18
  • Page 19 19
  • Page 20 20
  • Page 21 21
  • Page 22 22
  • Page 23 23
  • Page 24 24
  • Page 25 25
  • Page 26 26
  • Page 27 27
  • Page 28 28
  • Page 29 29
  • Page 30 30
  • Page 31 31
  • Page 32 32
  • Page 33 33
  • Page 34 34
  • Page 35 35
  • Page 36 36
  • Page 37 37
  • Page 38 38
  • Page 39 39
  • Page 40 40
  • Page 41 41
  • Page 42 42
  • Page 43 43
  • Page 44 44
  • Page 45 45
  • Page 46 46
  • Page 47 47
  • Page 48 48
  • Page 49 49
  • Page 50 50
  • Page 51 51
  • Page 52 52
  • Page 53 53
  • Page 54 54
  • Page 55 55
  • Page 56 56
  • Page 57 57
  • Page 58 58
  • Page 59 59
  • Page 60 60
  • Page 61 61
  • Page 62 62
  • Page 63 63
  • Page 64 64
  • Page 65 65
  • Page 66 66
  • Page 67 67
  • Page 68 68
  • Page 69 69
  • Page 70 70
  • Page 71 71
  • Page 72 72
  • Page 73 73
  • Page 74 74
  • Page 75 75
  • Page 76 76
  • Page 77 77
  • Page 78 78
  • Page 79 79
  • Page 80 80
  • Page 81 81
  • Page 82 82
  • Page 83 83
  • Page 84 84
  • Page 85 85
  • Page 86 86
  • Page 87 87
  • Page 88 88
  • Page 89 89
  • Page 90 90
  • Page 91 91
  • Page 92 92
  • Page 93 93
  • Page 94 94
  • Page 95 95
  • Page 96 96
  • Page 97 97
  • Page 98 98
  • Page 99 99
  • Page 100 100
  • Page 101 101
  • Page 102 102
  • Page 103 103
  • Page 104 104
  • Page 105 105
  • Page 106 106
  • Page 107 107
  • Page 108 108
  • Page 109 109
  • Page 110 110
  • Page 111 111
  • Page 112 112
  • Page 113 113
  • Page 114 114
  • Page 115 115
  • Page 116 116
  • Page 117 117
  • Page 118 118
  • Page 119 119
  • Page 120 120
  • Page 121 121
  • Page 122 122

LG 55EA980V User guide

Type
User guide

Ask a question and I''ll find the answer in the document

Finding information in a document is now easier with AI