Peachtree decco 125 User manual
- Category
- Musical Equipment
- Type
- User manual
This manual is also suitable for

125
USB
OPT
PHONO
AUX
The Spotify software is subject to third party licenses found here:
www.spotify.com/connect/third-party-licenses

IMPORTANT SAFETY INSTRUCTIONS
B Read these instructions – All the safety and operating instructions should be read before this
product is operated.
C Keep these instructions – The safety and operating instructions should be retained for future
reference.
D Heed all warnings – All warnings on the appliance and in the operating instructions should be
adhered to.
E Follow all instructions.
F Do not use this apparatus near water – The appliance should not be used near water or
moisture – for example, in a wet basement or near a swimming pool, and the like.
G Clean only with dry cloth.
H Do not block any ventilation openings. Install in accordance with the manufacturer’s instructions.
I Do not install near any heat sources such as radiators, heat registers, stoves, or other
apparatus (including ampliers) that produce heat.
J Do not defeat the safety purpose of the polarized or grounding plug. A polarized plug has two
blades with one wider than the other. A grounding plug has two blades and a third grounding
prong. The wide blade or the third prong is provided for your safety. If the provided plug does
not t into your outlet, consult an electrician for replacement of the obsolete outlet.
K Protect the power cord from being walked on or pinched particularly at the plugs, convenience
receptacles, and at the point where they exit from the apparatus.
L Only use attachments/accessories specied by the manufacturer.
M Use only with the cart, stand, tripod, bracket, or table specied by the manufacturer,
or sold with the apparatus. When a cart is used, use caution when moving the cart/
apparatus combination to avoid injury from tip-over.
N Unplug this apparatus during lightning storms or when unused for long periods of time.
O Refer all servicing to qualied personnel. Servicing is required when the apparatus has been
damaged in any way such as the power cord or plug is damaged. Other damage may occur
if liquid or objects have been dropped or spilled into the apparatus. Dropping the apparatus,
exposure to rain, and excessive moisture may cause additional damage.
P Please keep the unit in a good ventilation environment.
Q CAUTION: These servicing instructions are for use by qualied service personnel only. To
reduce the risk of electric shock, do not perform any servicing other than that contained in the
operating instructions unless you are qualied to do so.
R WARNING: To reduce the risk of re or electric shock, do not expose this apparatus to rain or
moisture. The apparatus shall not be exposed to dripping or splashing and objects lled with
liquids, such as vases, shall not be placed on apparatus.
S WARNING: The mains plug/appliance coupler is used as disconnect device, the disconnect
device shall remain readily operable.
T The lightning ash with arrowhead symbol within
an equilateral triangle is intended to alert the user
to the presence of non-insulated “dangerous
voltage” within the product’s enclosure that may
be of sufcient magnitude to constitute a risk of
electric shock.

WARNING: To reduce the risk of electric shock, do not remove cover (or back), as there are no
user-serviceable parts inside. Refer servicing to qualied personnel.
The exclamation point within an equilateral triangle is intended to alert the user to the presence of
important operating and maintenance instructions in the literature accompanying the appliance.
U No naked ame sources, such as lighted candles, should be placed on the apparatus.
V Batteries are included for the remote control. Do not expose these batteries to direct sunlight
or excessive heat such as a re. Care should be taken in the act of battery disposal as they
include toxic materials that may harm the environment. Please refer to your local recycling
and hazardous waste center for advise with battery disposal.
W WARNING: The terminals marked with symbol of “+/-” may be of sufcient magnitude
to constitute a risk of electric shock. The external wiring connected to the terminals
requires installation by an instructed person or the use of ready- made insulated
leads or cords.
X Correct disposal of this product. This marking indicates that this product should not be
disposed with other household wastes throughout the EU. To prevent possible harm to the
environment or human health from uncontrolled waste disposal, recycle it responsibly to
promote the sustainable reuse of material resources. To return your used device, please use
the return and collection systems or contact the retailer where the product was purchased.
They can take this product for environmentally safe recycling.
Unpacking and Warranty
B Please keep all packing materials for any potential shipping needs.
C Please keep a copy of the sales receipt and note the serial number on it for warranty and
insurance purposes.
D Please register your product online at www.peachtreeaudio.com.
Marking by the “CE” symbol (shown left) indicates compliance of this device with the
EMC (Electromagnetic Compatibility) and LVD (Low Voltage Directive) standards of
the European Community.
Note: This equipment has been tested and found to comply with the limits for a class
B digital device, pursuant to part 15 of the FCC Rules. These limits are designed to
provide reasonable protection against harmful interference in a residential installation.
The equipment generates, uses and can radiate radio frequency energy and, if not
installed and used in accordance with the instructions, may cause harmful interference
to radio communications. However, there is no guarantee that interference will not
occur in a particular installation. If this equipment does cause harmful interference to
radio or television reception, which can be determined by turning the equipment off
and on, the user is encouraged to try to correct the interference by one or more of the
following measures:
• Reorient or relocate the receiving antenna
• Increase the separation between the equipment and the receiver
• Connect the equipment into an outlet on a circuit different from that to which
the receiver is connected
• Consult the dealer or an experienced radio/TV technician for help

Introduction
Back Panel
Front Panel
Remote Control
Wireless Network
Spotify connect
Useful Tips
Troubleshooting
Warranty and Repair
Specications
(Rev. 6/2017)
125

INTRODUCTION
Thank you for choosing the decco125! The original decco that Peachtree Audio launched
over a decade ago was a ground-breaking product that featured a USB input and built-in
DAC to facilitate audio streaming from a computer. The whole concept of “computer audio”
was cutting-edge at the time and other brands eventually followed Peachtree Audio’s lead
and DACs built into integrated ampliers became an industry standard over time.
The new decco takes the integrated amplier concept another step further and addresses
the most critical component in a Hi-Fi system; the speaker. The amplier inside the decco
is designed to drive virtually any pair of traditional speakers, but when it is paired with
the optional duet speakers, it becomes a 3-way, fully-active, Hi-Fi system that easily
outperforms much larger and more expensive systems.
A portion of the decco rear panel is modular. As shipped from Peachtree, the rear panel
is congured to drive a pair of traditional loudspeakers. When the optional duet speakers
are added, the rear panel is replaced with a new one that congures the decco to drive
the speakers in a fully active conguration including individually amplied drivers, active
crossovers and equalization.
The new decco carries on the Peachtree tradition of form following function. The front
panel is machined out of a single piece of aluminum and designed to emulate an old car
radio with a single row of buttons and a volume knob. Simply select the desired input and
adjust the volume to easily enjoy all of your music! The chassis is wrapped in a beautiful
real-wood cabinet that has been a calling card of Peachtree Audio since the original decco
was launched over a decade ago.
The new decco is designed to handle a wide range of inputs. There is a USB input for a
computer along with an optical input for another digital audio source like a streamer or
a disc player. There are two analog inputs as well. One for a turntable (with a moving
magnet cartridge) and a second for a cassette deck or other “line-level” analog source
device. The decco also includes an optional wireless input to facilitate audio streaming
from the Internet. On the front panel, there is a headphone output capable of driving a
wide range of headphones to enjoy music without disturbing others.
Please take the time to read this manual to get familiar with the decco125 and
visit www.peachtreeaudio.com to register your purchase. We will extend the standard
warranty if you do and your information will not be shared with anyone. We will only
contact you with news that is relevant to your decco purchase! If you have additional
questions or feedback, please contact your Peachtree dealer or us directly.
Thank you again for choosing Peachtree Audio. We sincerely hope that you love your
decco and that it brings you many years of enjoyment. It represents a new standard for
value, exibility and innovation in the market. Happy listening!
- Your friends at Peachtree Audio

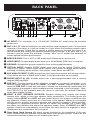
BACK PANEL
B C
D
E
F
G
H
I
A
C~
IN
RoHS
C
AUT
IO
N
RISK O
F EL
EC
T
R
I
C SHO
CK
TO REDUCE THE RISK OF ELECTRIC SHOCK,
DO NOT EXPOSE THIS EQUIPMENT
TO RAIN OR MOISTURE !
DO NOT
OP
E
N
W
A
RNING
A
N
T-1 ANT-2
Gn
d
.
S
ER
VI
CE
S
ER
VI
CE
ON
L
Y
O
P
TIC AL
INP UT
U
S
B
-
B
INPUT
SPEAKER
OUTPUT
RIGHT
SPEAKER
OUTPUT
LEFT
L
L
L
R
R
R
PHONO
PRE OUT
AUX
S
e
ria
l Nu
m
be
r
MAD
E I
N
CHI
NA
D
E
SI
G
NE
D
IN CA
N
ADA
Type: Integrated Amplifier
Model: Decco125
Maximum power consumption is 400W
125
J K
L
B AC INPUT: For connection to a 100-240VAC 50/60Hz AC outlet using the included
power cord.
C ANT-1 & 2: RF antenna inputs for use with wireless input equipped units. Connect both
antennas if the decco is or will be located in a spot where the wireless network signal
strength is weaker. Check this by placing a mobile device in the spot the decco is or
will be located and reading the wireless network signal strength. If all “bars” are lit, you
shouldn’t need to utilize the antennas. If fewer “bars” are lit, utilized the antennas to
ensure optimal wireless performance.
D SERVICE ONLY: This is NOT a USB audio input! Reserved for service use.
E USB-B INPUT: Accepts digital audio input up to 24-bit/96kHz PCM from a computer.
F GROUND: Accepts the ground connection from a phonograph/turntable.
G OPTICAL INPUT: Accepts S/PDIF digital audio input from an optical (Toslink style)
output up to 96kHz. Optical digital audio outputs are common on digital audio sources
including; streaming audio devices, disc players, cable boxes and HDTVs.
H AUX ANALOG INPUT (L) (R): Accepts line level input from devices with analog outputs.
If the device also has a digital audio output, it may provide better sound quality.
I PHONO INPUT (L) (R): Accepts input from a phonograph/turntable with a moving
magnet (MM) cartridge.
J PRE-OUT: Provides analog audio output to connect to a powered subwoofer or an
external power amplier. Note: the RIGHT and LEFT speaker outputs remain active
when the PRE OUT is used and both sets of outputs are automatically muted when the
mute function is engaged or when headphones are connected to the front panel. Note:
The PRE-OUT is not available when the decco is used with the optional Peachtree
Audio duet speaker system.
K RIGHT & LEFT SPEAKER OUTPUTS: Speaker binding post outputs that accept
banana style, spade or bare wire speaker cable terminations. The binding posts are
clearly marked RIGHT and LEFT with red (+) and black (-) for proper connections with
the speakers. Please check that all of the ends of the speaker cables are connected
with the correct polarity; positive-to-positive and negative-to-negative. Wiring positive-
to-negative or negative-to-positive should not cause any damage but it does alter
the phase and therefore the sound the speakers create. Note: the RIGHT and LEFT
speaker outputs are automatically muted when the mute function is engaged or when
headphones are connected to the front panel.
L Rear Panel Hand Screws (4): Hand screws provided for the installation of the rear
panel included with the optional Peachtree Audio duet speaker system. Please do not
remove these screws unless you are installing this option.

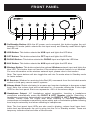
FRONT PANEL
USB
OPT
PHONO
AUX
B C
D
E
F
G
H
I
J
B On/Standby Button: With the AC power cord connected, this button toggles the unit
between On mode (which selects the last input used) and Standby mode which lights
the LED red.
C USB Button: This button selects the USB input and lights the LED blue.
D OPT Button: This button selects the OPT input and lights the LED blue.
E PHONO Button: This button selects the PHONO input and lights the LED blue.
F AUX Button: This button selects the AUX input and lights the LED blue.
G Wireless Button: This button selects the optional Wireless network input and lights the
blue LED. This button does not function if the wireless network feature is not enabled.
For more information on the wireless network input, please refer to that section.
Note: The inputs buttons will also toggle the unit into On mode when in Standby mode
for faster access.
H IR Receiver: Window for receiving Infra-Red (IR) commands from the included remote
control or third-party remote control systems.
I Volume Knob: Rotate clockwise to increase and counter-clockwise to decrease output
level. Note: the volume level will be indicated for ~2 seconds utilizing the 5 blue input
LEDS on the front panel. Each one represents ~20% of the volume range.
J Headphone Output: 1/4” headphone output connection. Inserting a headphone
connection automatically mutes the RIGHT & LEFT Speaker outputs. Removing a
headphone connection automatically un-mutes the RIGHT & LEFT Speaker outputs.
Caution: Please lower the output level when inserting or removing headphone
connections as headphone sensitivity varies widely and a comfortable speaker listening
level may be extremely loud when switching to headphones.
Note: The front panel input LEDs are also used to display; volume level, bass level,
treble level and whenever the unit is going into the On or Standby modes. These are
temporary indicators that end after a few seconds.

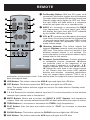
REMOTE
B On/Standby Button: With the AC power cord
connected, this button toggles the unit between
On mode (which selects the last input used) and
Standby mode which lights the LED red. Note:
the input LEDs will ash white in a sequence
when the unit goes into on or standby mode.
C BASS +/-: Increases or decreases the BASS
(low frequencies). The front panel input LEDs
will display the bass level with FLAT indicated
by the middle LED being lit Blue.
D VOL /: Increases and decreases the output
level. Note: the volume level will be indicated for
~2 seconds using the 5 blue input LEDS on the
front panel. Each LED represents ~20% of the
entire volume range.
E Wireless Network: This button selects the
optional Wireless network input and lights the
LED blue. This button does not function if the
wireless network feature is not enabled. For
more information on the wireless network input,
please refer to that section.
F Transport Control Buttons: Controls playback
of compatible sources connected. selects
the previous track or the beginning of the
current track if playback is in progress.
toggles between play mode and pause mode.
selects the next track in the current queue
or list. Please note that some USB capable
devices and wireless streaming applications
may not support these controls. This is not a
malfunction of the remote control. If the source does not respond to these commands, it
does not support them.
G USB Button: This button selects the USB-B input and lights the LED blue.
H OPT Button: This button selects the OPT input and lights the LED blue.
Note: The inputs buttons will also toggle the unit into On mode when in Standby mode
for faster access.
I 1 2 3 4: Reserved for wireless network input use. For more information on the wireless
network input, please refer to that section.
J MUTE Button: Mutes and un-mutes the RIGHT & LEFT Speaker and headphone
outputs. Note: the currently selected input LED will ash white while the output is muted.
K TREB Button +/-: Increases or decreases the TREBle (high frequencies).
L FLAT Button: Sets the bass and treble control to “FLAT” (no increase or decrease
applied).
M PHONO Button: This button selects the PHONO input and lights the LED blue.
N AUX Button: This button selects the AUX input and lights the LED blue.
B
C
D
E
F
G
H
I
M
N
J
K
L

WIRELESS NETWORK
The decco125 offers an optional IEEE 802.11b/g/n wireless network input optimized
for audio. If equipped, this input can be selected by pressing the button on the front
panel or remote control. It can also be selected by starting an audio stream using the
MUZO Player application on a compatible phone or tablet.
To setup the mobile device, please download the MUZO Player application on your
compatible phone or tablet from the App Store (iOS devices) or Google Play (Android
devices).
To setup the decco for wireless streaming, please use one of the following methods:
Setup method 1 - Web Browser
1. Open the Wi-Fi settings on the mobile device and connect to the
decco125_xxxx network
2. Open a web browser and enter 10.10.10.254 in the address bar
3. A settings page will load. Select the desired wireless network and enter the
password (if necessary)
4. Once the decco125 is connected to the wireless network, “forget” or delete
the decco125_xxxx network from the mobile device used to set it up
5. Make sure the mobile device is put on to the same network as the decco125
Setup method 2 - WPS button on router
1. Press and hold the WPS button on the router until it enters pairing mode
2. Press and hold the wireless network input button on the decco125 for more
than 3 seconds
3. The router and the decco125 should nd each other and complete the
setup automatically
Once the decco125 is connected to the wireless network, utilize the MUZO Player
application to select and control playback. The MUZO Player application can also
control the decco125 volume and the following input selections: USB, OPT and AUX.
To setup the 1-4 direct access buttons on the decco remote control, navigate to the
station or playlist you want to add and press the small icon in the lower right hand
corner shown as a circle surrounding three dots. This will bring up a sub-menu to
select this as a “Favorite” or a “Preset”. Select “Preset” then select 1, 2, 3 or 4. This will
provide direct access for up to 4 of your favorite stations and/or playlists.
Please visit www.peachtreeaudio.com for any other tips and updates on setting up and
using the wireless input feature.
If the wireless network input stops working; Press the wireless network input button and
the On/Standby button simultaneously to reset the wireless network receiver without
unplugging the unit from AC power.

SPOTIFY CONNECT
You’ll need Spotify Premium to use Connect, see details overleaf provided separately.
1. Add your new device to the same wi network as your phone, tablet or
PC (see product user instructions for details).
2. Open the Spotify app on your phone, tablet or PC, and play any song.
3. If you’re using the app on a phone - tap the song image in the bottom
left of the screen. For tablet and PC move to step 4.
4. Tap the Connect icon
5. Pick your device from the list. If you can’t see it, just check it’s
connected to the same wi network as your phone, tablet or PC.
All done! Happy listening.
Licenses
The Spotify Software is subject to third party licenses found here:
www.spotify.com/connect/third-party-licenses.

USEFUL TIPS
At Peachtree Audio we believe all products should be easy to use, but sometimes getting the
audio to stream out of a computer’s USB port requires a few extra steps. See instructions
below. Some minor changes may occur with Windows or Apple OS updates, but the basics
are the usually the same.
USB Connections
Windows PC
B Connect the USB-B input on the decco to an open USB port on your computer.
C Your computer should “recognize” the decco as a USB device. You might even get a pop-
up window notifying you.
D Right click the speaker icon on your screen.
E Select the “AUDIO” tab.
F Using the drop-down menu, choose the Peachtree Audio option.
G Click “OK.”
Launch your music application and enjoy!
Mac
B Open System Preferences.
C Click on Sound.
D In the output tab you should see Peachtree as one of the choices.
E Select it.
Launch iTunes or other music application and enjoy!
Once you set up your computer using the instructions above, it should automatically
recognize the decco each time you use it. If you unplug the USB connection or re-boot your
computer, you may have to repeat some of the steps above. This is normal.
Other useful tips...
For the best sound when listening to music from your computer, set your computer and
music program volume controls to maximum and use the decco volume knob or remote
control as the master volume control.
For critical listening to music from your computer, avoid keeping multiple programs open. It
can compromise the sound quality and even cause signal dropouts.
Provide adequate ventilation above the decco so it can “breathe.” It is designed to draw
cooler air in through the vents on the bottom and exhaust warmer air through the vents on
the top.
Please check www.peachtreeaudio.com periodically for additional tips and articles.
Interested in the Green Movement?
• The decco meets European RoHS standards for non-hazardous metals.
• The decco draws less than half a watt of power in standby mode.
• The internal power amplier is set to minimize power consumption when headphones are used.
• We are committed to continue exploring additional methods for making our products even
more environmentally friendly.

TROUBLESHOOTING
ISSUE SOLUTIONS
The decco will not power on.
Check that the AC power cord is connected and plugged
into an actice AC outlet. If it is, the on/standby LED on the
front panel LED should be lit red. Check that the AC outlet is
functioning correctly by plugging in a lamp or other device to
conrm its operation.
The decco powers on, but
there is no sound or the sound
is very low.
Check that the decco is not muted (blinking input LED) or
headphones connected to the front panel (speaker outputs
muted). Be sure your input source is powered on and playing
at a reasonable volume level. Double-check the connections
on the rear panel. If a phonograph/turntable is accidentally
plugged into the AUX input, the sound will be very low.
The PHONO input exhibits
some background static/noise.
The PHONO input is sensitive to RF noise including the signal
from the wireless network input. If the noise is bothersome,
press the PHONO and On/Standby buttons at the same time to
disable the wireless network input temporarily while listening
to the PHONO input. This mode is exited automatically when
selecting a different input and needs to be re-enabled when
selecting PHONO again. The noise can also be minimized
by using extenders on the RF antennas attached to the rear
panel. Please contact Peachtree Audio for more details at
The remote control does not
work.
Check the remote control batteries by removing the cover on
the back and trying new ones. Make sure the remote control
has a clear “line of sight” to the sensor on the front panel.
Check that no powerful light sources, like direct sunlight, is
interfering with the sensor on the front panel.
The USB signal from a com-
puter is intermittent.
Try re-launching the music application (iTunes, etc.). If the
computer doesn’t recognize the decco, unplug the USB cable
from the computer and the decco, wait a few seconds, then
reconnect the USB cable. Try re-starting the computer. The
decco is designed to remain locked on USB signals at all
times, but computers drop connections occasionally and may
require prompts to re-connect.
There is hum/noise when
using a computer.
If you have music les available on a laptop computer, play
them while running the computer on its battery power only. If
the hum/noise disappears, then the ground connection on the
computer’s AC adapter is introducing a “ground loop” into the
system. This is not unusual, but the USB input on the decco
is designed to minimize the potential. If the issue persists,
please contact your reseller or Peachtree Audio.
There is a “click” or “pop”
when using the front panel
controls.
Sometimes static buildup on your hand will discharge into
the unit when touched and cause an audible click or pop
noise. This is normal and happens most frequently in low
humidity environments and in rooms with carpets. If the unit
is behaving erratically afterwards, power it down completely
by turning it off, letting it sit for a minute or so, then powering
it back on. If the issue persists, please contact your reseller
or Peachtree Audio.
The wireless network input
stops working.
Press the wireless network input button and the On/Standby
button simultaneously to reset the wireless network receiver.

WARRANTY
International Warranty
Peachtree Audio warrants this product for two (2) years, parts and labor, from the
original date of purchase from an authorized Peachtree Audio re-seller. If you register
your product online at www.peachtreeaudio.com/support/product-registration.html/,
the warranty is extended to three (3) years, parts and labor.
Peachtree Audio reserves the right to refuse any warranty claims if coverage cannot be
veried by a valid proof of sale or serial number.
Peachtree Audio assumes no responsibility for product failures caused by accident,
neglect, misuse, modication or unauthorized repair.
Warranty does not cover shipping costs.
Visit www.peachtreeaudio.com for complete warranty details.
Repair Process
In the event that a product fails, please repack it in its original carton and contact an
authorized Peachtree reseller for further instructions. If the reseller is unable to assist,
please contact Peachtree Audio directly at [email protected] or +1-704-
391-9337 to obtain a Return Authorization (RA) number prior to shipping the product.
Any products received without an RA number may be misdirected and repair delayed.
If a RA number is issued by Peachtree Audio, please ship the product using FedEx or
UPS. Do not ship using a Postal Service.
Peachtree Audio assumes no responsibility for products in transit. Please insure the
shipment for the product’s replacement value in the unlikely event it is lost, stolen or
damaged in transit.
US Shipping Address:
Peachtree Audio
12777 East Independence Blvd
Suite B
Matthews, NC 28105
USA
RA# __________
www.peachtreeaudio.com

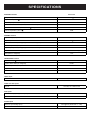
SPECIFICATIONS
SPEAKER OUTPUT Decco125
Compatible Speakers 4-16
Output Power (WPC, 8
, <1% THD+N, AES17) 120
Frequency Response (20 - 20kHz) <+/-3dB
Inter-Modulation Distortion (100Hz, 2kHz 4:1 -30dBFS) -60dB
Total Harmonic Distortion (AES17, 1kHz, 4
, 1W) 0.03%
Channel Separation (1kHz, 8
) 94dB
PREAMP OUTPUT
Output Voltage (rms) 920mV
Output Impedance 100
Signal-to-Noise Ratio (Analog | Digital Source, un-weighted) 100dB
Channel Separation (1kHz) 92dB at 1kHz
Frequency Response (Analog | Digital Source, 8Hz-20kHz) +/- 0.1dB 20-20k
Total Harmonic Distortion 0.007% (1V rms, 1kHz, A-weighted)
Noise (RMS, A-weighted) <7uV
HEADPHONE OUTPUT
Output Power (32
, rms) 17mW
Signal-to-Noise Ratio (un-weighted) 107dB
Channel Separation (1kHz) 102dB
Frequency Response (Analog source, 8Hz-100kHz) +/- 0.5dB
Total Harmonic Distortion 0.01%
USB-B Input
Formats 16-24 Bit, 44.1-96kHz PCM
COAX and OPT Inputs
Formats 16-24 Bit, 44.1-96kHz PCM
AUX Inputs
Maximum Voltage (rms | peak-to-peak) 840mV
Impedance 10k
PHONO Input
Maximum Input Voltage (rms) 18mV@1kHz (RIAA Filter +/- 1dB)
Impedance 47k
AC Power
AC Input 100-240VAC, 50/60Hz
Maximum Power Consumption 400W
On Mode (Idle) Power Consumption 18W
Standby Mode Power Consumption <2W
Fuse
100-120VAC: 3.15 A/250V (IEC time lag high
breaking capacity)
Physical
Height (including feet) 89 mm | 3.50 inches
Width 250 mm | 9.84 inches
Depth (Cabinet depth (320mm) plus volume knob (18mm) plus binding posts (25mm)) 363 mm | 14.29 inches
Weight (shipping) 10 lbs (13.5 lbs), 4.8 kg (6.1 kg)
All specications subject to change without notice

A
C~
IN
RoHS
C
AUT
IO
N
RISK O
F EL
EC
T
R
I
C SHO
CK
TO REDUCE THE RISK OF ELECTRIC SHOCK,
DO NOT EXPOSE THIS EQUIPMENT
TO RAIN OR MOISTURE !
DO NOT
OP
E
N
W
A
RNING
A
N
T-1 ANT-2
Gn
d
.
S
ER
VI
CE
S
ER
VI
CE
ON
L
Y
O
P
TICAL
INPUT
U
S
B
-
B
INPUT
SPEAKER
OUTPUT
RIGHT
SPEAKER
OUTPUT
LEFT
L
L
L
R
R
R
PHONO
PRE OUT
AUX
S
e
ria
l Nu
m
be
r
MAD
E I
N
CHI
NA
D
E
SI
G
NE
D
IN CA
N
ADA
Type: Integrated Amplifier
Model: Decco125
Maximum power consumption is 400W
125
125
-
 1
1
-
 2
2
-
 3
3
-
 4
4
-
 5
5
-
 6
6
-
 7
7
-
 8
8
-
 9
9
-
 10
10
-
 11
11
-
 12
12
-
 13
13
-
 14
14
-
 15
15
-
 16
16


Peachtree decco 125 User manual
- Category
- Musical Equipment
- Type
- User manual
- This manual is also suitable for
Ask a question and I''ll find the answer in the document
Finding information in a document is now easier with AI
Related papers

Other documents
-
Peachtree Audio deepblueSKY User manual
-
Pyle PODWIFIB64 Owner's manual
-
-
-
 TIME2TECHNOLOGY Time 2 User manual
-
-
-
-
-
 Ugo Wi-Fi Speaker User manual

