Page is loading ...

Panason'ic
Omnlvision
MODEL PV-4415S
Operating
Instructions
Belore attempting to connect, operate or adjust this product, please read these instructions completely.
Spanish Quick Operation Guide is included. Guia para r&pidaconsulta en espaSot est&inctudo.

f'_ _ j[ 1 1__=
t.ongrarutartons onyour purchase of
one of the most sophisticated and reliable products on
the market today. Used properly, we're sure it will bring
you and your family years of enjoyment. Please take
time to fill in the information at right. The serial number
is on the tag located on the back of your VCR. You°,
want to keep this manual handy as your convenient
VCR information source.
f
Date of Purchase
Dealer Purchased From
Dealer Address
Dealer Phone No.
Model No. PV-4415S
Serial No.
\
Unpacking Your VCR
The accessories shown below are provided to help you
use or set up your VCR.
Optional accessories are also listed.
Accessories
:QQ®I
Remote Control
VSQS1341
IOQ_I
G "6"
Optional Accessories
• 1/2" Video Cassette Tape
I P
I p
2 "AA"
Batteries
RF Coaxial
Cable
VJAS0155
Load the batteries in the Remote Control
Press in the direction of the
arrow and lift off the lid.
Install two batteries as
indicated inside the Battery
Compartment.
Replace the lid and snap
into place.
Battery replacement caution
• Do not mix old and new batteries. (Also, never mix
alkaline with manganese batteries.)
Safety Precautions
Warning: To prevent fire or shock hazard, do not expose this equipment to rain or moisture.
This video recorder, equipped with the HQ (High Quality) System, is compatible with existing VHS equipment.
Only use those tapes with the _r_ mark. It is recommended that only cassette tapes that have been tested and
inspected for use in 2, 4, 6, and 8 hour VCR machines be used.
the unit may have sufficient magnitude to cause
shock. Therefore, it is dangerous to make any kind of
concerning the operation and maintenance of this unit have
been included. Therefore, it should be read carefully in order
to avoid any problems.

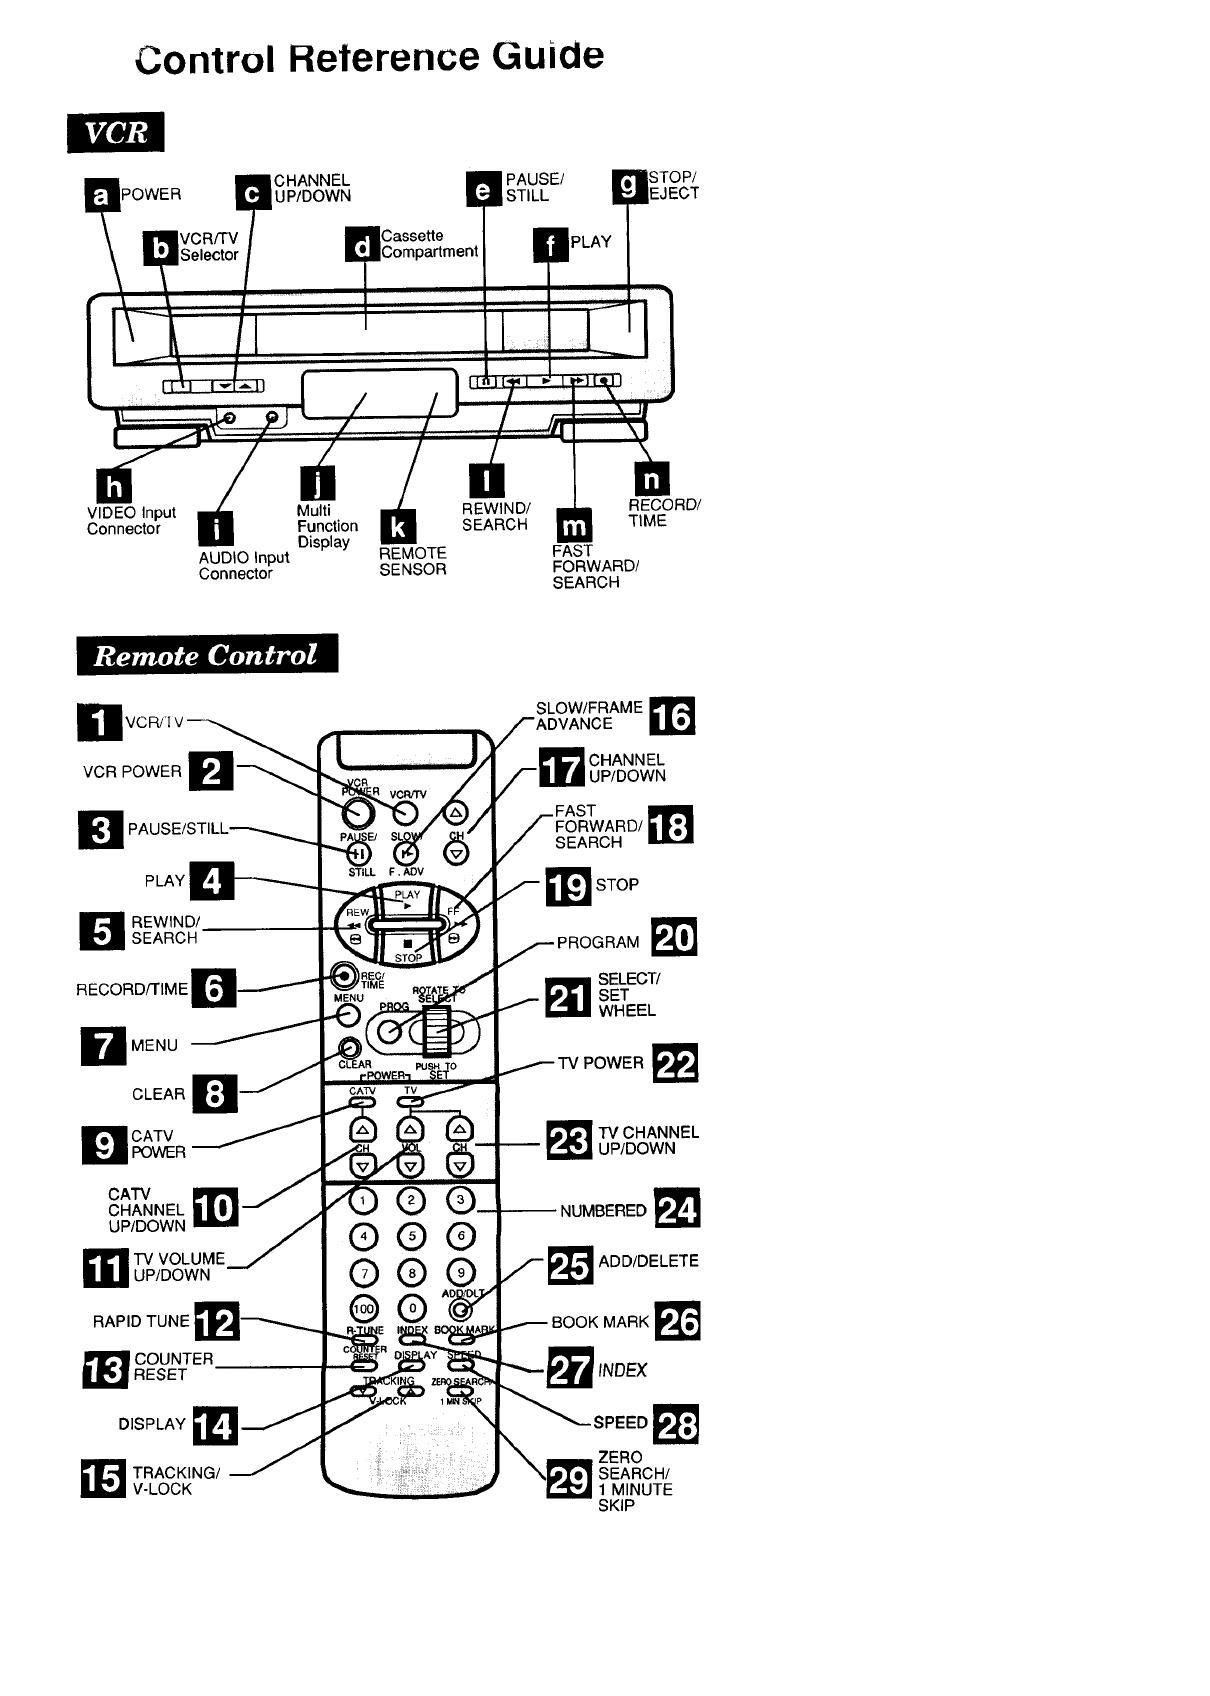
Using this Manual
To get the most from your product, we recommend that you read
the Operating Instructions thoroughly and in the order presented.
To assist you in locating controls and indicators on the remote
control and VCR, we have provided a fold-out Control Reference
Guide. Each control and indicator is listed by name as well as a
reference number or letter. You will also find corresponding
numbers and letters throughout the Operating Instructions.
Keep this manual handy as a ready reference source.
• Fold out the Control Reference Guide.
• Read the Operating Instructions carefully.
• When an unfamiliar control or indicator is
encountered, see the reference number or
letter and then find the corresponding
character on the Control Reference Guide.
Example:
Control Reference Guide
VCR/TV
CHANNEL _1_UP/DOWN
REMOTE
SENSOR
Operating Instructions
@
Press (or !
UP or Down _-
screen dis
h.
|)
Control Reterence Guide
CHANNEL PAUSE/
POWER UP/DOWN STILL
Casse_e
STOP/
EJECT
i i =ii_
VIDEO Input Multi REWIND/
Connector Function SEARCH
Display
AUDIO Input REMOTE
Connector SENSOR
RECORD/
TIME
FAST
FORWARD/
SEARCH
El
VCR POWER
PLAY
D EWIND/SEARCH
RECORD/rIME
D MENU
CLEAR
D CATVPOWER
CATV
CHANNEL
UP/DOWN
TV VOLUME
UP/DOWN
RAPID TUNE
1 OUNTERRESET
DISPLAY
_[L_ RACKING/
V-LOCK
©
O
O0
SLOW/FRAME _r_
CHANNEL
UP/DOWN
_1 STOP
PROGRAM
_11 ELECT/
SET
WHEEL
POWER E_ _
!_TV CHANNEL
UP/DOWN
-- NUMBERED
ADD/DELETE
BOOK MARK
INDEX
SPEED
rZERO
:SEARCH/
1 MINUTE
SKIP
See the separate, "Basic Connection Guide" which covers not only TV/VCR connections, but
optional Audio/Video and Cable connections as well.
One Time Set Ups (Channel Memory/Setting the Clock) ...................................................... 4, 5
On Screen Displays ................................................................................................................... 6
Basic Playback/Special Playback .............................................................................................. 7
Basic Recording ........................................................................................................................ 8
Copying Your Tapes ................................................................................................................... 9
Timer Recording ................................................................................................................. 10, 11
Tape Operation ......................................................... ,....................................................... 12, 13
Setting at the VCR ................................................................................................................... 14
Multi-Brand Control Feature .................................................................................................... 14
Helpful Notes on Operations ................................................................................................... 15
VCR and Cassette Information .............................................................................. 16, 17, 18, 19
Before Requesting Service ................................................................................................ 20, 21
Spanish Quick Use Guide/Gufa para r&pida consulta ....................................................... 22, 23
Quick Use Guide ....................................................................................................... Back cover
Product Features
Auto Daylight Saving Time ......................................................................................................... 15
Auto Operation Functions .......................................................................................................... 12
Auto Repeat Function ................................................................................................................ 12
Book Mark Search ...................................................................................................................... 12
Digital Auto Picture ...................................................................................................................... 7
Easy-to-Read English/Spanish On Screen Displays ................................................... 4, 5, 10, 11
Front-mounted A/V In Terminals ................................................................................................... 9
Multi Brand TV/Cable Box Remote Control ............................................................................... 14
One Minute Skip ......................................................................................................................... 12
One Month, 8 Program Timer Recording ............................................................................. 10, 11
One Touch Recording (OTR) ....................................................................................................... 8
Program Director Remote Control ....................................................................................... 10, 11
Quick Play Mechanism .............................................................................................................. 21
Rapid Tune .................................................................................................................................. 5
Special Effects Playback .............................................................................................................. 7
VHS Index Search System ......................................................................................................... 13
Zero Search ............................................................................................................................... 12
181-CH Cable-Compatible Tuner/All Channel Auto Set .............................................................. 4

Before you begin, make sure...
• your Antenna or Cable system is connected to the
VCR. (See separate Connection Guide.)
• you familiarize yourself with the easy operation of
the Select/Set Wheel before turning on the VCR.
Se/ect/Set Wheel _n
There are two types of Wheel operation.
Selecting from a menu type screen and entering
information, such as setting the clock,
programming the timer, etc.
ROTATE TO
PUSH TO
SET
To Use the Wheel
Rotate
0 (up ordown)
to make selection
Press
(like a button)
to enter selection
Examples of Operation
A
When selecting from a
menu, rotate the Wheel to
move the shaded area up
or down the screen.
Then, press the Wheel like
a button to make your
selection.
....... MENU .......
Iti[i[l_.l]: y;1_I -_I=ivJI",v!
SET UP VCR
SET C LOCK
CHANNEL AUTO SET
SELECT ROTATE WHEEL
SET PUSH WHEEL
END ' PUSH MENU KEY
B
When entering information
such as setting the clock,
rotate the Wheel to change
the numbers. Then, press
the Wheel to enter and
move on to the next item.
I..__ _,,- SET CLOCK
/ k'lal=[lll_[l]0na;I
BY ROTATING WHEEL
/ PUSH WHEEI_
L TO END PUSH MENU KEY
• ByrepeatedlypressingtheWheel,youcanskip
overalreadyset itemsas desired.
®
1 Press (_ _(orB)
UP or Down for on-
screen displays in
SELECTLANGUAGE}
PUSH VCR CH UP ENGLISH
PUSH VCR CH DOWN ESPANOL
i
English or Spanish.
• You mustchoose one.
• Thisscreenappearsa
few seconds later.
CHANNELAUTOSET
CONNECTANTENNACABLE
THEN.
PUSH VCR CH UP KEY
2Press G 11_ (orb)
to start Channel Auto Set.
Afterchannels have been placed in memory,
the following on-screen displays appear in
sequence:
"CH AUTO SET COMPLETED"
The lowest numbered channel.
"PLEASESETCLOCKBY PUSHINGMENUKEY"
If MENU is not pressed within 10 seconds,
the VCR will exitthis mode. In this case,
pleaseseethe "Set orResetthe Clock"
sectiononthenextpage.
3 Press _ I_1
within 10 seconds to
display the SET
CLOCK screen.
Then,
rotate ....
and ,__
press
_;.__._.SET CLOCK .....
b_i ON
BY ROTATING WHEEL
TO END PusHF_uWK_ ELj_
to select and enter the month, date, year,
time, and D.S.T. (Daylight Saving Time).
• The day ofthe week automatically appears.
• "DST:ON" automatically adjusts for Daylight
Saving Time. (See page 15 for details.)
Now, _,,=
press uu
l[wlce to start the clock
and exit this mode.
..... SETCLOCK.....
|ll!Jlt_,ll{llikll_l_t
DST ON
TO CORRECT
PUSH WHEEL OR CLEAR KEY
TO START PUSH MENU KEY
4 I
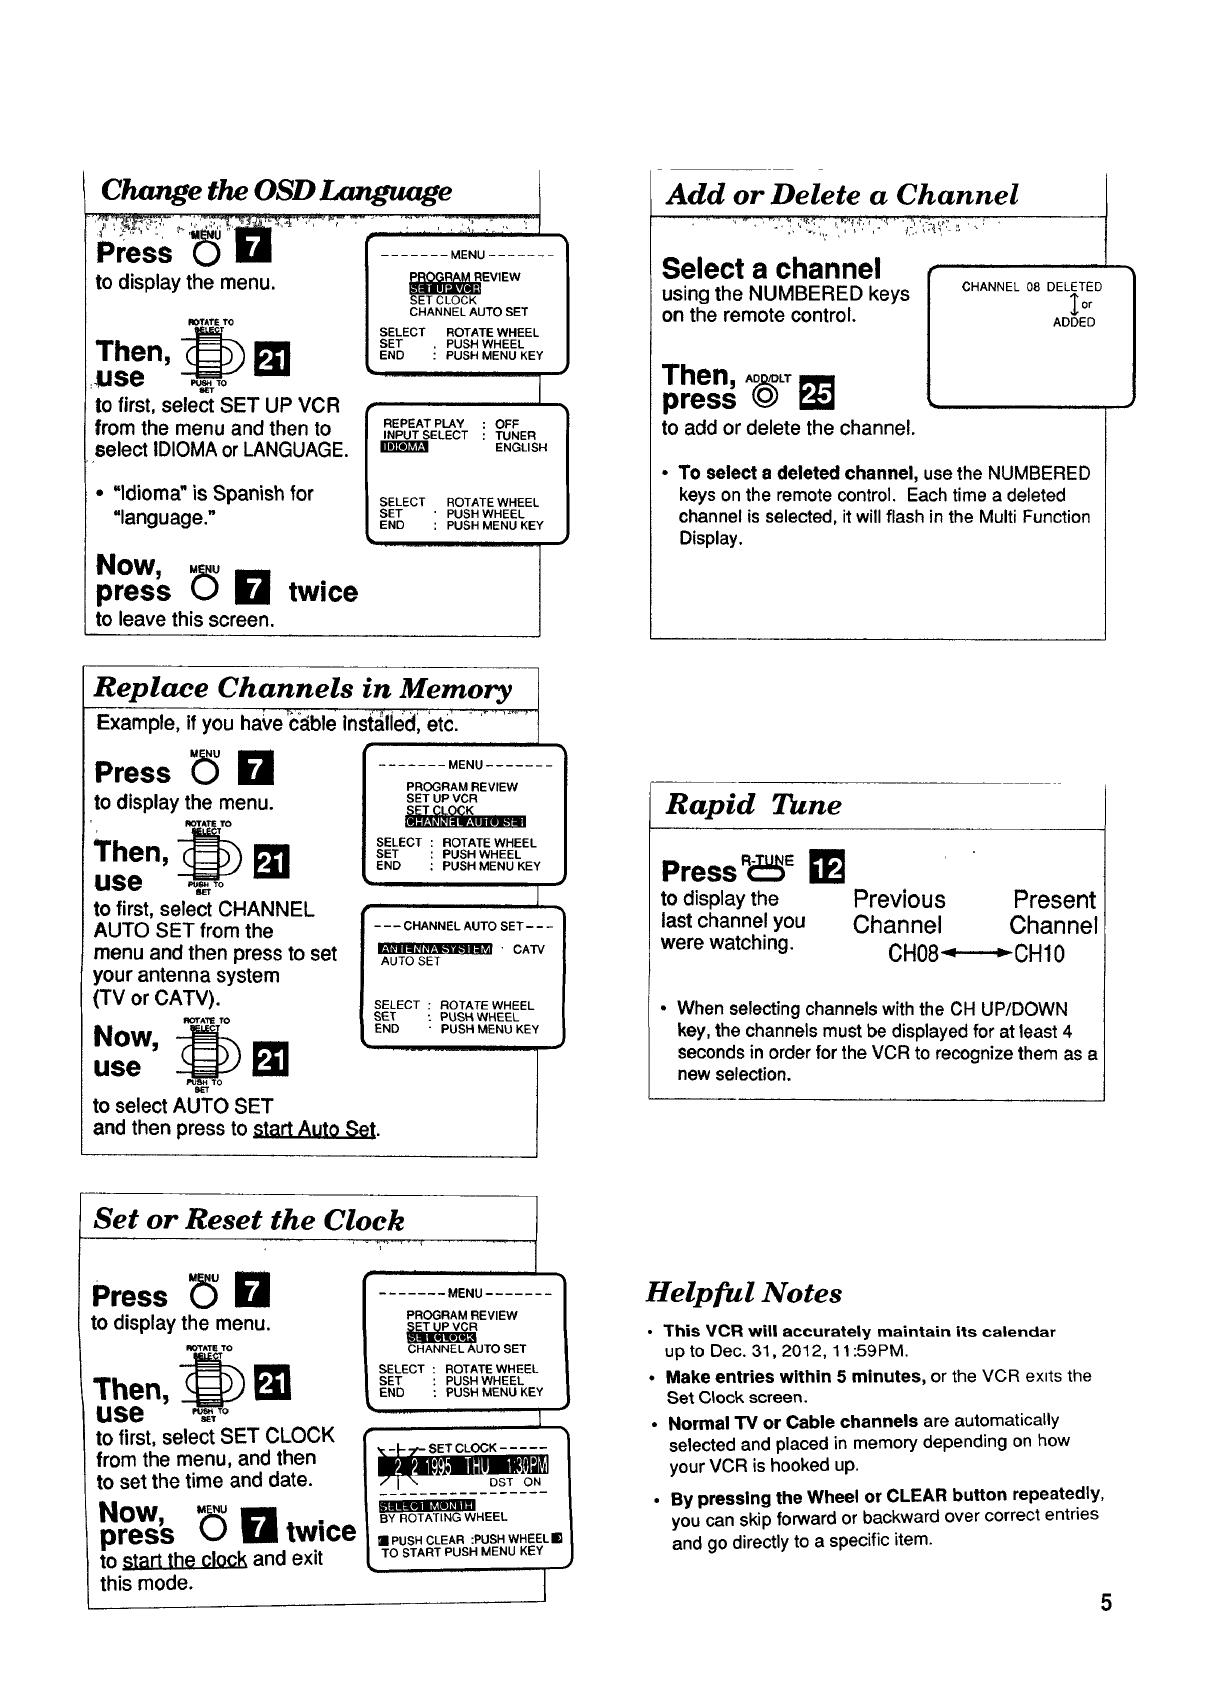
Change the OSD Language
Press
to display the menu.
to first, select SET UP VCR
from the menu and then to
select IDIOMA or LANGUAGE.
• "ldioma" is Spanish for
"language."
Now,
press _ I_1 twice
to leave this screen.
....... MENU .......
EViEWJ
SETCLOCK
CHANNEL AUTO SET
SELECT ROTA_ WHEEL
SET . PUSH WHEEL
END : PUSH MENU KEY
INPUT SELECT : _NER
SELECT ROTATE WHEEL
END : PUSH MENU KEY
ENGLISH
SET ' PUSH WHEEL
Replace Channels in Memory I
Example, if you ha_,e:c_ble inst_lied, etc. - ...........
t
Press _ 0
to display the menu.
ROTATETO
Then, _
use
to first, select CHANNEL
AUTO SET from the
menu and then press to set
your antenna system
(TV or CATV).
ROTATE TO
NOW,
use I_
to select AUTO SET
and then press to _{EL_.Lt.0_._,_.
....... MENU ....... 1
PROGRAM REVIEW
SET UP VCR
SELECT ROTATE WHEEL
SET PUSH WHEEL
END PUSH MENU KEY
1
[ 1
AUTO SET
SELECT : ROTATE WHEEL
SET : PUSH WHEEL
END " PUSH MENU KEY
............. t
Add or Delete a Channel
Select a channel
using the NUMBERED keys
on the remote control.
Then, A_L_
press
to add or delete the channel.
CHANNEL 08 DELETED
_o_
ADDED
• To selecta deleted channel, usetheNUMBERED
keysonthe remote control. Eachtime a deleted
channelisselected,itwillflash inthe MultiFunction
Display.
Rapid Tune
Press R_E _]
to display the Previous Present
last channel you Channel Channel
were watching. CH08_CH10
• When selecting channels with the CH UP/DOWN
key, the channels must be displayed for at least 4
seconds in order for the VCR to recognize them as a
new selection.
Set or Reset the Clock
Press _ I_1
to display the menu.
Then, _
use _.,To
[.......M0.u.......1
| PROGRAM REVIEW
/ OHAN.E AUTOSET
/ SELEOT"OTATEW"EEL
,SET USHW.EEL
LENDPUS. E.O E
1
tO first, select SET CLOCK I"_,-I---?'-SETCLOCK..... /
from the menu, and then / __!o_,Nl__ /
to set the time and date.
NOW, / _Y ROTATING WHEEL /
press _ 0 twice 1=_OS.OLEA":.OS.W.EEL,,
to _tart the clock and exit _ TOSTARTPUSHMENUKEY
this mode. J
Helpful Notes
This VCR will accurately maintain its calendar
up to Dec. 31,2012, 11:59PM.
Make entries within 5 minutes, or the VCR exits the
Set C_ock screen.
Normal TM or Cable channels are automatically
selected and placed in memory depending on how
your VCR is hooked up.
By pressing the Wheel or CLEAR button repeatedly,
you can skip forward or backward over correct entries
and go directly to a specific item.
5

Whenever a function
button is pressed (PLAY,
FF, etc.) or the channel is
changed, a 4 second
OSD will appear first in
large and then small
characters.
I
FF 02
Press _ r_l
to display the menu.
I_OT^TETTO
Then, ._o1_ 1
use
to make your selection.
(See page4 fordetails.)
....... MENU ....... l
1
• _ LJ .
SETUP VCR
SET CLOCK
CHANNEL AUTO SET
SELECT ' ROTATE WHEEL
SET ' PUSH WHEEL
END PUSH MENU KEY
• To getthe mostfrom eachfeature, itis
recommendedthat youread theOperation
Manualbeforeattemptinganyoperation.
Press D(_Y
to display the overlay Function
shown at right. Status
Channel
I
12:00 AM OH 08
0"00 O0
Press _e Counter
again o_,Y
to leave this mode.
If a blank section of tape is encountered in the
Play mode or the channel you select has no
broadcast, the TV screen will change to a solid
blue field. The screen will remain blue until a
recorded signal is again detected or an active
channel is selected.
6
These displays will alert you to a missed
operation or provide further instructions.
If no active channels
are found for CHANNEL
MEMORY...
t
{OHOUN}
PLEASE CHECK ANTENNA
CABLE CONNECTION THEN
PUSH VCR CN UP KEY AGAIN
,I
If you attempt to set
or review a Timer Recording
and the Clock is not set...
PLEASE SET CLOCK
BEFORE PROGRAMMING
if a Timer Program was not
completed before exiting
the Program mode...
PROGRAM IS INCOMPLETE
After a Timer Program
has been set...
I
TURN VCR OFF
FOR TIMER RECORDING
If you press REC on the
remote control or REC and
PLAY on the VCR, and a
cassette is inserted with no
record tab...
CHECK CASSETTE
RECORD TAB
If you press PLAY or REC
on the remote control or
REC and PLAY on the
VCR without a cassette
inserted...
If you press POWER or
STOP during a Timer
Recording...(visible in
VCR mode only)
NO CASSE]q-E
PLEASE INSERT A CASSETTE
J
EOPEY1

Before you begin, make sure ...
• connections are made (see separate Connection Guide).
• VCR isplugged in.
Turn TV on. Select VCR
Channel
(CH3 or CH4).
• The TV channel isthe same number you
set on the back of the VCR (see separate
Connection Guide).
Insert a
cassette f_i I VCR I
Thisindicatorlightsinthe
MultiFunctionDisplay.
• VCR powercomeson automatically.
Playbackbeginsif cassettehasno recordtab.
Press [_ IL_(orB)
tOstart playback.
4 Press (_ _ (or H)
or _ _J (or _! )
to quickly locate a scene
during playback.
• SP mode tapes have a search speed of 9
times and SLP mode tapes 27 times the
normal speed.
• Some noise bars will appear during search.
Press _ L'_ (or _1)
to stop playback.
Then,
press _
on the VCR to eject the
cassette.
Special Effects During Playback
These features workbestin SP or SLP mode.Sound
willbemuted.
Slow Motion Playback
Press _._v _j
Then,
press _ ILql(orlrl)
to release.
Still Frame Picture
Press P_,,_,s_I1_1(orI11 )
Press again to release.
Frame Advance
Hold _'
down FAovR_J
in Still mode to advance the still picture
one frame at a time.
Features for a Quality Picture
Digital Auto Picture
This feature automatically controls the video
output signal for improved picture resolution or
less noise depending on the tape condition.
Digital Auto Tracking
This feature continuously analyzes the signal
and adjusts for optimum picture quality.
Manual Tracking Control
Use during Playback and Slow Motion to
reduce picture noise.
Press c_ACj_;_b
unti| the picture clears up.
V-Lock Control
Use during Still mode to reduce jitter.
Press _-LOC_
until the picture is stabilized.
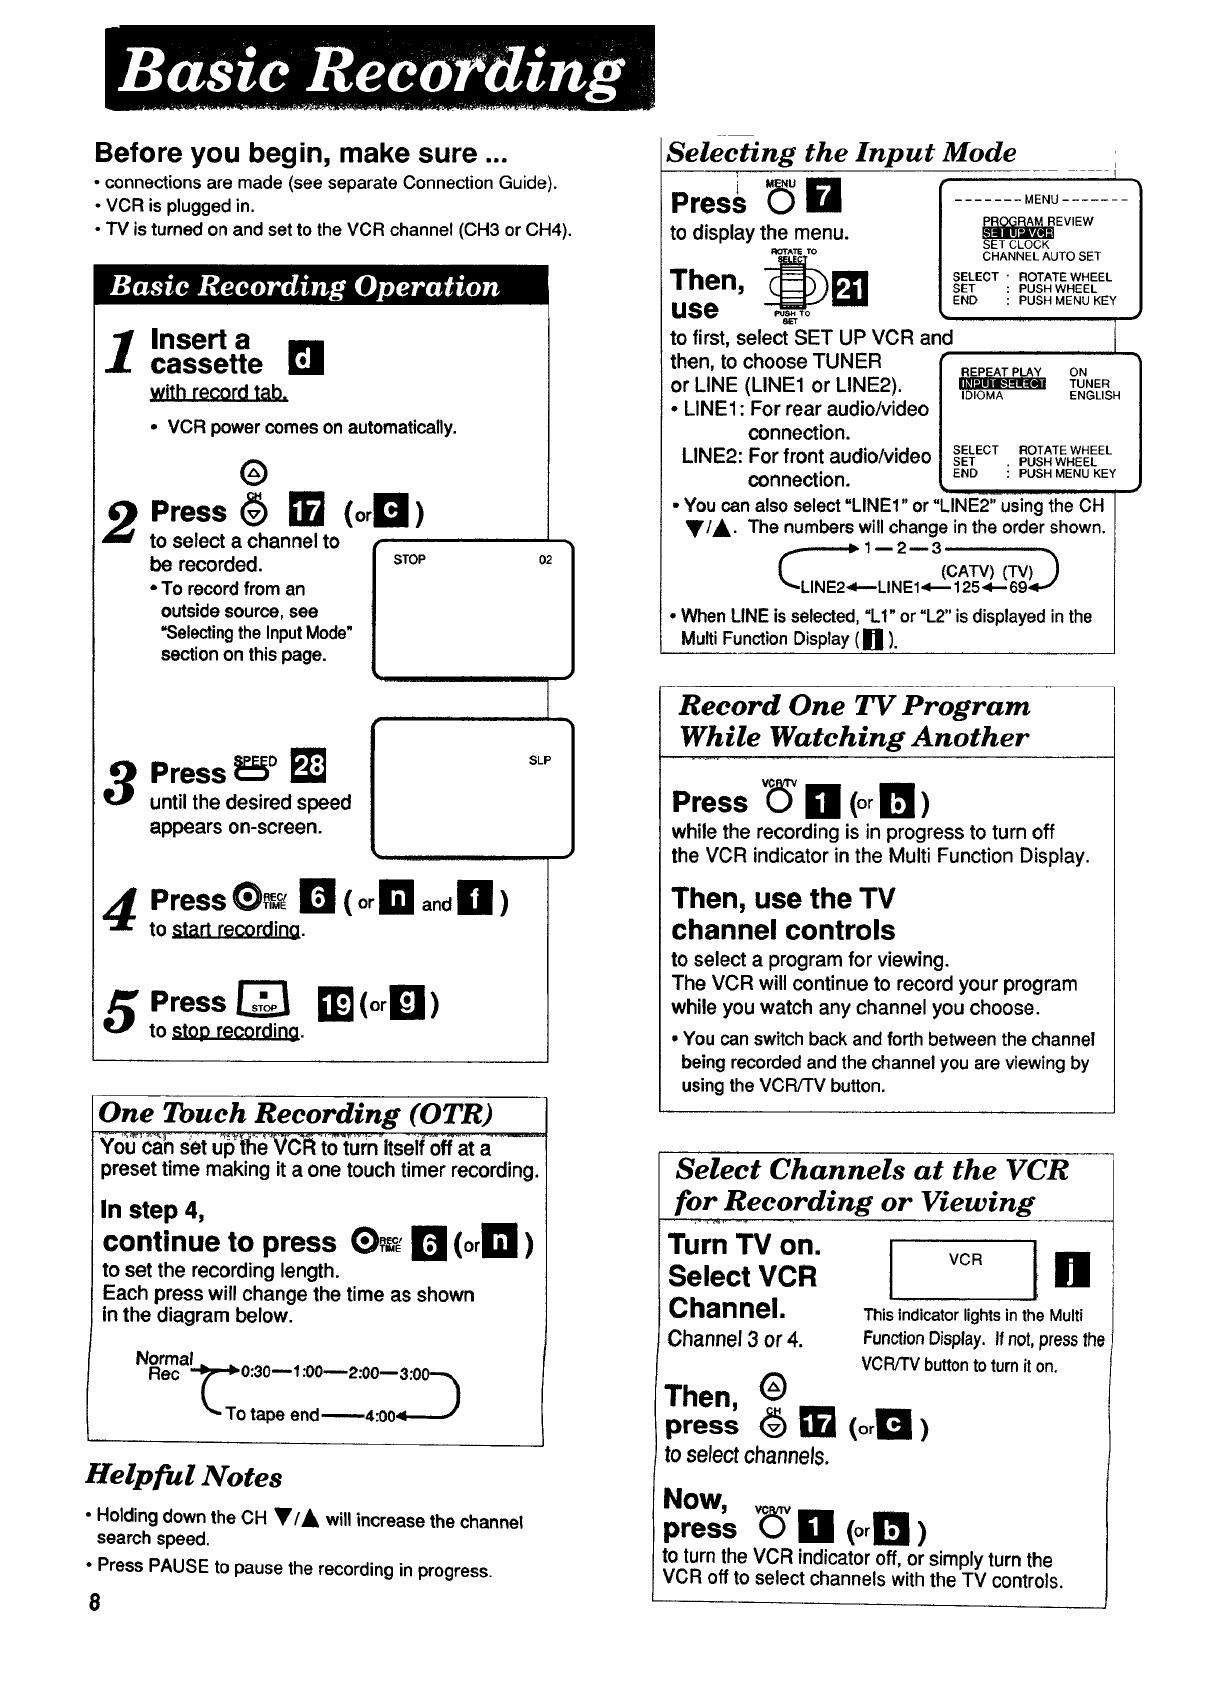
Before you begin, make sure •..
• connections are made (see separate Connection Guide).
• VCR is plugged in.
• TV is turned on and set to the VCR channel (CH3 or CH4).
Insert a
cassette
with record tab.
• VCR powercomeson automatically.
®
Press (_) _]_ (or _I_ )
to select a channel to
be recorded. J STOP
[
• To recordfroman
outsidesource,see
"SelectingtheInputMode"
sectionon thispage.
02
3 Press _F:_oF_
until the desired speed
appears on-screen.
SLP
Press _)_%_r_ ( orE! and H )
to start recording.
5 Press _ _] (or_l)
to stoD recording.
One Touch Recording (OTR)
Yo'u_'c'_set U_p'_"_VC:"l_"t_'t_t:n"itsei_off'at _............
preset time making it a one touch timer recording.
In step 4,
continue to press E)_ r_ (oriel)
to set the recording length.
Each press will change the time as shown
in the diagram below.
Normal
Rec _"_ 0:30-- 1:00--2:00-- 3:0_
_- To tape end_4:OO<-_-J
Helpful Notes
• Holding downtheCH _/A willincrease thechannel
searchspeed.
• PressPAUSE topausetherecordingin progress.
8
Selecting the Input Mode
4
Press _ El
to display the menu.
ROTATETO
Then, _1_
use
MENU ....... ]
EVIEW
SET CLOCK
CHANNEL AUTO SET
SELECT " ROTATE WHEEL
SET : PUSH WHEEL
END : PUSH MENU KEY
to first, select SET UP VCR and
then, to choose TUNER [
or LINE (LINE1 or LINE2).
l
• LINE1: For rear audio/video
connection.
LINE2: For front audio/video SELECT
SET
connection. END : PUSH MENU KEY
REPEAT PLAY ON 1
TUNER
J
IDIOMA ENGLISH
ROTATE WHEEL
• PUSH WHEEL
•You can alsoselect=LINE1"or "LINE2;'ursi_'_th°eCH
T/A. The numbers will changein the order shown.
• When LINE is selected, "L1" or "L2" is displayed in the
Multi Function Display (1111).
Record One TV Program
While Watching Another
Press _' _]_ (or Ir_)
while the recording is in progress to turn off
the VCR indicator in the Multi Function Display.
Then, use the TV
channel controls
to select a program for viewing.
The VCR will continue to record your program
while you watch any channel you choose.
• You canswitchbackandforth betweenthechannel
beingrecordedandthechannelyouare viewingby
usingtheVCR/TV button.
Select Channels at the VCR
for Recording or Viewing
"°m'V°n.lvc i
Select VCR I1_
Channel• _is indicator lights in the Multi
Channel 3 or 4. FunctionDisplay.Ifnot,pressthe
VCRiTVbuttontoturniton.
Then, G
press (_ _]_ (or _1_ )
toselectchannels.
Now,
press _(_ Ill (orr_)
to turn the VCR indicator off, or simply turn the
VCR off to select channels with the TV controls.

Connections you'll
need to make.
(Choose front or rear
connection.)
Playing (Source) VCR
Front View
for front audio/video
inputconnection
I _l I
It 1 I_l_ll
(-_ Oul
Recording
(Editing) VCR
fideo
TV for Monitoring
CH3 or 4
In
Insert a pre-recorded tape
intothe Playing (Source) VCR.
Then, insert a blank tape
with record tab into the Recording
(Editing) VCR.
Select "LINE"
as the input on the Recording VCR.
LINE1" For rear audio/video connection.
LINE2: For front audio/video connection.
• See page 8 for LINEinputinformation.
Press PLAY
on the Playing VCR.
Then, press PAUSE/STILL
when the tape reaches the point you want to
start copying.
Press REC and PLAY
at the same tim_ on the Recording VCR.
Then, press PAUSE/STILL
immediately.
5
Press PAUSE/STILL
on both VCRs to begin coDyil'Ig,
Then, press STOP
on both VCRs to stop CODVing.
To Monitor the Re-Recording
Turn the TV on and select its
VCR channel (either channel 3 or 4).
Then, set the VCRFFV selector
on the Recording VCR to the "VCR" position.
Caution:
Unauthorized exchanging and/or copying of
copyrighted recordings may be copyright
infringement.
Helpful Note
• By usingthe PAUSE/STILL button (on the
Recordingunit)whilecopyingis inprogress, youcan
editoutunwantedpartsoftheoriginalrecording.
9
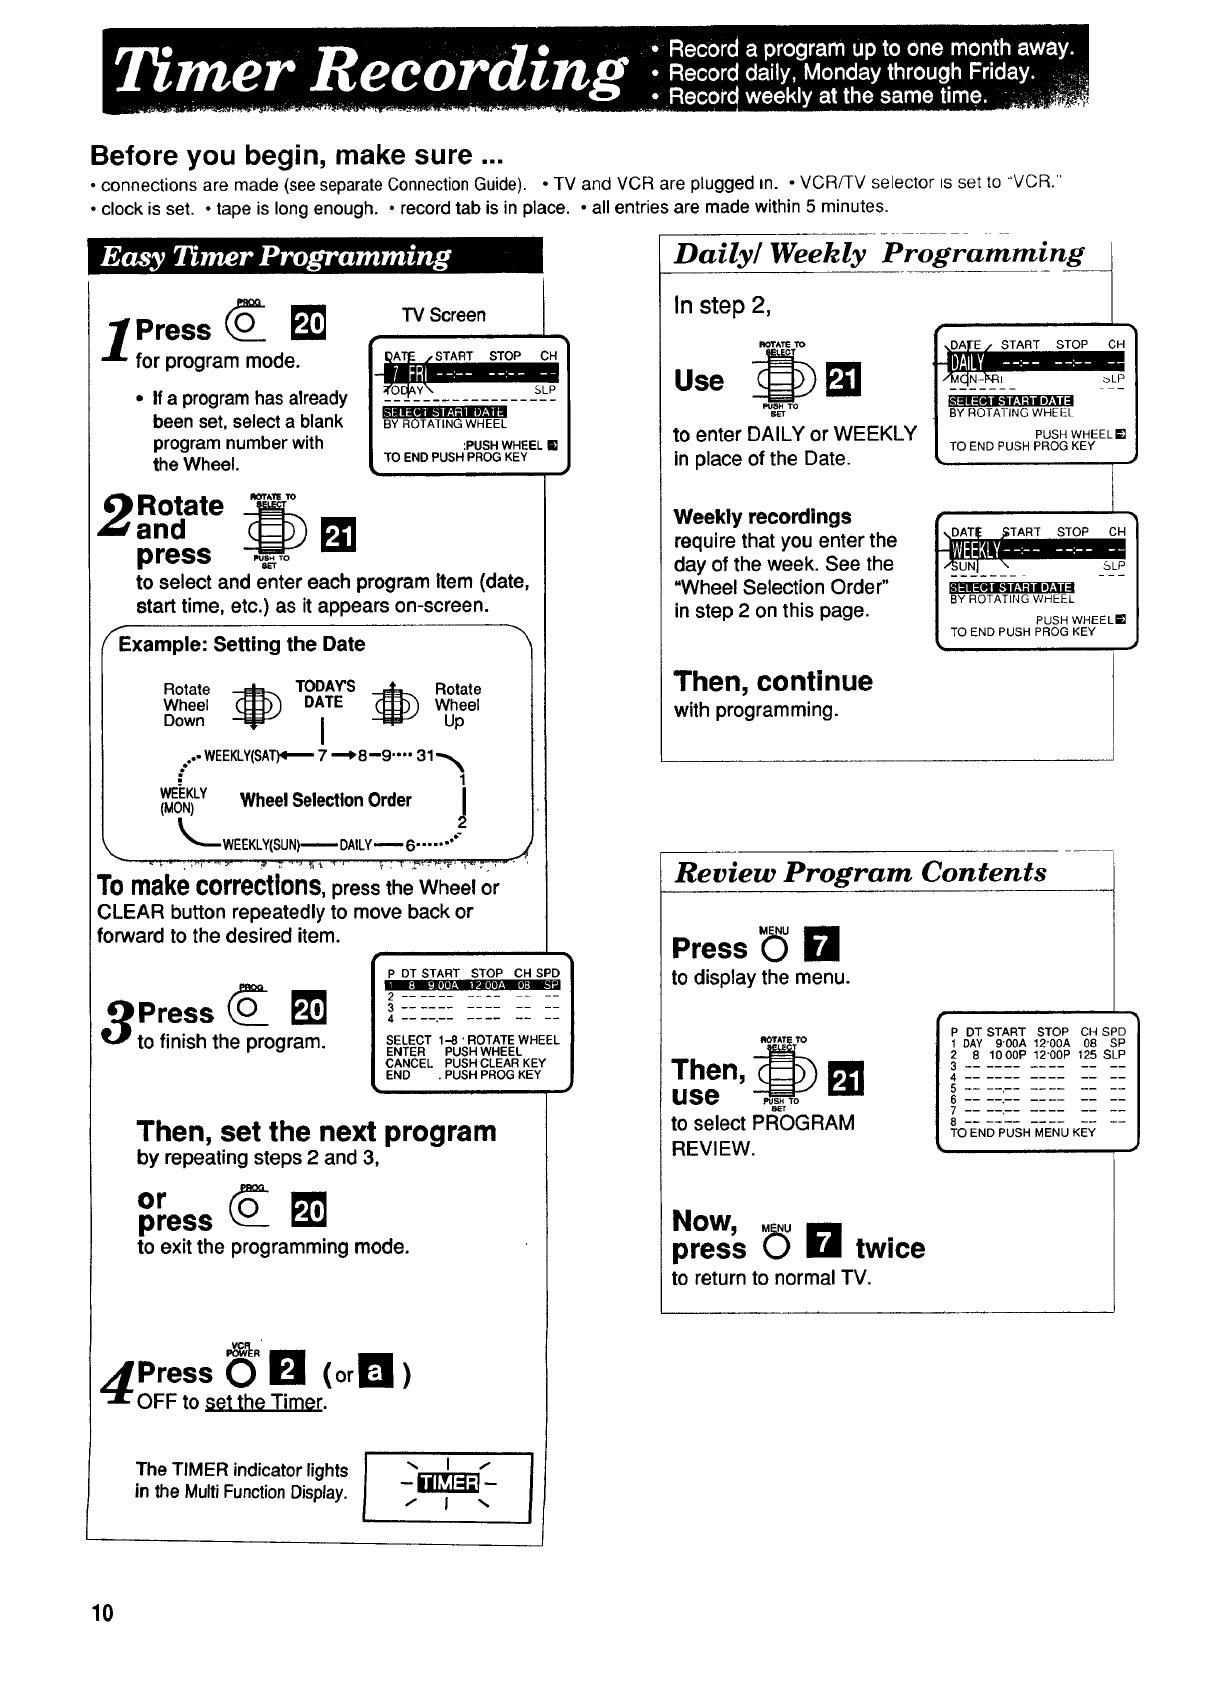
Before you begin, make sure ...
• connections are made (seeseparateConnectionGuide). • TV and VCR are plugged m. - VCR/TV selector tsset to "VCR."
•clock is set. • tape is longenough. • recordtab is in place. • all entries are made within 5 minutes.
/Press
for program mode.
• Ifa programhasalready
been set,selecta blank
programnumberwith
theWheel.
TV Screen
Rotate
and I_
press ,_To
to select and enter each program Item (date,
start time, etc.) as itappears on-screen.
fExample: Setting the Date -'_
Rotate _ TODAY'S _ Rotate
Wheel DATE Wheel
Down I Up
..- WEEKLY(SAT)<_ 7 '_8--9 .... 31 "._
.." 1
WEEKLY/ J
(MON) WheelSelectionOrder
Tomake corrections,press the Wheel or
CLEAR button repeatedly to move back or
forward to the desired item.
Press O_ I_
to finish the program.
"t
P DT START STOP CH SPD /
2
3
4
SELECT 1-8 ' ROTATE WHEEL
ENTER PUSH WHEEL
CANCEL PUSH CLEAR KEY
END . PUSH PROG KEY
Then, set the next program
by repeating steps 2 and 3,
or
press
to exit the programming mode.
zS Press _" I_ (or_ )
OFF to set the Timer.
The TIMER indicat°r lights l -'k-_ J
in the MultiFunctionDisplay, - -
Daily/Weekly
In step 2,
ROTATE1"O
Use
HT
to enter DAILY or WEEKLY
in place of the Date.
Weekly recordings
require that you enter the
day of the week. See the
"Wheel Selection Order"
in step 2 on this page.
Programming
,ARTSTOPOH]
III1[,,,_ --- __
14_U_N_I___"_.=,; ____P
_ BY ROTATING WHEEL
| PUSH WHEEL _1
TO END PUSH PROG KEY
Then, continue
with programming.
Review Program Contents
Press _ I_1
to display the menu.
fIOTAT TO
Then, _
use
to select PROGRAM
REVIEW.
I P DT START STOP CH SPD 1
1 DAY 9'00A 12"00A 08 SP
SLP125
8 1000P 12"00P
8
TO END PUSH MENU KEY
Now,
press _ I_1 twice
to return to normal TV.
10
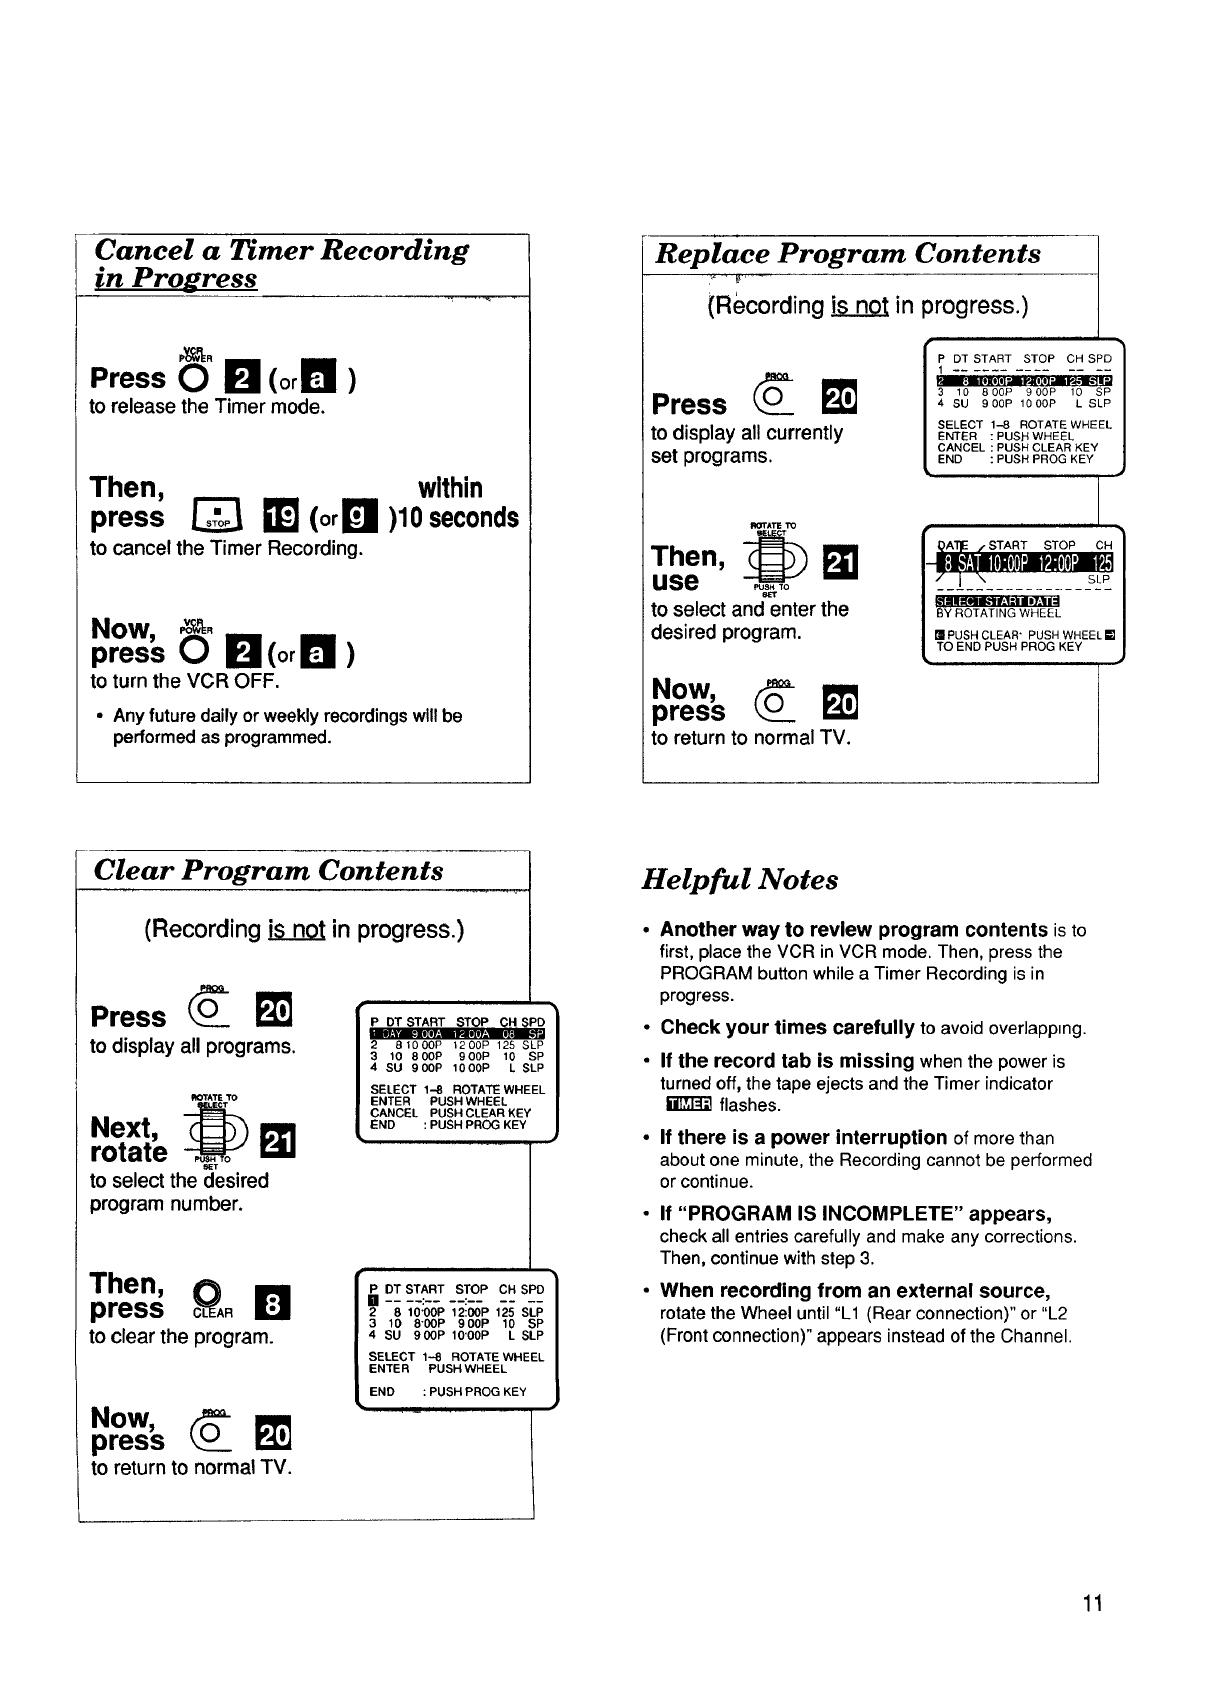
Cancel a Timer Recording
in Progress
Press _" B (or _L_I_)
to release the Timer mode.
Then,
press _ _](orL_
to cancel the Timer Recording.
within
)10seconds
Now,
press _" B(°rll_ )
to turn the VCR OFF.
• Any future daily or weekly recordings will be
performed as programmed.
Replace Program Contents
(Recording isnot in progress.)
Press O_
to display all currently
set programs.
P DT START STOP CH SPD /
1
/
: I II" I1" •
3 10 800P 900P 10 SP
4 SU 900P 1000P L SLP
SELECT 1-8 ROTATE WHEEL |
ENTER : PUSH WHEEL /
CANCEL : PUSH CLEAR KEY |
END : PUSH PROG KEY /
J
ROTATIE1'O
Then, _
use
to select and enter the
desired program.
Now,
press O_ _
to return to normal TV.
f _A'I_E /START STOP CH 1
I--ll:l,'f:lIilol_oIo]'-nuP,Ho]o]'.nupJ,1/
/";__!__..........-_-_-/
i k'flllql_ f'.l.'l 117=11_ |
/ BY ROTATING WHEEL /
| =PUSH CLEAR" PUSH WHEEL=|
L TO END PUSH PROG KEY J
Clear Program Contents
(Recording isnot in progress.)
Press O_
to display all programs.
_rATE 'TO
Next, G_11
rotate _
to select the desired
program number.
P DTSTART STOP CHSPD |
ImlW.'Y_II[II.'! VAIIIyAI_ aJ
2 81000P 1200P 125 SLP
3 10 800P 900P 10 SP
4 SU 900P 1000P L SLP
SELECT 1-8 ROTATE WHEEL
ENTER PUSH WHEEL
CANCEL PUSH CLEAR KEY
END : PUSH PROG KEY
Then,
press _A.
to clear the program.
Now,
press O_ _
to return to normal TV.
_ OTST_.TSTOPCRSPO1
3 _0 8-00P900P _0 sP
4 su 900Pmo.ooPLS,P
SELECT 1-8 ROTATE WHEEL
ENTER PUSH WHEEL
END : PUSH PROG KEY
Helpful Notes
• Another way to review program contents is to
first, place the VCR in VCR mode. Then, press the
PROGRAMbuttonwhilea TimerRecordingisin
progress.
• Check your times carefully to avoidoverlapping.
• If the record tab is missing whenthepoweris
turnedoff,thetape ejectsandtheTimerindicator
flashes.
If there is a power interruption of more than
about one minute, the Recording cannot be performed
or continue.
• If "PROGRAM IS INCOMPLETE" appears,
check all entries carefully and make any corrections.
Then, continue with step 3.
• When recording from an external source,
rotate the Wheel until "L1 (Rear connection)" or "L2
(Front connection)" appears instead of the Channel.
11
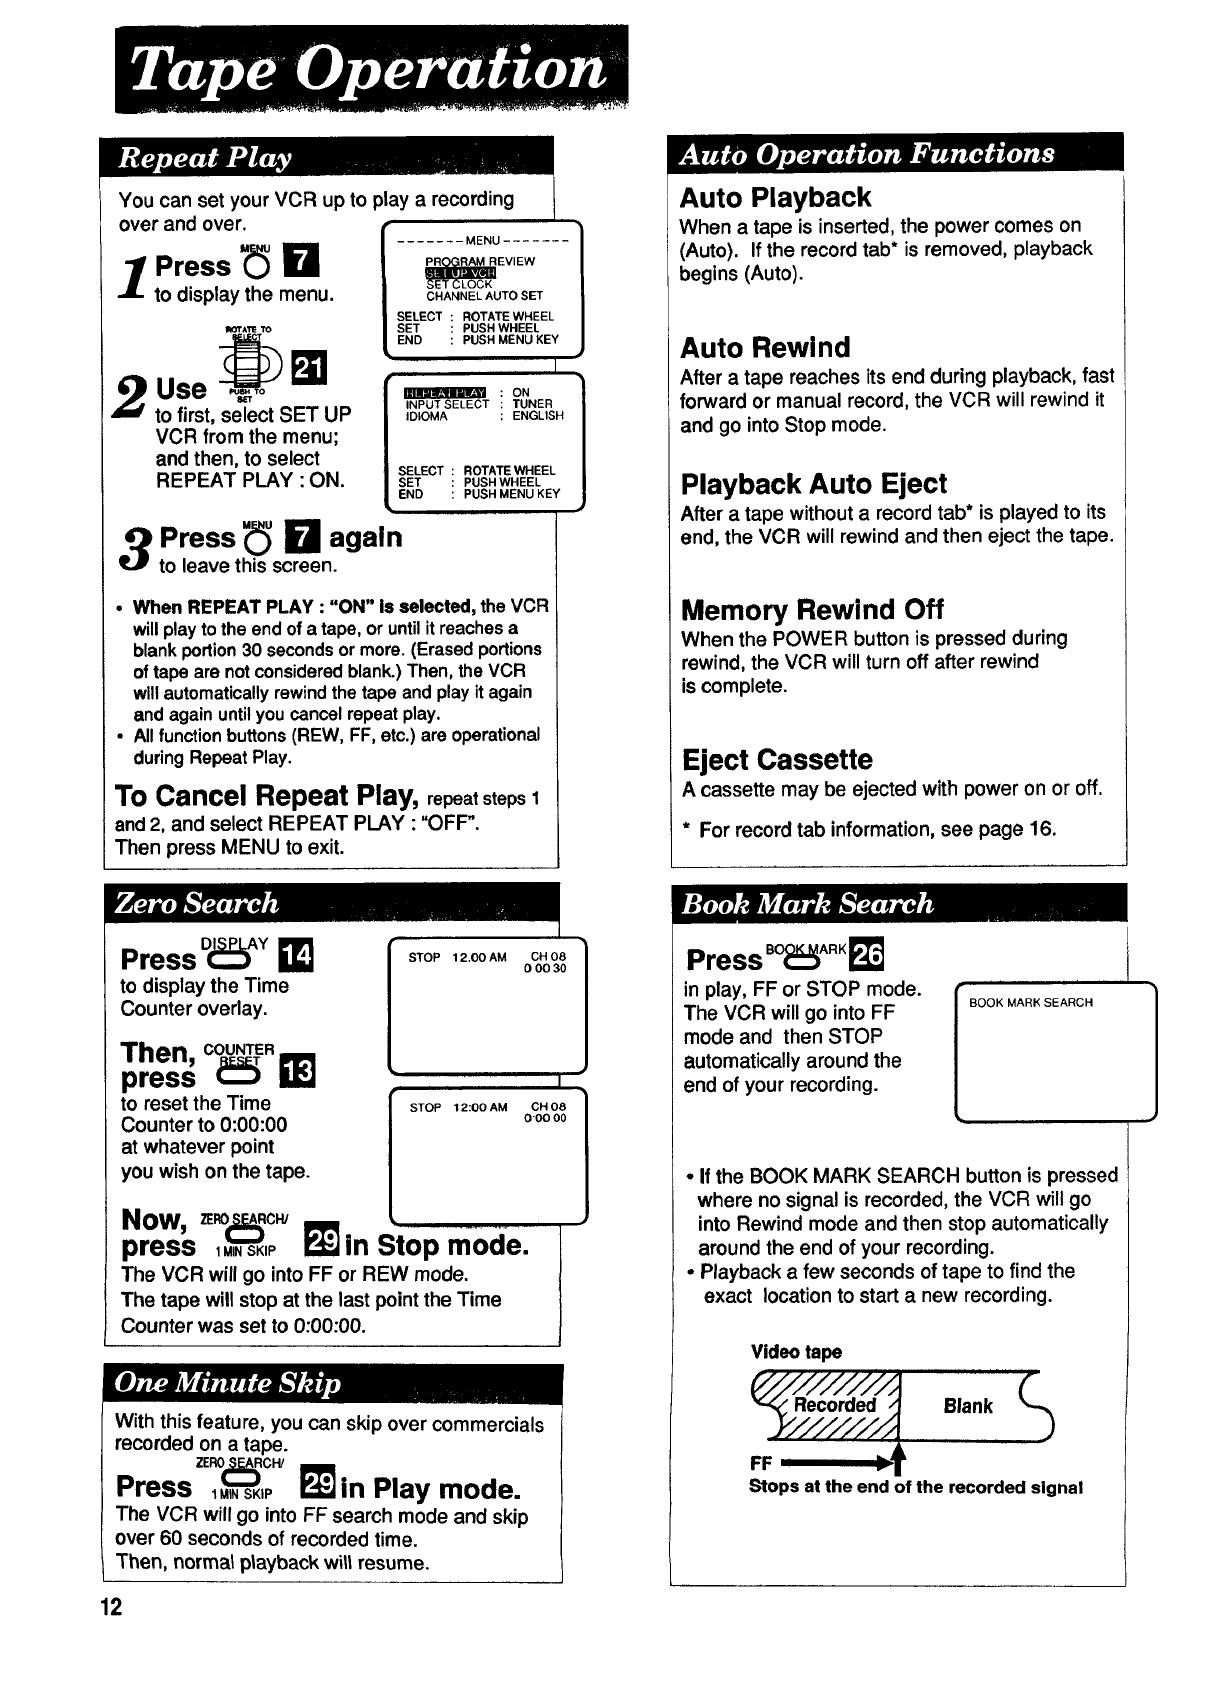
You can set your VCR up to play a recording
over and over.
1 Press "(_ !_
to display the menu.
IROI"A'rI_10
to first, select SET UP
VCR from the menu;
and then, to select
REPEAT PLAY •ON.
....... MENU .......
EVIEW
SET CLOCK
CHANNEL AUTO SET
SELECT ROTATE WHEEL
SET PUSH WHEEL
END PUSH MENU KEY
I
_ ON
INPUT SELECT TUNER
IDIOMA ENGLISH
SELECT ROTATE WHEEL
SET PUSH WHEEL
END PUSH MENU KEY
3 Press _ I_ again
to leave this screen.
• When REPEAT PLAY : "ON" is selected, the VCR
will play to the end of a tape, or until it roaches a
blank portion 30 seconds or more. (Erased portions
of tape are not considered blank.) Then, the VCR
will automatically rewind the tape and play it again
and again untilyou cancel repeat play.
• All function buttons (REW, FF, etc.) are operational
during Repeat Play.
To Cancel Repeat Play, repeatsteps1
and 2, and select REPEAT PLAY • "OFF".
Then press MENU to exit.
Press D_)A¥ I_
to display the Time
Counter overlay.
Then, coup. m
press _
to reset the Time
Counter to 0:00:00
at whatever point
you wish on the tape.
Now, =_(:_:_c_
press 1MINSKIP _1_
STOP 12.00 AM
STOP 12:00 AM
CH 08 1
0 O0 30
I
CH 08 I
0"00 O0
in Stop mode:
The VCR will go into FF or REW mode.
The tape will stop at the last point the Time
Counter was set to 0:00:00.
With this feature, you can skip over commercials
recorded on a tape.
ZER0_CW
Press 1,_,sK,P _"_in Play mode.
The VCR will go into FF search mode and skip
over 60 seconds of recorded time.
Then, normat playback witt resume.
12
Auto Playback
When a tape is inserted, the power comes on
(Auto). If the record tab* is removed, playback
begins (Auto).
Auto Rewind
After a tape reaches its end during playback, fast
forward or manual record, the VCR will rewind it
and go into Stop mode.
Playback Auto Eject
After a tape without a record tab* is played to its
end, the VCR will rewind and then eject the tape.
Memory Rewind Off
When the POWER button is pressed during
rewind, the VCR will turn off after rewind
is complete.
Eject Cassette
A cassette may be ejected with power on or off.
* For record tab information, see page 16.
Press BO_IARK_!1_
in play, FF or STOP mode.
The VCR will go into FF
mode and then STOP
automatically around the
end of your recording.
BOOK MARK SEARCH
• If the BOOK MARK SEARCH button is pressed
where no signal is recorded, the VCR will go
into Rewind mode and then stop automatically
around the end of your recording.
• Playback a few seconds of tape to find the
exact location to start a new recording.
Video tape
r ir J,i
P'////////A (..)
'_ Recorded _ Blank
FF ;T
Stops at the end of the recorded signal
1
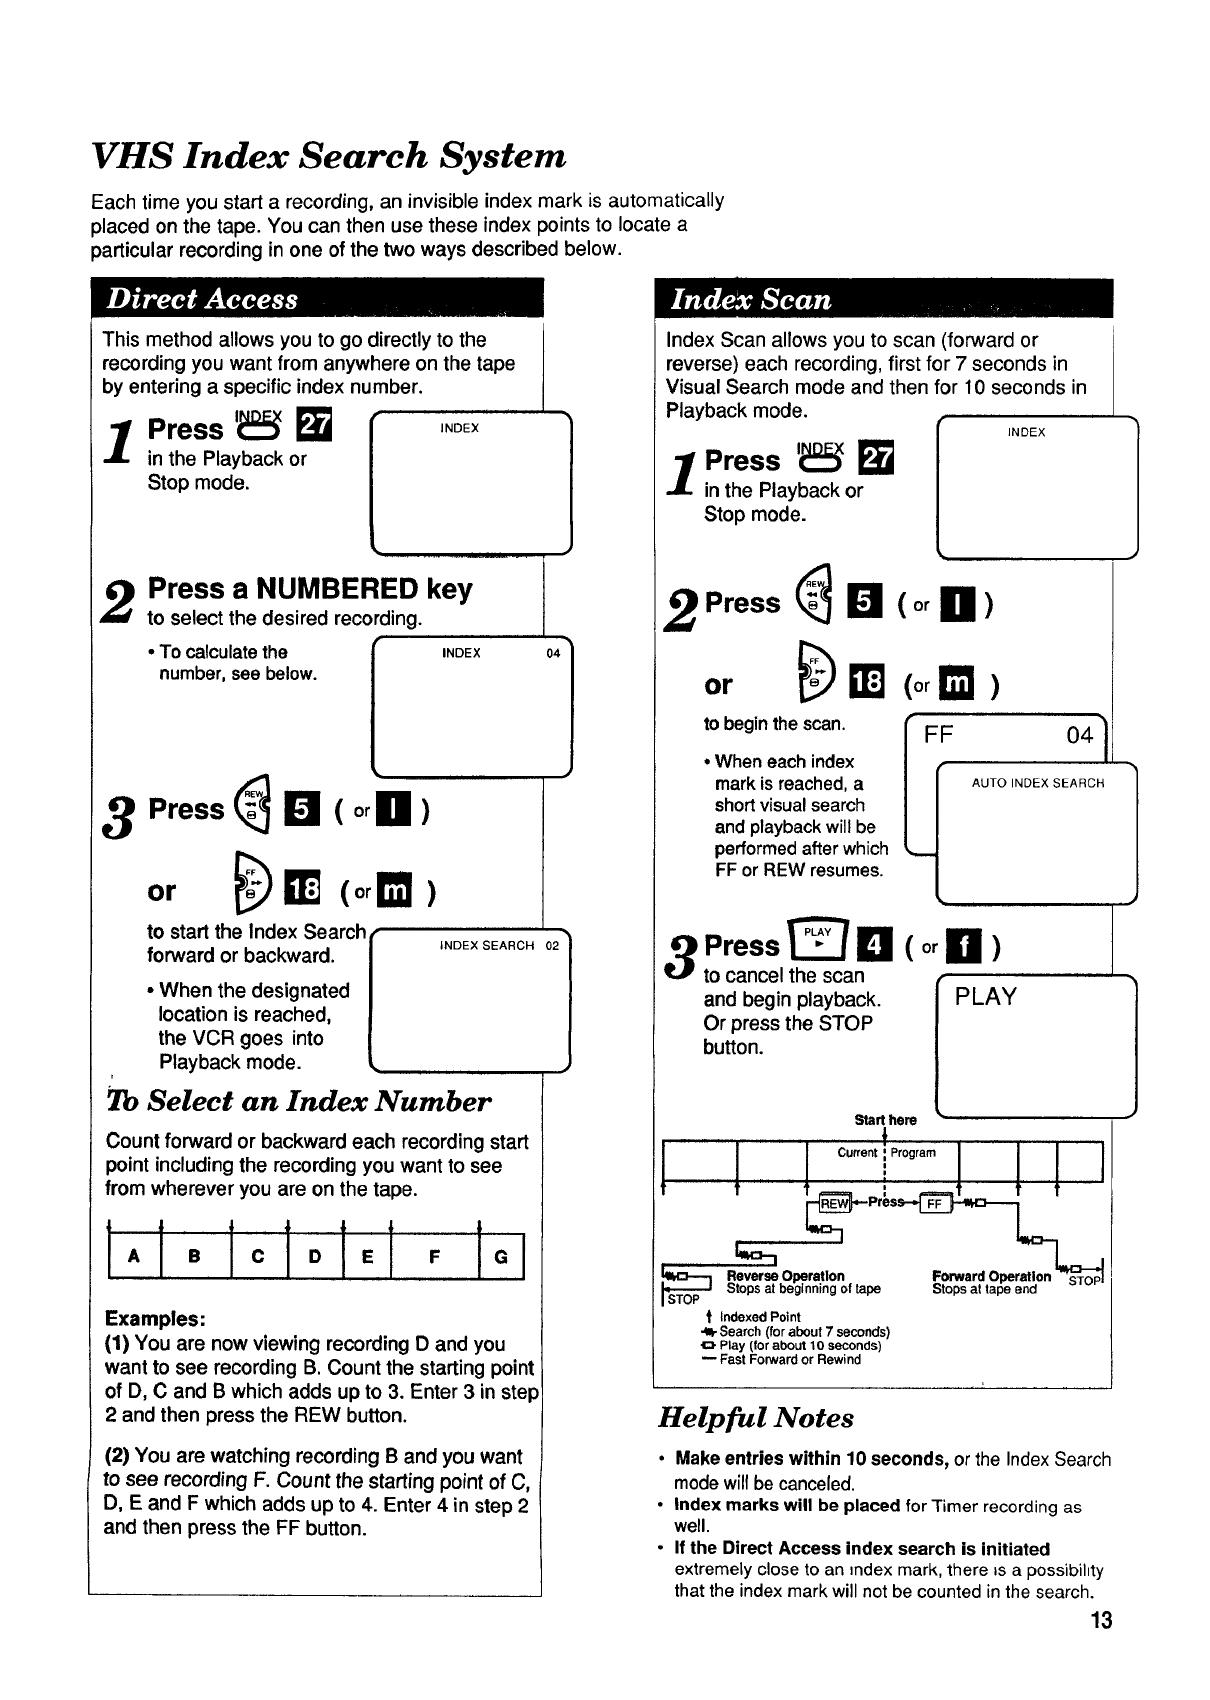
VHS Index Search System
Each time you start a recording, an invisible index mark is automatically
placed on the tape. You can then use these index points to locate a
particular recording in one of the two ways described below.
This method allows you to go directly to the
recording you want from anywhere on the tape
by entering a specific index number.
1 Press '_:_ _ ,NOEX
in the Playback or
Stop mode.
2
3 Press (_ _ ( or B )
or bl _ (orr_)
Press a NUMBERED key
to select the desired recording.
• To calculate the r
number, see below.
L
INDEX
to start the Index Search
forward or backward.
• When the designated
location is reached,
the VCR goes into
Playback mode.
iNDEX SEARCH 021
2b Select an Index Number
Count forward or backward each recording start
point including the recording you want to see
from wherever you are on the tape.
1,11olclo1El
F
Examples:
(1) You are now viewing recording D and you
want to see recording B. Count the starting point
of D, C and B which adds up to 3. Enter 3 in step
2 and then press the REW button.
(2) You are watching recording B and you want
to see recording F. Count the starting point of C,
D, E and F which adds up to 4. Enter 4 in step 2
and then press the FF button.
Index Scan allows you to scan (forward or
reverse) each recording, first for 7 seconds in
Visual Search mode and then for 10 seconds in
Playback mode.
Press 'i_:_ i_
l in the Playback or
Stop mode.
INDEX
2 Press _ _ ( or El )
or __"J (orI_1 )
to beginthe scan. FF
• Wheneachindex
markisreached,a
shortvisualsearch
andplaybackwillbe
performedafterwhich
FF or REW resumes.
3 Press _:/O (or H )
to cancel the scan
and begin playback.
Or press the STOP
button.
041
AUTO INDEX SEARCH
PLAY
Start hem
" ' t
t "t' + '
sRt%_%, aS_bOegiPenraiinl_%f tape Stops at tape end
STOP
t Indexed Point
•_ Search (for about 7 seconds)
_. Play (for about 10 seconds)
Fast Forward or Rewind
Helpful Notes
• Make entries within 10 seconds, or the Index Search
mode will be canceled.
• Index marks will be placed for Timer recording as
well.
• If the Direct Access Index search is initiated
extremely close to an index mark, there _sa possibihty
that the index mark will not be counted in the search.
13
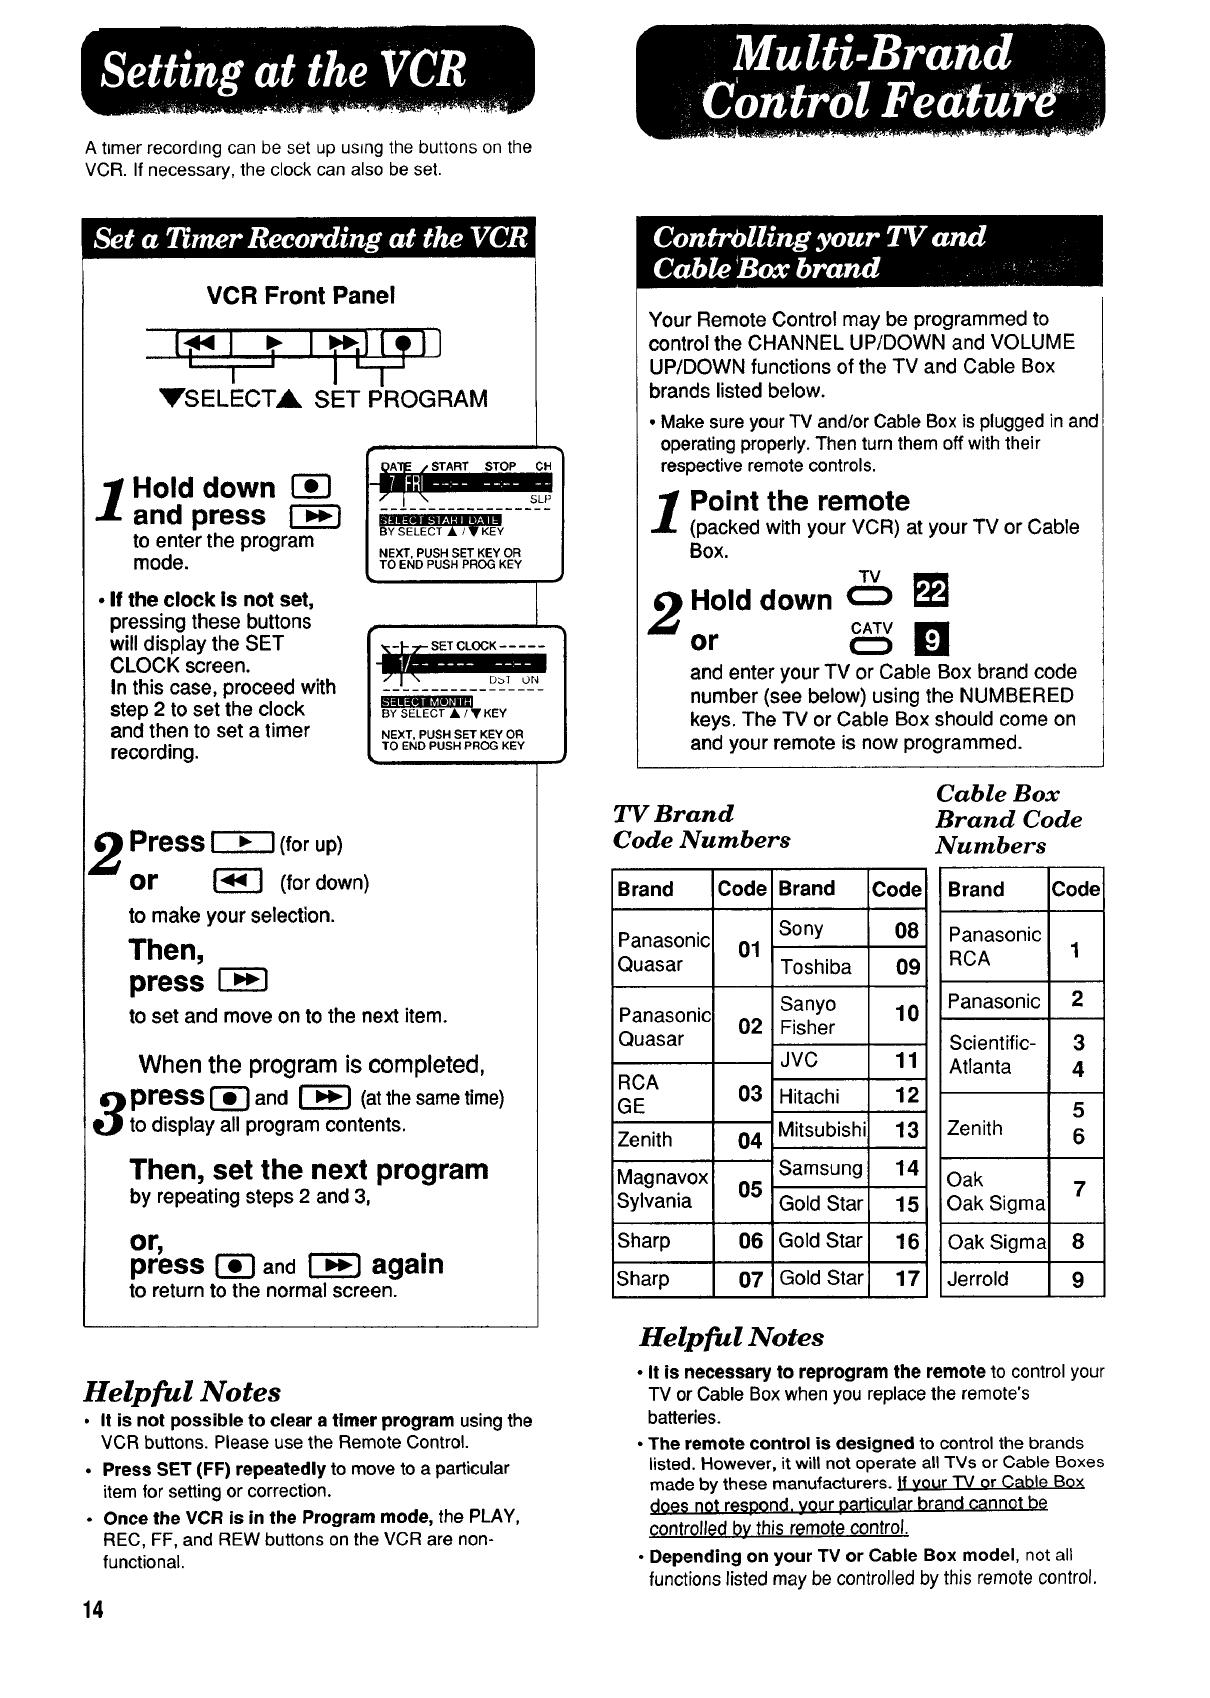
A timer recording can be set up using the buttons on the
VCR. If necessary, the clock can also be set.
VCR Front Panel
[,*,l t I ,llol]
' I I -T
_rSELECT,_ SET PROGRAM
I .,o,c.1
and press , ;;.-,;,_;;,_.--.,:.,;;--,
to enter the program I BYSELECT• :•KEY l
I NEXT, PUSH SET KEY OR 1
mode. [,TO END PUSH PRCK3 KEY J
• If the clock is not set,
pressing these buttons
will display the SET
CLOCK screen.
In this case, proceed with
step 2 to set the clock
and then to set a timer
recording.
[ ._.!-i"-SETCLOCK.....
NEXT, PUSH SET KEY OR
TO END PUSH PROG KEY
2
Press I--'€-I (forup)
or _ (fordown)
to make your selection.
Then,
press
to set and move on to the next item.
When the program is completed,
3_ press I-_ and _ (atthe same time)
to display all program contents.
Then, set the next program
by repeating steps 2 and 3,
or,
press _ and E_ again
tO return to the normal screen.
Helpful Notes
• It is not possible to clear a timer program using the
VCR buttons. Please use the Remote Control.
• Press SET (FF) repeatedly to move to a particular
item for setting or correction.
• Once the VCR is in the Program mode, the PLAY,
REC, FF, and REW buttons on the VCR are non-
functional.
14
Your Remote Control may be programmed to
control the CHANNEL UP/DOWN and VOLUME
UP/DOWN functions of the TV and Cable Box
brands listed below.
• Make sure your TV and/or CableBox is plugged in and
operating properly. Then turn them off with their
respective remote controls.
Point the remote
(packed with your VCR) at your TV or Cable
Box.
TV
2 Hold down 0 _'_
or CATV D
and enter your TV or Cable Box brand code
number (see below) using the NUMBERED
keys. The TV or Cable Box should come on
and your remote is now programmed.
TV Brand
Code Numbers
Cable Box
Brand Code
Numbers
Brand Code Brand Code
Sony 08
Panasonic 01
Quasar Toshiba 09
Sanyo 10
Panasonic 02 Fisher
Quasar
JVC 11
RCA
03 Hitachi 12
GE
Zenith 04 Mitsubishi 13
Samsung 14
Magnavox 05
Sylvania Gold Star 15
Sharp 06 Gold Star 16
Sharp 07 Gold Star 17
Brand Code
Panasonic
RCA 1
Panasonic 2
Scientific- 3
Atlanta 4
5
Zenith 6
Oak 7
Oak Sigma
Oak Sigma 8
Jerrold 9
Helpful Notes
• It is necessary to reprogram the remote to control your
TV or Cable Box when you replace the remote's
batteries.
• The remote control is designed to control the brands
listed. However, it will not operate all TVs or Cable Boxes
made by these manufacturers. If your "IV or Cable Box
does not respond, your particular brand cannot be
controlled by this remote control.
• Depending on your TV or Cable Box model, not all
functions listed may be controlled by this remote control.
• Duringsearchplayback,horizontalnoisebarswill
appearontheTVscreen.
• After the VCR is in the Still or Slow mode for 3
minutes it will go into the Stop mode automatically to
protect the tape and video head.
• The special effects playback feature is intended for
tapes recorded in SP or SLP speed. Tapes recorded
in LP mode can also be viewed in special effects
playback, but the picture may be completely snowy.
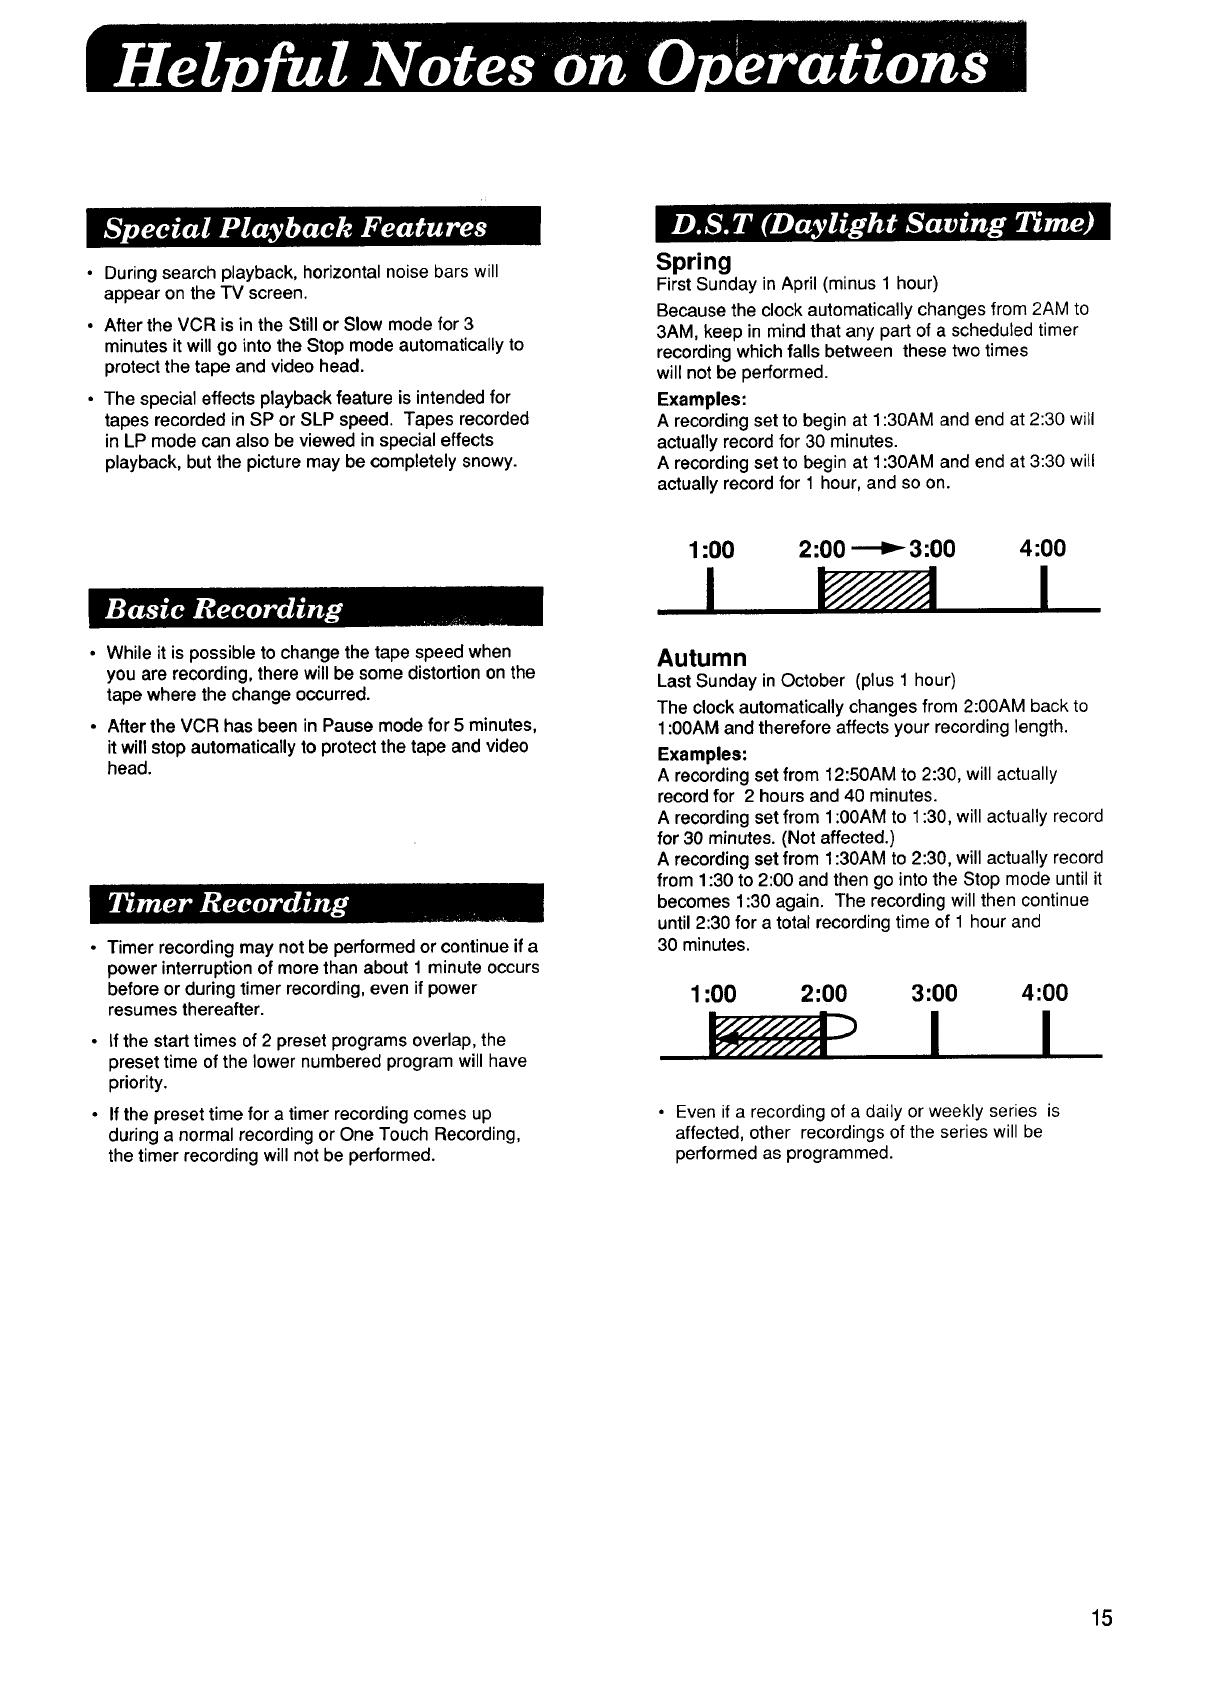
Spring
First Sunday in April (minus 1 hour)
Because the clock automatically changes from 2AM to
3AM, keep in mind that any part of a scheduled timer
recording which falls between these two times
will not be performed.
Examples:
A recording set to begin at 1:30AM and end at 2:30 will
actually record for 30 minutes.
A recording set to begin at 1:30AM and end at 3:30 will
actually record for 1 hour, and so on.
• While it is possible to change the tape speed when
you are recording, there will be some distortion on the
tape where the change occurred.
• After the VCR has been in Pause mode for 5 minutes,
it will stop automatically to protect the tape and video
head.
• Timer recording may not be performed or continue if a
power interruption of more than about 1 minute occurs
before or during timer recording, even if power
resumes thereafter.
• If the start times of 2 preset programs overlap, the
preset time of the lower numbered program will have
priority.
• If the preset time for a timer recording comes up
during a normal recording or One Touch Recording,
the timer recording will not be performed.
1:00 2:00 _ 3:00 4:00
I
I
Autumn
Last Sunday in October (plus 1 hour)
The clock automatically changes from 2:00AM back to
1:00AM and therefore affects your recording length.
Examples:
A recording set from 12:50AM to 2:30, will actually
record for 2 hours and 40 minutes.
A recording set from 1:00AM to 1:30, will actually record
for 30 minutes. (Not affected.)
A recording set from 1:30AM to 2:30, will actually record
from 1:30 to 2:00 and then go into the Stop mode until it
becomes 1:30 again. The recording will then continue
until 2:30 for a total recording time of 1 hour and
30 minutes.
1:00 2:00 3:00 4:00
I
• Even if a recording of a daily or weekly series is
affected, other recordings of the series will be
performed as programmed.
15

Cassettes have a record tab to ensure that
recordings are not accidentally erased.
Break off the tab with
a screwdriver
to prevent accidental erasure.
Cover the hole with
cellophane tape
to record again.
Only use tapes with the _ mark anthis un0t.
Tape Speed
Position
SP
(Standard Play)
LP
(Long Play)
SLP
(SuperLongRay)
Type of Video Cassette
T60
1 Hour
2 Hours
3 Hours
T120
2 Hours
4 Hours
6 Hours
T160
2 Hours
40 Minutes
5 Hours
20Minutes
8 Hours
f
Clogged Video
Head Picture
Clogged Video Heads
Your VCR will not normally require head
cleaning, however the heads may become
clogged when playing an old or damaged tape.
If the image on your screen resembles the
image shown above during playback, the heads
probably require cleaning.
Cleaning the Heads
It is recommended that head cleaning
be performed by a qualified service technician.
Please contact your nearest Panasonic Service
Center. An alternate solution isto obtain a
head cleaning cassette. Be sure to follow the
cleaning instructionscarefully. Excessive use
of a cleaning cassette could shorten head life.
Use this cassette only when symptoms occur.
16

Power Source:
Power Consumption:
Video Signal:
Video Recording System:
Audio Track:
Tuner:
Broadcast Channels:
CATV Channels:
Operating Temperature:
Operating Humidity:
Weight:
Dimensions:
120V AC, 60 Hz
Approx. 18 watts
EIA Standard NTSC color
4 rotary heads helical scanning system
1 track
VHF 2~13, UHF 14~69
Midband A through I (14~22)
Superband J through W (23~36)
Hyperband AA~EEE (37~64)
Lowband A-5~A-1 (95~99)
Special CATV channel 5A (01)
Ultraband 65~94, 100~125
41°F~ 104°F (5°C~40°C)
10%~75%
8.2 Ibs. (3.7 Kg)
14-15/16" (W) X 3-1/2" (H) X 11-1/4" (D)
380 (W) X 89 (H) X 285 (D) mm
Note: Designs and specifications are subject to change without notice.
17
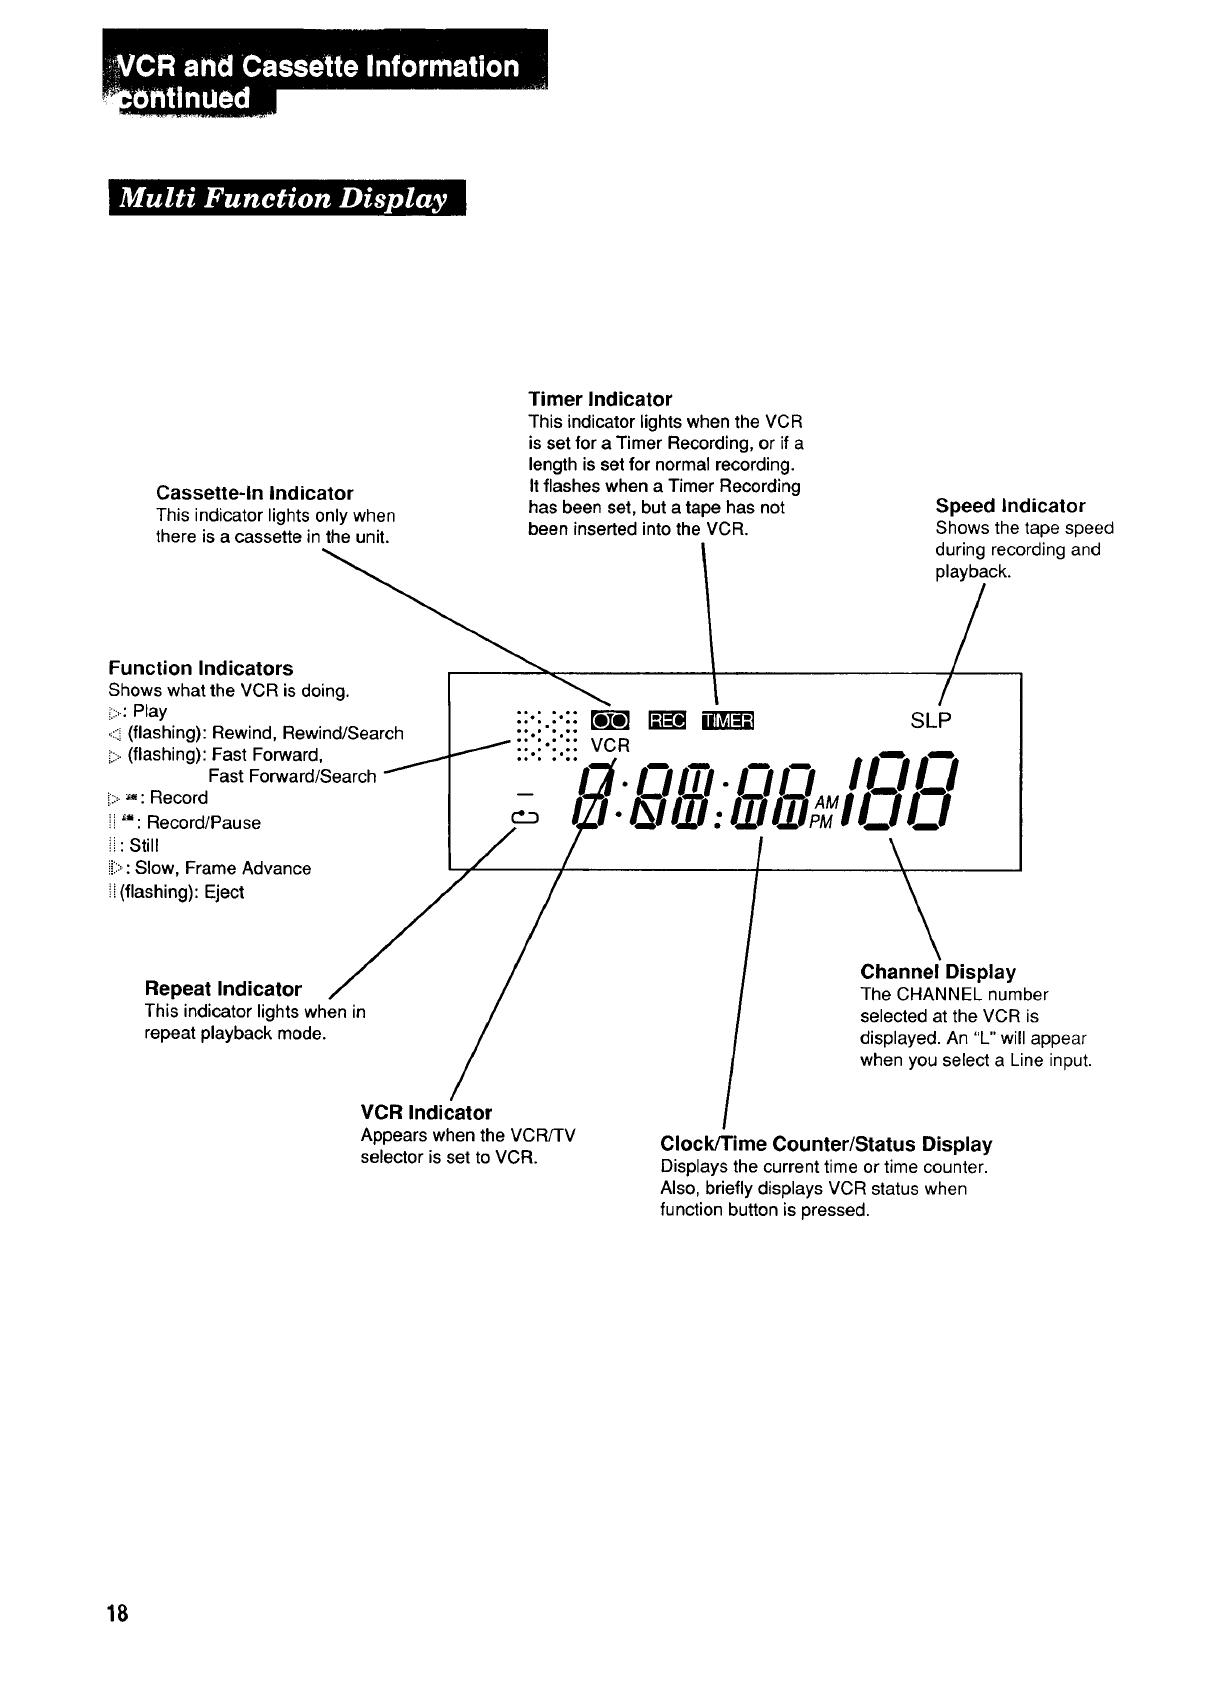
Cassette-In Indicator
This indicator lights only when
there is a cassette in the unit.
Function Indicators
Shows what the VCR is doing.
i:::,.:Play
.,::_(flashing): Rewind, Rewind/Search
i> (flashing): Fast Forward,
Fast Forward/Search /
i;::=._: Record
!i ": Record/Pause
: Still
i[::=:Slow, Frame Advance
(flashing): Eject
Repeat Indicator
This indicator lights when in
repeat playback mode.
Timer Indicator
This indicator lights when the VCR
is set for a Timer Recording, or if a
length is set for normal recording.
It flashes when a Timer Recording
has been set, but a tape has not Speed Indicator
been inserted into the VCR. Shows the tape speed
during recording and
playback.
/
ii:i.i:!! _ _ SLP
ii.i'i.ii VCR
_ L,t.L3 T_ .nnIQQ
Channe_ Display
The CHANNEL number
selected at the VCR is
displayed. An "L" will appear
when you select a Line input.
VCR Indicator
Appears when the VCR/TV
selector is set to VCR.
Clock/Time Counter/Status Display
Displays the current time or time counter.
Also, briefly displays VCR status when
function button is pressed.
18
/