Wolf CSO24TE/S/TH Installation guide

Type
Installation guide
Convection Steam Ovens Installation Guide
CONVECTION STEAM OVENS
2
|
Wolf Customer Care 800.222.7820
Contents
3 Convection Steam Ovens
4 Specications
8 Installation
9 Troubleshooting
Features and specications are subject to change at any
time without notice. Visit wolfappliance.com/specs for the
most up-to-date information.
Important Note
To ensure this product is installed and operated as safely
and efciently as possible, take note of the following types
of highlighted information throughout this guide:
IMPORTANT NOTE highlights information that is especially
important.
CAUTION indicates a situation where minor injury or product
damage may occur if instructions are not followed.
WARNING states a hazard that may cause serious injury or
death if precautions are not followed.
IMPORTANT NOTE: Throughout this guide, dimensions in
parentheses are millimeters unless otherwise specied.
IMPORTANT NOTE: Save these instructions for the local
electrical inspector.
wolfappliance.com
|
3
CONVECTION STEAM OVENS
Product Information
Important product information including the model and
serial number are listed on the product rating plate. The
rating plate is located on the left side of the front face frame.
The oven door must be open to view the rating plate. Refer
to the illustration below.
If service is necessary, contact Wolf factory certied service
with the model and serial number. For the name of the
nearest Wolf factory certied service or for questions
regarding the installation, visit the contact & support section
of our website, wolfappliance.com or call Wolf customer
care at 800-222-7820.
Rating plate location.
RATING PLATE
4
|
Wolf Customer Care 800.222.7820
SPECIFICATIONS
Installation Requirements
The convection steam oven can be installed in a standard
or ush inset application. The electrical supply for the oven
must be located in an adjacent cabinet.
Finish the edges of the opening. They may be visible when
the door is open.
For standard installations, face trim will overlap stiles and
rails. Refer to the chart.
For ush inset installations, a minimum
1
/8" (3) reveal is
required on all sides. To ensure consistent reveals, each
corner of the opening must be exactly 90°.
If the convection steam oven is installed above or below
a Wolf E series oven in a ush inset application, a
1
/4" (6)
reveal is required.
INSTALLATION REQUIREMENTS
BASE SUPPORT MIN
Convection Steam Oven 100 lb (45 kg)
TRIM OVERLAP 24" MODEL 30" MODEL
Top
3
/16" (5)
3
/16" (5)
Bottom 0" (0) 0" (0)
Sides
11
/16" (18) 3
7
/8" (98)
wolfappliance.com
|
5
Electrical
Installation must comply with all applicable electrical codes.
Locate the electrical supply as shown in the illustrations
on the following pages. A separate circuit, servicing only
this appliance is required. A ground fault circuit interrupter
(GFCI) is not recommended and may cause interruption of
operation. Refer to the illustration below for minimum power
cord plug clearance.
Performance may be compromised if the electrical supply is
less than 240 volts.
ELECTRICAL REQUIREMENTS
Electrical Supply grounded, 240/208 VAC, 60 Hz
Service 20 amp dedicated circuit
Receptacle NEMA 6-20R grounding-type
Power Cord 6'
(1.8 m)
WARNING
ELECTRICAL SHOCK HAZARD: Plug into a grounded
3-prong outlet. Do not remove ground prong. Do not
use an adapter. Failure to follow these instructions can
result in electric shock, re or death.
NEMA
PLUG
GROUNDED
NEMA RECEPTACLE
3"
(76)
MINIMUM CORD
CLEARANCE
NEMA 6-20R receptacle.
Power cord clearance.
SPECIFICATIONS
Rating plate location.
RATING PLATE
6
|
Wolf Customer Care 800.222.7820
SPECIFICATIONS
Convection Steam Oven
STANDARD INSTALLATION
FRONT VIEW
SIDE
VIEW
NOTE: 24"
(610) and 30" (762) models require the same opening dimensions.
Electrical supply must be located in adjacent cabinet within 3'
(.9 m) of opening.
Dashed line represents profile of unit
.
17
11
/
16
"
(449)
OPENING
HEIGHT
21
9
/16"
(548)
OPENING
DEPTH
TOP VIEW
W
OPENING WIDTH
EE
OPENING WIDTH
MODEL W
24" Model 22
1
/8" (562)
30" Model 22
1
/8" (562)
wolfappliance.com
|
7
SPECIFICATIONS
Convection Steam Oven
FLUSH INSET INSTALLATION
W
FLUSH INSET WIDTH
FRONT VIEW
SIDE
VIEW
23" (584)
FLUSH INSET
DEPTH
7
/8" (22)
*W
ill be visible and should be finished to match cabinetry.
NOTE: Electrical supply must be located in adjacent cabinet within 3'
(.9 m) of opening.
Dashed line represents profile of unit
.
18
1
/8"
(460)
FLUSH INSET
HEIGHT
5
/16"(8)
1
/8" (3)
A
TOP VIEW
EE
FINISHED
CLEATS*
OPENING WIDTH
MODEL W A
24" Model 23
3
/4" (603)
13
/16" (21)
30" Model 30
1
/8" (765) 4" (102)
8
|
Wolf Customer Care 800.222.7820
INSTALLATION
Preparation
Before moving the oven, protect any nished ooring and
secure oven door closed to prevent damage.
Use an appliance dolly to move the unit near the opening.
Remove and recycle packing materials. Do not lift or carry
the oven by the door handle.
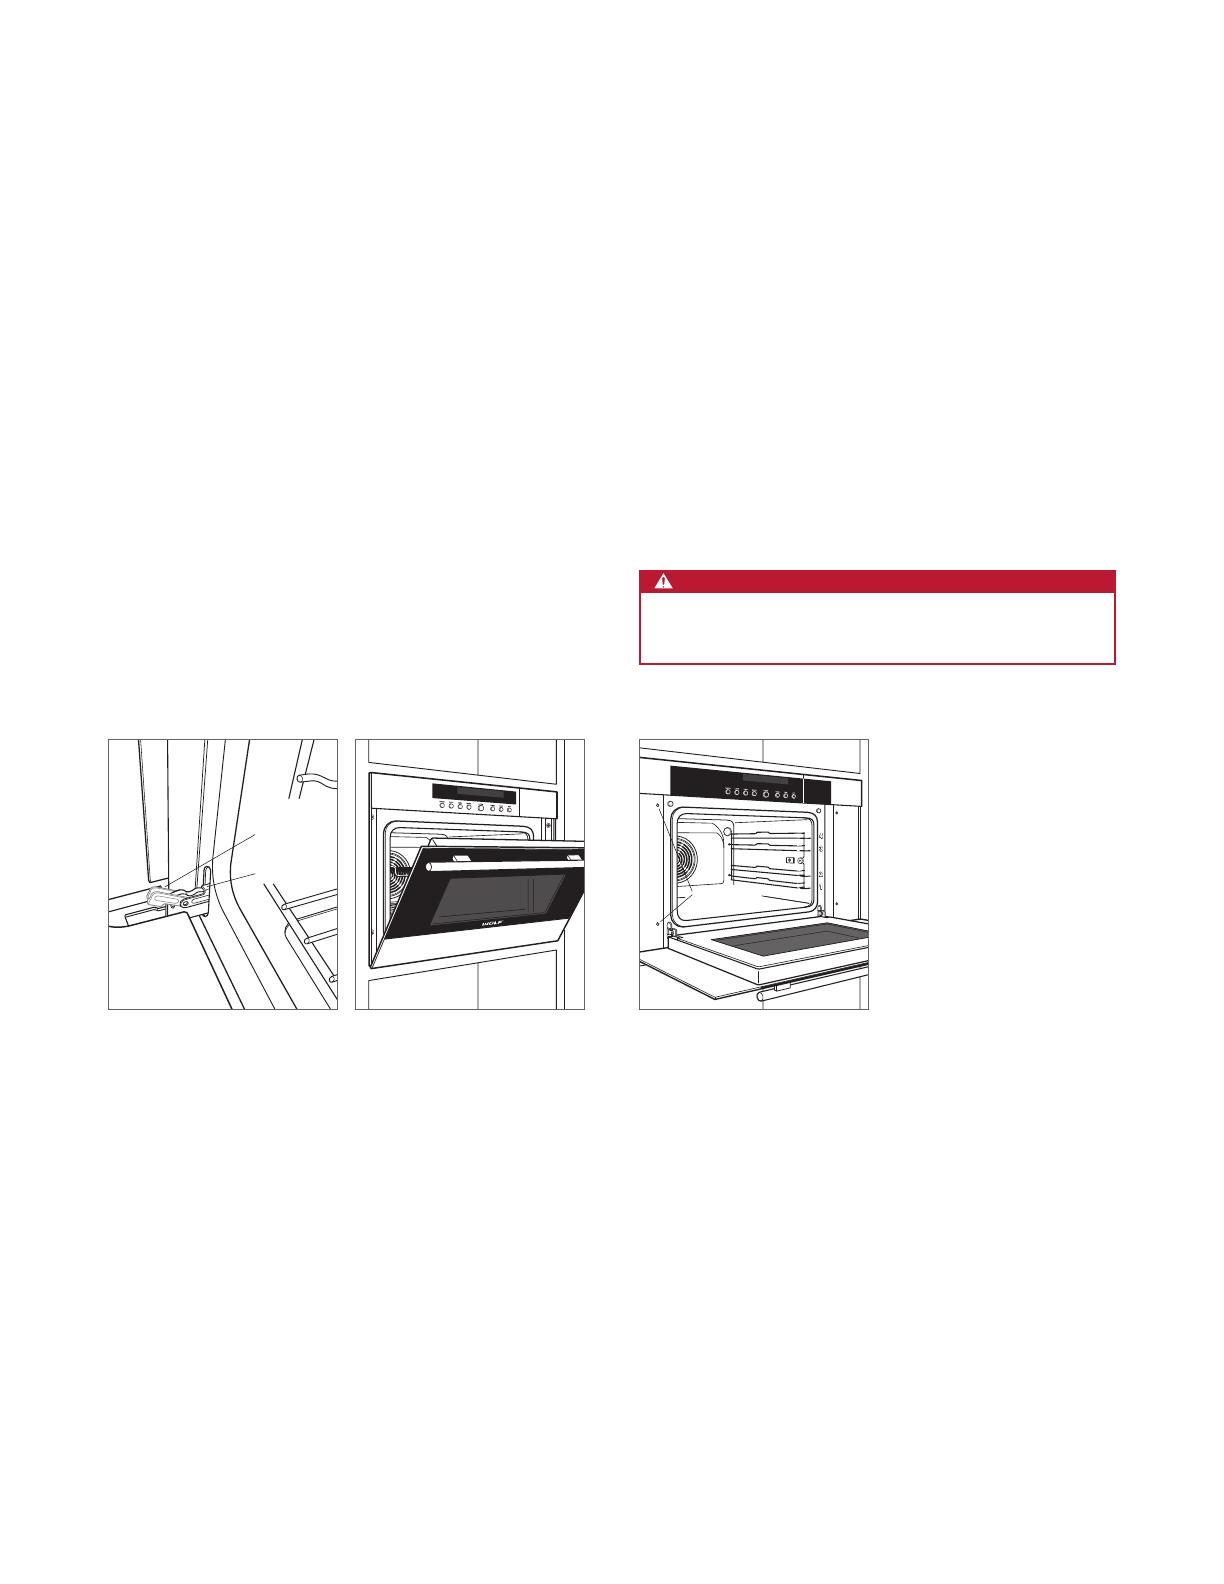
OVEN DOOR REMOVAL
To remove, open oven door completely. Rotate both hinge
latches forward to the open position. Close door to the
“at-rest” position, then lift up and out. Refer to the illustra-
tions below.
To reinstall, insert door hinges into frame openings. Open
oven door completely and rotate both hinge latches back to
the closed position.
OPEN
POSITION
CLOSED
POSITION
Oven door hinge latch.
Door “at-rest” position.
Installation
Place the oven in the opening and slide back partially. Guide
the power cord through the opening of the adjacent cabinet
and slide oven back fully. Verify the power cord is not
trapped between the oven and cabinet wall.
Locate mounting holes on the oven side trim, two on each
side. Drill
1
/16" pilot holes. Use the mounting screws pro-
vided to secure the oven to cabinetry. Refer to the illustra-
tion below.
To avoid interference, a 90° door stop may be required for
any appliance or cabinet door installed next to the oven.
CAUTION
Failure to install the mounting screws may cause the
oven to tip forward during use.
MOUNTING
HOLES
Oven installation.
wolfappliance.com
|
9
TROUBLESHOOTING
Troubleshooting
IMPORTANT NOTE: If the convection steam oven does not
operate properly, follow these troubleshooting steps:
Verify electrical power is supplied to the oven.
Verify proper electrical connections.
If the oven does not operate properly, contact Wolf
factory certied service. Do not attempt to repair the
oven. Wolf is not responsible for service required to
correct a faulty installation.
Wolf, Wolf & Design, Wolf Gourmet, W & Design and the color red as applied to knobs are registered trademarks and service marks of Wolf Appliance, Inc. Sub-Zero,
Sub-Zero & Design, Dual Refrigeration, The Living Kitchen, Great American Kitchens The Fine Art of Kitchen Design, and Ingredients are registered trademarks and service marks
of Sub-Zero, Inc. All other trademarks or registered trademarks are property of their respective owners in the United States and other countries.
wolfappliance.com
|
7
ESPECIFICACIONES
Horno de vapor de convección
INSTALACIÓN EMPOTRABLE
W
FLUSH INSET WIDTH
FRONT VIEW
SIDE
VIEW
23" (584)
FLUSH INSET
DEPTH
7
/8" (22)
*W
ill be visible and should be finished to match cabinetry.
NOTE: Electrical supply must be located in adjacent cabinet within 3'
(.9 m) of opening.
Dashed line represents profile of unit
.
18
1
/8"
(460)
FLUSH INSET
HEIGHT
5
/16"(8)
1
/8" (3)
A
TOP VIEW
EE
FINISHED
CLEATS*
ANCHO DE ABERTURA
MODELO ANCHO A
Modelo de 24" 23
3
/4" (603)
13
/16" (21)
Modelo de 30" 30
1
/8" (765) 4" (102)
PROFUNDIDAD DE
LA INSTALACIÓN
EMPOTRABLE
VISTA SUPERIOR
VISTA FRONTALVISTA LATERAL
*Será visible y debe tener un acabado que haga juego con los gabinetes.
NOTA: el suministro eléctrico debe estar en un gabinete adyacente a 3 pies (0,9 m) de la abertura.
La línea punteada representa el perl de la unidad.
CORNAMUSAS
TERMINADAS*
ANCHO DE LA INSTALACIÓN
EMPOTRABLE
ALTURA
EMPOTRABLE
ANCHO
WOLF APPLIANCE, INC. P.O. BOX 44848 MADISON, WI 53744 WOLFAPPLIANCE.COM 800.222.7820
824652 REV-B 9/2014
  • Page 1 1
  • Page 2 2
  • Page 3 3
  • Page 4 4
  • Page 5 5
  • Page 6 6
  • Page 7 7
  • Page 8 8
  • Page 9 9
  • Page 10 10
  • Page 11 11
  • Page 12 12
  • Page 13 13
  • Page 14 14
  • Page 15 15
  • Page 16 16
  • Page 17 17
  • Page 18 18
  • Page 19 19
  • Page 20 20
  • Page 21 21
  • Page 22 22
  • Page 23 23
  • Page 24 24
  • Page 25 25
  • Page 26 26

Wolf CSO24TE/S/TH Installation guide

Type
Installation guide

Ask a question and I''ll find the answer in the document

Finding information in a document is now easier with AI