
DESCRIPTION/APPLICATION
RANCO commercial pressure controls are used for either
operating or protecting commercial refrigeration or air
conditioning systems. They are suitable for R12, R22, and R502
refrigerants and are available with either male are or capillary are
nut connections. Both low pressure (suction sensing) and high
pressure (discharge sensing) versions are available.
These controls, with NEMA 1 enclosures and snap action switches,
may be used in a variety of applications: direct control of motors
or compressors; with a contactor for pilot duty control; to control
solenoid valves. The electrical ratings inside the control cover must
not be exceeded.
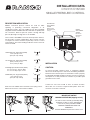
O10 Single pole, single throw (SPST)
close (cut-in) on rise
open (cut-out) on drop
O11 Single pole, single throw (SPST)
open (cut-out) on rise
close (cut-in) on drop
O16 Single pole, double throw (SPDT)
2-3 close on rise, open on drop
2-1 close on drop, open on rise
O20 Double pole, single throw (DPST)
close (cut-in) on rise
open (cut-out) on drop
3
2
1
L
L T
T
DIFFERENTIAL
ADJUSTMENT
SCREW
CW increases
CCW decreases
See p. 3
RANGE
ADJUSTMENT
SCREW
CW lowers
CCW raises
See p. 3
COVER
SCREW
All O series are available in the automatic reset/cycling version.
Manual reset versions of the O16 are available.
NO! NO!
DIFF HIGH EVENT
3
12”
0
10
20
30
40
50
0
1
2
3
35
25
15
5
2
1
PSI. bar
CLOSES ON PRESSURE RISE.
SWITCH LOW EVENT
IS HIGH EVENT
MINUS DIFF
bar PSI.
DIFF HIGH EVENT
3
12”
0
10
20
30
40
50
0
1
2
3
35
25
15
5
2
1
PSI. bar
CLOSES ON PRESSURE RISE.
SWITCH LOW EVENT
IS HIGH EVENT
MINUS DIFF
bar PSI.
DIFF HIGH EVENT
3
12”
0
10
20
30
40
50
0
1
2
3
35
25
15
5
2
1
PSI. bar
CLOSES ON PRESSURE RISE.
SWITCH LOW EVENT
IS HIGH EVENT
MINUS DIFF
bar PSI.
YES!
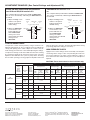
IMPORTANT NOTICE
MANUAL OPERATION (tripping switch)
The switch can be manually operated by lifting
the bellows to tabs as shown. Operating the
control at any other point WILL CAUSE
CONTROL DAMAGE AND VOID THE
WARRANTY.
DO NOT REMOVE the protective switch cover.
INSTALLATION
CAUTION:
To prevent possible electrical shock or equipment damage,
disconnect electrical power to unit before and during installation.
DO NOT restore electrical power to unit until the control is properly
installed and grounded. DO NOT locate the control in an explosive
atmosphere as a safety hazard can result due to possible spark
generation in the control.
Controls are not to be located in areas of extreme moisture,
dirt or dust, or in a corrosive or explosive atmosphere. These envi-
ronments can shorten control life.
1
INSTALLATION DATA
O10/011/O16/O20
SINGLE PRESSURE CONTROL

CONTROL BODY MOUNTING
Select a location that will permit proper capillary routing. It is
important not to twist or strain the control body as shifting of the
calibration may result.
RANCO pressure controls can be mounted in any position,
either vertically or horizontally, without affecting performance. The
control can be mounted on an existing bracket, on the bracket
provided, or can be ush-mounted without a bracket. Whichever
method is selected, use only the mounting holes provided; no
other holes are to be added to the control frame.
1. Secure the control to a bracket with the 10-32 x 3/16
screws
by using the two tapped holes in the back of the control.
If other mounting screws are used, they must not
protrude into the control more than 1/8” to avoid
damage.
2. When using the angle bracket, the control can be mounted to
the compressor or any at surface by using two or more of
the four slotted holes in the base of the angle bracket.
3. When ush mounting the control, use the .20 inch holes in
the back of the control frame. Access can be gained by
removing the front cover an securing
the control body to a wall or any at surface.
Mounting to an uneven surface may cause improper
control operation.
CAPILLARY CARE AND MOUNTING
Compressors vibrate. Copper work-hardens and fractures when
exed beyond its physical limits. Combine these two factors
and broken capillaries can result. Breakage can be prevented by
proper installation practices.
1. Minimizes the number of times the capillary is bent. Each
time it is rebent, it work-hardens making it more susceptible
to breakage.
2. Avoid sharp bends, kinks, strains or pinch marks in the
capillary. Never allow the capillary to rest against sharp
edges or rub against metal surfaces where it can be
damaged by friction.
3. The capillary should be straight within 4 inches of the
pressure connection so the pulsations do not work-harden
the capillary.
4. Purge all tubing and lines before connecting pressure
controls.
5. Route the capillary so that it will be safe-draining to minimize
PREFERRED
H.P.
L.P.
No Alternate
oil logging.
6. When the control is mounted directly on the compressor, the
capillary must be secured to the compressor so that ever
thing moves together. If the capillary or control is shaking or
vibrating against the compressor vibration, work-hardening
Plastic or
Rubber Lined
Clamp
Coils can be taped
or tied. See
notes 8, 9 & 10
Compressor
COMPRESSOR MOUNTING
of the capillary may occur, leading to eventual failure.
7. When the control body is mounted remote from the
compressor and the pressure connections are on the
compressor, vibration coils must be used between the
compressor and the mounted control. The coils should not
touch. A section of rubber pipe insulation inserted into the
vibration coils and secured with silicone adhesive will keep
the coils separated, yet allow them to absorb vibration.
The capillary between the vibration coils and the control body
should be secured to a stationary member when that distance
3” to 6”
If this distance is more
than 6”, the tubing
should be clamped
as shown below.
Min. of 2 Coils
2 to 3 Inch
Diameter Coils
12” to 18”
Control
Coils Should Not
Touch
Compressor
REMOTE MOUNTING
exceeds 6 inches.
The capillary between the vibration coils and the control body
should be secured to a stationary member when that distance
exceeds 6 inches.
12” Approx
Min. of 2 Coils
2 to 3 Inch Dia.
Coils
Clamp Tube to
Stationary Member
2 or More Coils of Tubing On
Compressor Side Clamp
Coils Should Not
Touch
Compressor
Control
REMOTE MOUNTING
2

8. Coil and secure any excess capillary to avoid possible
damage due to vibration. Capillary coils should be no less
than 2 inches in diameter (3 inches is recommended).
Silicone adhesive applied between the coils will keep them
from rubbing.
9. Although coiling and securing the excess capillary is
important to dampen the effects of vibration, it is just as
important to allow enough slack in the capillary so that it is
not taut like a “banjo string”.
10. On startup of the equipment, observe the capillary for
excessive vibration and make corrections as required.
CONTROL WIRING
1. Disconnect electrical power to the unit.
2. All electrical wiring should conform to the National Electrical
Code and local regulations.
3. The electrical rating inside the control cover must not be
exceeded. See below for DC ratings.
4. Use copper conductors only.
5. When mounting a conduit connector to the control frame,
take care to not damage the control mechanism or the
hinge pin.
6. The terminals must not be bent, cut off, drilled or
retapped. Electrical leads must not be taut; slack must be
allowed for temperature change and vibration.
7. Attach electrical leads to the switch terminals using the
screws provided (also, see below for the O16), tightened to
15-20 inch pounds.
The furnished cupwashers are to be used on the O16 when the
conductor wires are directly connected to the terminals. The
stripped end of the conductors should be made into a clockwise
formed eye with an inside diameter to slip over the shank of the
terminal screw. The cup washer, with its anges outward, should
be placed between the terminal and the screw head to capture
the eye of the conductor.
CONTROL SETTINGS AND ADJUSTMENTS
ALL CONTROL SETTINGS are to be as specied by the equip-
ment manufacturer and as required for the application. DO NOT
adjust the pointers beyond the highest and lowest marks on the
scaleplate. The scaleplate is only for reference and the nal set-
ting should be veried with a gauge set. As a nal check, the
system should be run through several cycles to assure proper
settings and installation.
LOWEST EVENT: DO NOT set the control below the lowest event.
On automatic reset controls, if the combination of the Range (R.H.
pointer) minus the Differential (L.H. pointer) is lower than the Low-
est Event, the control will not operate. See Specications on page
4 for the Lowest Event.
LOW PRESSURE CONTROLS
Low pressure controls which are used to cut-out the compres-
sor on pressure drop should never be set to cut-out (cut-in mi-
nus differential) lower than 20 inches of vacuum on R12; single
stage R22 and R502 systems should never be set lower than 3
inches of vacuum. Excessively low settings can cause compressor
damage.
Manual reset O16 low pressure controls have a scaleplate that
indicates the pressure at which switch terminals 2-3 will lock
open on pressure drop (DO NOT set the pointer below the Lowest
Event). The pressure must rise approximately 10 PSIG above this
setting before the control can be reset.
HIGH PRESSURE CONTROLS
High pressure controls which are used to cut-out the compressor
on pressure rise should normally be set not higher than the values
shown below:
Volts FLA LRA NIA PD VA
32 9.3 93
72 7.3 73
115 4.6 46 57.5
230 2.3 23 57.5
120 4.6 46 3 57.5
240 2.3 23 0.5 57.5
600 57.5
010 and 011
with 1397004-2
magnet package
installed
020
Some high pressure controls are equipped with limit stops.
Although the control setting can be adjusted, the limits stop
prevents adjustment higher than the limit stop factory setting. DO
NOT force the adjustment beyond the limit stop setting.
Manual reset O16 high pressure controls have a scaleplate that
indicates the pressure at which switch terminals 2-1 will lock open
on pressure rise. The pressure must drop approximately 40 PSIG
below this setting before the control can be reset.
3
DC Rating (For AC, see inside of control cover)
Type Air Cooled Water Cooled
R12 230 psi 230 psi
R22 360 psi 300 psi
R502 380 psi 300 psi
Refrigerant Cut-Out Setting

ADJUSTMENT EXAMPLES (See Control Settings and Adjustment P.3)
CLOSE ON RISE CONTROLS with Automatic
reset 010 and 020; 016 terminals 2-3
The scaleplate directly indicates the cut-in and differential.
The cut-out is calculated by subtracting the differential from
the cut-in:
1) Adjust the range screw
until the scale pointer
indicates the desired
cut-in setting.
2) Adjust the differential
screw until the scale
pointer indicates the
desired differential
setting. The cut-out
setting equals the cut-in
setting, less the
differential.
OPEN ON RISE with Automatic reset
011
The scaleplate directly indicated the cut-out and differential.
The cut-in is calculated by subtracting the differential from
the cut-out:
1) Adjust the range screw
until the scale pointer
indicates the desired
cut-out setting.
2) Adjust the differential
screw until the scale
pointer indicates the
desired differential
setting. The cut-in
setting equals the cut-out
setting, less the
differential.
EXAMPLE
Cut In
Differential
Cut Out
36 - 20 = 16
Differential
Cut In
CLOSES ON PRESSURE RISE
CUT OUT IS
CUT IN
MINUS
DIFFERENTIAL
20
36
20
30
40
10
10
20
40
60
80
100
3.0
2.0
1.0
KG.
LBS.
0
1.0
4.0
5.5
7.0
KG.
LBS.
EXAMPLE
Cut Out
Differential
Cut In
360 - 120 = 240
Differential
Cut Out
OPEN ON RISE OF PRESSURE
CUT IN IS
CUT OUT
MINUS
DIFFERENTIAL
120
360
40
100
150
150
250
350
450
1.0
4
KG.
LBS.
10
15
20
30
KG.
LBS.
LOW PRESSURE CHECK
Low pressure controls can be preset by using a container of re-
frigerant and a gauge set. Use a continuity meter to indicate the
closing and opening of the switch. Adjust the control to the de-
sired settings; pressurize the control while adjusting the settings.
Low pressure settings can be rechecked when the unit is running
by connecting a gauge to the section line service valve. Close the
liquid line valve and allow the system to pump down, observing
the low switch opening (or closing). Open the liquid line valve and
allow the pressure to increase, observing the high switch closing
(or opening). Adjust the settings as necessary.
HIGH PRESSURE CHECK
High pressure control settings can be checked by selectively dis-
connecting various stages of fans or by blocking the air ow on
air cooled condensers. On water cooled condensers, reduce or
shut off the water ow while observing the cut-out and adjust as
required.
CAUTION: These checks must be for a brief time only.
LOW
PRESSURE
HIGH
PRESSURE
Pressure
Range
P.S.I.G.
(Inches
Mercury
Vacuum)
(12”) to 50
(10”) to 100
50 to 150
100 to 250
100 to 400
150 to 450
Differential
P.S.I.
5 to 35
10 to 40
Manual*
Reset
10 to 40
20 to 100
40 to 150
17 Fixed
40 to 150
Manual**
Reset
Lowest
Event
P.S.I.G.
(Inches
Mercury
Vacuum)
(20”)
(20”)
(20”)
10
0
0
83
0
110
SPECIFICATIONS
O10 O11 O16 O20
SPST-Opens Low SPST-Opens High SPDT-Opens High or Low DPST-
Opens Low
Male
Flare
O16-120
O16-107
O16-585
-
-
O16-5870
-
O16-503
O16-209
36”
Capillary
with
Flare Nut
O16-557
O16-527
-
O16-166
-
O16-108
O16-142
-
-
48”
Capillary
with
Flare Nut
-
-
O16-261
-
O16-593
-
-
-
O16-200
36”
Capillary
with
Flare Nut
O20-7002
O20-7004
-
-
-
O20-7006
-
-
-
36”
Capillary
with
Flare Nut
Male
Flare
48”
Capillary
with
Flare Nut
36”
Capillary
with
Flare Nut
Male
Flare
O10-1401
O10-1831
Use O16
Use O16
O10-1807
O10-1894
Use O16
Use O16
Use O16
O10-1402
O10-1483
-
O10-2054
O10-1842
O10-1093
O10-2000
-
O11-1799 O11-3099
Use O16
Use O16
Use O16
Use O16
Use O16
011-1713
Use O16
Use O16
011-1711
* Locks on Pressure decrease. Pressure must rise approx. 10 PSI to be reset.
** Locks on pressure increase. Pressure must stop approx. 40 PSI to be reset.
191 E. North Avenue
Carol Stream Illinois 60188 USA
Customer Service Telephone 1.800.304.6563
Customer Service Facsimile 1.800.426.0804
Invensys™, Robertshaw
®
, Ranco
®
, and Eliwell are trademarks
of Invensys plc., its subsidiaries and/or affiliated companies. All
other brands mentioned may be the trademarks of their respective
owners.
www.Uni-Line.com
www.InvensysControls.com
©2013 Invensys
1515064 Rev C
For Technical Service
Telephone 1.800.445.8299
Facsimile 1.630.260.7294
-
 1
1
-
 2
2
-
 3
3
-
 4
4


Ranco O10 User manual
- Type
- User manual
- This manual is also suitable for
Ask a question and I''ll find the answer in the document
Finding information in a document is now easier with AI
Other documents
-
Robertshaw O12/O22 Dual Pressure Controls User manual
-
-
LG RCAW070PBAA Owner's manual
-
-
-
-
-
-
-
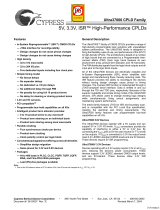 Cypress ISR 37000 CPLD User manual
