RTH230B 69-1800 2/6/05 4/4
5.2 Energy-saving Schedule
Your thermostat is preprogrammed with an energy-saving schedule.
The schedule automatically controls your heating or cooling system
by switching from one setpoint to the next according to the preset
times.
Note: To use the schedule, place the thermostat in programmable
mode.
5.3 Modifying the Schedule
You can program up to 4 periods per day, each period having its
own temperature settings. The same program is repeated daily from
Monday through Friday and another program is used for Saturday
and Sunday. For each period, you can set the start time, the heating
setpoint and the cooling setpoint.
nPress [ Pgm ]. The settings for period 1 are displayed.
Note: During programming, to skip a period, press [ CLR ] while
the period is displayed. For example, in the predefined energy-sav-
ing schedule, periods 2 and 3 have been skipped for Saturday and
Sunday.
oSelect the program using the [ Day ] button (MO TU WE TH FR
appears when the Monday-Friday program is selected or SA
SU appears when the Saturday/Sunday program is selected).
Press for 3 seconds to select all 7 days.
pSet the time (in increments of 15 minutes) using the but-
tons.
qPress [ P# ]. The heating or cooling setpoint
flashes depending on the position of the Heat/
Cool selector.
rSet the desired temperature for the displayed
period using the buttons.
sUse the Heat/Cool selector to switch to the other mode (e.g., if
you were in Heating mode, switch to Cooling mode). The set-
point for that mode flashes.
tSet the desired temperature using the buttons.
uPress [ P# ] to go to the next period.
vRepeat steps 2 to 8 for each of the remaining periods.
wPress [ Exit ] to exit.
Note: To use the schedule, place the thermostat in programmable
mode.
Power supply: 2 AA batteries
Maximum load: 1 A @ 24 Vca per output
Setpoint range (heating): 41 to 82°F (5 to 28°C)
Setpoint range (cooling): 59 to 95°F (15 to 35°C)
Display range: 23 to 122°F (-5 to 50°C)
Storage temperature: -2 to 122°F (-20 to 50°C)
Temperature display resolution: 1°F (0.5°C)
Accuracy: ± 1°F (0.5°C)
Heating/cooling cycle lengths: 10, 12, 15, 20 or 30 minutes (programmable)
Compressor short-cycle protection (minimum off time): 5 minutes
Data memory: non-volatile
Dimensions: 5 in. x 3 in. x 1 in. (127 mm x 75 mm x 28 mm)
Honeywell warrants this product, excluding battery, to be free from defects in
the workmanship or materials, under normal use and service, for a period of
one (1) year from the date of purchase by the consumer. If at any time dur-
ing the warranty period the product is determined to be defective or malfunc-
tions, Honeywell shall repair or replace it (at Honeywell's option).
If the product is defective,
(i) return it, with a bill of sale or other dated proof of purchase, to the place
from which you purchased it, or
(ii) call Honeywell Customer Care at 1-800-468-1502. Customer Care will
make the determination whether the product should be returned to the
following address: Honeywell Return Goods, Dock 4 MN10-3860,
1885 Douglas Dr N, Golden Valley, MN 55422, or whether a replace-
ment product can be sent to you.
This warranty does not cover removal or reinstallation costs. This warranty
shall not apply if it is shown by Honeywell that the defect or malfunction was
caused by damage which occurred while the product was in the possession
of a consumer.
Honeywell's sole responsibility shall be to repair or replace the product
within the terms stated above. HONEYWELL SHALL NOT BE LIABLE FOR
ANY LOSS OR DAMAGE OF ANY KIND, INCLUDING ANY INCIDENTAL
OR CONSEQUENTIAL DAMAGES RESULTING, DIRECTLY OR INDI-
RECTLY, FROM ANY BREACH OF ANY WARRANTY, EXPRESS OR
IMPLIED, OR ANY OTHER FAILURE OF THIS PRODUCT. Some states do
not allow the exclusion or limitation of incidental or consequential damages,
so this limitation may not apply to you.
THIS WARRANTY IS THE ONLY EXPRESS WARRANTY HONEYWELL
MAKES ON THIS PRODUCT. THE DURATION OF ANY IMPLIED WAR-
RANTIES, INCLUDING THE WARRANTIES OF MERCHANTABILITY AND
FITNESS FOR A PARTICULAR PURPOSE, IS HEREBY LIMITED TO THE
ONE-YEAR DURATION OF THIS WARRANTY. Some states do not allow
limitations on how long an implied warranty lasts, so the above limitation
may not apply to you.
This warranty gives you specific legal rights, and you may have other rights
which vary from state to state.
If you have any questions concerning this warranty, please write Honeywell
Customer Relations, 1985 Douglas Dr, Golden Valley, MN 55422 or call 1-
800-468-1502. In Canada, write Retail Products ON15-02H, Honeywell Lim-
ited/Honeywell Limitée, 35 Dynamic Drive, Scarborough, Ontario M1V4Z9.
If you have any questions about the operation of your thermostat, please go
to www.honeywell.com/yourhome, or call Honeywell Customer Care toll-
free at 1-800-468-1502.
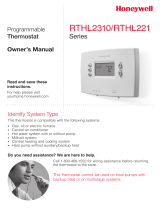
Default schedule settings Monday
to Friday
Saturday
& Sunday
Heating 70°F (21°C)
6:00 a.m. 6:00 a.m.
Cooling 78°F (25.5°C)
Heating 62°F (16.5°C)
8:00 a.m. --
Cooling 85°F (29.5°C)
Heating 70°F (21°C)
6:00 p.m. --
Cooling 78°F (25.5°C)
Heating 62°F (16.5°C)
10:00 p.m. 10:00 p.m.
Cooling 82°F (28°C)
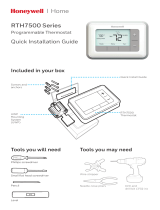
Period start time
Program days
Period number
Temperature
setting
6. Technical Specifications
7. Warranty
8. Customer Assistance
As an ENERGY STAR® partner, Honeywell has determined that this
product meets the ENERGY STAR guidelines for energy efficiency.
Printed in China