


- 1 -
SPECIAL NOTE FOR USERS IN THE U.K.
The mains lead of this product is fitted with a non-rewireable (moulded) plug incorporating a 1.6 A fuse.
Should the fuse need to be replaced, a BSI or ASTA approved BS 1362 fuse marked or and of
the
same rating as above, which is also indicated on the pin face of the plug, must be used.
Always refit the fuse cover after replacing the fuse. Never use the plug without the fuse cover fitted.
In the unlikely event of the socket outlet in your home not being compatible with the plug supplied, cut-
off
the mains plug and fit an appropriate type.
DANGER: The fuse from the cut-off plug should be removed and the cut-
off plug destroyed immediately
and disposed of in a safe manner.
Under no circumstances should the cut-
off plug be inserted elsewhere into a 13 A socket
outlet, as a serious electric shock may occur.
To fit an appropriate plug to the mains lead, follow the instruction below:
IMPORTANT: The wires in the mains lead are coloured in accordance with the following code:
Blue: Neutral
Brown: Live
As the colours of the wires in the mains lead of this product may not correspond with the coloured
markings identifying the terminals in your plug, proceed as follows:
?
The wire which is coloured blue must be connected to the plug terminal which is marked N or coloured
black.
?The wire which is coloured brown must be connected to the plug terminal which is marked L or
coloured red.
Ensure that neither the brown nor the blue wire is connected to the earth terminal in your three-pin plug.
Before replacing the plug cover make sure that:
?If the new fitted plug contains a fuse, Its value is the same as that removed from the cut-off plug.
?The cord grip is clamped over the sheath of the mains lead and not simply over the lead wires.
IF YOU HAVE ANY DOUBT, CONSULT A QUALIFIED ELECTRICIAN.

- 2 -
SAFETY INFORMATION
Power Lead Protection
To avoid any malfunctions of the unit, and to protect against
electric shock, fire or personal injury, please observe the
following,
l Hold the plug firmly when connecting or disconnecting
the AC power lead.
l Keep the AC power lead away from heating
appliances.
l Never put any heavy object on the AC power lead.
l Do not attempt to repair or reconstruct the AC power
lead in any way.
l This player is classified as a CLASS 1 LASER product.
l The CLASS 1 LASER PRODUCT is located on the rear
cover.
l This product contains a low power laser device. To
ensure continued safety do not remove any cover or
attempt to gain access to the inside of the product.
Refer all servicing to qualified personnel.
(Rear of product)
Note:
This unit can be used only where the power supply is
AC 220V-240V, 50/60Hz. It cannot be used
elsewhere.
CAUTION:
USE OF CONTROLS OR ADJUSTMENTS OR
PERFORMANCE OF PROCEDURES OTHER
THAN THOSE SPECIFIED HEREIN MAY RESULT
IN HAZARDOUS RADIATION EXPOSURE.
AS THE LASER BEAM USED IN THIS PLAYER IS
HARMFUL TO THE EYES, DO NOT ATTEMPT TO
DISASSEMBLE THE CABINET. REFER
SERVICING TO QUALIFIED PERSONNEL ONLY.
WARNING:
TO REDUCE THE RISK OF FIRE OR ELECTRIC
SHOCK, DO NOT EXPOSE THIS EQUIPMENT TO
RAIN OR MOISTURE.
TO REDUCE THE RISK OF FIRE OR ELECTRIC
SHOCK, AND ANNOYING INTERFERENCE, USE
THE RECOMMENDED ACCESSORIES ONLY.
Laser Diode Properties
Material: AlGalnP
Wave length: DVD 650 ±15 nm
CD 790 ±20 nm
Emission Duration: Continuous
Laser output: Max. 0.5 mW

- 3 -
SAFETY INFORMATION
Location and Handling
l Do not place your Player in enclosed space or do not
cover it to prevent excessive temperatures inside the
unit.
l Do not place the Player in direct sunlight, or near heat
sources.
l Keep the Player away from magnetic fields, i.e.
loudspeakers etc.
l Do not place any object containing water or other
liquids on the Player. In the event that liquid should
enter the cabinet, unplug the Player immediately and
contact the retailer or service centre approved by
SHARP immediately.
l Do not remove the Player cabinet. Touching parts
inside the cabinet could result in electric shock and/or
damage to the Player. For service and adjustment
inside the cabinet, call a qualified dealer or service
centre approved by SHARP.
Periods of no use
When the unit is not being used, switch the unit to the
Standby mode.
When left unused for a long period of time, the unit should
be unplugged from the household AC socket.
No Fingers or Other Objects Inside
Do not put any foreign object on the disc tray.
Stacking
Place the unit in a horizontal position, and do not place
anything heavy on it.
Condensation
Moisture may form on the pickup lens in the following
conditions:
l Immediately after a heater has been turned on.
l In a steamy or very humid room.
l When the unit is suddenly moved from a cold
environment to a warm one.
If moisture forms inside this unit, it may not operate
properly.
In this case, turn on the power and wait about one hour for
the moisture to evaporate.
Cleaning
Unplug your Player before cleaning. Use a damp cloth for
cleaning. Do not use cleaning fluids or aerosols which
could enter the unit and cause damage, fire, or electrical
shock. These substances may also deteriorate the finish of
your Player.
If there is Noise Interference on the TV While
a Broadcast is being Received
Depending on the reception condition of the TV,
interference may appear on the TV monitor while you watch
a TV broadcast and the unit is left on. This is not a
malfunction of the unit or the TV. To watch a TV broadcast,
turn off the unit.
Service
Do not attempt to service this Player yourself. Please refer
any service to the nearest service centre approved by
SHARP.
Copyright
Recording and playback of any material may require
consent.
Please refer particularly to the provisions of the Copyright
Act 1956, the Dramatic and Musical Performers Protection
Act 1958, the Performers Protection Acts 1963 and 1972
and to any subsequent statutory enactments and orders.
Copy Protection
This DVD video player supports Macrovision copy protection.
On DVDs that include a copy protection code, if the contents of
the DVD are copied using a VCR, the copy protection code
prevents the videotape copy from playing normally.
Recommended Measures for Optimum
Picture Excellence
The unit is a precision device that is constructed using
extremely accurate technology.
Soiling or friction affecting the pickup lens or disc drive can
impair the image quality. In the worst case, neither video or
audio will be played back. To obtain optimum picture quality,
the Player should be checked (cleaning and replacement of
some parts) every 1,000 hours. Note that this period varies
depending on the environment (temperature, humidity, dust,
etc.) in which the Player is used. Contact your authorized
Sharp supplier for details.
Apparatus Claims of U.S. Patent Nos. 4,631,603,
4,577,216, 4,819,098 and 4,907,093 licensed for
limited viewing uses only.
This product incorporates copyright protection
technology that is protected by method claims of
certain U.S. patents and other intellectual property
rights owned by Macrovision Corporation and other
rights owners. Use of this copyright protection
technology must be authorized by Macrovision
Corporation, and is intended for home and other
limited viewing uses only unless otherwise authorized
by Macrovision Corporation Reverse engineering or
disassembly is prohibited.
Do not attempt to clean the pickup lens yourself.

- 4 -
INDEX
SAFETY INFORMATION ..................................................2
INDEX................................................................................4
FEATURES........................................................................5
PACKAGE CONTENTS....................................................6
PRECAUTIONS ................................................................7
DISC CARE.......................................................................8
DISC COMPATIBILITY CHART........................................9
REMOTE CONTROL UNIT.............................................10
FRONT & REAR PANEL/DISPLAY WINDOW ...............12
FRONT PANEL ............................................................. 12
REAR PANEL ............................................................... 12
DISPLAY WINDOW........................................................ 13
CONNECTIONS..............................................................14
VIDEO OUTPUT TERMINALS AND CONNECTIONS .............. 14
AUDIO OUTPUT TERMINALS AND CONNECTIONS .............. 15
INITIAL SETTING ...........................................................16
TV SETUP ................................................................ 16
TV DISPLAY ...................................................................16
TV TYPE ........................................................................16
SCART OUT...................................................................16
AUDIO SETUP.......................................................... 17
AUDIO OUT....................................................................17
DOWN MIX.....................................................................17
DOLBY DIGITAL SETUP........................................... 17
DUAL MONO..................................................................17
DYNAMIC.......................................................................18
AUDIO EFFECT SETUP........................................... 18
AUDIO EFFECT .............................................................18
LINEAR PCM SETUP ............................................... 18
Linear PCM OUT............................................................18
GENERAL SETUP.................................................... 19
ANGLE MARK................................................................19
OSD LANGUAGE...........................................................19
CAPTIONS.....................................................................19
SCREEN SAVER............................................................19
PREFERENCES....................................................... 20
AUDIO ........................................................................... 20
SUBTITLE...................................................................... 20
DISC MENU................................................................... 20
PARENTAL..................................................................... 20
PASSWORD .................................................................. 21
DEFAULTS..................................................................... 21
ON-SCREEN DISPLAY (OSD) ....................................... 22
DVD OSD MODES ...................................................... 22
AUDIO CD/VCD OSD MODES...................................... 22
BASIC OPERATION OF PLAYBACK ............................ 23
START PLAYBACK....................................................... 23
SKIP PLAYBACK.......................................................... 23
STILL/PAUSE PLAYBACK............................................ 23
FAST FORWARD/REVERSE SCAN......................... 24
SLOW-MOTION PLAYBACK ........................................ 24
STOP PLAYBACK ........................................................ 25
ADVANCED OPERATION OF PLAYBACK ................... 26
REPEATED PLAYBACK ............................................... 26
PROGRAM PLAYBACK ............................................... 26
TITLE MENU (DVD ONLY)......................................... 27
DVD MENU (DVD ONLY)........................................... 27
MULTI-ANGLE PLAYBACK .......................................... 27
CHANGING SUBTITLE DURING PLAYBACK .................... 28
CHANGING AUDIO LANGUAGE DURING PLAYBACK...... 28
DIRECT FUNCTION..................................................... 28
VCD PLAYBACK CONTROL (PBC) .......................... 29
MP3 PLAYBACK ............................................................ 30
MP3 COMPATIBLE FORMAT........................................... 30
OPERATION METHOD ................................................... 30
ADDITIONAL INFORMATION........................................ 30
GLOSSARY .............................................................. 32
REGION MANAGEMENT INFORMATION................ 32
LICENSE .................................................................. 32
Dolby License ................................................................ 32
DTS License .................................................................. 32
WARNING................................................................. 32
TROUBLE SHOOTING............................................. 33
SPECIFICATION....................................................... 34

- 5 -
FEATURES
< Compatible With DVD, VCD, Audio CD, and
MP3 Media Format.
This DVD player can play a variety of disc media
including DVD Video, Video CD, Audio CD, and MP3
media format.
< Two SCART Terminals
This DVD player equipped with two SCART terminals
to offer the ability to connect with VCR to TV.
(Loop-Through Interface).
< 2 Channel Analog Audio Output
This DVD player offers one set of down mixed analog
audio output.
< Virtual 3D Surround Sound
This DVD player features the virtual 3D surround
sound effect through standard analog outputs.
< Coaxial Digital Audio Outputs
The DVD player features one coaxial digital audio
output. User selectable SPDIF/RAW and SPDIF/PCM
digital audio maximizes convenience when switching
between DVD and Audio CD playback.
< Dolby® Digital, DTS®, and MPEG Digital
Audio Output Support
This DVD player can send Dolby® Digital, DTS®, and
MPEG Digital audio data via its built-in digital audio
output to an external Dolby® Digital or DTS® or MPEG
Digital decoder.
< High Quality 96kHz/24bit Audio D/A
Converter
This DVD player features a 96KHz/24Bit D/A converter
for superior audio reproduction of encoded discs.
< 10-Bit 27Mhz D/A Video Converter
This DVD player’s 10-bit D/A converter is four times
more accurate than conventional 8-bit converters. The
result is artifact-free and crystal clear video image.
< Auto NTSC and PAL Video Disc
Conversion
This unit can play NTSC and PAL formats discs. This
DVD player can automatically convert either format to
match your TV set. For example, if your TV set is a
PAL system TV and you’re playing a NTSC format disc,
this DVD player will automatically convert the NTSC
format signal to PAL format signal to play on your TV.
< Video Zoom Support
The user selectable digital video zoom-out, zoom-in on
a specific portion of a video image.
< Multi-Speed Fast Forward/Reverse Scan
The digital fast forward/reverse scan function is
capable of scanning with different speeds.
< Multi-Speed Slow Motion Forward /
Reverse Scan
This DVD player offers perfect slow motion scans.
< Volume Control of Analog Audio Output
This DVD player can control the volume of analog
audio output from remote control.
< Auto Power Shut Down Function
This DVD player offers auto power shut down function.
When the player is not in use for 20 minutes, the player
will shut down automatically to save the power
consumption and prolong the life of DVD player.

- 6 -
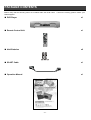
PACKAGE CONTENTS
Please verify that the following items are included within the DVD carton. If items are missing, please contact your
retailer/supplier.
< DVD Player x1
< Remote Control Unit x1
< AAA Batteries x2
< SCART Cable x1
< Operation Manual x1

- 7 -
PRECAUTIONS
Please read the following carefully to get the best and safest performance from this DVD player
< Power Supply
Make sure to use the correct power outlet as rated on
the back of the DVD unit. (AC 220-240 V)
< Power Cord
? Do not put any heavy objects on top of the power cord
to avoid fires or electrical shocks caused by cord
damage.
? Unplug the power cord if the unit will not be used for a
long time.
< Unit Placement
? Do not place this unit in locations with:
ü Vibrations
ü High humidity
ü Poor ventilation
ü Direct sunlight
ü Extremely high or low temperatures
? This unit should be placed on a horizontal surface
only.
? Keep this unit away from television sets, radios,
computers and loudspeakers to avoid magnetic field
interference.
< Usage and Storage
? Do not remove the top cover to avoid possible
electric shock from touching the inside of this unit.
? Do not place any heavy objects on top of this unit.
< Condensation
? Condensation may result from moving the unit from a
cold place to a hot place. Please turn the power on
for 1 to 2 hours before using this unit if condensation
occurs.
< Unit Cleaning
? Clean the front panel and the body of the unit with a
dry soft cloth. Other areas can be cleaned using a
soft cloth moistened with a mild detergent. Do not
clean with evaporative solutions to avoid possible
damage to the unit.

- 8 -
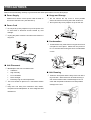
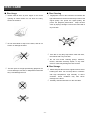
DISC CARE
< Disc Usage
? Please hold all discs by their edges or the centre
opening as shown below. Do not touch the shiny
surface of the discs.
? Do not stick labels or tape on the discs, and do not
scratch or damage the discs.
? The disc spins at a high speed during playback. Do
not use damaged, cracked, or warped discs because
they could damage the unit.
< Disc Cleaning
? Fingerprints or dirt on disc surfaces can weaken the
light reflected from the disc and directly influence the
signal quality. The poorer the signal quality, the
poorer the playback performance. Keep the disc
clean by wiping it straight out from the centre with a
dry soft cloth.
? If the disc is very dirty, wipe with a moist soft cloth,
then follow with a dry soft cloth.
? Do not use record cleaning sprays, benzene,
thinner, anti-static electricity liquids, or any other
solvent. These may damage the disc surface.
< Disc Storage
? Please keep the discs in their original cases to avoid
bending the discs. Do not keep discs in locations
with high temperature, high humidity, or direct
sunshine. These conditions may also cause
damage to the discs.
? Carefully read all instructions on the disc label.

- 9 -
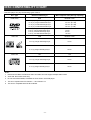
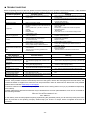
DISC COMPATIBILITY CHART
This DVD player can play the following types of discs:
Disc Type Dimension/Side/Layer Max. Playback Time (Storage Capacity)
DVD MPEG2 TYPE
12 cm (5’’) /single sided/single layer
12 cm (5’’) /single sided/double layer
12 cm (5’’) /double sided/single layer
12 cm (5’’) /double sided/double layer
133 min. (4.7 GB)
242 min. (8.5 GB)
266 min. (9.4 GB)
484 min. (17 GB)
DVD Video
8 cm (3’’) /single sided/single layer
8 cm (3’’) /single sided/double layer
8 cm (3’’) /double sided/single layer
8 cm (3’’) /double sided/double layer
41 min.
75 min.
82 min.
150 min.
VCD MPEG1 TYPE
12 cm (5’’)/single sided/single layer 74 min.
Video CD
8 cm (3’’)/single sided/single layer 20 min.
CD CD
12 cm (5’’)/single sided/single layer 74 min.
Audio CD
8 cm (3’’)/single sided/single layer 20 min.
Notes:
1. DVD and VCD Discs contain both video and audio and can support multiple audio tracks.
2. Audio CD: Discs have audio only.
3. Do not insert DVD-ROMs, CD-ROMs or Photo CDs in this DVD player.
4. This unit complies with VCD Version 1.1 and Version 2.0.
5. This unit is compatible with CD-R & CD-RW.

- 10 -
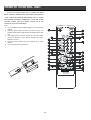
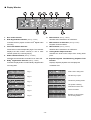
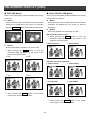
REMOTE CONTROL UNIT
To use the remote control unit to operate the DVD
player, insert two batteries (size AAA) making sure that the
+ and – ends of the batteries are matched to the +/– marks
printed inside the battery compartment. To use the remote
controller, please point the remote control unit at the
remote sensor on the DVD player.
Notes:
i Do not use different types of batteries together, or mix old and new
batteries.
i When the remote control unit does not function correctly or its
operation range reduces, please replace both batteries at the same
time.
i If the remote control unit will be not used for a long time, please
remove the batteries to avoid possible damage from battery
leakage or corrosion.
i Keep the remote controller away from extremely hot or humid
locations.
i Do not open the remote controller unit.

- 11 -
REMOTE CONTROL UNIT
1. OPEN/CLOSE
Opens or closes disc tray.
2. SETUP
Customizes DVD player settings. Refer to p.16.
3. AUDIO
During playback of a DVD disc with more than two
audio languages, this button changes the audio
language played. Refer to p.28.
4. ANGLE
If the DVD disc contains multiple view angles, this
button will change the viewing angle displayed by the
DVD player. Refer to p.27.
5. SUBTITLE
During playback of DVD discs with more than two
subtitle languages, this button toggles between
available subtitle languages. Refer to p.28.
6. VIRTUAL
To enable the virtual audio effect during playback.
Refer to p.18 (Audio Effect Setup).
7. MUTE
To mute the sound of playback.
8. VOCAL
To switch the output audio in MONO LEFT, MONO
RIGHT, and STEREO modes during DVD, VCD, and
Audio CD playback.
9. A-B REPEAT
Displays A-B REPEAT playback. Refer to p.26.
10. TITLE
Enters the title menu for DVD discs. Refer to p.27
11. 3
Used for navigation within a selection menu
12. VOL
Reduce the volume of analog audio output.
13. SLOW
Engages slow-motion forward/reverse playback.
Refer to p.24.
14. STILL/PAUSE
Still/Pause the playback and enters into step mode
where the video can be advanced frame by frame.
Refer to p.23.
15.
9
SKIP
Goes back to the previous chapter during play. Refer
to p.23.
16.
7
REV
Fast reverse scan during playback. Refer to p.24.
17. FWD
8
Fast forward scan during playback. Refer to p.24.
18. SKIP
:
Skips to the next chapter during playback. Refer to
p.23.
19. STOP
Stops playback. Refer to p.25.
20. DISPLAY
On-Screen display of the DVD player’s operational
status. Refer to p.22.
21. 6
Used for navigation within a selection menu.
22. VOL
Increase the volume of analog audio output.
23. ENT/PLAY
Confirms selection of an item in the menu or starts
playing the disc.
24. 4
Used for navigation within a selection menu.
25. 5
Used for navigation within a selection menu.
26. MENU
Some DVDs have complex submenus. This button
allows access to these submenus. Refer to p.27.
27. REPEAT
Shows repeat playback for one title, or all titles on the
disc. Refer to p.26.
28. DIRECT
Enables search mode by title/chapter and time. Refer
to p.28.
29. Digits
Used for direct selection of menu choices, audio tracks,
and other inputs such as time and password
30. ZOOM
Enters the zoom mode during playback.
31. PBC
The button turns on/off the Playback Control (PBC)
function during VCD playback. Refer to p.29.
32. PROGRAM
Displays program playback for VCD/Audio CD. Refer
to p.26.
33. OPERATE
Turns on/off the DVD player unit.

- 12 -
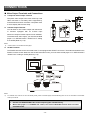
FRONT & REAR PANEL/DISPLAY WINDOW
< Front Panel
1. OPERATE Switch Button
Turns the unit’s power on and off.
2. OPEN/CLOSE Button
Opens or closes the disc tray.
3. Disc Tray
To place DVD, VCD, Audio CD, and MP3 discs on.
4. STOP Button
Stops playback.
5. PLAY Button
Plays the inserted disc.
6. STANDBY Indicator
LED Indicator of Standby mode.
7. Display Window
Displays operation information.
8.
9
SKIP Button
Goes to the previous chapter/track during playback with
DVD/VCD/Audio CD. It functions as “Go to the previous page” in the
PBC menu with VCD discs.
9.
7
REV Button
Reverse scan.
10. FWD
8
Button
Forward scan.
11. SKIP
:
Button
Goes to the next chapter/track during playback with
DVD/VCD/Audio CD. It functions as “Go to the next page” in the
PBC menu with VCD discs.
< Rear Panel
1. Composite Video Output Jack
2. S-Video Output Jack
3. R/L Audio Output Jacks
4. Coaxial Digital Audio Output Jack
5. AV1 (TV) (SCART1)
6. AV2 (SCART2)

- 13 -
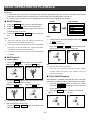
< Display Window
1. Disc inside indicator
2. DTS® Digital Audio Indicator (See Fig. 1 below)
Indicates the disc played contains DTS® Digital audio
encoding.
3. Title/Track Number Indicator
Some DVDs contain multiple title pages. This indicator
displays the title number currently in use or track
number (Audio CD) currently playing.
4. Audio CD/VCD Indicator (See Fig. 2-3 below)
Identifies the inserted disc as Audio CD or Video CD.
5. Dolby® Digital Audio Indicator (See Fig. 4 below)
Indicates the played disc contains Dolby® Digital audio
encoding data.
6. DVD Indicator (See Fig. 4 below)
Identifies the inserted disc as a DVD disc.
7. PBC Indicator for VCD Disc (See Fig. 5 below)
Playback Control indicator.
8. MP3 Indicator (See Fig. 6 below)
Identifies the inserted disc as a MP3 disc.
9. Analog Audio Output Indicator
Indicates the audio sound output from analog audio
jacks.
10. Elapsed Playback Time/Remaining Playback Time
Indicator
Displays elapsed playback time and playback
remainder time.
DVD TITLE is being read.
The disc tray is open.
The disc tray is being closed.
The system is loading
information from the disc.
No disc is loaded.
Bad disc or Wrong region
disc is being loaded.
Fig. 1
Fig. 2
Fig. 3
Fig. 4
Fig. 5
Fig. 6

- 14 -
CONNECTIONS
< Video Output Terminals and Connections
l Composite Video Output Terminal
Composite video output is the most commonly used
video connection in use today and is supported by
most televisions and A/V receivers. Composite video
is set to display without user setup.
l S-Video Output Terminal
You will want to use S-video output with televisions
or monitors equipped with an S-video input
whenever component video inputs are not available.
To activate the S-video output, you must set the DVD
player’s “TV SETUP PAGE”/ “SCART OUT” setting
to S-VIDEO (Refer to p.16).
NOTE:
i S-video cable is not included with this player.
l SCART Terminal
The SCART terminal can be connected to the TV set equipped with SCART connectors. The audio transmitted on the
SCART is stereo sound. Whenever the SCART terminal is used, you must set the DVD player’s “TV SETUP PAGE”/
“SCART OUT” setting to “RGB” (Refer to p.16).
NOTE:
i For selected TVs, when the TV set is at standby mode, power on the DVD player will automatically power on the TV and switch to the SCART
video input channel.
WARNING:
1. S-Video and SCART/RGB video cannot output signals simultaneously.
2. When DVD player is in POWER OFF status, the LOOP THROUGH function does not work
with RGB mode.

- 15 -
< Audio Output Terminals and Connections
l Down-Mixed Audio Output Terminals (L/R)
Use down-mixed (stereo) audio output terminals for
connection with your television or other non-Dolby®
Digital A/V receivers or amplifiers. These terminals
provide down-mixed Dolby® Digital audio signals for
standard 2-channel playback.
l Coaxial Digital Audio Output Terminals
Use digital audio outputs for connection with an
external Dolby® Digital or DTS® decoder. To use the
coaxial output, you will need to purchase a coaxial
cable.
Note:
i Digital cable is not included with this player.

- 16 -
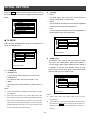
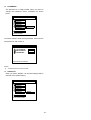
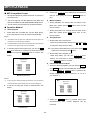
INITIAL SETTING
Press the SETUP button on the remote controller to set up
the initial setting. The On-Screen Display (OSD) will display
below:
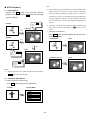
< TV SETUP
There are three available items: They are TV DISPLAY, TV
TYPE, and SCART OUT.
l TV DISPLAY
? NORMAL/PS
4:3 Pan & Scan video output for a normal TV set
? NORMAL/LB
4:3 Letterbox video output for a normal TV set
? WIDE
16:9 Wide Screen video output for a wide screen TV
set
NOTES:
i Aspect ratios available for playback will be printed on the DVD
rear packaging.
i Some DVDs are recorded in the Cinema Wide format (16:9
aspect ratio), and some are recorded in the standard format (4:3
aspect ratio). Some DVD discs are recorded in both formats and
may have the Pan Scan feature available. The Pan Scan feature if
available will fill the entire screen in 4:3 TV screen. However, it will
cut some of the picture off at the two sides.
l TV TYPE
? MULTI
The DVD player will choose the correct system to
display the playback of inserted disc.
? NTSC
The DVD player will output in NTSC format regardless
of what format the disc was designed for.
? PAL
The DVD player will output in PAL format regardless of
what format the disc was designed for.
l SCART OUT
The SCART OUT terminal has three kinds of output
ways; they are COMPOSITE, RGB, and S-VIDEO. If
you are using S-video output, please set this setting to
“S-VIDEO”. If you are using SCART output, you can
choose one of these three kinds output ways, which
matches with your TV’s SCART input.
NOTES:
i SCART video output and S-Video output cannot be used
simultaneously.
i The changes of TV output can be made with the disc tray opened
status. Press the DISPLAY button on the remote control and the TV
output will be changing in turn as COMPOSITE ßà RGB ßà
S-VIDEO
- - TV SETUP PAGE - -
TV DISPLAY
TV TYPE MULTI
SCART OUT NTSC
PAL
MAIN PAGE
SET TV STANDARD
SETUP MENU - - MAIN PAGE
TV SETUP
AUDIO SETUP
DOLBY DIGITAL SETUP
AUDIO EFFECT SETUP
LPCM SETUP
GENERAL SETUP
PREFERENCES
EXIT SETUP
GOTO TV SETUP
- - TV SETUP PAGE - -
TV DISPLAY NORMAL/PS
TV TYPE NORMAL/LB
SCART OUT WIDE
MAIN PAGE
SET TV DISPLAY MODE
- - TV SETUP PAGE - -
TV DISPLAY
TV TYPE
SCART OUT COMPOSITE
RGB
MAIN PAGE S-VIDEO
SET TV OUTPUT

- 17 -
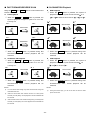
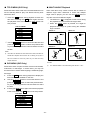
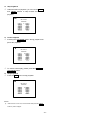
< AUDIO SETUP
There are two available items: They are AUDIO OUT and
DOWN MIX.
l AUDIO OUT
You can choose to send the player’s audio signals to an
external receiver using the following outputs:
? ANALOG:
Audio signals are sent using stereo (L/R) audio
terminals. Selecting this choice will disable the digital
audio outputs.
? BITSTREAM:
Set to this selection will output the raw bit stream
signal of Dolby® Digital or DTS from the coaxial jack.
In order to enjoy Dolby® Digital DTS discs, this unit’s
digital output jack must be connected to the
digital-input jack of a Dolby® Digital or DTS compatible
receiver or processor.
? D-PCM:
PCM stands for Pulse Code Modulation and is digital
audio. Connecting this unit to an amplifier with a
built-in D/A converter can play the same digital audio
format as on CDs. Additionally, 2-channel analog
audio will output from the audio output jacks of
amplifier.
NOTES:
i Analog and digital audio signals cannot output simultaneously.
i Do not play the Dolby® Digital or DTS® or MPEG audio sound tracks
on an audio component without having a built-in Dolby® Digital or
DTS or MPEG audio decoder. Otherwise, when you play the Dolby®
Digital or DTS or MPEG audio sound track, a loud noise will come
out from the speakers, affecting your ears or causing the speakers
to be damaged.
i This player has a conversion function for converting Dolby® Digital
and MPEG audio into the LPCM format. This allows playback of
CDs with the regular playback system without the need for a special
converter.
l DOWN MIX
? Pro Logic
Please connect to a built-in Dolby Pro Logic receiver or
amplifier to enjoy the Dolby Pro Logic surround sound.
? STEREO
Down mixed Stereo L/R audio output.
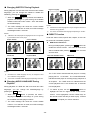
< DOLBY DIGITAL SETUP
There are two available items: They are DUAL MONO and
DYNAMIC.
l DUAL MONO
There are four available modes: STEREO, L-MONO,
R-MONO, and MIX-MONO.
Audio output description
MODE LEFT SPEAKER RIGHT SPEAKER
STERO STEREO -L STEREO -R
L-MONO
L-MONO L-MONO
R-MONO
R-MONO R-MONO
MIX-MONO
L-MONO+R-MONO L-MONO+R-MONO
- - AUDIO SETUP PAGE - -
AUDIO OUT
DOWNMIX Pro Logic
STEREO
MAIN PAGE
SET DOWNMIX MODE
- - DOLBY DIGITAL SETUP - -
DUAL MONO STEREO
DYNAMIC L-MONO
R-MONO
MAIN PAGE MIX-MONO
DUAL MONO (1 + 1) SETUP
- - AUDIO SETUP PAGE - -
AUDIO OUT ANALOG
DOWNMIX BITSTREAM
D-PCM
MAIN PAGE
SELECT AUDIO OUTPUT

- 18 -
l DYNAMIC
“Dynamic Range” is the difference between the
maximum level and the minimum level of sounds.
Sounds on a movie originally designed for movie
theaters feature a very wide dynamic range, so
sometimes it is not suitable for home use. Depending
on the condition of your listening environment, Dynamic
Range function can reduce the instant sound effect
alteration of the movie while playing back. When seeing
movies in the night, turn this function on to avoid the
suddenly loud sound to influence your neighbors.
(Default value is FULL, no compression to be done.)
NOTES:
i This function works only during playback of Dolby® Digital recorded
discs.
i The level of Dynamic Range Reduction may differ depending on
the DVD discs.
< AUDIO EFFECT SETUP
l AUDIO EFFECT
This player offers the audio effect function. This function
is available when setting to “ON” position and then
press the VIRTUAL button on the remote control to open
this function during playing back. There are four steps
of effect level.
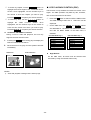
< LINEAR PCM SETUP
This option sets the audio output format sent using the
unit’s coaxial digital audio output.
l Linear PCM OUT
? LPCM 48K
In the Linear PCM setting, “48K” means “the digital
audio output maximum sampling rate is 48KHz”;
therefore, when the title’s encoding sampling rate* is
96KHz, the output will be forced converted to 48KHz.
? LPCM 96K
If “96K” is selected, then the maximum output
sampling rate is 96KHz and no conversion will take
place.
DISC CODING AND OUTPUT FORMAT
Disc
Audio encoding format
Digital output format
Dolby® Digital
Dolby® Digital Bit stream
(1~5.1 ch) or 48kHz/16bits
2ch Linear PCM
DTS® Bit stream (1~5.1 ch) or OFF
Linear PCM
(48/96kHz, 24bits)
Linear PCM
(48KHz/16 bits up to
96kHz/24bits)
DVD
MPEG PCM (2ch) (48KHz/16 bit) or
MPEG audio bit stream (1-7.1 ch)
Video
CD
MPEG I Linear PCM (44.1KHz sampling)
Audio
CD
Linear PCM Linear PCM (44.1kHz/16bit)
NOTES:
i Sampling rate:
When a sound wave is converted to a digital signal, the sound is
sampled and converted to data at a specific frequency rate. For
example, a signal with a 96 kHz sampling rate indicates that in one
second, the analog signal was sampled 96000 times to produce
the digital signal.
i In LPCM set-up menu, there will be a case that even when “LPCM
96K” is selected, output signal is converted to 48KHz if the disc has
the copy guard management system in it.
- - LPCM SETUP PAGE - -
LPCM OUT LPCM 48K
LPCM 96K
MAIN PAGE
SET LPCM OUTPUT TO 48K OR 96K
- - AUDIO EFFECT PAGE - -
AUDIO EFFECT
OFF
ON
MAIN PAGE
SET AUDIO EFFECT MODE
- - DOLBY DIGITAL SETUP - -
DUAL MONO
DYNAMIC
MAIN PAGE
DYNAMIC RANGE COMPRESSION
FULL
6/8
4/8
2/8
OFF
Page is loading ...
Page is loading ...
Page is loading ...
Page is loading ...
Page is loading ...
Page is loading ...
Page is loading ...
Page is loading ...
Page is loading ...
Page is loading ...
Page is loading ...
Page is loading ...
Page is loading ...
Page is loading ...
Page is loading ...
Page is loading ...
-
 1
1
-
 2
2
-
 3
3
-
 4
4
-
 5
5
-
 6
6
-
 7
7
-
 8
8
-
 9
9
-
 10
10
-
 11
11
-
 12
12
-
 13
13
-
 14
14
-
 15
15
-
 16
16
-
 17
17
-
 18
18
-
 19
19
-
 20
20
-
 21
21
-
 22
22
-
 23
23
-
 24
24
-
 25
25
-
 26
26
-
 27
27
-
 28
28
-
 29
29
-
 30
30
-
 31
31
-
 32
32
-
 33
33
-
 34
34
-
 35
35
-
 36
36


