Page is loading ...

Acuvim II Series Power Meter
AXM WEB2
User's Manual

www.accuenergy.com
V: 2.0 Revised: Dec. 2018
II
Copyright © 2018 V2.00
This manual may not be altered or reproduced in whole or in part by any means
without the expressed written consent of Accuenergy.

www.accuenergy.com
V: 2.0 Revised: Dec. 2018
1
The information contained in this document is believed to be accurate at the time of publica-
tion, however, Accuenergy assumes no responsibility for any errors which may appear here and
reserves the right to make changes without notice. Please ask the local representative for latest
product specications before ordering.
Please read this manual carefully before installation, operation and maintenance of the Acuvim
II series meter. The following symbols in this manual are used to provide warning of danger or
risk during the installation and operation of the meters.
Electric Shock Symbol: Carries information about procedures which must be
followed to reduce the risk of electric shock and danger to personal health.
Safety Alert Symbol: Carries information about circumstances which if not
considered may result in injury or death.
Prior to maintenance and repair, the equipment must be de-energized and grounded. All main-
tenance work must be performed by qualied, competent accredited professionals who have
received formal training and have experience with high voltage and current devices. Accuenergy
shall not be responsible or liable for any damages or injuries caused by improper meter installa-
tion and/or operation.

www.accuenergy.com
V: 2.0 Revised: Dec. 2018
2
Table of Contents
1. Introduction to Ethernet ...........................................................4
2. Functional Description of the Ethernet module
....................4
3. Appearance and Dimensions
...................................................5
4. Installation Method
...................................................................6
5. Denition of RJ45
.......................................................................7
6. Initializing the Ethernet module
..............................................8
7. Cable
..........................................................................................16
8. Connection Method
.................................................................17
8.1 Direct Connect to a Computer .............................................................17
8.2 Direct Connect to a Router/Switch
......................................................20
8.3 Connect through WiFi
............................................................................21
9. Description of Modbus-TCP Protocol ....................................23
9.1 Protocol ...................................................................................................23
9.1.1 Data Frame Format .........................................................................................23
9.1.2 Modbus Application Header (MBA Header) Field
........................................ 23
9.1.3 Function Field
...................................................................................................24
9.1.4 Data Field
..........................................................................................................24
9.2 Format of communication .....................................................................25
9.2.1 Explanation of frame......................................................................................25
9.2.2 Read Status of Relay (Function code 01)
.....................................................26
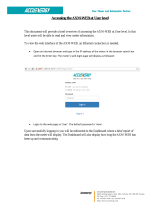
10. Web Interface Readings and Parameter Settings ..............31
10.1 User Access Login .................................................................................31
10.2 Dashboard
.............................................................................................32

www.accuenergy.com
V: 2.0 Revised: Dec. 2018
3
10.3 Metering web page ...............................................................................33
Basic Metering ...........................................................................................................33
Power & Energy
......................................................................................................... 34
Min/Max
.....................................................................................................................35
THD
............................................................................................................................. 35
Harmonics
..................................................................................................................36
Phase Angles
.............................................................................................................37
Sequence
...................................................................................................................38
I/O
...............................................................................................................................39
10.4 Logs.........................................................................................................40
Trendlog ..................................................................................................................... 40
Data Log
.....................................................................................................................41
Alarm Log
................................................................................................................... 42
SOE Log
......................................................................................................................42
Waveform Log
...........................................................................................................43
10.5 About ......................................................................................................44
10.6 Setting
....................................................................................................44
Meter ..........................................................................................................................44
Communications
....................................................................................................... 46
Network
......................................................................................................46
Email
...........................................................................................................49
Time/Date
..................................................................................................52
Data Log
.....................................................................................................54
Post Channel..............................................................................................56
AcuCloud
.................................................................................................... 60
BACnet/IP
................................................................................................... 61
SNMP
..........................................................................................................63
DNP
.............................................................................................................65
Management
.............................................................................................................67
Network Diagnostic
..................................................................................................68
Module Firmware
......................................................................................................68

AXM-WEB2 for Acuvim II Series Power Meter
www.accuenergy.com
V: 2.0 Revised: Dec. 2018
4
1. Introduction to Ethernet
Ethernet was originally developed by Xerox and then further developed by DEC and Intel.
This networking technology uses Carrier Sense Multiple Access with Collision Detection
(CDSM/CD) protocol and provides transmission speeds up to 100Mbps.
Ethernet is a not a network but more of a standard. It is the most current communication
standard Local Area Network(LAN). This standard denes the type of cable that is used and
the method of Signal Processing.
2. Functional Description of the Ethernet module
Please read the Technical Data and specications of the Ethernet module in the Appendix
prior to using it.
The AXM-WEB2 module supports the Modbus-TCP protocol. When connected to the Acuvim
II series meter, it is a slave device that can only respond to queries. The default value for the
Modbus Port is 502. The user dened range is 2000~5999.
The AXM-WEB2 supports the SMTP protocol. It has the ability to send emails based on a
time interval or when there is a triggered event. It can send mail from encrypted servers and
servers that use dierent SMTP ports.
The AXM-WEB2 protocol supports HTTPS protocol. It is used as an HTTPS server and the de-
fault value of the protocol port in 443.
Using the HTTPS protocol, the AXM-WEB2 can send post requests to both HTTP and HTTPS
servers.

www.accuenergy.com
V: 2.0 Revised: Dec. 2018
5
3. Appearance and Dimensions
22mm
(Side View)
(Top View)
55.6mm
90mm
Bottom View)
Chapter 3: Appearance and Dimensions

AXM-WEB2 for Acuvim II Series Power Meter
www.accuenergy.com
V: 2.0 Revised: Dec. 2018
6
4. Installation Method
The AXM-WEB2 module is linked to the Acuvim II series meter by a communication plug.
Other extended modules such as the IO modules can be linked to the Acuvim II series
meter through the AXM-WEB2.
1. Remove cover from the back of the Acuvim II series meter which will expose the
socket.
2. Insert the installation clips to the grooves in the Acuvim II series meter and then
press the AXM-WEB2 module lightly to establish a linking between meter and mod-
ule.
3. Tighten the installation screws.
Note: Installation with power to the meter is forbidden.

www.accuenergy.com
V: 2.0 Revised: Dec. 2018
7
5. Denition of RJ45
The AXM-WEB2 uses two standard RJ45 connectors to access the Ethernet network. The
mechanical and electrical characteristics of the connector are consistent with the require-
ments of IEC 603-7.
Top View
Pin number Name Description
1 TX+ Tranceive Data+
2 TX- Tranceive Data-
3 RX+ Receive Data+
4 n/c Not connected
5 n/c Not connected
6 RX- Receive Data-
7 n/c Not connected
8 n/c Not connected
LED_L (Yellow): Displays the speed status. When the LED is on it indicates 100Mpbs,
whiles an o LED represents a speed of 10Mbps.
LED_R (Green): Displays the link and activity status. When the LED is on it indicates
that the link status. When the LED is ashing it indicates that there is activity.
Chapter 5: Denition of RJ45

AXM-WEB2 for Acuvim II Series Power Meter
www.accuenergy.com
V: 2.0 Revised: Dec. 2018
8
6. Initializing the Ethernet module
The default settings in the Acuvim II series meter are as followed:
Ethernet 1 (Static IP address)
IP Address (192.168.1.254);
Subnet Mask (255.255.255.0);
Gateway (192.168.1.1);
DNS Server 1 (8.8.8.8);
DNS Server 2 (8.8.4.4);
Modbus Port 502
Ethernet 2 (Dynamic IP address)
This information can be found by using the buttons from the meter display. The following
is how to congure the Ethernet module settings from the display:
• Press the 'H' and 'V/A' buttons simultaneously on the Acuvim II series. Release the buttons
and the meter will enter the meter selecting mode, as indicated by the ashing 'Meter' cur-
sor.

www.accuenergy.com
V: 2.0 Revised: Dec. 2018
9
• Press the 'P' or 'E' button to move the cursor to 'Setting'. Press 'V/A' button to enter the pa-
rameter setting mode. The device address page is the rst page of the 'Setting' mode. It will
show the Modbus address of the meter for a second before prompting for the password of
the device. Press 'V/A' button to conrm password and enter the parameter setting page.
Press the 'P' or 'E' button to move the cursor to 'NET' and press the 'V/A' button to enter
the Ethernet module settings.
Chapter 6: Initializing the Ethernet module

AXM-WEB2 for Acuvim II Series Power Meter
www.accuenergy.com
V: 2.0 Revised: Dec. 2018
10
• The rst page of the NET Settings will be the N01 DHCP setting. By default this is congured
to Manual. Setting this conguration to Auto will allow the router to assign the meter with
an IP address, whiles Manual will allow the user to congure the IP address. Press the 'V/A'
button to enter edit mode. Press 'P' or 'E' to change the setting and press 'V/A' to conrm.
Note: If the DHCP is selected as Auto, the Ethernet module needs to be rebooted before it can
be assigned with the new IP address.

www.accuenergy.com
V: 2.0 Revised: Dec. 2018
11
• Press 'P' to get to "N02 IP address" This is the IP address of the meter and will be the IP ad-
dress to access the web interface of the module. Users can congured the IP address if the
DHCP is congured to Manual. Press 'V/A' to congure the IP address. The cursor of the rst
digit will begin to ash. Press the 'H' button to scroll through the digits, press the 'P' or 'E'
to change the value of the ashing cursor and press 'V/A' to conrm.
• Press 'P' to get to "N03 Subnet Mask". Press 'V/A' to congure the subnet address. The cur-
sor of the rst digit will begin to ash. Press the 'H' button to scroll through the digits, press
the 'P' or 'E' to change the value of the ashing cursor and press 'V/A' to conrm.
Chapter 6: Initializing the Ethernet module

AXM-WEB2 for Acuvim II Series Power Meter
www.accuenergy.com
V: 2.0 Revised: Dec. 2018
12
• Press 'P' to get to "N04 Gateway". Press 'V/A' to congure the gateway IP address. The cur-
sor of the rst digit will begin to ash. Press the 'H' button to scroll through the digits, press
the 'P' or 'E' to change the value of the ashing cursor and press 'V/A' to conrm.
• Press 'P' to get to "N05 DNS Primary Server". Press 'V/A' to congure the DNS address. The
cursor of the rst digit will begin to ash. Press the 'H' button to scroll through the digits,
press the 'P' or 'E' to change the value of the ashing cursor and press 'V/A' to conrm. The
DNS parameters must be set correctly to use the SMTP, FTP/HTTP Post and AcuCloud func-
tions.

www.accuenergy.com
V: 2.0 Revised: Dec. 2018
13
• Press 'P' to get to "N06 DNS Secondary Server". Press 'V/A' to congure the DNS address.
The cursor of the rst digit will begin to ash. Press the 'H' button to scroll through the dig-
its, press the 'P' or 'E' to change the value of the ashing cursor and press 'V/A' to conrm.
• Press 'P' to get to "N07 Modbus Port". Press 'V/A' to congure the Modbus Port. The cursor
of the rst digit will begin to ash. Press the 'H' button to scroll through the digits, press
the 'P' or 'E' to change the value of the ashing cursor and press 'V/A' to conrm.
Chapter 6: Initializing the Ethernet module

AXM-WEB2 for Acuvim II Series Power Meter
www.accuenergy.com
V: 2.0 Revised: Dec. 2018
14
• Press 'P' to get to "N08 HTTP Port". Press 'V/A' to congure the HTTP Port. The cursor of the
rst digit will begin to ash. Press the 'H' button to scroll through the digits, press the 'P'
or 'E' to change the value of the ashing cursor and press 'V/A' to conrm.
• Press 'P' to get to "N09 NET REST". After making any changes to the NET settings, users
must reboot the Ethernet module from this page for the settings to take eect. Press 'V/A'
to reboot the module, the cursor will begin to ash. Press the 'P' or 'E' button to change
the setting to 'Reset' and press 'V/A' to conrm. The cursor will return to 'No' once success-
ful.

www.accuenergy.com
V: 2.0 Revised: Dec. 2018
15
• Press 'P' to get to "N10 PASSREST". Press 'V/A' to congure the password reset. The cursor
of the rst digit will begin to ash. Press the 'P' or 'E' button to change the setting to 'Re-
set' and press 'V/A' to conrm. The cursor will return to 'No' once successful.
• Press 'P' to get to "N11 WiFi" This is the IP address of WiFi and will be the IP address to
access the web interface of the module by using WiFi connection. Press 'V/A' to congure
the IP address. The cursor of the rst digit will begin to ash. Press the 'H' button to scroll
through the digits, press the 'P' or 'E' to change the value of the ashing cursor and press
'V/A' to conrm.The module will appear in the WiFi network as AXM-WEB2-WIFI-(serial num-
ber of module) as the SSID or name of the wireles network.By default, the network key or
password will be ''accuenergy''.
Chapter 6: Initializing the Ethernet module

AXM-WEB2 for Acuvim II Series Power Meter
www.accuenergy.com
V: 2.0 Revised: Dec. 2018
16
• Press 'P' to get to 'N12 IP2'. This is the IP address for Ethernet port 2, it is preset as dynamic
DHCP. A new IP address will be assigned to it when it is connected to the internet via Ether-
net port 2.
7. Cable
An RJ45 cable is needed to connect the meter to the network. A shielded twisted pair cable(-
standard 568A or standard 568B) is recommended as reference to the EIA/TIA standard.

www.accuenergy.com
V: 2.0 Revised: Dec. 2018
17
Chapter 8: Connection Method
8. Connection Method
8.1 Direct Connect to a Computer
The AXM-WEB2 can be connected to a computer using a crossover cable(standard 568A). The
AXM-WEB2 module supports Modbus-TCP and HTTPS Functions for this method of connection.
To connect meter directly to the computer, the following can be done using a computer run-
ning the Windows OS:
• Manually connect the meter via Ethernet cable to the computer
• Right click on the connection icon
• Select "Open Network Sharing Center"

www.accuenergy.com
V: 2.0 Revised: Dec. 2018
18
AXM-WEB2 for Acuvim II Series Power Meter
• Click on Change adapter options
• Once there, right click on the local area connection icon and click properties.
/