Page is loading ...

operation manual

2
table of contents
Introduction
4 Using the Operators Manual
Product Identification
5 Inverter Generator
Safety
6 Safety Rules
6 Hazard Symbols and Meanings
Inverter Generator Components
11 Component Chart
Pre-Operation Checklist
12 Engine Oil
12 SAE Viscosity Grades
13 Fuel
14 Air Cleaner
Starting the Inverter Generator
15 Starting Your Inverter Generator
Operation
17 High Altitude Operation
17 General Operation
18 AC Application
19 Output and Overload Indicators
21 DC Applications
Starting the Engine
23 Starting the Engine
23 Oil Alert System
Stopping the Engine
24 Stopping the Engine
Maintenance
25 Maintenance Schedule
26 Engine Oil Replacement
27 Air Cleaner Service
28 Spark Plug Servicing

3
table of contents
Introduction
4 Using the Operators Manual
Product Identification
5 Inverter Generator
Safety
6 Safety Rules
6 Hazard Symbols and Meanings
Inverter Generator Components
11 Component Chart
Pre-Operation Checklist
12 Engine Oil
12 SAE Viscosity Grades
13 Fuel
14 Air Cleaner
Starting the Inverter Generator
15 Starting Your Inverter Generator
Operation
17 High Altitude Operation
17 General Operation
18 AC Application
19 Output and Overload Indicators
21 DC Applications
Starting the Engine
23 Starting the Engine
23 Oil Alert System
Stopping the Engine
24 Stopping the Engine
Maintenance
25 Maintenance Schedule
26 Engine Oil Replacement
27 Air Cleaner Service
28 Spark Plug Servicing
Transporting and Storage
30 Transporting and Storage
30 When Transporting the Generator
30 Before Storing the Unit for an Extended Period
Spark Arrest Service
31 Spark Arrest Service
Troubleshooting
32 Engine will not start
33 The Equipment that connects to the
Generator doesn’t start
33 There is no power in the DC Electric Outlet
34 Deficient AC Output
Specifications
35 Size and Weight
35 Engine
35 Generator
Wiring Diagram
36 Wiring Diagram
Exploded Parts View
37 Exploded Parts View I2500
Parts List
38 Parts List I2500
Exploded Parts View
40 Exploded Parts View I3500
Parts List
41 Parts List I3500

4
introduction
Using the Operator’s manual
The operating manual is an important part of your generator and should
be read thoroughly before initial use, and referred to often to make sure
adequate safety and service concerns are being addressed.
Reading the owner’s manual thoroughly will help avoid any personal injury
or damage to your machine. By knowing how best to operate this
machine you will be better positioned to show others who may also
operate the unit.
This manual contains information for the complete range of BE
generators, and was written to take you from the safety requirements
to the operating functions of your machine. You can refer back to the
manual at any time to help troubleshoot any specific operating functions,
so store it with the machine at all times.
Attention: Read through the complete
manual prior to the initial use of your
generator.

5
product identification
Record Identification Numbers
Generator
If you need to contact an Authorized Dealer or Customer Service line (1-
866-770-1711) for information on servicing, always provide the
product model and identification numbers.
You will need to locate the model and serial number for the machine and
record the information in the places provided below.
Date of Purchase:
Dealer Name:
Dealer Phone:
Product Identification Numbers
Model Number:
Serial Number:

6
The safety alert symbol ( ) is used with a signal word (DANGER,
CAUTION, WARNING), a pictorial and/or a safety message to alert you
to hazards.
DANGER indicates a hazard which, if not avoided, will result in death or
serious injury.
WARNING indicates a hazard which, if not avoided, could result in death
or serious injury.
CAUTION indicates a hazard which, if not avoided, might result in minor
or moderate injury.
NOTICE indicates a situation that could result in equipment damage.
Follow safety messages to avoid or reduce the risk of injury or death.
Hazard Symbols and Meanings
Save these Instructions
Safety Rules
safety
This is the safety alert symbol. It is used
to alert you to potential personal injury
hazards. Obey all safety messages that
follow this symbol to avoid possible
injury or death.
explosion
kickback read manual
fire electric shock
toxic fumes

7
safety
WARNING
Generator exhaust contains carbon monoxide, a
poisonous gas that can kill you.
You CANNOT smell or see this gas.
• Use the generator outdoors, away from open windows, vents, or
doors that could allow the carbon monoxide gas to come indoors.
Keep the generator at least 1 meter (3 feet) away from any structure
or building during use.
• NEVER use a generator indoors, including in homes, garages,
basements, crawl spaces, and other enclosed or partially-enclosed
areas, even with ventilation. Opening doors and windows or using
fans will not prevent carbon monoxide build-up in the home.
• NEVER use a generator in enclosed or partially-enclosed spaces.
Generators can produce high levels of carbon monoxide very quickly.
When you use a portable generator, remember that you cannot smell
or see carbon monoxide. Even if you can’t smell exhaust fumes, you
may still be exposed to carbon monoxide.
• NEVER operate the generator in an explosive atmosphere, near
combustible materials or where ventilation is not sufficient to carry
away exhaust fumes. Exhaust fumes can cause serious injury or death.
• If you start to feel sick, dizzy, or weak while using a generator, get
to fresh air RIGHT AWAY. DO NOT DELAY. The carbon monoxide
from generators can rapidly lead to full incapacitation and death.
• If you experience serious symptoms, get medical attention
immediately. Inform medical staff that carbon monoxide poisoning
is suspected. If you experienced symptoms while indoors, have
someone call the fire department to determine when it is safe to
re-enter the building.

8
safety
WARNING
Fuel and its vapors are extremely flammable and
explosive.
Fire or explosion can cause severe burns or death.
When Adding or Draining Fuel
• Observe all safety regulations for the safe handling of fuel. Handle
fuel in safety containers. If the container does not have a spout, use
a funnel.
• Do not overfill the fuel tank, leave room for the fuel to expand.
• Do not refill fuel tank while the engine is running. Before refueling the
generator, turn it off and let it cool down. Gasoline spilled on hot
engine parts could ignite.
• Fill the tank only on an area of bare ground. While fueling the tank,
keep heat, sparks and open flame away. Carefully clean up any spilled
fuel before starting engine.
• Always fill fuel tank in an area with plenty of ventilation to avoid
inhaling dangerous fumes.
• NEVER store fuel for your generator in the home. Gasoline, propane,
kerosene, and other flammable liquids should be stored outside of
living areas in properly-labeled, non-glass safety containers. Do not
store them near a fuel-burning appliance, such as a natural gas water
heater in a garage. If the fuel is spilled or the container is not sealed
properly, invisible vapors from the fuel can travel along the ground and
can be ignited by the appliance’s pilot light or by arcing from electric
switches in the appliance.

9
safety
WARNING
The GFCI may not function unless the generator is properly
grounded. Follow the correct procedure specified in the section
labeled GROUNDING INSTRUCTIONS.
Ground Fault Circuit Interrupter Protection
These generators are equipped with a GFCI (Ground Fault Circuit
Interrupters) 120V duplex receptacles for protection against the hazards
of electrical shock from defective attachments such as, tools, cords,
and cables.
A GFCI is a device that interrupts electricity from either the utility or
generator by means of a special type of circuit breaker that determines if
a current flow to the ground occurs.
A GFCI can be used only with generators that have the neutral wire
internally bonded to the frame, and the frame properly grounded to the
earth. A GFCI will not work on generators that do not have the neutral
wire bonded to the frame, or on generators which have not been properly
grounded. All BE generators have internally bonded ground wires.

10
safety
safety
DANGER
Improper grounding can result in a risk of electrocu-
tion. Check with a qualified electrician for your local
requirements if you are in doubt as to whether the unit
is properly grounded.
This generator is equipped with a grounding terminal for added
protection. Using the ground path from the generator to an external
ground source as instructed in the section labeled “Grounding
Instructions” in the Preparation section of this manual can be neces-
sary. Please consult a qualified electrician for local regulations.
The generator is a potential source of electrical shock if not kept dry.
Keep the generator dry and do not use in rain or wet conditions. To
protect from moisture, operate it on a dry surface under an open,
canopy-like structure. Dry your hands if wet before touching the
generator.
Plug appliances directly into the generator. Or, use a heavy duty,
outdoor-rated extension cord that is rated (in watts or amps) at least
equal to the sum of the connected appliance loads. Check that the
entire cord is free of cuts or tears and that the plug has all three
prongs,especially a grounding pin.
NEVER try to power the house wiring by plugging the generator into
a wall outlet, a practice known as “back feeding”. This is an extremely
dangerous practice that presents an electrocution risk to utility workers
and neighbors served by the same utility transformer. It also bypasses
some of the built-in household circuit protection devices.
If you must connect the generator to the house wiring to power
appliances, have a qualified electrician install the appropriate
equipment in accordance with local electrical codes.
This product has been designed with internal grounding or floating
bonded neutral. If it should malfunction or breakdown, grounding pro-
vides a path of least resistance for electric current to reduce the risk of
electric shock.

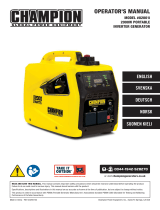
11
Read this operator’s manual and safety
rules before operating your inverter
generator.
components
1. Control Panel
2. Recoil Starter
3. ON/OFF Switch
4. Auto throttle
5. DC Connection
6. DC Breaker
7. 120V Receptacles
8. 120V Receptacles (I2000 only)
8. 120V 3 Prong Twistlock (I3000 only)
9. Ground
10. AC Breaker
11. Output Indicator Light
12. Overload Indicator Warning
13. Oil Alarm Indicator
14. Fuel Cap
15. Air Vent Knob
14.15.
11.
9.
7.
6.
5.
12.
13.
1.
2.
8.3. 4.

12
pre-operation checklist
CAUTION
• Be sure to check the generator on a level surface with the engine
stopped.
• Using non-detergent oil or 2-stroke engine oil could shorten the
engine’s service life.
Engine Oil
Use high-detergent, premium quality 4 –stroke engine oil, certified to
meet or exceed U.S. automobile manufacturer’s requirements for API
Service Classification SG. SF.(15W40)
Select the appropriate viscosity for the average temperature in your area.
SAE Viscosity Grades
1. Loosen the cover screw and remove the left side maintenance cover.
2. Remove the oil filer cap, and wipe the dipstick with a clean rag.
3. Check the oil level by inserting the dipstick in the filler hole without
screwing it in.
4. If the oil level is below the end of the dipstick, refill the recommended
oil up to the top of the oil filler neck.
NOTICE
The Oil Alert System will automatically stop the engine before the oil
level falls below the safe limit. However, to avoid the inconvenience of
an unexpected shutdown, it is still advisable to visually inspect the oil
level regularly.
WARNING
Always check the level of the engine oil prior to starting
the inverter generator.
• Failure to do so could cause the engine to seize if the oil is low or
empty.
single
viscosity
multi
viscosity
0
-20 -10 0 10 20 30 40oC
20 40 60 80 100oF
Ambient Temperature
10W
20W
20
30
40
20W-40-20W-50
15w-40-15w-50
10W-40
100W-30

13
pre-operation checklist
Fuel
1. Turn the fuel cap lever to “OFF” position before transporting.
2. Use automotive fuel (Unleaded or low leaded is preferred to minimize
combustion chamber deposits).
WARNING
DO NOT overfill the tank, leave room for the fuel to
expand.
NOTICE
• Don’t use fuel-containing alcohol: Fuel system damage or engine
performance problems resulting from the use of fuels that contain
alcohol are not covered under the warranty.
• Never use an oil/gasoline mixture or dirty gasoline.
• Avoid getting dirt, dust or water in the fuel tank.
WARNING
Gasoline is extremely flammable and is explosive under
certain conditions.
• Refuel in a ventilated area with engine stopped.
• Keep away from cigarette, smoke and sparks when refueling the
generator.
• Do not overfill the fuel tank. After refueling, make sure the tank cap is
closed properly and securely.
• Be careful not to spill fuel when refueling. Spilled fuel or fuel vapor
may ignite. If any fuel is spilled, make sure the area is dry before
starting the engine.
3. After refueling, tighten the fuel filler cap securely.
Fuel Cap
1)OIL WARNING SYSTEM
When the oil level falls below the lower level, the engine stops automatically.
Unless you refill with oil, the engine will not start again.
2)ENGINE SWITCH
The engine switch controls the ignition system.
① “ON”(run)
Ignition circuit is switched on. The engine can be started.
② “OFF”(stop)
Ignition circuit is switched off. The engine will not run.
3)ECONOMY CONTROL SWITCH
2
1
When the economy control switch is turned “ON”, the economy control unit
control the engine speed according to the connected load. The results are
better fuel connection and less noise.
4)DC CIRCUIT PROTECTOR
The DC circuit protector turns off automatically when the load exceeds the
generator rated output.
2
1
CAUTION: ──────────────────────
zReduce the load to within specified generator rated output if the DC circuit
protector turn off.
───────────────────────────
5)FUEL TANK CAP AIR VENTKNOB
O
FF
O
N
OFF ON
The fuel tank cap is provided with an air vent knob to stop fuel flow. The air vent
knob must be turned 1 turn counterclockwise from the tigened position. This will
allow fuel to flow to the carburetor and the engine to run.
When the engine is not in use, tigten the air vent knob clockwise until it is
finger-tight to stop fuel flow.
4

14
pre-operation checklist
Air Cleaner
Check the air cleaner element to be sure it is clean and in good
condition.
1. Loosen the cover screw and remove the left side maintenance cover.
2. Press the latch tab on the top of the air cleaner body, remove the air
cleaner cartridge, and check the element.
3. Clean or replace the element if necessary.
4. Never run the engine without the air cleaner. Rapid engine wear will
result from contaminants. Such as dust and dirt, being drawn through
the carburetor, into the engine.
5. It is normal for a little oil to appear under the air filter box if the
generator is running for a long period of time, or a lot of oil is in the
engine. Wipe up excess oil after each use and after stopping the
generator.
Air Filter Cover
starting your inverter generator

15
starting your inverter generator
WARNING
Before starting the engine, disconnect any load.
The right choke position is the key to starting the motor. You may have to
practice a few times to use the choke correctly.
Position the choke completely to the right to restart a hot motor.
Position the choke about halfway to restart a warm motor.
1. Turn the fuel cap lever to the ON position.
Air Flow Knob
2. Set the fuel valve in the “ON” –position.
3. To start a cold motor push the choke lever all the way to the left. To
restart a hot motor set the choke lever halfway.
1)OIL WARNING SYSTEM
When the oil level falls below the lower level, the engine stops automatically.
Unless you refill with oil, the engine will not start again.
2)ENGINE SWITCH
The engine switch controls the ignition system.
① “ON”(run)
Ignition circuit is switched on. The engine can be started.
② “OFF”(stop)
Ignition circuit is switched off. The engine will not run.
3)ECONOMY CONTROL SWITCH
2
1
When the economy control switch is turned “ON”, the economy control unit
control the engine speed according to the connected load. The results are
better fuel connection and less noise.
4)DC CIRCUIT PROTECTOR
The DC circuit protector turns off automatically when the load exceeds the
generator rated output.
2
1
CAUTION: ──────────────────────
zReduce the load to within specified generator rated output if the DC circuit
protector turn off.
───────────────────────────
5)FUEL TANK CAP AIR VENTKNOB
O
FF
O
N
OFF ON
The fuel tank cap is provided with an air vent knob to stop fuel flow. The air vent
knob must be turned 1 turn counterclockwise from the tigened position. This will
allow fuel to flow to the carburetor and the engine to run.
When the engine is not in use, tigten the air vent knob clockwise until it is
finger-tight to stop fuel flow.
4
ON
Starting Your Inverter Generator

16
4. Set the motor switch in the “ON’-position.
5. Pull slightly on the start cord until you feel resistance and then yank
hard and swiftly.
starting your inverter generator
NOTICE
A hot motor will not start if there is too much fuel in the cylinder. If
this happens, wait five to ten minutes before trying again. Position the
choke completely to the right and the motor should start.
6. After the engine starts, allow the engine to run continuously to warm up.
7. Press the choke in completely after the engine is started.
CAUTION
• DO NOT let the start cord retract by itself; guide it back by hand.
• Hold the carry handle firmly to prevent the generator from falling over
when you pull the start cord.
NOTICE
If the engine stops and will not restart, check the engine oil level before
troubleshooting in other areas.
Engine Switch
Starting Grip
ON
OFF

17
starting your inverter generator
CAUTION
Operation of the generator at an altitude lower than the carburetor is
jetted for may result in reduced performance, overheating, and serious
engine damage caused by an excessively lean air/fuel mixture.
High Altitude Operation
• At high altitude, the standard carburetor air–fuel mixture will be
excessively rich.
• Performance will decrease, and fuel consumption will increase.
• High altitude performance can be improved by installing a smaller
diameter main fuel jet in the carburetor and readjusting the slow tempo
screws.
• If you always operate the generator at altitudes higher than 1,500 m
(4,000 feet) above sea level, have your dealer perform these carburetor
modifications.
• Even with suitable carburetor jetting, engine horsepower will decrease
approximately 3.5% for each 300m (1,000 feet) increase in altitude. The
effect of altitude on the horsepower will be greater than this if no
carburetor modification is made.
General Operation
WARNING
To prevent electrical shock from faulty appliances , the
generator should be grounded.
• Connect an electric conductor (cable) of at least 1.5mm2 between the
generator’s ground terminal and an external ground source.
• Connections for standby power to a building’s electrical system must be
made by a qualified electrician and must comply with all applicable laws
and electrical codes. Improper connections can allow electrical current
from the generator to back feed into the utility lines. Such back feed may
electrocute utility power is restored; the generator may explode, burn, or
cause fires in the building’s electrical system.
• Do not exceed the current limit specified for any one receptacle
• Do not connect the generator to a household circuit . This could cause
the damage to the generator or to electrical appliances in the house.
• Do not modify or use the generator for other purpose than it is intended
for.
• Do not connect generators in parallel.
• Do not connect an extension to exhaust pipe.
operation

18
operation
• When an extension cable is required, be sure to use a rubber sheathed
flexible cable.
• Limit length of extension cables; 60m for cables of 1.5mm2 and 100m
for cables of 2.5mm2.
• Keep the generator away from other electric cables or wires such as
distribution network.
• The DC receptacle can be used while the AC power is in use. If you use
both at the same time, be sure not to exceed the total power for AC and
DC.
• Most appliance motors require more than their rated wattage for start-up.
AC Application
1. Start the engine and make sure the output indicator light (green)
illuminates.
2. Confirm that the appliance to be used is switched off, and plug in the
appliance.
NOTICE
Substantial overloading that continuously lights the overload indicator
light (red) may damage the generator. Marginal overloading that
temporarily lights the overload indicator light (red) may shorten the
service life of the generator.
NOTICE
Be sure that all appliances are in good working order before connect-
ing them to the generator, if an appliance begins to operate abnormally,
becomes sluggish, or stops suddenly, turn off the generator engine
switch immediately. Then disconnect the appliance, and examine it for
signs of malfunction.
Ouput Indicator Light
Overload Indicator Light
**I2500 Image

19
operation
• When an electric motor is started, both the overload indicator light (red)
and the output indicator light (green) may go on simultaneously. This
is normal if the overload indicator light (red) goes off after about four
seconds.
• If the overload indicator light (red) stays on, consult your dealer.
1. Connect the ground terminal
WARNING
• Before connecting an appliance to the generator,
check that it is in good order, and that its electrical
rating does not exceed that of the generator. Then
connect the power cord of the appliance, and start the
engine.
• Be sure all equipment is turned off before plugging in
the power cord.
Output and Overload Indicators.
• The output indicator light (green) will remain lighted during normal
operating conditions.
• If the generator is overloaded or of here is a short in the connected
appliance, the output indicator light (green) will go OFF, the overload
indicator light (red) will go ON and current to the connected appliance
will be shut off.
• Stop the engine if the overload indicator light (red) switches ON and
investigate the overload source.
Grounding
Terminal
**I2500 Image
**I2500 Image
Output Indicator Light
Overload Indicator Light
Oil Alarm Indicator

20
operation
CAUTION
When the output indicator light (green) does not light and the overload
indicator light (red) lights instead, set the engine switch to STOP, stop
the engine at once and then start the engine again.
WARNING
Check that the equipment to be connected is switch
off. When the equipment to be used is switched on, it
will operate suddenly, and injuries or accidents may be
caused.
2. Start engine according to “STARTING THE ENGINE”
3. Confirm that the equipment to be used is switched off, and insert the
plug of the equipment to be used into the AC receptacle unit A.
NOTICE
When equipment requires a large starting power, the overload indicator
lights (red) and the output indicator light (green) may light together for
a short time, but this is no abnormality. After start of the equipment, the
overload indicator light (red) will go out and the output indicator light
(green) will stay lit.
AC Electric Lamps Power Tools Electromotor DC Battery
Power Factor 1 0.8-0.9 0.4-0.7(efficiency 0.86)
I2500 0-2000W 0-1520W 0-760w Rated voltage 12V
Rated current 6A (for Canada),
8A (except for Canada)
I3500 0-2600W 0-2000W 0-10002
When Overloaded
or short circuited,
Overload Indicator
Light (Red) will
illuminate
Normal: Output
indicator will
illuminate
4. Switch on the equipment output indicator light will glow. In case of
overload operation or when trouble occurs for the equipment being
used, the output indicator light (green) will go out, the overload
indicator light (red) will light continuously, and no power will be put out.
At this time, the engine may not stall, flick the engine switch to STOP
to turn off.
**I2500 Image
/