Page is loading ...

Agriculture Product Line
User Guide
Kestrel 5000AG Livestock Environmental Meter
Kestrel 5400AG Cattle Heat Stress Tracker
www.kestrelinstruments.com

2
CAUTION
!
WARNING
!
Your Kestrel Weather/Environmental Meter is designed to provide accurate
measurement of current conditions only. Depending on your location and
environment, conditions may change rapidly.
Rapid temperature and humidity changes (i.e., moving your meter from indoors to outdoors) may cause inaccurate readings of tempera-
ture and humidity as well as all readings that rely on either of these values. Before relying on readings from your Kestrel Meter, be sure to
wait until your unit’s readings have stabilized, indicating it has equilibrated to its new environment. Forcing air over the sensors by waving
or slinging your meter through the air can help speed that process.
To maximize the accuracy and reliability of your readings:
• Ensure that your Kestrel Meter is in good repair and within factory calibration.
• Take readings frequently and carefully according to the guidelines above.
• Allow your meter’s readings to stabilize after signicant changes in temperature or humidity (i.e., changing location from indoors
to outdoors).
• Allow a margin of safety for changing conditions and reading errors (2-3% of reading is recommended).
Use care and good judgment when referring to your Kestrel Meter to make any decisions regarding safety,
health or property protection.
To reduce the risk of injury or death to persons or animals, read and
follow these guidelines!
Your Kestrel Weather/Environmental Meter may provide one or more of these measurements relating to estimation of danger of injury to
people or animals from heat or cold: Heat Stress Index, Wind Chill Index, Wet Bulb Globe Temperature (“WBGT”), Temperature-Humidity
Index (THI), Heat Load Index (HLI), Accumulated Heat Load Units (AHLU). Note that guidance tables based on these values are based on
typical physiological response. Certain individuals/animals may be more susceptible to harm relating to environmental conditions and
require additional precautions. For example, high producing dairy cows; heavier nished cattle; and individuals/animals that are very
young or elderly, with asthma or respiratory conditions, or who have not become acclimatized to hot conditions are likely to be more prone
to heat injury.
• Biological factors (breed, acclimation, heat sensitivity, diet, health, coat color, etc.) can modify an individual animals response to
given environmental conditions with severe and extreme conditions sometimes resulting in death. The use of a Kestrel Meter does
not replace the need for animal observation and monitoring.
• In the case of human heat illness, remember the rule – “Cool rst, transport second.” An inexpensive ice bath can mean the
dierence between life and death.
Be prepared: know yourself and those you are responsible for, know what to do in the event of a heat or cold
injury, and know when to seek guidance of medical professionals.
Your Kestrel Weather/Environmental Meter is not a medical device. It is only one source of information and
must be employed with care and good judgment.

3
CONTENTS
Contact .................................................................................. 4
Batteries ................................................................................ 4
Measurements And Features ............................................ 5
Getting To Know Your Kestrel ............................................ 7
Buttons .................................................................................. 8
Kestrel Options Menu ......................................................... 8
Weather Mode Screens ....................................................... 9
Kestrel Menu Navigation ...................................................10
Getting Started .................................................................... 11
Measuring Air Flow .............................................................12
Measuring THI, HLI, AHLU, and WBGT ............................ 12
Custom Flag Settings .......................................................... 16
Measuring Direction ........................................................... 16
Altimeter And Barometer ...................................................17
Using Min/Avg/Max ............................................................18
Connecting To Devices Using Link ................................... 18
Creating, Viewing, & Exporting Data Logs ......................20
Weather Glossary.................................................................22
THI Menu ............................................................................... 23
HLI Menu ..............................................................................24
AHLU Menu .......................................................................... 25
Impeller Replacement ........................................................29
Warranty Certicate ............................................................ 31

4
We recommend that ONLY Lithium AA batteries
be used in your Kestrel Weather/Environmental
Meter to provide the widest operating
temperature range and to avoid damage caused
by leaking lead-acid batteries. If you must use
conventional AA batteries, please do not store
your Kestrel Meter with the batteries in place.
Damage caused by battery corrosion is not
covered under warranty.
WARNING: Lithium is a toxic substance and
ingestion may cause serious injury or death.
Keep lithium batteries out of the reach of children
and animals. If swallowed, immediately seek
medical help. Have doctor phone 24-hour hotline
at (202) 625-3333, call collect if necessary. Dispose
of batteries properly and according to local
regulations. Do not puncture or burn batteries.
If the battery compartment does not close
securely, stop using the product and keep it away
from children and animals.
WARNING: Utilizing the alert light and buzzer
in your Kestrel Cattle Heat Stress Tracker places
a higher demand on the battery. To ensure the
alert light and buzzer operate when needed,
replace the battery when a third or less of
battery life remains, as indicated on start up.
BATTERIES
This User Guide contains all the information you need
to get started using your Kestrel meter. For additional
information, FAQ’s, chat, and e-mail support, visit
www.kestrelinstruments.com.
For more information on cattle heat stress
visit us at www.cattleheatstress.com.
For questions about your Kestrel Meter,
contact us at (800) 784-4221 Toll Free
North America (610) 447-1555
Email: [email protected]
Facebook: Fb.com/KestrelMeters
Twitter: @KestrelWeather
CONTACT

5
MEASUREMENTS Icon 5000
Environmental
5000AG
Livestock
5400
HST
5400AG
Cattle
Wind Direction (Cardinal Points, Degrees) o •
Wind Speed | Air Speed
(mph | fpm | Bft | m/s | km/h | kt) • • • •
Volume Air Flow (cfm, m/hr, m/m, m/s, L/s) •
Crosswind
(mph | fpm | Bft | m/s | km/h | kt) o •
Headwind | Tailwind
(mph | fpm | Bft | m/s | km/h | kt) o •
Temperature (˚F | ˚C) • • • •
Wind Chill (˚F | ˚C) • • • •
Relative Humidity (%) • • • •
Heat Stress Index (˚F | ˚C) • • • •
Temperature-Humidity Index (THI) • •
Globe Temperature (˚F | ˚C) • •
Naturally Aspirated Wet Bulb Temp (˚F | ˚C) • •
Wet Bulb Globe Temperature (WBGT) (˚F | ˚C) • •
Heat Load Index (HLI) •
o optional

6
MEASUREMENTS Icon 5000
Environmental
5000AG
Livestock
5400
HST
5400AG
Cattle
Accumulated Heat Load Units (AHLU) •
Dewpoint Temp (˚F | ˚C) • • • •
Wet Bulb Temp (˚F | ˚C) • • • •
Station Pressure (inHg | hPA | psi | mb) • • • •
Barometric Pressure (inHg | hPA | psi | mb) • • • •
Altitude(m | ft ) • • • •
Density Altitude (m | ft) • • • •
Delta T (˚F | ˚C) •
FEATURES 5000
Environmental
5000AG
Livestock
5400
HST
5400AG
Cattle
LiNK Connectivity & Kestrel LiNK Mobile App N/A o o o •
Backlit Display switchable white or
Night-Vision preserving red
N/A • • • •
o optional

7
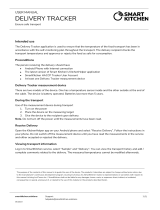
GETTING TO KNOW YOUR KESTREL
BACK
DATA TRANSFER
PORT
SERIAL NUMBER
AA BATTERY (1)
(Lithium recommended)
LANYARD
ATTACHMENT
PRESSURE
SENSOR
FRONT
OPTIONS/EXIT
POWER
BACKLIGHT
SCROLL/ADJUST
TEMPERATURE
SENSOR
REPLACEABLE
IMPELLER
SELECT
BATTERY DOOR LATCH
HUMIDITY SENSOR
BATTERY DOOR
IMPELLER COVER
CAPTURE
SUNLIGHT
READABLE
DISPLAY
BLACK GLOBE
SENSOR*
ZONE ALERT
LIGHT*
*Only available on 5400 meters

8
BUTTONS
Button Name Function
POWER Turns Kestrel on and o.
Press for on, hold for two
seconds to turn o.
OPTIONS/
EXIT
Enter the main Options
menu or exit a menu.
SELECT Access Settings on any
measurement screen or
select a menu option to
enter its submenu or conrm
a task.
UP/DOWN Scroll up and down through
measurement screens or
menus. Adjust values when
entering text in name
menus.
LEFT/
RIGHT
Scroll options left and
right. Adjust values in
combo menus and setting
submenus.
CAPTURE In Weather Mode, manually
capture all environmental
values.
BACK-
LIGHT
Turn backlight on or o.
(Also turns o automatically
after one minute.)
Most system-wide and weather setup options are accessed
from the main Options menu by pressing the button
from any Weather Measurement Screen.
BLUETOOTH
» Bluetooth On/O
» Conct
• DATA PORT
• MEMORY OPTIONS
» Mem Used
» Auto Store
» Store Rate
» Overwrite
» Clear Log
• GRAPH SCALE
• DISPLAY
» Auto Shutdown
» Contrast
» Backlight
» Alerts
• SYSTEM
» Time & Date
» Compass Cal
» Measurements
» Units
» Lang
» Batt
» Factory Restore
• ABOUT
» Version
» Legal
KESTREL OPTIONS MENU
Note! Not all features listed available on all units.

9
Measurement
& Icon Units
WEATHER MODE SCREENS
Graph of Stored Data Log Data Point Value
Data Point Scroll Bar
Current Measurement Screen
Press SELECT to enter settings
menu for that measurement.
Min Ave Max Screen
Press SELECT to start, stop
and clear the Min/Avg/Max
tracking.
Data Graph Screen
Press SELECT to enter
the Data Log Detail Screen to
view logged data points.
Data Points Screen
Press LEFT/RIGHT to scroll through
data points. Press OPTIONS to exit
Data Log Details Screen.
MORE MEASUREMENTS
MORE MEASUREMENTS
Data Point Time Stamp
» The UP/DOWN buttons navigate between all weather
measurements set to “On” in Options|Measurements.
» The LEFT/RIGHT buttons scroll between the three
display screens for the measurement.
» The OPTIONS button exits the settings submenu
and Data Log Detail Screen.

10
KESTREL MENU NAVIGATION
TYPES OF MENU ITEMS
» Tasks are executed by highlighting the eld and pressing Select.
» The presence of a submenu is indicated by a “…” following a eld.
» Highlight the eld and press Select to enter a submenu.
» Adjust the value of a Combo Field by pressing left or right.
» Enter the Combo Field sub menu by pressing select.
» Adjust a setting by pressing left or right.
» An arrow indicates there are additional elds o screen.
» Locked values are either driven by another value or cannot be edited on
the current screen.
» Locked values may have submenus which are entered by pressing select.
» Navigation buttons indicate available actions on the current screen.
AHLU-86
32
MLA: Orange
AHLU MEASUREMENT SCREEN
» HLI Upper Limit Threshold
» AHLU Measurement
» Selected Guideline: Current Zone
HLI
79.2
MLA:Orange
HLI MEASUREMENT SCREEN
» HLI Measurement
» Selected Guideline: Current Zone
Note! While HLI and THI are measured in Fahrenheit and Celisius, the scale of
both values is not comparable to standard temperature readings.

11
1. INSTALL BATTERY. Slide the battery door latch and open
door. Insert the provided AA lithium battery as indicated
by the label. Replace the battery door, ensuring it “clicks”
fully into place.
2. POWER ON KESTREL. Press to power on Kestrel.
3. ENTER OPTIONS MENU. Press to enter the Options
Menu.
4. SET AUTO STORE RATE. Scroll to and select Memory
Options. Scroll to Auto Store and ensure it is set to ON.
Scroll to Store Rate and adjust to desired frequency of
automatic weather data logging.
5. SET OVERWRITE. Scroll to and select Memory Options.
Scroll to Overwrite and set to On to allow the data log to
wrap once full and to OFF to stop logging when full.
6. SET GRAPH SCALE. Scroll to and select Graph Scale. Scroll
to and select the desired measurement type. Adjust the
Set High and Set Low values to bound the desired display
values.
7. SET AUTO SHUTDOWN. Scroll to and select Display. Scroll
to Auto Shtdwn and choose a time window after which the
Kestrel will shut down without any button presses.
8. SET BACKLIGHT COLOR. Scroll to and select Display.
Scroll to Backlight and set to either White or Red. White is
very bright and ideal for any dim light use. Red is reduced
brightness and a wavelength selected to preserve adapted
night vision for true dark operations.
9. SET DATE AND TIME. Scroll to and select System. Scroll to
and select Time & Date. Adjust the time and date.
10. CALIBRATE THE COMPASS.
Kestrel 5400AG Cattle Heat Stress Tracker Only
GETTING STARTED
Scroll to and select System. Scroll to and
select Compass Cal. Follow the on-screen
instructions:
» Place the base of the Kestrel on a at
surface at least 3 feet from any large
metal objects.
» Start the calibration routine. Rotate
the Kestrel around its vertical axis 3
times,
keeping the unit as vertical as possible
and taking approximately 10 seconds per full rotation.
You may need to restart the routine a few times until you
get the timing correct.
Note: When taking compass readings, keep the Kestrel as
vertical as possible for maximum accuracy.
11. TURN MEASUREMENT SCREENS ON/OFF.
Scroll to and select System. Scroll to and select
Measurements. Set measurement screens to either
On or O as desired.
12. SET UNITS. Scroll to and select System. Scroll to and
select Units. To change all units select Global, then
set Global to Imperial or Metric, and then scroll to
Apply and select Go. To set units individually, scroll
to each measurement type in the Units submenu
and set to the desired units. Units can also be set in
the Settings menu for each measurement.
13. SET LANGUAGE. Scroll to and select Lang. Adjust
to desired language: English, Deutsche, Francais,
Espanol.
3x

12
MEASURING THI, HLI, AHLU, AND WBGT
1. SELECTING THI AND HLI EQUATIONS.
1. Scroll to the THI Current Measurement Screen and
press select.
2. Set THI Model to either NRC or YOUSEF (see Glossary/
THI Menu for denitions).
3. Your Kestrel Cattle Heat Stress Tracker oers the
blended HLI equation (see Glossary/HLI Menu for
denitions).
2. CONFIGURE HLI AND THI SETTINGS
HLI Available in Kestrel 5400AG Cattle Heat Stress
Tracker Only
1. Scroll to HLI (or THI) Current Measurement Screen and
press select.
2. To use the colored HLI/THI zones or categories, scroll
to Zones and set to On. The zones increase from
White to Black in order of severity of risk of heat injury.
3. To access a pre-saved HLI/THI guideline, scroll to
Zones. . . and press select, then scroll to Guide. . . and
press select. Follow the menu options to nd your
organizations suggested threshold guidelines for
each zone. More detailed information on zones can
be found in the Glossary/THI MENU and HLI MENU.
4. For information on setting custom zone settings see
page 16.
5. Light or buzzer alerts are available in the Kestrel
5400AG Cattle Heat Stress Tracker only. To receive
light or buzzer alerts when HLI or THI is above a zone
threshold, scroll to and select Alerts. . . in the HLI/
THI Settings menu. You may set Light and Buzzer
individually. Selecting a zone for Light or Buzzer
Kestrel 5000AG Livestock Environmental Meter Only
Kestrel Meters can calculate air ow through a duct by
combining user input information about the size and
shape of the duct with the measured air velocity. In
addition to reading the instantaneous Air Flow o the
main measurement screen, a more accurate result may
be obtained by capturing an average air ow on the Min/
Ave/Max screen while traversing the duct. Capturing
an average can be particularly helpful when measuring
ducts with registers or dimensionally uneven air ow.
» From any current measurement screen, scroll to AIR
FLOW and select Settings.
» Set Shape to match the shape of the duct, either Rect
(rectangle) or Circle.
» Input the dimensions of the duct by setting Length
and Width for a Rectangle or Diameter for a Circle
duct and press exit.
MEASURING AIR FLOW

13
will cause that alert to activate when conditions reach
the threshold for the selected zone.
Warning: In addition to monitoring AHLU/HLI/THI values,
please observe cattle for additional signs and symptoms of
heat stress. Additional factors such as age, coat length, coat
color, acclimation, health, and nutritional status interact
with environmental factors and contribute to severity of
heat stress on individual animals.
3. CONFIGURE AHLU SETTINGS
Kestrel 5400AG Cattle Heat Stress Tracker Only
Your Kestrel Cattle Heat Stress Tracker oers 3 AHLU
screens. Each AHLU screen can be congured for
dierent pen and cattle conditions.
1. Scroll to AHLU (1,2 or 3) Current Measurement
Screen and press select.
2. Scroll to Pen Management. . . and press select.
Default settings are set to “reference animal”
as dened in the Glossary/AHLU Menu/Table
1. The reference animal has an HLI upper limit
of 86. Set parameters for your pen conditions
if they vary from reference animal. Set Manure
Class based on your site’s manure management
practices (Glossary/AHLU Menu/ Table 2 and
3). Set Shade based on the amount of shade
available calculated at midday per Standard
Cattle Unit (Glossary/AHLU Menu/Table 4). Set
H2O Temp based on the temperature of the
water in the troughs (Glossary/AHLU Menu/Table
5). Set Extra H2O to Ye s if extra water troughs
are installed during heat events (Glossary/AHLU
Menu/Table 6). Set Heat Rations to Ye s if your
site implements a feeding strategy for heat stress
management (Glossary/AHLU Menu/Table 6).
Set Manure Clear to Yes if your site implements
strategic manure clearing of wet deposition areas
during heat events (Glossary/AHLU Menu/Table 6).
3. Scroll to Cattle Prole. . . and press select. Default
settings are set to “reference animal” as dened in
the Glossary/AHLU Menu/Table 1. The reference
animal has an HLI upper limit of 86. Set parameters
for your herd conditions if they vary from reference
animal. Set Type based on cattle breed (Glossary/
AHLU Menu/ Table 7). Set Coat based on coat color
(Glossary/AHLU Menu/Table 8). Set Days based on
the number of days on feed for cattle (Glossary/AHLU
Menu/Table 9). Set Health based on if cattle are
healthy or sick/recovering/unacclimatised (Glossary/
AHLU Menu/Table 10).
4. To use the colored AHLU zones or categories, scroll to
Zones and set to On. The zones increase from White
to Black in order of severity of risk.
5. To access a pre-saved guideline, scroll to Zones.
. . and press select, then scroll to Guide. . . and
press select. Follow the menu options to nd your
organizations suggested threshold guidelines for
each zone. More detailed information on zones can
be found in the Glossary/AHLU MENU.

6. For information on setting custom zone settings see
page 16.
7. To receive light or buzzer alerts when AHLU is above
a zone threshold, scroll to and select Alerts. . . in the
AHLU Settings menu. You may set Light and Buzzer
individually. Selecting a zone for Light or Buzzer
will cause that alert to activate when conditions
reach the threshold for the selected zone.
8. Repeat steps 1 and 7 for all AHLU screens.
Note: The AHLU Current Measurement Screen will display
the HLI Upper Limit threshold based on the selected pen
and cattle conditions as part of the icon. If varying pen
and cattle conditions were selected, each AHLU Current
Measurement Screen will display a dierent AHLU icon
value.
4. CONFIGURE WBGT SETTINGS.
Kestrel 5400AG Cattle Heat Stress Tracker Only
1. Scroll to the WBGT Current Measurement Screen
and press select.
2. Set Type to either Indoor or Outdoor,
depending on your environment.
3. To use the colored WBGT zones (also known as
Flag Settings), scroll to Zones… and set to On.
The zones increase from White to Black in order of
severity of risk of heat injury.
4. To access one of the pre-saved WBGT guidelines,
scroll to Zones… and press select, then scroll
to Guide… and press select. Follow the menu
options to nd your organization’s WBGT
guidelines. If additional workload or clothing
inputs are required, set Workload and Clothing to
appropriate values for your situation.
5. For information on setting custom threshold ag
settings see page16.
6. To receive light or buzzer alerts when WBGT
is above a zone threshold, scroll to and select
Alerts… in the WBGT Settings menu. You may set
Light and Buzzer individually. Selecting a zone
for Light or Buzzer will cause that alert to activate
when conditions reach the threshold for the
selected zone.
Warning: In addition to monitoring WBGT values, please refer
to your state or organization’s requirements for measuring
WBGT, heat acclimatization guidelines, work/rest ratios and
water consumption.

15
Notes: The AHLU upper limit in the Cattle Heat Stress Tracker
is 400. Dr. John Gaughan, University of Queensland, provided
guidance on using this value.
To highlight the severity of conditions, if the Red Warning Zone
is reached, the line indicating the current zone will ash. If the
Black Warning Zone is reached, the measurement value will
ash inverted.
If an alert is activated, pressing on the AHLU/HLI/THI
Measurement Screen will deactivate the alert until the
next higher threshold is reached or until the AHLU/HLI/THI
measurement dips below the threshold and then raises above
it again.
In the Options Menu under Display, there is an Alerts Test
function which will activate the light and buzzer. When using
the unit in a new situation, test the alerts to familiarize yourself
with their intensity.
HOW TO MEASURE WBGT, AHLU, HLI and THI
ACCURATELY:
» Dierences in the reectivity of ground surfaces such
as grass or asphalt will impact measurements. Be
sure to take measurements in the same solar/radiant
heat environment as the people and animals you are
monitoring.
» When changing environments (moving from an air
conditioned room to outdoors or removing the unit
from your pocket) the unit requires between 8-15
minutes to equilibrate to its surroundings before
taking readings.
» Take measurements at least 3 feet o the ground and
in the same wind or air ow conditions as the people
or animals you are monitoring. Ensure the Kestrel
is oriented into the wind and able to measure the
full wind value. A tripod or pole mount and the
Kestrel Rotating Vane Mount are ideal for ensuring
accurate measurements.

16
If you do not wish to follow one of the WBGT, AHLU, HLI
or THI guidelines pre-loaded into your Kestrel meter, you
may set custom zones and zone thresholds. Your Kestrel
allows you to activate and set up to six customized heat
stress warning zones identied by color names on screen.
SETTING CUSTOM HEAT STRESS ZONES:
1. In the Settings Menu of the WBGT, AHLU, HLI or THI
Current Measurement Screen, scroll to and select
Zones.
2. Scroll to the colored zones you wish to edit and press
select. Editing any value from a preset guideline in
the Zone Settings Menu will automatically change the
name of the guideline to Custom.
3. In the Zone submenu you can turn zones on or o
by setting Status to ON or OFF as well as change the
lower temperature bound of the zone by adjusting the
Threshold value.
4. The threshold for a zone cannot be greater than the
zone above or less than the zone below it.
5. Zone thresholds cannot be adjusted if the Status is
set to O.
6. If the Status of a zone is set to OFF and the thresholds
of the zones above and below are set one tenth of a
degree apart (the minimum resolution available) the
Status of the intermediary zone cannot be set to On.
Warning: While the Kestrel LiNK app for mobile devices does have
a threshold alerts feature, it does not currently synch with the zone
thresholds set in the Kestrel 5400 which must be set separately.
CUSTOM ZONE AND FLAG SETTINGS
Kestrel 5400AG Cattle Heat Stress Tracker Only
» The Kestrel’s compass is intended for measuring
wind direction. The Kestrel must be held vertically
with the back of the unit pointed towards the
direction to be determined.
» Using the included Kestrel Vane Mount adjusted
to level will provide the most accurate wind and
direction measurements.
MEASURING DIRECTION

17
The Kestrel employs a stable, accurate pressure sensor to
measure station pressure, the unadjusted air pressure in
your location.
» To use your Kestrel to measure barometric pressure
(station pressure adjusted for local elevation), you
must enter a correct reference value for your altitude.
Accurate barometric readings require that no elevation
changes be made while taking measurements.
» To use your Kestrel to measure altitude changes
(changes in station pressure associated with changes
in elevation), you must enter a correct reference
value for your starting barometric pressure. Accurate
altitude readings depend on stable, weather related
barometric air pressure while measurements are taken.
» Synched values between the Altitude and Barometer
measurement screens allow reference value updates
on either screen to automatically update reference
values on the other.
Note! You cannot use your Kestrel as a barometer and altimeter
simultaneously.
ALTIMETER AND BAROMETER
SETTING REFERENCE VALUES ON BARO
MEASUREMENT SCREEN:
» Scroll to the Baro measurement screen and
select Settings.
» Adjust either the Altitude or the Barometric
Pressure value to a local, known value obtained
from a mapping reference, GPS, or accurate
weather station in the same location.
SETTING REFERENCE VALUES ON ALTITUDE
MEASUREMENT SCREEN:
» Scroll to the ALTITUDE measurement screen
and select Settings.
» Adjust either the Altitude or the Barometric
Pressure value to a local, known value obtained
from a mapping reference, GPS, or accurate
weather station in the same location.
Note! You should enter new reference values whenever
you are using the Altimeter or Barometer functions and
your reference value is no longer accurate (Ref Baro
for Alt, Ref Alt for Baro) due to a change in weather or
location.

18
Pressing the right scroll button from any Current
Measurement Screen will open the Min/Avg/Max Screen.
The capture process is linked for all measurement screens,
capturing Min/Avg/Max values on one measurement
screen will capture Min/Avg/Max values over the same
time period for all measurements. Each new Min/Avg/Max
capture overwrites the previously captured value from all
measurements.
CAPTURING MIN/AVG/MAX VALUES:
» Scroll to the Min/Avg/Max Screen of the desired
measurement. This can be done by scrolling right from
the desired Current Measurement Screen or scrolling
vertically from another measurement’s Min/Avg/Max
Screen.
» Press Select to Start a new Min/Avg/Max capture.
» Press Select to Stop the capture time period and view
Min, Avg, and Max values.
» Press Select to Clear the Min/Avg/Max values.
USING MIN/ AVG/ MAX
Your Kestrel can be connected wirelessly to other LiNK-
compatible devices. LiNK is powered by Bluetooth Smart®,
also known as Bluetooth® LE, which is available in most iOS
devices released after 2014 and Android devices released
after 2015, as well as in a USB Dongle available from
Kestrel that supports connectivity to Windows and Mac OS
devices. LiNK-enabled Kestrel units can connect to mobile
devices running Kestrel LiNK to install rmware updates.
LiNK-enabled units can be run wirelessly to computers
using the Kestrel Dongle.
CONNECTING TO A COMPUTER, MOBILE PHONE OR
TABLET:
» On your phone or tablet, follow the links at
www.kestrelinstruments.com to locate Kestrel LiNK
for iOS or Android in the App or Play store and install
on your mobile device.
OR
» On your computer, follow the links at
www.kestrelinstruments.com and install on your
computer. Insert your Kestrel USB Dongle (available
separately) into an open USB port.
» On the Kestrel, open the Options Menu and select
Bluetooth. Set Bluetooth to On.
» On your Kestrel select Conct from the Bluetooth
Options menu and set to PC/Mobile. In PC/Mobile
mode, the Kestrel’s Status will change to Available,
indicating that it is available for pairing with a
computer or mobile device.
CONNECTING TO DEVICES USING LINK

19
Note! LiNK range is typically 100 ft/30M line of sight. Shorter
distances should be expected if there are obstacles such as
walls or metal enclosures. Range is also impacted by the
signal strength of the other device.
CONNECTING TO COMPUTERS USING USB CABLE:
All Kestrel 5 Series units can connect to a computer via
the Data Transfer Port using the USB Data Transfer Cable
available separately. Kestrel LiNK software is available
for Windows and Mac for downloading logged weather.
data and installing rmware updates.
» Ensure the computer or mobile device is searching
and in range. When Status changes from Available
to Connected, the pairing is active and your Kestrel is
ready to communicate.
CONNECTING TO A NEW LINK-COMPATIBLE DEVICE:
» Follow directions for your LiNK-compatible Device to
power it on and put it in pairing mode.
» On the Kestrel, open the Options Menu and select
Bluetooth. Set Bluetooth to On.
» Set Conct to Device.
» Scroll to Name and select New, then wait for the list of
available devices in range to populate.
» Select a device from the available list. Once connected,
the settings menu for that device will open, allowing
you to manage the device’s settings.
» Exit to the Bluetooth menu. Status should indicate
Connected, meaning the pairing is active and your
Kestrel is ready to communicate.
CONNECTING TO/ADJUSTING A PREVIOUSLY PAIRED
LINK-COMPATIBLE DEVICE:
» Follow the directions for connecting to a new device
except instead of selecting New in the Name eld,
scroll left or right to nd the desired device.
»Status will change to Searching. If the device is in
range and in active pairing mode, a connection will
be made and Searching will change to Connected,
indicating that the pairing is active and your Kestrel is
ready to communicate.

20
In addition to taking live measurements, your Kestrel 5
Series weather meter is a powerful data logger. The Kestrel
will automatically create a time stamped data log of all
measurements at the logging interval you set. Additional log
points can also be captured manually. Logged data can be
accessed four ways:
» Viewed on the Kestrel Meter on the Data Graph Screen and
Data Log Detail Screens.
» Exported to an iOS or Android mobile device using the
Kestrel LiNK mobile apps available in the App Store and
Google Play Store. Requires a Kestrel LiNK-enabled meter
and a compatible Bluetooth® Smart/LE devices.
» Exported to a PC or Mac using Kestrel LiNK software and a
Kestrel USB Dongle (available separately). Requires a Kestrel
LiNK-enabled meter
» Exported to your Windows or Mac computer using Kestrel
LiNK software and a Kestrel USB Data Transfer Cable
(available separately). All 5 Series Kestrel meters can connect
to Kestrel LiNK using a Kestrel USB Data Transfer Cable.
TURNING ON AND ADJUSTING AUTOMATIC DATA LOGGING:
» In the main Options menu, scroll to and select Memory
Options. Scroll to and select Auto Store and set to ON.
Scroll to Store Rate and adjust to desired frequency of
automatic weather data logging.
» In the Memory Options sub menu scroll to Overwrite and
set to On to allow the data log to wrap once full and O to
stop logging when full.
» When Auto Store is set to On, the Kestrel unit will
automatically begin logging at the rate set in Store Rate.
CREATING, VIEWING, & EXPORTING DATA LOGS
MANUAL DATA LOGGING:
» Individual data points can be added to the log at
any time by pressing the Capture button.
» Manual capture simply adds every measurement
to the data log at the capture time/date.
VIEWING LOGGED DATA ON THE KESTREL METER:
» Scroll to the Graph Data Screen of the desired
measurement. This can be done by scrolling right
from the desired Current Measurement Screen or
scrolling vertically from another measurement’s
Graph Data Screen.
» A graph of the most recently logged data points
will be displayed and continue to grow at the
selected store rate.
» To view individual data log points, or to view
graph data older than what is shown in the Graph
Data Screen, press Select to open the Data Log
Detail Screen. Scrolling left or right will move the
bar highlighting individual data points. Log values
are shown in the upper left and the time stamp is
shown along the bottom. Press Exit to return to
the Graph Data Screen.
» To change the resolution of the graph, scroll to
and select Graph Scale in the Options menu.
Scroll to and select the desired measurement
type. Adjust the Set High and Set Low values to
bound the desired display values.
/