Page is loading ...

Installation Instructions
1. Slide the Post Protector over the post. The Post Protector should slide easily over the
post & the post’s bottom should contact the bottom of the Post Protector. NOTE: Post
Protector’s are designed to project above finished floor height. Be certain you are
starting with a level building site! Post sizes can vary. Trimming solid post corners on
a 45-degree angle is occasionally practiced. “Field built” laminated posts occasionally
may need trimming as well.
CALL with any installation questions! 877-966-8768
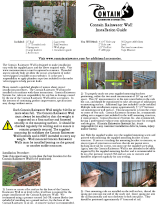
2. (2) ½” galvanized lag screws with sealing washers are provided for each post. Use the
lag locations located on the (2) sides of the Post Protector with the “vertical”
channels. The lag locations are located between the “horizontal” ribs on the Post
Protector’s lower section. The lags will join Post Protector to post to utilize the
integral post uplift protection. Pre drill a 3/8” perpendicular hole through the Post
Protector & into the post. Install ½” lag and allow the sealing washer to snug the Post
Protector sidewall to the post.
(Note: If your situation requires more than 4’ post embedment, either increase your
footing depth to compensate or remove the bottom of the Post Protector & position
it on the post so that the top edge of the Post Protector will be above the
determined top of finished floor.)
3. Optional Drainage Holes- On building will have posts subjected to the elements,
(pavilion, open sided building, porch post, etc.) Drill out drainage hole dimples.
These dimples are centered on all (4) sides of the base “horizontal” uplift rib. They
allow drainage for rainwater running down the post and through the Post Protector.
We suggest 4” – 6” of drainage stone for initial backfill material. On enclosed
buildings, most builders will utilize (1) drainage hole so any (during construction)
rainwater can drain. Others prefer to shrink wrap the top of the Post Protector after
posts are set & remove wrap when the building is weathered in.

Installation Instructions (continued)
4. Set the post in a typical posthole with desired footing & backfill material. Post should
be set with the Post Protector logo facing “inside” the building. This allows for a flat
side both inside & outside for ease of framing. The “vertical” rib sides will be
“inside” the wall of your building.
5. Set your string line “above” the top edge of the Post Protectors to align the posts. Or,
you may also use a roofing nail or screw to draw the Post Protectors firmly &
uniformly against the “outside” of the posts to be sure the string line post alignment
is accurate.
6. Install the base pressure treated board directly over the Post Protector. This will have
no ill affect on your sidewall profile! Post Protectors will show that your postholes
vary in depth. If you want the Post Protectors at a uniform height on the unfinished
inside of your building, simply measure up from the top edge of the baseboard &
mark to desired height above finished floor. Trim by dropping a horizontal sawzall
blade on (4) sides, then a vertical cut with a utility knife to remove excess material.
7. Overhead Door - To allow for post / jamb trim installation, trim jamb side of the Post
Protector to approximately ¼ “ above finished floor. Silicone seal top, horizontal
edge of Post Protector where trimmed. Install post trim covering the Post Protector.
8. Any unique installation situations or any questions – 877-966-8768.


42” – Deck, Pergola, Sunroom, Etc
Installation Instructions - Outdoor Post
1. Slide the Post Protector over the post. The Post Protector should slide easily over the
post & the post’s bottom should contact the bottom of the Post Protector. NOTE: Post
Protector’s are designed to project above grade or finished floor height. Be certain
you are starting with a level building site!
CALL with any installation questions! 877-966-8768
2. (4) 3/8” galvanized lag screws with sealing washers are provided for each post. There
are (2) lag locations located between the “horizontal” ribs on the Post Protector’s
lower section. Continue lag pattern with lag #3 & #4 (see diagram) The lags will join
Post Protector to post to utilize the integral post uplift protection. Pre drill a 1/4”
perpendicular hole through the Post Protector & into the post. Install 3/8” lag and
allow the sealing washer to snug the Post Protector sidewall to the post.
3. Drill out drainage holes dimples. These dimples are centered on all (4) sides of the
base “horizontal” uplift rib. They allow drainage for rainwater running down the post
& through the Post Protector. We suggest 4” – 6” drainage stone for initial backfill.
4. Set the post in a typical posthole with desired footing & backfill material.
5. Set your string line “above” the top edge of the Post Protectors to align the posts. Or,
you may also use a roofing nail or screw to draw the Post Protectors firmly &
uniformly against the “outside” of the posts to be sure the string line post alignment
is accurate.
6. Post Protectors will show that your postholes vary in depth. If you want the Post
Protectors at a uniform height, simply measure & mark to desired height. We suggest
4”-6”. Trim by dropping a horizontal sawzall blade on (4) sides, then a vertical cut
with a utility knife to remove excess material.
7. Any unique installation situations or any questions – 877-966-8768.

/