VOLTCRAFT Charge Manager 2020 Owner's manual
- Type
- Owner's manual

Impressum
Diese Bedienungsanleitung ist eine Publikation von Voltcraft®, Lindenweg 15, D-92242 Hirschau,
Tel.-Nr. 0180/586 582 7 (www.voltcraft.de).
Alle Rechte einschließlich Übersetzung vorbehalten. Reproduktionen jeder Art, z. B. Fotokopie, Mikroverfilmung, oder die
Erfassung in elektronischen Datenverarbeitungsanlagen, bedürfen der schriftlichen Genehmigung des Herausgebers.
Nachdruck, auch auszugsweise, verboten.
Diese Bedienungsanleitung entspricht dem technischen Stand bei Drucklegung. Änderung in Technik und Ausstattung
vorbehalten.
© Copyright 2008 by Voltcraft®.
Legal Notice
These operating instructions are a publication by Voltcraft®, Lindenweg 15, D-92242 Hirschau/Germany,
Phone +49 180/586 582 7 (www.voltcraft.de).
All rights including translation reserved. Reproduction by any method, e.g. photocopy, microfilming, or the capture in electronic
data processing systems require the prior written approval by the editor. Reprinting, also in part, is prohibited.
These operating instructions represent the technical status at the time of printing. Changes in technology and equipment
reserved.
© Copyright 2008 by Voltcraft®.
Information légales
Ce mode d'emploi est une publication de la société Voltcraft®, Lindenweg 15, D-92242 Hirschau/Allemagne,
Tél. +49 180/586 582 7 (www.voltcraft.de).
Tous droits réservés, y compris de traduction. Toute reproduction, quelle qu'elle soit (p. ex. photocopie, microfilm, saisie dans
des installations de traitement de données) nécessite une autorisation écrite de l'éditeur. Il est interdit de le réimprimer, même
par extraits.
Ce mode d'emploi correspond au niveau technique du moment de la mise sous presse. Sous réserve de modifications
techniques et de l'équipement.
© Copyright 2008 par Voltcraft®.
Colofon
Deze gebruiksaanwijzing is een publicatie van de firma Voltcraft®, Lindenweg 15, D-92242 Hirschau/Duitsland,
Tel. +49 180/586 582 7 (www.voltcraft.de).
Alle rechten, vertaling inbegrepen, voorbehouden. Reproducties van welke aard dan ook, bijvoorbeeld fotokopie,
microverfilming of de registratie in elektronische gegevensverwerkingsapparatuur, vereisen de schriftelijke toestemming van
de uitgever. Nadruk, ook van uittreksels, verboden.
Deze gebruiksaanwijzing voldoet aan de technische stand bij het in druk bezorgen. Wijziging van techniek en uitrusting
voorbehouden.
© Copyright 2008 by Voltcraft®.
01_1008_01
CHARGE MANAGER 2020
BEDIENUNGSANLEITUNG SEITE 4 - 17
CHARGE MANAGER 2020
OPERATING INSTRUCTIONS PAGE 18 - 32
CHARGE MANAGER 2020
NOTICE D’EMPLOI PAGE 33 - 48
Best.-Nr. / Item No. /
N° de commande / Bestnr.:
20 20 20
VERSION 10/08
Page is loading ...
Page is loading ...
Page is loading ...
Page is loading ...
Page is loading ...
Page is loading ...
Page is loading ...
Page is loading ...

34
Table des matières
Page
Introduction................................................................................................................................33
Utilisation conforme ..................................................................................................................33
Table des matières ....................................................................................................................34
Consignes de sécurité ..............................................................................................................34
Maniement ................................................................................................................................36
Maintenance ..............................................................................................................................36
Généralités ................................................................................................................................38
Caractéristiques ........................................................................................................................38
Mise en service ..........................................................................................................................40
Dépannage ................................................................................................................................45
Aperçu........................................................................................................................................46
Caractéristiques techniques ......................................................................................................47
Conditions ambiantes ................................................................................................................48
Elimination du chargeur ............................................................................................................48
Elimination des piles et accumulateurs......................................................................................48
Consignes de sécurité
Tout dommage résultant d’un non-respect des présentes instructions a
pour effet d’annuler la garantie ! Nous déclinons toute responsabilité pour
les dommages consécutifs !
De même, le constructeur n’assume aucune responsabilité en cas de
dommages matériels ou corporels résultant d’une utilisation de l’appareil
non conforme aux spécifications ou d’un non-respect des présentes ins-
tructions. De tels cas ont pour effet d’annuler la garantie.
Pour des raisons de sécurité et d'homologation (CE), toute transformation ou modification du
chargeur, réalisée à titre individuel, sont interdites.
Ce chargeur appartient à la classe de protection II. Comme source de tension, utiliser unique-
ment une prise de courant en parfait état de marche raccordée au réseau d'alimentation public
(100 à 240 volts AC, 50 à 60 Hz).
Veillez à ce que la mise en service du chargeur soit effectuée dans les règles de l’art. Tenez
compte à cet effet des indications du présent mode d’emploi.
La mise en marche doit être effectuée uniquement par un personnel qualifié afin d´assurer le
fonctionnement de ce produit.
Lors de l'installation du produit, veillez à ce que le cordon secteur ne soit pas écrasé ou
endommagé par des arêtes vives.
Ne placez jamais le chargeur à proximité de matériaux inflammables ou facilement inflam-
mables tels que les rideaux par exemple.
Ne pas exposer le chargeur à des températures élevées, à de fortes vibrations ou à l'humidité.
Les appareils alimentés par le secteur ne doivent pas être laissés à portée de main des enfants.
Une prudence toute particulière s'impose donc en présence d'enfants.
19
Table of Contents
Page
Introduction................................................................................................................................18
Intended Use..............................................................................................................................18
Table of Contents ......................................................................................................................19
Safety Notices: ..........................................................................................................................19
Handling ....................................................................................................................................21
Maintenance ..............................................................................................................................21
General ......................................................................................................................................22
Properties ..................................................................................................................................23
Commissioning ..........................................................................................................................25
Troubleshooting ........................................................................................................................30
Overview ....................................................................................................................................31
Technical Data ..........................................................................................................................31
Ambient Conditions ..................................................................................................................32
Disposal of the Accumulator......................................................................................................32
Disposal of Batteries / Accumulators ........................................................................................32
Safety Notices
Damages caused by non-compliance with this operating manual lead to
the expiration of the warranty! We will not assume any liability for subse-
quent damages!
We will not assume any liability for damages to items or persons caused
by improper handling or non-compliance with the safety notices! Any war-
ranty claim will be null and void in such cases.
For reasons of safety and licensing (CE) it is not allowed to alter respectively modify the charger.
This charger is constructed in Protective Class II. You may only connect the charger to a prop-
er mains outlet of the public supply net (100-240 Volt AC, 50 to 60 Hz).
Ensure the correct commissioning of the charger. Observe the operating manual!
Qualified personnel has to commission the charger in order to guarantee its safe operation.
Make sure that the power cable does not get squashed or damaged by sharp edges when
installing the product.
Never place the charger close to flammable respectively easily inflammable materials, e.g. cur-
tains.
Do not expose the charger to high temperatures, strong vibrations or high degrees of humidity.
Appliances that are operated on supply voltage do not belong in the hands of children. There-
fore, be especially careful when children are present.

32
Power pack:
Input: 100-240 V AC, 50 to 60 Hz
max. 75 W
Output:
Slot 1 to 8: 3V DC / max. 4A
Slot A and B: 15V DC / max. 21mA
Protective class: 2
Type of protection: IP20
Fuses: * 3 A slow
Charging current
Total charging current max. 16A
Charge current slot 1-4 max. 4 A
Charge current slot 5-8 max. 2 A
Round cells without POWER mode 300mA to max. 2A
Round cells with POWER mode 600mA to max. 4A
9V block accumulator 21mA
Discharge current:
Round cells max. 850 mA
9V block accumulator 16mA
max. voltage on the
contacts: 3 V respectively 15 VDC (direct current)
Ambient conditions
Operating temperature range (min/max) 0°C to +40°C
Rel. air humidity max. 85%
Disposal of the Charger
Dispose of the obsolete charger according to the valid legal directives.
Disposal of Batteries / Accumulators
You are required by law (Battery Ordinance) to return all spent batteries/accumulators. Dis-
posing of spent batteries/accumulators in the household waste is prohibited!
Batteries / accumulators that contain hazardous substances
are marked with the symbols on the side. These symbols indi-
cate that it is prohibited to dispose of these batteries in the
household waste.
The abbreviations for the respective heavy metal are: Cd =
cadmium, Hg = mercury, Pb = lead.
You can return spent batteries respectively accumulator that
can no longer be charged free of charge to the collection
points in your community, our outlets or everywhere else
where batteries or accumulators are sold.
You thus fulfil the legal requirements and contribute to the protection of our environment!
21
Avoid operation in immediate proximity to strong magnetic fields (loudspeakers, magnets),
electromagnetic fields (transformers, engines, reels, relays, protectors, electromagnets), elec-
trostatic fields (discharges, charges), broadcast antennas or HF generators. This may have an
adverse influence on the operation of the charger.
If the device no longer reacts after the impact of magnetic fields, turn the device off with the
mains switch and on again.
Also refer to the chapter "Troubleshooting".
Handling
Never turn the charger on right away when you bring it from a cold into a warm room. The con-
densation may destroy the device under adverse circumstances.
Leave the charger turned off until it has reached room temperature.
Ensure sufficient ventilation during operation. The ventilation slots on the front and the back of
the casing may never be covered!
Place the device on a hard, non-inflammable surface. Never place the device on a tablecloth or
carpet! The charger is cooled with the installed fan that is always on. In operation, the device
must have a sufficiently large distance to a wall or other obstacles in order not to impair the air
circulation.
The charger may not be used on humans or animals.
Never operate the charger and the inserted accumulators unsupervised!
Do not wear any metal or conductive materials like jewellery for example (chains, rings,
bracelets, etc.) when working with the charger.
The laying of metal cables and contacts is prohibited.
Maintenance
Check the technical safety of this charger at regular intervals, e.g. for damages on the power
cable or the housing.
If safe operation can no longer be assured, put the device out of operation and protect it from
being used again accidentally! Pull the power plug out of the socket.
Safe operation can no longer be assumed if
- the appliance shows visible damage,
- the appliance no longer works and
- after long storage under adverse conditions or
- after heavy transport strain.
Make sure you observe the following safety notices prior to cleaning or servicing the
product:
When opening the covers or removing parts of the casing, you may expose live parts.
Therefore you have to disconnect the device from all voltage sources prior to performing main-
tenance or repair work.

30
Troubleshooting
With this charger, you have purchased a product that reflects the latest state of technology and
is safe to operate.
Still there might be problems or malfunctions. At this point, we want to tell you how to easily
remedy possible malfunctions yourself.
Problem Solution:
No function or - Is the contrast properly adjusted?
display - Is the device turned on?
- Is the power plug in the outlet?
- Check the outlet with another electric device.
The fan does not run - Turn the device off immediately and have it repaired!
(regardless of whether
an accumulator is
charged or not)
The device no longer - If the charger detects a defect fan, all programs are cancelled, an
reacts to any input. error message is issued (FAN ERROR) and the charger no longer
reacts.
No accumulator - Did you observe the proper polarity of the accumulator?
detected - Are the contacts dirty (those of the charger and/or accumulator)?
Wrong or unlikely - You changed the accumulators while the device was turned off.
values on the display This leads to wrong charge capacities (C ) respectively discharge
capacities (D) and may also damage the accumulators!
ERROR display with - MONO or BABY accumulators were inserted in slots 5 to 8 for
inserted accumulator charging with activated POWER mode: Insert these accumulator
types into slots 1 to 4.
- Accumulator voltage is too high (poss. battery inserted)
- The accumulator voltage is too low (defect accumulator)
- Deep-discharge accumulator discharged with DISCHARGE or
CHECK
- Hardware detection error of the device: load a functioning accu-
mulator in the same slot. If the error occurs again, send the
device in for repair.
Immediate READY - deep discharge accumulator: abandon charging to protect the
display with the accumulator.
program DISCHARGE
or immediate start of
charging with the
program CHECK.
Low charge capacity (C ) - Treat the accumulator with the ALIVE program. If the charge
although the accumulator capacity C is still too low then, the accumulator is defect.
was discharged
EMV impulses, - No display or display does not react:
electrostatic discharge Turn the device off and on again on the mains switch
= ESD, surge impulse - Error display: the hardware detection for the protection of the
or line-conducted accumulator kicked in: Take out the accumulator, reinsert it and
disturbance resistance enter the program
Housing heats up - The high capacity output of the device leads to the heating of the
considerably housing top and bottom. There is no defect. Ensure good ventila
tion (see chapter "Safety notices")
23
Properties
This is a fast charger for nickel/cadmium and nickel/metal hydride accumulators.
The microcomputer-controlled fast charge charges the accumulators to 100%. 100% means
up to 115% of the stated capacity with new accumulators and less than 100% of the stated
capacity with older accumulators.
With accumulators with a capacity of less than 500 mAh, the discharge capacity (D) may not
reach 100%. However, this discharge value must be larger than 80%, otherwise the accumula-
tor is defect (best test it with the ALIVE program).
With this charger, it is not necessary to discharge the accumulators prior to recharging. The
accumulator is charged from its current charge state to its presently possible 100%.
The charging and discharging cycle is controlled independently of the charge state of the accu-
mulator.
The charge and discharge current is microcomputer-controlled.
The discharge current of the charger is practice-conform (16 mA to 850 mA).
The charger has an automatic sustain charge.
The charger has an automatic fan control. The fan, which only runs slowly in standby-operation,
automatically accelerates to maximum speed when charging or discharging an accumulator. If
the charger detects a defect fan, all programs are cancelled, an error message is issued (FAN
ERROR) and the charger no longer reacts.
The charger has an automatic accumulator monitoring (charge voltage and charge quantity).
The automatic accumulator detection notices when an accumulator is inserted or removed
from the charger.
There is no memory effect (charge and discharge current are clocked). This reduces the high
interior resistance of the accumulator and its power capacity increases.
The accumulator's degree of effectiveness increases (relation of the required charge quantity to
the usable capacity).
The charger has a memory backup. In case of power failure, the accumulator's data and the
current functions are saved for up to two days. Once the charger is reconnected with the mains,
the program is continued. To do so, the charger must have been connected with the mains for
at least two hours beforehand and turned on.
The LCD (alphanumerical) serves to display
- the program (CHA, DIS, CHK, CYC, ALV)
- the type of accumulator (BABY/MONO, MIGNON, MICRO, 9V block)
- the accumulator's charge status (battery symbol)
- the current accumulator voltage(U)
- the current charge respectively discharge current (I)
- the current respectively saved charge data (C) and discharge data (D) in mAh or Ah
- the required time in hours and minutes (TIME hh:mm)
There are three function keys for entering the programs and the settings.

28
All available accumulator data can be displayed. You can display the accumulator data of all
accumulators inserted in the slots with the two SELECT buttons (UP and DOWN).
If all data of the slots in which accumulators are located was displayed, the overview appears
again at the next push of the button.
With the display of the individual accumulator data, the overview is displayed again when
pressing the OK button. In the general overview, the OK button serves to adjust the display
contrast.
Overview Display:
Here you see the overview of all inserted accumulators with the corresponding program and the
charge status (battery symbol). If the charge status of the accumulator was not determined yet,
a question mark appears ("?"). When the accumulator is treated, the battery symbol or an arrow
alternate. When a charge is currently taking place, the arrow points upwards, if the accumula-
tor is currently discharged, the arrow points downwards.
If the POWER mode was turned on, "*PM*" blinks in the center of the second row.
Display of Accumulator Data
The charge program (e.g. CHARGE) and the charge capacity (C) is displayed in the first row.
The status of the POWER mode appears in the second row, the accumulator symbol (?) shows
the approximate charge status of the accumulator and the discharge capacity (D) is displayed.
When charging is currently taking place, an arrow blinks in front of "C" and if a discharge is cur-
rently taking place, an arrow blinks in front of "D".
The third row displays the accumulator type and the measured accumulator voltage.
The fourth and last row displays the already passed processing time (TIME) in the format
"hh:mm". The charge respectively discharge current is also displayed. .
ATTENTION!
Remove the accumulator again immediately if the accumulator type (MONO/BABY,
MIGNON or MICRO) is displayed wrong. Observe the correct fit when inserting the accumu-
lator.
If no voltage was determined yet,
appears.
A running program can only be cancelled by taking out the accumulator. If the accumulator is
removed during charging or discharging, ERR for ERROR or RDY for READY may appear
briefly, as the device notices that current no longer flows respectively that the discharge volt-
age was undercut.
If a program was performed successfully, RDY respectively READY appears and the display
stops blinking.
U= --.---V
1:CHARGE > C=123.1mAh
PM OFF ? D= 0.0mAh
MICRO U= 1.210V
TIME 0:11 I= 0.659A
1:CHA? CM2020 2:---
3:--- A:CHA? 4:TRI?
5:DIS? A:CHA? 6:ALV?
7:CHA? B:DIS? 8:CHK?
25
Charge Types
There are two different charge types: fast charge and POWER mode. With fast charging, the
charge current is approx. 350 up to 2000 mA. In the POWER mode, the charge current doubles
with round cells. For the two 9V block accumulators, the POWER mode has no significance (the
charge current remains the same).
ATTENTION!
When the POWER mode is on, please note that NiCd and NiMH accumula-
tors may be charged with maximum 1C. Therefore, the inserted micro
accumulators have to have a minimum nominal capacity of 700 mAh,
MIGNON min. 2000 mAh and BABY accumulators at least 4000 mAh!
The total charge current of this charger is 16 ampere. As soon as these 16 ampere total charge
current are reached, another inserted accumulator is set to BREAK and only treated when the
total charge current is reduced (when another accumulator is finished).
Mono and baby accumulators may only be charged in the slots 1 to 4 in POWER mode (only
slot 1 to 4 can charge with 4000 mA). If these accumulators are inserted in slots 5 to 8, ERROR
appears.
Charge current with POWER mode (approx.) without POWER mode (approx.)
MONO/BABY: 4000 mA (slot 1-4) 2000 mA
MIGNON: 2000 mA 1000 mA
MICRO: 700 mA 350 mA
9V: 21 mA 21 mA
Charge and Discharge Data
The capacity charged in the accumulator (C) and the discharged capacity (D) is stated in mil-
liampere hours (mAh) or ampere-hours (Ah). With the programs CYCLE and ALIVE, the old data
is deleted with renewed charging respectively discharging. The capacity during trickle charge
is not calculated, not displayed and also not added.
Commissioning
Remove all possibly inserted accumulators, plug the charger in and turn it on with the POWER
switch on the back of the device. You will see the following displayed on the display for approx.
2 seconds:
In this time, the charger performs a self-test and also checks for possibly inserted accumula-
tors. This is necessary for the preserving the memory of all data in case of a power failure
(memory backup).
Now leave the charger switched on for at least 2 hours so that the integrated gold cap can
charge to maximum. This gold cap serves to store all data for at least 48 hours when the charg-
er is turned off or in case of power failure. Of course, the device is completely operational dur-
ing this time.
CHARGE- MANAGER 2020
====================
SELFTEST RUNNING

2
Diese Bedienungsanleitung gehört zu diesem Produkt. Sie enthält wichtige
Hinweise zur Inbetriebnahme und Handhabung. Achten Sie hierauf, auch wenn
Sie dieses Produkt an Dritte weitergeben.
Heben Sie deshalb diese Bedienungsanleitung zum Nachlesen auf!
Eine Auflistung der Inhalte finden Sie in dem Inhaltsverzeichnis mit Angabe der ent-
sprechenden Seitenzahlen auf Seite 4.
These Operating Instructions are part of the product. They contain impor-
tant information on commissioning and installation. Please follow them, includ-
ing when passing this product on to third parties.
Please keep the Operating Instructions for future reference!
The contents page on page 19 lists the contents of these instructions together with
the relevant page number.
Le présent mode d'emploi fait partie intégrante du produit. Il comporte des
directives importantes pour la mise en service et la manipulation de l’appareil.
Tenir compte de ces remarques, même en cas de transfert du produit à un
tiers.
Conserver le présent mode d'emploi afin de pouvoir le consulter à tout moment.
La table des matières se trouve à la page 34.
51
Page is loading ...
Page is loading ...
Page is loading ...
Page is loading ...
Page is loading ...
Page is loading ...
Page is loading ...

18
Introduction
Dear customer,
Thank you for purchasing this charger.
With this charger, you have purchased a product that reflects the latest state of technology.
The structure corresponds to Protection Class 2. This product fulfils the requirements of
the valid European and national guidelines. The conformity was proven and the corre-
sponding declarations were deposited with the manufacturer.
In order to maintain this condition and ensure safe operation, you as the user have to observe
this operating manual.
Intended Use
This charger serves exclusively for charging up to eight nickel/cadmium respectively
nickel/metal hydride round cell accumulators size mono, baby, mignon and micro simultane-
ously.
Additionally, you can charge two 9V block accumulators made of nickel/cadmium respectively
nickel/metal hydride in the intended slots. These block accumulators may consist of 6, 7 or 8
cells.
There is no restriction regarding the maximum nominal capacity (stated in mAh or Ah) of the
accumulator to be charged.
This charger serves exclusively for charging the stated accumulators. You may not charge oth-
er types of accumulators!
You may neither charge nor discharge lithium-ion accumulators, rechargeable alkaline and dry
batteries (primary cells) with this charger. Non-rechargeable batteries may not be charged!
This charger is constructed in Protective Class II. The charger may be connected to alternate cur-
rent nets from 100 V~ up to 240 V~. The net frequency must be 50 or 60 Hz.
Use is only permitted in closed rooms, meaning not out in the open. The contact with moisture,
e.g. in bathrooms and similar rooms has to be avoided at all cost.
Another use than the one described above leads to damages to the product and is also asso-
ciated with dangers like short circuit, fire, electric shock, etc. The entire product may not be
altered respectively modified and the casing may not be opened.
The safety notices have to be observed under all circumstances!
35
Dans les installations industrielles, il convient d’observer les consignes de prévention d’acci-
dents relatives aux installations et moyens d’exploitation, édictées par les syndicats profes-
sionnels.
Dans les écoles, les centres de formation, les ateliers de loisirs et de réinsertion, la manipulation
de chargeurs doit être surveillée par un personnel responsable, spécialement formé à cet effet.
ATTENTION
Ne pas laisser piles et accumulateurs à portée des enfants.
Respecter la polarité lors de la mise en place des accumulateurs.
Ne pas laisser les piles à la portée de tous, les enfants ou les animaux
domestiques risquent de les avaler. Consultez dans ce cas immédiate-
ment un médecin!
Les piles ou les accumulateurs qui fuient ou qui sont endommagés peu-
vent entraîner des brûlures en cas de contact avec la peau. Veuillez donc
utiliser des gants de protection appropriés.
Veillez à ne pas court-circuiter ou jeter les piles ou les accumulateurs
dans le feu. De plus, ne pas recharger les piles. Danger d’explosion.
Ce chargeur permet de charger en même temps jusqu´à huit piles cylindriques au nickel-cad-
mium ou nickel-métal-hydrure de type Mono, Baby, Mignon et Micro.
Il est possible aussi de charger deux accumulateurs Bloc 9 V en nickel-cadmium ou nickel-
métal-hydrure dans les logements destinés à cet effet. Ces accumulateurs de type Bloc doivent
être constitués de 6, 7 ou 8 éléments.
Il n´y a pas de restriction de capacité nominale (indiquée en mAh ou Ah) de l´accumulateur à
charger.
Ne pas recharger ou décharger les accumulateurs lithium-ions avec ce chargeur.
Ne pas charger de piles sèches (cellules primaires) avec cet appareil.
Ne pas charger de piles sèches alcalines rechargeables avec cet appareil.
Ne pas charger de piles non rechargeables avec cet appareil.
Les règles VDE, en particulier la norme DIN VDE 0700, partie 29 sont applicables.
Une tension continue de maximum 15 volts existe aux contacts.
L'appareil est protégé contre les courts-circuits.
L´appareil doit uniquement fonctionner en présence d´une température ambiante de 0 à + 40
degrés Celsius.
Le ventilateur fonctionne toujours lorsque l´appareil est en marche. Dès la charge ou la déchar-
ge d´un accumulateur quelconque introduit – reconnaissable au courant de charge ou de
décharge « I » qui défile pour cette opération sur l´indicateur - le ventilateur doit commuter sur
le régime maximum. Ce fonctionnement plus rapide est bien audible (il devient nettement plus
fort!)
Si le ventilateur ne tourne absolument pas ou s´il est en marche mais ne tourne pas plus vite
que, arrêter immédiatement l´appareil et le préserver d´une mise sous tension involontaire.
Les constructeurs leaders d´accumulateurs recommandent une température ambiante d´envi-
ron 20°C pendant l´opération de charge. Eviter par ailleurs une exposition aux rayons directs du
soleil.
Pour ce chargeur, une technique de charge nouvelle est en usage qui endigue l´effet mémoire
et garantit une charge à 100% de l´accumulateur.

20
In commercial institutions, make sure you observe the accident prevention regulations of the
commercial trade organisation for electric installations.
In schools, training facilities, hobby and self-help workshops, qualified personnel needs to
supervise the operation of chargers.
ATTENTION!
Chargers and batteries/accumulators do not belong in the hands of chil-
dren.
Observe the right polarity when inserting the accumulators.
Do not leave batteries and accumulators lying around. Pets or small chil-
dren might swallow them. If swallowed, contact a doctor immediately.
Leaking or damaged batteries/accumulators may lead to injuries of the
skin when touched. Therefore, use suitable protective gloves.
Make sure that you do not short-circuit the batteries/accumulators. Do
not throw into fire. Do not recharge the batteries. Danger of explosion!
This charger serves for charging up to eight nickel/cadmium respectively nickel/metal hydride
round cell accumulators size mono, baby, mignon and micro simultaneously.
Additionally, you can charge two 9V block accumulators made of nickel/cadmium respectively
nickel/metal hydride in the intended slots. These block accumulators may consist of 6, 7 or 8
cells.
There is no restriction regarding the maximum nominal capacity (stated in mAh or Ah) of the
accumulator to be charged.
You may neither charge nor discharge lithium-ion accumulators with this charger!
You may not charge dry batteries (primary cells) with this charger.
You may not charge rechargeable alkaline batteries with this charger.
You may not recharge non-rechargeable batteries with this charger.
Observe the VDE instructions, especially DIN VDE 0700, part 29.
The connection contacts of the charger carry a maximum 15 V DC
The device is short-circuit-proof.
The device may only be operated at ambient temperatures from 0 to +40 degrees Celsius.
The fan always runs when the device is turned on. As soon as any inserted accumulator is
charged or discharged (detectable on the flowing charging respectively discharging current "I"
on the display), the fan has to switch to maximum capacity. This faster run is clearly audible
(becomes much louder)-
If the charger does not run at all or faster in operation, you must turn the device off immediate-
ly and secure it against accidental activation.
During the charging process, leading accumulator manufacturers recommend an ambient tem-
perature of 20°C. Also avoid direct sunlight here.
This charger uses a new charging technology that is supposed to prevent the memory effect
and guarantee the 100% charge of the accumulator.
Please note that the inserted micro accumulators have to have a minimum nominal capacity of
700 mAh, MIGNON min. 2000 mAh and BABY accumulators at least 4000 mAh in POWER
MODE!
33
Introduction
Cher client,
Nous vous remercions d´avoir acheté ce chargeur.
Avec cet appareil, vous avez acquis un produit à la pointe du développement technique et
bénéficiant d’une grande sécurité de fonctionnement.
La construction du produit correspond à la classe de protection 2. Ce produit satisfait
aux exigences des directives européennes et nationales en vigueur. La conformité a été
prouvée, les documents et déclarations correspondants ont été déposés chez le
constructeur.
Afin de maintenir le produit dans son état actuel et d’assurer un fonctionnement sans risques, les
utilisateurs sont tenus d’observer les instructions contenues dans le présent mode d’emploi !
Utilisation conforme
Ce chargeur sert exclusivement à charger simultanément jusqu´à huit piles cylindriques au nic-
kel-cadmium ou nickel-métal-hydrure de type Mono, Baby, Mignon et Micro.
Il est possible de charger également deux accumulateurs Bloc 9 V en nickel-cadmium ou nic-
kel-métal-hydrure dans les logements destinés à cet effet. Ces accumulateurs de type Bloc
doivent être constitués de 6, 7 ou 8 éléments.
Il n´y a pas de restriction de capacité nominale (indiquée en mAh ou Ah) de l´accumulateur à
charger.
Ce chargeur permet de charger uniquement les accumulateurs cités. Il est interdit de charger
d´autres types d´accumulateurs.
Ne pas recharger ou décharger des accumulateurs lithium-ions ou des piles sèches alcalines
rechargeables (cellules primaires) à l´aide de ce chargeur. Ne pas charger de piles non rechar-
geables !
Ce chargeur appartient à la classe de protection II. Le chargeur doit uniquement être branché
sur des réseaux de tension alternative de 100 à 240 volts. La fréquence du réseau doit être de
50 à 60 Hz.
Le produit peut être utilisé uniquement dans des locaux clos, une utilisation à l´extérieur est
interdite. Il convient d’éviter impérativement tout contact avec de l’humidité, par exemple dans
une salle de bains ou autres pièces analogues.
Toute utilisation autre que celle décrite précédemment provoque l’endommagement de ce pro-
duit; par ailleurs, elle entraîne des risques de court-circuit, d’incendie, d’électrocution, etc. Il est
interdit de transformer, de modifier l’ensemble de l’appareil et d´ouvrir le boîtier !
Observer impérativement les consignes de sécurité.

22
Condensers in the appliance may still be charged, even if the appliance was disconnected from
all voltage sources.
Repairs may only be conducted by experts who are familiar with the associated risks respec-
tively the pertinent regulations.
If you need to change a fuse, make sure that you only use fuses of the stated type and with the
stated nominal amperage for replacement.
Repairing fuses or bridging the fuse holder is not permitted!
When working on live appliances, only use tools expressively permitted for such work.
Only a trained expert may replace a damaged power connection cable.
General
Accumulators consist of two electrodes that are placed in an electrolyte; this makes an accu-
mulator a chemical element. Chemical processes take place on the inside of this element. As
these processes are reversible, accumulators can be recharged.
Charging the accumulator requires the so-called charging voltage, which must be higher than
the cell voltage. In addition, more energy must be provided during charging (mAh) than what
can be used again later on. This relation between supplied and used energy is called degree of
effectiveness.
The usable capacity, which strongly depends on the discharge current is decisive for the state
of the accumulator. The supplied charge cannot be used as rate, as a part of it is lost (e.g.
transformed into heat).
The capacity details stated by the manufacturer are the maximum theoretical charge quantity
the accumulator can give off. That means that an accumulator with 2000 mAh can theoretically
provide a current of 1000 mA (= 1 ampere) for a period of two hours. This value strongly
depends on many factors (condition of the accumulator, discharge current, temperature, etc.).
The term "C rate" is very common with chargers. The C rate is the current value that is normal-
ly stated for charging and discharging. Here this current value in ampere corresponds to the
nominal capacity in ampere-hours, meaning with an accumulator with 2000 mAh, 1C = 2.0 A.
Please note that the usable capacity of an accumulator strongly depends on the discharge cur-
rent. The lower the discharge current, the higher the usable capacity.
With this charger, a discharge current of 850 mA can flow at the beginning of a discharge
process: for an accumulator with 850 mAh, 850 mA are already 1C, while this is only C/2 for an
accumulator with 1700 mAh. Therefore, the 1700 mAh accumulator is going to reach its 1700
mAh easier than the 850 mAh accumulator its 850 mAh.
Meanwhile, renowned manufacturers state the capacity of an accumulator with C/3, meaning
that e.g. a 2500 mAh accumulator reaches these 2500 mAh with a discharge current of 850 mA
(= approx. C/3). However, if a manufacturer states a discharge current of C/10 for a 2500 mAh
accumulator (= 250 mA), one can assume that this accumulator cannot give off 2500 mAh with
a discharge current of 850 mA. This makes the C/10 accumulator the inferior one.
Accumulators also discharge over time. This characteristic is called spontaneous discharge.
31
ATTENTION!
Other repairs than the ones described above may only be performed by an authorised expert.
Overview
Contrast
The reading angle of the display depends on the location of the charger. Depending on the
angle of view, you can adjust the good readability of the writing with the menu "DISPLAY CON-
TRAST" with a high or low position of the charger.
POWER MODE
If no accumulator is inserted, you can activate the POWER mode: this doubles the charge cur-
rent for the eight round cells.
The inserted micro accumulators have to have a minimum nominal capacity of 700 mAh,
MIGNON min. 2000 mAh and BABY accumulators at least 4000 mAh for the POWER mode!
You can only charge MONO and BABY accumulators in slot 1 to 4 while the device is in POW-
ER mode.
Procedure
Insert the accumulator. If the accumulator is not detected automatically, check the polarity.
Then set the program with the two SELECT buttons and conform with OK.
In case of a wrong program, take out the accumulator, reinsert it and enter the program anew!
You can select the charge types CHA, DIS, CHK, CYC and ALV.
At the start of the program, the fan (which is only running slowly) switches to maximum capac-
ity and becomes perceivably louder.
READY (RDY) appears in the display when the charging of the accumulator is done. Now you
can take out the accumulator.
The three buttons serve to display the individual slots during the processing of a program and
to adjust the display contrast.
In case of power failure or when the device is unplugged or switched off, the data and settings
are preserved as long as the accumulator is not taken out.
ERROR (ERR)
This appears if a MONO or BABY accumulator was inserted in slots 5 to 8 in POWER mode, if
a (non-rechargeable) battery was inserted or if another error has occurred.
BREAK (BRK)
The total charge current of 16 A was exceeded. The accumulator is charged automatically as
soon as another accumulator is finished.
Technical Data
This charger serves exclusively for charging up to eight nickel/cadmium respectively
nickel/metal hydride round cell accumulators size mono, baby, mignon and micro simultane-
ously.
Additionally, you can charge two 9V block accumulators made of nickel/cadmium respectively
nickel/metal hydride. These accumulators may consist of 6, 7 or 8 cells.

24
Main Menu
If no accumulator is inserted, you can turn on the POWER mode. The display contrast can be
changed at any time (also during charging).
Charge Programs
- CHARGE = charge respectively recharge once only .
CHAR (CHARGE) means that the inserted accumulator is charged.
- DISCHARGE = discharge only once
DISCHARGE means that the inserted accumulator is discharged only.
- CHK (CHECK) = discharge once and recharge
- CHECK means that the inserted accumulator is discharged and charged again.
- CYC (CYCLE) = charge / discharge / charge
CYCLE means that the inserted accumulator is first charged, then discharged and finally
charged again.
- ALV (ALIVE) = charge / discharge / charge / discharge / charge
The ALIVE program serves to revive new accumulators stored over a longer period of time.
If an accumulator is already treated in slot 1, the selection starts with the same program as this
accumulator (SAME AS SLOT 1); otherwise the selection starts with CHARGE.
Please note that new and possibly improperly treated accumulators may at first only take up
30% of their capacity. This bad degree of effectiveness is indicated by a high charge capacity
(C)and a very low discharge capacity (D). Charge these accumulators with the ALIVE program.
After some cycles, the usable capacity (D) increases.
NiCd and NiMH accumulators should be charged with C/3 up to 1C.
Accumulator Voltage
The accumulator voltage is stated in the deactivated state (and can therefore not be measured
during operation). If no voltage U is displayed, the charger hasn't determined it yet.
Accumulator Status
In order to obtain a fast overview of the status of the accumulator to be charged respectively
discharged, this device displays a battery symbol. This symbol merely serves to be able to tell
at a quick glance how far the charge respectively discharge process has already advanced.
Here, the battery symbol is filled from the bottom to the top during charging, while it is emptied
from the top to the bottom when discharging. This does not allow any conclusions about the
time remaining until the end of the program. When the charge status of the accumulator was
not determined yet, a question mark appears in place of the battery symbol (in this manual, the
battery symbol is generally portrayed with a "?".
Charge and Discharge Current
The current I flowing through the accumulator during charging and discharging is displayed. If
no current was determined at the start of a program or if there is no current running after the
end of the program (READY/ERROR), I = 0.000 A appears.
Times
The complete time in which the accumulator was charged and discharged is displayed in hours
and minutes (TIME hh:mm). The time during trickle charge (TRICKLE) and during breaks
(BREAK) is not added.
If an accumulator exceeds approx. 80% of its maximum capacity during charging, a part of the
charge current is converted to heat. This may cause the accumulator to heat up.
29
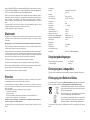
Now you can take out the accumulator.
If you leave the accumulator in the charger and if required for the accumulator, the trickle
charge program TRICKLE (TRI) is started automatically. This means that the accumulator is
recharged (this naturally does not apply if the accumulator was merely discharged with the pro-
gram DISCHARGE). The capacity (C) of the trickle charge and the time required for this
(hh:mm) is not displayed or added. Only the voltage and the current are constantly updated.
Therefore, the charge capacity, the discharge capacity and time only always refers to the
processed program.
When the charge was not successful, an error message ERR respectively ERROR appears and
the charger no longer handles this accumulator.
If the 16 A total charge current were already reached, each additional accumulator is set to
BREAK. These accumulators are charged automatically as soon as another accumulator is fin-
ished.
This charger has a memory backup, meaning that the program and the added capacity values
of the accumulator are saved in case of a power failure. Therefore never change the accumula-
tor when the charger is off, as it otherwise takes over the no longer valid values and would thus
determine wrong values for the new accumulator!
If the charger is turned off during program selection, selection starts anew.
The programs can only be continued if the integrated gold cap was previously charged (this
requires that the charger was turned on for at least two hours).
ATTENTION!
All inserted round cell accumulators must be fast-charge capable in POWER mode.
Please note that the inserted micro accumulators have to have a minimum nominal
capacity of 700 mAh, MIGNON min. 2000 mAh and BABY accumulators at least 4000 mAh
in POWER MODE!
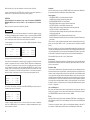
1:BREAK C= 0.0mAh
PM ON ? D= 0.0mAh
MONO/BABY U= 1.209V
TIME 0:00 I= 0.000A
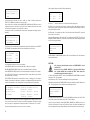
1:ERROR C= 32.5mAh
PM OFF ? D= 0.0mAh
MONO/BABY U= 1.317V
TIME 0:01 I= 0.000A
1:TRICKLE> C= 1328mAh
PM OFF ? D= 0.0mAh
MIGNON U= 1.341V
TIME 1:19 I= 1.007A
1:READY C= 1328mAh
PM OFF ? D= 0.0mAh
MIGNON U= 1.317V
TIME 1:19 I= 0.000A
1:RDY? CM2020 2:---
3:--- *PM* 4:---
5:--- A:--- 6:---
7:--- B:--- 8:---

26
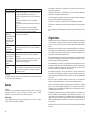
Without inserted accumulators, the standby display appears:
The lines "---" mean that there is no accumulator inserted in these slots.
The numbers 1 to 8 stand for the 8 slots in which you can insert the mono, baby, mignon or
micro accumulators. The arrangement on the display corresponds to the arrangement of the
slots.
The letter "A" corresponds to the left 9 Volt slot, the letter "B" corresponds to the right 9 Volt
slot.
If no accumulator is inserted, you can turn the POWER mode on and off with the two SELECT
buttons (UP and DOWN) and adjust the display contrast in three stages.
POWER MODE means that all eight round cells are charged with twice the current.
ATTENTION!
All inserted round cell accumulators must be fast-charge capable in POW-
ER mode.
Please note that the inserted micro accumulators have to have a minimum
nominal capacity of 700 mAh, MIGNON min. 2000 mAh and BABY accumu-
lators at least 4000 mAh in POWER MODE!
You can select the POWER mode with the two SELECT buttons (UP and DOWN) and confirm
them with the OK button.
After pressing the OK button, you can adjust the display contrast.
During charging, you cannot change the POWER mode. When pressing OK, you go straight to
the menu with the display contrast.
You can set the contrast to "LOW", "MID" and "HIGH" with the two SELECT buttons (UP and
DOWN) and confirm the entry with the OK button.
Now insert an accumulator size MONO, BABY, MIGNON or MICRO into one of the 8 slots.
Observe the correct polarity: the positive pole of the accumulator always has to point inwards
towards the charger and the negative pole outwards.
CHARGE- MANAGER 2020
====================
DISPLAY CONTRAST <>
MID
CHARGE- MANAGER 2020
====================
POWER- MODE <>
ON
1:--- CM2020 2:---
3:--- 4:---
5:--- A:--- 6:---
7:--- B:--- 8:---
27
The charger detects this accumulator and starts querying the program settings.
Now you merely need to select the charge program with the two SELECT buttons (UP and
DOWN). Five different programs are available.
These programs have the following functions:
CHA (CHARGE) means that the inserted accumulator is fast-charged.
DIS (DISCHARGE) means that the inserted accumulator is discharged only.
CHK (CHECK) means that the inserted accumulator is discharged and charged again.
CYC (CYCLE) means that the inserted accumulator is first charged, then discharged and finally
charged again.
ALV (ALIVE) means that the accumulator is charged / discharged / charged / discharged and
charged again. The ALIVE program serves to revive new accumulators and accumulators
stored over a longer period of time.
You now have five seconds to select the program. After each press of the button for changing
the charge program, you have once again 5 seconds. After these 5 seconds, the setting is tak-
en over and the program activates.
You can also press "OK" for confirmation.
Without an entry, the program CHARGE starts.
If a program was already started in slot 1,
"- ADJ SAME AS SLOT 1" appears.
This means that this accumulator is charged with the same program as the one in slot 1.
So if you want to charge several accumulators with the same program, first insert an accumu-
lator in slot 1 and select the desired program. Then insert the remaining accumulators; these
are then charged with the same program without the push of any button.
The built-in fan runs with maximum power when starting the device. With the programs CHA,
CYC and ALV, the device starts charging, with the programs DIS and CHK, it starts discharg-
ing.
CHA = Charge once only
DISCHARGE = discharge only once
CHK = Discharge / charge
CYC (CYCLE)= charge / discharge / charge
ALV = Charge - discharge - charge - discharge - charge
- ADJ CHARGE CHA
- ADJ DISCHARGE DIS
- ADJ CHECK CHK
- ADJ CYCLE CYC
- ADJ ALIVE ALV
CHARGE- MANAGER 2020
====================
SET PROGRAM SLOT 1<>
- ADJ CHARGE CHA
-
 1
1
-
 2
2
-
 3
3
-
 4
4
-
 5
5
-
 6
6
-
 7
7
-
 8
8
-
 9
9
-
 10
10
-
 11
11
-
 12
12
-
 13
13
-
 14
14
-
 15
15
-
 16
16
-
 17
17
-
 18
18
-
 19
19
-
 20
20
-
 21
21
-
 22
22
-
 23
23
-
 24
24
-
 25
25
-
 26
26


VOLTCRAFT Charge Manager 2020 Owner's manual
- Type
- Owner's manual
Ask a question and I''ll find the answer in the document
Finding information in a document is now easier with AI
in other languages
Related papers
-
VOLTCRAFT 20 20 05 Owner's manual
-
Reely 2141862 Operating instructions
-
-
-
-
-
-
-
-
Other documents
-
 Reely 1559975 Operating instructions
-
Hama 00073435 Owner's manual
-
-
-
Lupine Charger One Operating instructions
-
-
elv ALC 7000 Operating instructions
-
Opus BT-C700 Operating instructions
-
 Ultra Products ULT40033 User manual
-
 PS Power PA-NT2000 User manual


