
Instrument Panel . . . . . . . . . . . . . . . . . . . . . . . . . .2
Instrument Panel Cluster . . . . . . . . . . . . . . . . . . .3
Remote Keyless Entry . . . . . . . . . . . . . . . . . . . . .4
Content Theft-Deterrent System . . . . . . . . . . . . .4
OnStar
®
. . . . . . . . . . . . . . . . . . . . . . . . . . . . . . . . . .4
Passenger Air Bag Status Indicator . . . . . . . . . .5
Rear Center Seat Belt Operation . . . . . . . . . . . . .5
Child Restraints (LATCH) . . . . . . . . . . . . . . . . . . .6
Power Windows . . . . . . . . . . . . . . . . . . . . . . . . . . .6
Driver’s Seat Height Adjustment . . . . . . . . . . . . .6
Closing the Sunroof . . . . . . . . . . . . . . . . . . . . . . .6
Storing a Flat Tire . . . . . . . . . . . . . . . . . . . . . . . . .6
Air Filtration System . . . . . . . . . . . . . . . . . . . . . . .7
Automatic Lamp Control (ALC) . . . . . . . . . . . . . .7
Air Conditioning System . . . . . . . . . . . . . . . . . . .7
Side Vent Airflow . . . . . . . . . . . . . . . . . . . . . . . . . .7
Window Anti-Fog Feature . . . . . . . . . . . . . . . . . . .8
Front and Rear Washers/Wipers . . . . . . . . . . . . .8
Cruise Control . . . . . . . . . . . . . . . . . . . . . . . . . . . .8
Steering Wheel Lock-Up . . . . . . . . . . . . . . . . . . . .9
Cold Engine Speed . . . . . . . . . . . . . . . . . . . . . . . .9
Cold Engine Shifting . . . . . . . . . . . . . . . . . . . . . . .9
Reverse Gear Alert Signal . . . . . . . . . . . . . . . . .10
EVAP Leak Detection Pump . . . . . . . . . . . . . . . .10
Auxiliary Power Outlets . . . . . . . . . . . . . . . . . . .10
Daytime Running Lamps (DRL) . . . . . . . . . . . . .10
Rear Cargo Track Tie-Downs . . . . . . . . . . . . . . .10
115-Volt AC Power Outlet . . . . . . . . . . . . . . . . . .11
Dome Lamp Control . . . . . . . . . . . . . . . . . . . . . .11
Radio Data System (RDS) Operation . . . . . . . . .11
Tire Pressure Monitor . . . . . . . . . . . . . . . . . . . . .12
StabiliTrak
®
– Stability Control System . . . . . . .12
Premium Fuel . . . . . . . . . . . . . . . . . . . . . . . . . . . .13
Roadside Assistance . . . . . . . . . . . . . . . . . . . . .16
My GMLink . . . . . . . . . . . . . . . . . . . . . . . . . . . . . .16
Congratulations on your purchase of a Pontiac Vibe. Please read this information and your Owner Manual to
ensure an outstanding ownership experience. Note that your vehicle may not include all the features
described in this booklet. Keep this booklet with your Owner Manual for easy reference.

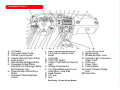
A. Air Outlets
B. Instrument Panel Cluster
C. Climate Control System
D. Hazard Warning Flasher Button
E. Audio System
F. Rear Window Defogger Button
G. Passenger Air Bag Status
Indicator/Front Passenger Safety
Belt Reminder Light
H. Power Remote Control Mirror
Button
I. Instrument Panel Brightness
Control
J. Rear Liftglass Release Button
K. Tire Pressure Monitor Reset
Button
L. Coinholder
M. TRAC OFF Button
N. Content Theft-Deterrent Security
Light
O. Storage Compartment
P. Turn Signal/Multifunction Lever
and Exterior Lamp Stalk
Q. Hood Release
R. Tilt Lever
S. Horn
T. Cruise Control Lever
U. Ignition Switch
V. Windshield Wiper Lever
W. Cigarette Light or Accessory
Power Outlet
X. Shift Lever
Y. Power Outlet
Z. Parking Brake
AA.Center Console Storage
Area
BB.Glove Box
Getting to Know Your Vibe
2
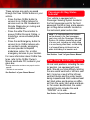
Instrument Panel
See Section 3 of your Owner Manual.

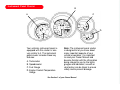
Your vehicle’s instrument panel is
equipped with this cluster or one
very similar to it. The instrument
panel cluster includes these key
features:
A. Tachometer
B. Speedometer
C. Fuel Gauge
D. Engine Coolant Temperature
Gauge
Note: The instrument panel cluster
is designed to let you know about
many important aspects of your
vehicle’s operation. It is important
to read your Owner Manual and
become familiar with the information
being relayed to you by the lights,
gauges and indicators, as well as
what action can be taken to ensure
safety and to prevent damage.
3
Instrument Panel Cluster
See Section 3 of your Owner Manual.
A
B
C
D

Getting to Know Your Vibe
4
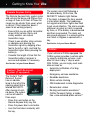
Remote Keyless Entry
OnStar
®
Content Theft-Deterrent
System (if equipped)
The Remote Keyless Entry system locks
and unlocks the doors and liftglass from
a range of three to 30 feet. At times the
range may be shorter than usual, which
is normal. If the transmitter doesn’t
seem to be working properly:
• Ensure that you are within transmitter
range of the vehicle. Rainy and
snowy weather can reduce
transmitter range.
• Check to see whether other vehicles
or obstacles are blocking the
transmitter signal by stepping a few
feet to the left or right, and hold the
transmitter higher when pressing the
button(s).
• Consider the length of time that the
transmitter battery has been in
service and replace it if necessary.
See Section 2 of your Owner Manual.
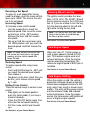
The Content Theft-
Deterrent System
has an indicator
lamp to the left of the
steering wheel that is
labeled SECURITY.
After closing all vehi-
cle doors, the system
can be activated in
three ways:
• Press the Lock button on the
Remote Keyless Entry key fob.
• Press the power door Lock button.
• Lock the front doors manually with
the key.
If your vehicle is OnStar-equipped, the
OnStar system provides in-vehicle safe-
ty, security and phone services, avail-
able 24 hours a day, 7 days a week.
With OnStar, you can enjoy such avail-
able services as:
• Automatic notification of air bag
deployment
• Emergency services assistance
• Roadside assistance
• Stolen vehicle tracking
• GM Goodwrench remote diagnostics
• Remote door unlock
• Routing and location assistance*
• OnStar Personal Calling, a hands-
free, voice-activated phone service**
The system arms itself following a
30-second delay. At this time, the
SECURITY indicator light flashes.
If the alarm is tripped, the horn sounds
in intermittent blasts. The headlamps,
turn signals and interior lights also flash
to get visual attention. The alarm sounds
whenever any door or hatch is opened
by force, or if the battery is disconnected
and then reconnected. The alarm will
also sound whenever it is armed and the
rear hatch or liftglass is opened with a
key.
See Section 2 of your Owner Manual

5
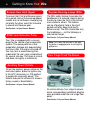
These services are easily accessed
through the three OnStar buttons in your
vehicle.
• Press the blue OnStar button to
connect to an OnStar Advisor for
services such as GM Goodwrench
Remote Diagnostics or routing and
location assistance.*
• Press the white Phone button to
access OnStar Personal Calling, a
hands-free, voice-activated phone
service.**
• Press the red Emergency button to
connect to an OnStar Advisor who
can contact a nearby emergency
services provider to dispatch
ambulance, police, fire, or other
emergency services to your location.
For more information about OnStar fea-
tures, refer to the OnStar Owner’s
Manual and Audio CD, located in your
glove box.
*Routing and location assistance may require service
upgrade
**Available in most markets
See Section 2 of your Owner Manual.
Your vehicle is equipped with a
Passenger Sensing System located in
the front passenger seat for the front
passenger frontal air bag, and a passen-
ger air bag status indicator located on
the instrument panel center stack.
See Sections 1 and 3 of your Owner Manual.
Passenger Air Bag Status
Indicator
Note: It is recommended that children
not be placed in the front passenger
seat, even with the Passenger Sensing
System. All children should be secured
in a rear seat, including an infant riding
in a rear-facing infant seat, a child riding
in a forward-facing child seat and an
older child riding in a booster seat.
Rear Center Seat Belt Operation
All rear seat positions, including the cen-
ter position, are equipped with seat
belts. Should you have difficulty latching
the rear-center seat belt or left-rear seat
belt, it may be a result of the left-rear
seat belt buckle and the center buckle
being mispositioned. Both outboard seat
belt latch plates and buckles are differ-
ent from the center latch plate and buck-
le. For easier identification, the center
seat belt buckle includes the word
“CENTER” on its side.
See Section 1 of your Owner Manual.

Getting to Know Your Vibe
6
Child Restraints (LATCH)
Your vehicle is equipped with LATCH
anchors, and may have top tethers for
use with a LATCH compatible child
restraint. If your child restraint is not
compatible with the LATCH system, you
may still use it by installing the child
restraint with the seat belt system.
Choose a child seat that is appropriate
for the child’s age and size (weight and
height).
See Section 1 of your Owner Manual.
Power Windows (if equipped)
Press the window lockout button, locat-
ed near the driver’s power door lock
switches, to disable the passengers’
power window switches. Press the
button again to enable the window
switches.
Only the driver’s window will operate
with the lockout button pressed.
See Section 2 of your Owner Manual.
Driver’s Seat Height Adjustment
To adjust the driver’s seat height, pull
the lever located on the outboard side of
the seat cushion until reaching the
desired height. (You may find the seat
easier to adjust when unoccupied.)
Before adjusting, make sure the ignition
is off and the vehicle is in Park (P).
See Section 1 of your Owner Manual.
Closing the Sunroof
As a safety measure, the sunroof clos-
ing mechanism is designed to stop in
the middle of its cycle. This prevents
objects from being closed in the sun-
roof. When the sunroof stops and the
opening is clear of all objects, release
the switch and press it again to com-
plete the closing cycle.
See Section 2 of your Owner Manual.
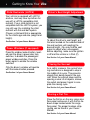
Storing a Flat Tire
Place the flat tire on the rear cargo area
floor panel and secure it with the tire tie-
down straps located under the cargo
floor panel. The proper tie-down strap
routing can be found in your Owner
Manual.
See Section 5 of your Owner Manual.

7
Automatic Lamp Control (ALC)
During daytime driving, the ALC may
temporarily switch the headlamp and
interior light systems, including the radio
display, to the nighttime mode. This
occurs when passing through darker
conditions, such as under a bridge or
overpass, or inside a parking garage.
The ALC light sensor is located at the
upper-left corner of the instrument panel.
To ensure proper system operation,
avoid placing objects or stickers on the
windshield at the windshield’s upper-left
corner.
See Section 3 of your Owner Manual.
Your vehicle is equipped with a pollen
and dust filter that removes common
allergens and pollutants from outside air
before they reach the vehicle cabin. If
air output volume from the heating and
air conditioning outlets drops over time
(with the fan at its highest setting), the
filter may be dirty and may need to be
changed. The filter is located in the
heating and A/C housing and can be
accessed through the filter door, behind
the glove box.
See Section 3 of your Owner Manual.
Air Filtration System
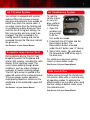
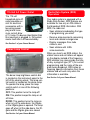
To cool the
vehicle interior
on very hot
days, perform
the following:
1. Open the
windows just
long enough
to let the
hot, inside air escape.
2. Press both the A/C button and the
Recirculation button. The
Recirculation button is located
under the A/C button (see “A” above).
3. Select Vent mode ( ) and adjust
the temperature knob all the way in
the blue area.
For continuous maximum cooling,
remain in recirculation mode.
See Section 3 of your Owner Manual.
Air Conditioning System
Side Vent Airflow
Airflow coming through the climate con-
trol system’s side vents is normal during
all operating modes. To optimize the
effectiveness of your system when using
the floor, defog or defrost mode, close
the outboard vents.
See Section 3 of your Owner Manual.
A

Getting to Know Your Vibe
8
Front and Rear Washers/Wipers
The wiper/washer controls are located
on the lever mounted to the right side of
the steering column. Moving the lever
down activates the front wipers; continue
moving it down to the desired setting.
(This activation method is the opposite
of all other Pontiac models.) Rear wipers
are activated by rotating the knob at the
end of the wiper lever to the desired
setting.
See Section 3 of your Owner Manual.
Window Anti-Fog Feature
The vehicle windows and windshield
often experience fogging when it is rain-
ing, or the humidity is high. To minimize
this effect, leave the Recirculation
button off and:
• Press the A/C button.
• Select Defrost ( ) on the mode
knob.
• Set the fan to HI and adjust the
temperature knob as desired.
The Recirculation button automatically
deactivates when the Climate Control
mode knob is set to the Defrost or
Heater/Defrost position.
For optimal
defog performance, it is recommend-
ed to leave this deactivated.
See Section 3 of your Owner Manual.
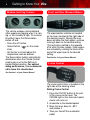
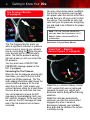
Cruise Control
The cruise control lever is located on the
right side of the steering wheel.
Setting Cruise Control
1. Press the ON-OFF button at the end
of the cruise control lever. The
CRUISE light on the instrument panel
cluster will come on.
2. Accelerate to the desired speed.
3. Move the lever down to –SET
and release it.
4. Take your foot off the accelerator
pedal.

9
Resuming a Set Speed
To return to a set speed after having
used the brakes, push the cruise control
lever up to +RES. This returns the vehi-
cle to its set speed.
Increasing Speed
To increase cruise control speed:
• Use the accelerator to reach the
desired speed; then move the cruise
control lever to the –SET position.
Release the lever and the acceler-
ator pedal.
• Tap up or hold the cruise lever up to
the +RES position until you reach the
desired speed, and then release the
lever.
Note: On some vehicles the cruise con-
trol system will terminate its set speed
memory anytime vehicle speed falls
below 25 mph.
Reducing Speed
To reduce speed while using cruise
control:
• Push and hold the lever to –SET until
you reach the desired lower speed;
then release it.
• Tap down on the lever. Each time you
do this, you’ll reduce vehicle speed
by 1 mph.
Ending Cruise Control
There are several ways to cancel cruise
control:
• Step lightly on the brake pedal or
push the clutch pedal, if you have a
manual transaxle.
• Press the ON-OFF button again (this
will erase the set speed memory).
• Pull the cruise control lever toward
you.
See Section 3 of your Owner Manual.
Cold Engine Shifting
Cold Engine Speed
When the engine is cold, the vehicle’s
powertrain computer directs automatic
transmission-equipped vehicles to shift
early, which may result in slower accel-
eration. This early shifting eases engine
and transmission loads and reduces
exhaust emissions. Once the engine
warms, the transmission shift points will
occur at higher engine speeds.
See Section 2 of your Owner Manual.
When the Vibe GT 1.8-liter engine is
cold, engine speed is limited to 7200
rpm. This reduces engine wear and
exhaust emissions. Once the engine
reaches operating temperature, the
maximum engine speed of 8300 rpm is
available.
See Section 2 of your Owner Manual.
Steering Wheel Lock-Up
The ignition switch provides four posi-
tions: LOCK, ACC, ON, START. Should
the key become stuck in the LOCK posi-
tion, or if you are unable to turn the key,
turn the steering wheel to the left and
right while turning the key hard.
See Section 2 of your Owner Manual.
Note: Turn the key only with your hand.
Using a tool to force it could damage
the key or ignition switch.

Getting to Know Your Vibe
10
Reverse Gear Alert Signal
To ensure that First and Reverse gears
on 6-speed manual transaxle-equipped
models are not confused, a beeping sig-
nal alerts the driver when the transaxle
is placed into Reverse gear.
See Section 2 of your Owner Manual.
The DRL safety feature illuminates the
headlamps at a reduced intensity during
the day to make the front of the vehicle
more visible to others. This feature
can be of particular help in the short
periods just after dawn and shortly
before sunset. The DRL illuminates only
the headlamps — not the taillamps or
side-marker lamps.
See Section 3 of your Owner Manual.
Daytime Running Lamps (DRL)
Note: DRL does not activate if the park-
ing brake is engaged prior to turning the
ignition on.
Auxiliary Power Outlets
To use the auxiliary power outlets on the
instrument panel, place the ignition key
in the ACC (Accessory) or ON position
to supply the necessary power. This
feature reduces the chances of encoun-
tering a weak or dead battery.
See Section 2 of your Owner Manual.
Rear Cargo Track Tie-Downs
At vehicle delivery, four cargo tie-downs
and a corresponding installation diagram
were provided under the rear cargo floor
panel.
See Section 2 of your Owner Manual.
EVAP Leak Detection Pump
Your Vibe is equipped with a vacuum
pump for the vehicle’s fuel evaporation
system. This pump performs a fuel
evaporation leakage test approximately
five hours after the engine is turned off.
You may hear a sound coming from
underneath the rear cargo compartment
for several minutes. The noise is normal
and does not signify a malfunction.

11
Dome Lamp Control
115-Volt AC Power Outlet
The 115-volt
household-style AC
outlet provides cur-
rent for electrical
accessories with a
two-prong power
plug and a maxi-
mum current draw
of 1.0 amp. If a device rated higher than
this maximum is plugged in, the system
resets itself after a 30-second delay.
See Section 3 of your Owner Manual.
The dome lamp brightness control dial
is located on the instrument panel to the
left of the steering wheel. The lamp con-
trol switch is located on the dome lamp.
To operate the lamp, place the lamp
control switch in one of the following
positions:
OFF: This position turns the lamp off.
ON: This position keeps the lamp on at
all times.
DOOR: This position turns the lamp on
when any of the side doors, the liftgate
or the liftgate glass is opened. The lamp
goes off when all the side doors, the lift-
gate and the liftgate glass are closed.
See Section 3 of your Owner Manual.
Radio Data System (RDS)
Operation
Your audio system is equipped with a
Radio Data System. RDS features are
available for use only on FM stations
that broadcast RDS information. With
RDS, the radio can:
• Seek stations broadcasting the type
of programming you select
• Receive announcements concerning
local and national emergencies
• Display messages from radio
stations, and
• Seek stations with traffic
announcements
When you tune to an RDS station, the
station name and call letters will appear
on the display instead of the frequency.
RDS stations may also provide the time
of day, a program type (PTY) for current
programming and the name of the pro-
gram being broadcast. RDS relies on
receiving specific information from these
stations and will work only when the
information is available.
See Section 3 of your Owner Manual.

Getting to Know Your Vibe
12
Tire Pressure Monitor
(if equipped)
StabiliTrak
®
– Stability
Control System (if equipped)
The Tire Pressure Monitor alerts you
when a significant reduction in pressure
occurs in one or more of your vehicle’s
tires by illuminating the (low tire pres-
sure) warning light on the instrument
panel. The low tire pressure warning
light will remain on until you correct the
tire pressure.
You may also have a CHECK TIRE
PRESSURE message appear on the
DIC (if equipped).
Correcting the Tire Pressure
When the low tire pressure warning light
illuminates, you must fill the tire to the
proper tire inflation pressure. The Tire
and Loading Information label shows the
correct inflation pressure for the tires
when they’re cold. “Cold” means your
vehicle has been sitting for at least three
hours or driven no more than one mile.
You can temporarily remove the DIC
message by acknowledging it with your
DIC controls. However, at the next vehi-
cle start-up, the DIC message will reap-
pear if the tire pressure has not been
corrected.
You may notice during cooler conditions
that the low tire pressure warning light
will appear when the vehicle is first start-
ed and then turn off as you start to drive
the vehicle. This could be an early indi-
cator that your tire pressures are getting
low and need to be inflated to the proper
pressure.
See Section 5 of your Owner Manual.
StabiliTrak is a Vehicle Stability Control
(VSC) system that uses an advanced
computer to assist your vehicle with
directional control during difficult driving
situations.
StabiliTrak activates automatically
whenever you start the vehicle and it
engages only when it senses a
discrepancy between your intended
drive path and the direction the vehicle
is actually moving.
Note: The Tire Pressure Monitor can
alert you about low tire pressure, but it
doesn’t replace normal monthly tire
maintenance.

13
Premium Fuel
Your vehicle may be equipped with an
engine that was designed to use premi-
um unleaded gasoline. See your Owner
Manual for information on fuel use for
your particular vehicle.
See Section 5 of your Owner Manual.
The system selectively applies the
appropriate brake(s) to help guide the
vehicle in the direction you are steering.
The system will activate when the
vehicle speed reaches or exceeds
9 mph (15 km/h) and will deactivate
when the vehicle speed reduces below
9 mph (15 km/h).
When engaged, the VSC symbol will
blink in the instrument panel cluster and
an alarm will sound intermittently.
Special care should be taken while
driving.
See Section 4 of your Owner Manual.

Getting to Know Your Vibe
14
Notes

15
Notes

Getting to Know Your Vibe
16
Certain restrictions, precautions and safety procedures apply to your vehicle. Please read your Owner
Manual for complete instructions. All information contained herein is based on information available at the
time of printing and is subject to change without notice. Copyright 2005 by GM Corp. All rights reserved.
06VIBEGTK A
Roadside Assistance
My GMLink
1-800-ROADSIDE (1-800-762-3743)
TTY Users: 1-888-889-2438
As the proud owner of a new Pontiac
vehicle, you are automatically enrolled
in the Pontiac Roadside Assistance pro-
gram. This value-added service is
intended to provide you with peace of
mind as you drive in the city or travel
the open road.
Pontiac’s Roadside Assistance toll-free
number is staffed by a team of techni-
cally trained advisors who are available
24 hours a day, 365 days a year, to pro-
vide minor repair information or make
arrangements to tow your vehicle to the
nearest Pontiac dealer.
Pontiac will provide the following servic-
es for 3 years/36,000 miles (60,000
km), at no expense to you:
• Fuel delivery
• Lockout service (identification
required)
• Tow to nearest dealership for
warranty service
• Flat tire assistance
• Jump starts
In many instances, mechanical failures
are covered under Pontiac’s compre-
hensive warranty. However, when other
services are utilized, our advisors will
explain any payment obligations you
might incur.
The Pontiac Owner Center at My
GMLink is a complimentary service for
Pontiac owners, a one-stop resource
to enhance your Pontiac ownership
experience. Exclusive member benefits
include online service reminders, vehicle
maintenance tips, online owner manual,
special privileges and more. Sign up
today at www.mygmlink.com.
For prompt and efficient assistance
when calling, please provide:
• Location of the vehicle
• Telephone number and your location
• Vehicle model, year and color
• Vehicle mileage
• Vehicle Identification Number (VIN)
• Vehicle license plate number
Pontiac reserves the right to limit servic-
es or reimbursement to an owner or
driver when, in Pontiac’s judgment, the
claims become excessive in frequency
or type of occurrence.
Roadside Assistance and OnStar
(if equipped)
If your vehicle is OnStar-equipped,
press the OnStar button and the vehicle
will send your current GPS location to
an OnStar Advisor who will speak to
you, assess your problem, contact
Roadside Assistance and relay your
exact location so you will get the help
you need.
!06VIBEGTK=A!
-
 1
1
-
 2
2
-
 3
3
-
 4
4
-
 5
5
-
 6
6
-
 7
7
-
 8
8
-
 9
9
-
 10
10
-
 11
11
-
 12
12
-
 13
13
-
 14
14
-
 15
15
-
 16
16


Pontiac Vibe 2006 User guide
- Type
- User guide
- This manual is also suitable for
Ask a question and I''ll find the answer in the document
Finding information in a document is now easier with AI
Related papers
-
Pontiac Vibe 2007 User guide
-
Pontiac Vibe 2008 User guide
-
-
-
-
Pontiac G3 2009 User guide
-
-
Pontiac 2009 Torrent User guide
-
-
Chevrolet TORRENT - NAVIGATION SYSTEM 2008 Operating instructions

