Page is loading ...

User's Manual
RE24U100/ RE42U100/ RE42U120/
RE48U100/ RE48U120
RE SERIES SERVER RACK
PROFESSIONAL RACK

01
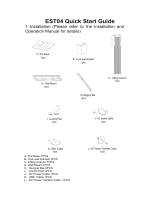
1. Introduction .................................................................................................... 01/02
2. Component idificatio .................................................................................... 03/03
3. Packaging Concept .................................................................................... 04/04
4. Enclosure Installation .................................................................................. 05/11
Optional Part(Bottom plate) Installation Instruction
Mounting cable management rails
Mounting vertical rails
Install roof panel
Install side panels
5. Enclosure Configuratio ...................................................................................12/12
Leveling the enclosure
Grounding the enclosure
Baying the enclosures
Equipment Installation
Before installing this product, please note the following safety information:
1. Always lower the leveling feet of the rack cabinet;
2. Always install equipment starting from the bottom of rack cabinet to top;
3. Always install the heaviest equipment in the bottom of the rack cabinet;
4. Always have two or more persons during assembling and moving the rack cabinet;
CONTENTS:
CAUTION:
02
NOTE:Above products can be shipped in Build-up method or Knock-down/flat-packe
method
OVERVIEW
Model No. Capacity(U) Width(mm) Depth(mm)
24U
42U
42U
48U
48U
AVAILABLE RACK DIMENSIONS BELOW:
RE SERIES FEATURE:
ATEN Racks are designed for mounting standard 19“ rack - mount equipment – servers,
routers, UPS systems, switches, audio/video devices – regardless of brand. All racks provide
straightforward equipment organization, excellent security and simple cable management
while enabling optimum airflow. The RE Series is perfect for advanced high - density server
and networking applications, such as demanding data center environments.
1. Perforated doors for massive front - to - rear airflow provide a ventilation rate up to 78%.
2. Static loading capacity up to 1500KG (without leveling feet and castors)
maintenance.
3. Horizontally divided side panels provide easy access and convenient post - installation
rails
4. Best design for cable management with large cable access slots and cable management
600
600
600
600
600
RE24U100
RE42U100
RE42U120
RE48U100
RE48U120
1070
1070
1200
1070
1200

03
①
Front vented door with single lock
⑥
Left vertical rail
②
Top cover
⑦
Cable management rails
③
Split rear door
⑧
Right vertical rails
④
Bottom plate
⑨
Side panels
⑤
Horizontal beam
Note: Bottom Plate is an additional mounting hardware.
Component identication
04
1pcs
1pcs
1pcs
Optional Part(Bottom plate) Installation Instruction: It is better to install bottom plate during step 4
and step 5.
Secure the bottom plate to the corner bracket with M4*8mm self-tapping screws(4pcs),the bottom
plate is tightened to the enclosure with M8*25mm hexagon headed bolt.The bottom plate is
optional.
Note: The bottom plate is one of mounting accessories. Your equipment may also
include other mounting hardware. Read the mounting instructions before installing your
equipment.
Important :
2
3
5
7
9
8
4
1
6

05
Part 1: Enclosure Installation
Step 1. Connect corner brackets to the lower beams with 2 screws.
Step 2. Connect each of 6 beams to the rear door with 2 screws.
1pcs
1pcs
1pcs
4pcs
1pcs
2pcs
06
⑨
⑨
⑤
①
⑤
①
1
1
1
1
6
2
2
2
4
CARTON A
CARTON B
CARTON C
PARTS LIST
PARTS LIST
PARTS LIST
Q'TY
Q'TY
Q'TY
⑦
③
⑦
③
⑥
②
⑥
②
⑧
④
⑧
④
2×左支架
2×右支架
6×横梁
2×理线架
2×左支架
2×右支架
6×横梁
2×理线架
2×左支架
2×右支架
6×横梁
2×理线架
2×左支架
2×右支架
6×横梁
2×理线架
1×后门组件
1×前门组件
1×顶盖
1×底板(选配)
1×后门组件
1×前门组件
1×顶盖
1×底板(选配)
1×后门组件
1×前门组件
1×顶盖
1×底板(选配)
1×后门组件
1×前门组件
1×顶盖
1×底板(选配)
4×侧门
Packaging Concept (Knock Down)
Safewell's at-pack(knock down) concept
allows the client to ship units to the limit
space, which can save container loading
space and transport cost.
CARTON A -19" STANDING SERVER RACK
FRONT & REAR DOOR KITS
CARTON B-19" STANDING SERVER RACK
RAILS & BEAM KITS
CARTON C-19" STANDING SERVER RACK
SIDE PANELS KITS
Front door/frame assy, 19"
standing server rack
Top cover,19" standing server
rack
Rear door/frame assy,19"
standing server rack
Bottom plate,19" standing
server rack
Horiztonal support beam
Vertical rail, left
Cable management rail
Vertical rail,,right
Side panel assy,19" standing
server rack

07
2pcs
1pcs
1pcs
Step 5. Install the cage nuts to the required square openings in the mounting beams, one for each
beam where you plan to install the cable management rails. Use M6 washers and mounting screws
to secure the cable management rails, one for each side. Place M6 washers between the screws
and the equipment mounting rails.
08
1pcs
1pcs
Step 3. Fasten each of 6 beams in step 2 to the front door with 2 screws
Step 4. Fasten corner brackets in step1 to the front with 2 screws

09
1pcs
1pcs
1pcs
Step 7. While holding the top cover, arrange the 2 pins near the rear of the top cover into the holes
in the enclosure frame. Pull the roof panel downward until it’s close to the enclosure frame.
2
1
10
2pcs
2pcs
1pcs
1pcs
Step 6. Install the cage nuts to the desired square openings as step 5. Fasten the rails to the
mounting beams with 3 screws and M6 washers, two rails for each side.

11 12
Note: The square holes at the middle of each U-shaped vertical rail are
numbered and also include a small notch to aid identification
When you need to install equipment, use cage nut to secure your
equipment to the U-shaped vertical rail.
Step 1. Placement: Use the casters to move the enclosure for a short distance over a level,smooth
and stable surface by pushing the unit,it should be moved near to the installation place.
Step 2. Leveling:After locating the enclosure in right place, using the
leveling feet on 4 corners to level the unit on the oor,please make
sure the enclosure is leveled before attempting to install equipments.
Step 3. Grounding Connection:Make sure all the parts of the
enclosure are properly bonded and grounded to the frame of
the enclosure,then connect one of the designated grounding
locations(two M6 threaded inserts on front/rear door frame) directly
to your facility's earth ground connection with 8AWG wire .Please
don't use the enclosure without an earth ground connection.
Step 4. Align the enclosures and join them using one M5 at-head
screw(pre-installed on the door frame) per bracket-two brackets for
the front and two brackets for the rear.
Step 5. Equipment installation:Please dont install any equipment until you have stablized the unit.
Install the heavier equipment firstly and towards the bottom of enclosure.Install the equipment
from the bottom of unit and then towards the top.
PART 2: ENCLOSURE CONFIGURATION
4pcs
1pcs
Step 8. Open side panel latch by sliding it downward,then intall side panels into the frame.
1
2
/