
www.kodak.com/go/c433support 1
ENGLISH
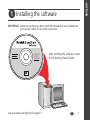
Installing the software
IMPORTANT:
Before connecting any cables, install the software that was included with
your camera. Follow the on-screen instructions.
After installing the software, return
to this Getting Started Guide.

2 www.kodak.com/go/easysharecenter
ENGLISH
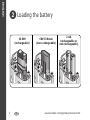
Loading the battery
CRV3 lithium
(non-rechargeable)
Ni-MH
(rechargeable)
2 AA
(rechargeable or
non-rechargeable)

www.kodak.com/go/c433support 3
ENGLISH
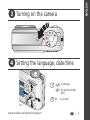
Turning on the camera
Setting the language, date/time
2
1
to change
OK
for previous/next
field
OK
to accept

4 www.kodak.com/go/easysharecenter
ENGLISH
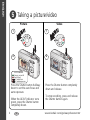
Taking a picture/video
Press the Shutter button completely
down and release.
To stop recording, press and release
the Shutter button again.
2
1
Press the Shutter button halfway
down to set the auto focus and
auto exposure.
When the AE/AF indicator turns
green, press the Shutter button
completely down.
1
2
Picture Video
AF/AE indicator
Green: successful
Red: failed
AF: failed focus
AE: failed exposure

www.kodak.com/go/c433support 5
ENGLISH
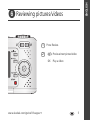
Reviewing pictures/videos
OK
2
1
Previous/next picture/video
Play a video
Press Review.

6 www.kodak.com/go/easysharecenter
ENGLISH
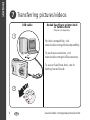
Transferring pictures/videos
USB cable
Kodak EasyShare printer dock
or camera dock
(May be sold separately.)
1
2
For dock compatibility, visit
www.kodak.com/go/dockcompatibility.
To purchase accessories, visit
www.kodak.com/go/c433accessories.
To use an EasyShare dock, see its
Getting Started Guide.

www.kodak.com/go/c433support 7
ENGLISH
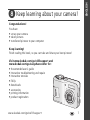
Keep learning about your camera!
Congratulations!
You have:
• set up your camera
• taken pictures
• transferred pictures to your computer
Visit www.kodak.com/go/c433support and
www.kodak.com/go/easysharecenter for:
• the extended user’s guide
• interactive troubleshooting and repairs
• interactive tutorials
• FAQs
• downloads
• accessories
• printing information
• product registration
Keep learning!
Finish reading this book, so you can take and share your best pictures!

8 www.kodak.com/go/easysharecenter
ENGLISH
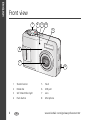
Front view
1 Shutter button 5 Flash
2Mode dial 6USB port
3 Self timer/Video light 7 Lens
4 Flash button 8 Microphone
41
5
2 3
6
7
8

www.kodak.com/go/c433support 9
ENGLISH
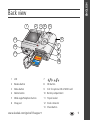
Back view
1LCD 7
2 Review button 8 OK button
3 Menu button 9 Slot for optional SD or MMC card
4 Delete button 10 Battery compartment
5 Wide angle/Telephoto button 11 Tripod socket
6 Strap post 12 Dock connector
13 Share button
541
6
7
2
13
3
8
9
12
10
11

10 www.kodak.com/go/easysharecenter
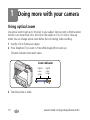
1 Doing more with your camera
Using optical zoom
Use optical zoom to get up to 3X closer to your subject. Optical zoom is effective when
the lens is no closer than 24 in. (60 cm) to the subject or 4 in. (10 cm) in Close-up
mode. You can change optical zoom before (but not during) video recording.
1 Use the LCD to frame your subject.
2 Press Telephoto (T) to zoom in. Press Wide Angle (W) to zoom out.
The zoom indicator shows zoom status.
3 Take the picture or video.
Zoom indicator
Optical
zoom
range
Digital
zoom
range
W
TD

Doing more with your camera
www.kodak.com/go/c433support 11
Using digital zoom
Use digital zoom in any Still mode to get up to 15X magnification. Press the Telephoto
(T) button to the optical zoom limit (3X). Release the button, then press it again.
NOTE: You may notice decreased image quality when using digital zoom. The blue slider on the zoom
indicator pauses and turns red when the picture quality reaches the limit for an acceptable 4 x 6-in.
(10 x 15 cm) print.
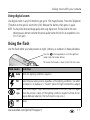
Using the flash
Use the flash when you take pictures at night, indoors, or outdoors in heavy shadows.
Flash modes Flash fires
Auto When the lighting conditions require it.
Fill Every time you take a picture, regardless of the lighting conditions. Use when
the subject is in shadow or is “backlit” (when the light is behind the subject).
Red-
eye
Once, so the subject’s eyes become accustomed to the flash, then fires again
when the picture is taken. (If the lighting conditions require flash but do not
require Red-eye reduction, the flash may fire only once.)
Off Never.
The current flash mode is shown in the LCD status area.
Press the button repeatedly to scroll through flash
modes (see Flash modes below).

Doing more with your camera
12 www.kodak.com/go/easysharecenter
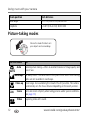
Picture-taking modes
Zoom position Flash distance
Wide angle 2–11.5 ft (0.6–3.5 m) @ ISO 200
Telephoto 2– 6.6 ft (0.6–2.0 m) @ ISO 200
Use this mode For
Auto General picture taking—offers an excellent balance of image quality and
ease of use.
Landscape Far-away scenes. The camera uses infinity auto-focus. Auto-focus framing
marks are not available in Landscape.
Close-up Close range. Use available light instead of flash if possible. The camera
automatically sets the focus distance depending on the zoom position.
Scene Point-and-shoot simplicity when taking pictures under special conditions.
(See page 13.)
Video Capturing video with sound.
Choose the mode that best suits
your subjects and surroundings.
SCN

Doing more with your camera
www.kodak.com/go/c433support 13
Scene modes
1 Turn the Mode dial to Scene .
2 Press to display Scene mode descriptions.
NOTE: If the Help text turns off, press the OK button.
3 Press the OK button to choose a Scene mode.
Use this SCN mode For
Portrait Full-frame portraits of people.
Sport Subjects that are in motion.
Children Action pictures of children in bright light.
Party People indoors. Minimizes red eye.
Beach Bright beach scenes.
Snow Bright snow scenes.
Fireworks Fireworks displays. Flash does not fire. Place the camera on a flat, steady
surface or use a tripod.

Doing more with your camera
14 www.kodak.com/go/easysharecenter
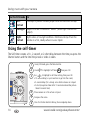
Using the self-timer
The Self-timer creates a 10-, 2-second, or 2-shot delay between the time you press the
Shutter button and the time the picture or video is taken.
Self-
Portrait
Close-ups of yourself. Assures proper focus and minimizes red eye.
Backlight Subjects that are in shadow or “backlit” (when light is behind the
subject).
Night
Portrait
Night scenes or low-light conditions. Minimizes red eye. Place the
camera on a flat, steady surface or use a tripod.
Use this SCN mode For
1
2
Use to highlight Self Timer , then press OK.
• 2-shot (one picture taken after 10 seconds and another picture
taken 8 seconds later)
In any Still mode, press the Menu button.
• 10-second delay (so you have time to get into the scene)
• 2-second delay (for a steady, auto-shutter release on a tripod
3
Use to highlight a self-timer setting, then press OK.
4
Place camera on a flat surface or tripod.
Compose the scene.
5
Press the Shutter button halfway, then completely down.
6

Doing more with your camera
www.kodak.com/go/c433support 15
To cancel the self-timer, follow steps 1 and 2, select Off, then press OK.
Use the same procedure to take a video, but:
■ Turn the Mode dial to Video .
■ Press the Shutter button completely down.
NOTE: The video stops when no storage space remains. Only the 2- and 10-second options are available in
video mode.
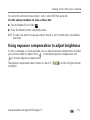
Using exposure compensation to adjust brightness
In Auto, Landscape, or Close-up mode, you can adjust exposure compensation to make
your pictures darker or lighter. Press to decrease exposure compensation and
to increase exposure compensation.
The exposure compensation level is shown on the LCD , and the LCD gets dimmer
or brighter.

Doing more with your camera
16 www.kodak.com/go/easysharecenter
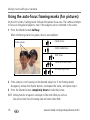
Using the auto-focus framing marks (for pictures)
On the LCD screen, framing marks indicate the camera focus area. The camera attempts
to focus on foreground subjects, even if the subjects are not centered in the scene.
1 Press the Shutter button halfway.
When the framing marks turn green, focus is accomplished.
2 If the camera is not focusing on the desired subject (or if the framing marks
disappear), release the Shutter button, recompose the scene, and repeat step 1.
3 Press the Shutter button completely down to take the picture.
NOTE: Framing marks do not appear in Landscape or Video mode. When you use Focus
Zone and set Center Zone, the framing marks are fixed at Center Wide.
Center focus
Center wide focus
Side focus
Center and side focus
Left and right focus
Framing marks

www.kodak.com/go/c433support 17
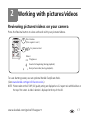
2 Working with pictures/videos
Reviewing pictures/videos on your camera
Press the Review button to view and work with your pictures/videos.
To save battery power, use an optional Kodak EasyShare dock.
(See www.kodak.com/go/c433accessories.)
NOTE: Pictures taken at the 3.5 MP (3:2) quality setting are displayed at a 3:2 aspect ratio with black bars at
the top of the screen. A video’s duration is displayed at the top of the LCD.
1
2
for previous/next.
Press Review.
(Press again to exit.)
Videos:
OK
Play/pause.
Rewind to beginning (during playback).
Next picture/video (during playback).

Working with pictures/videos
18 www.kodak.com/go/easysharecenter
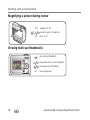
Magnifying a picture during review
Viewing multi-up (thumbnails)
magnify 2X - 8X.
W/T
view other parts of the picture.
return to 1X.
OK
view previous/next thumbnail.
view multi-up thumbnails.
view previous/next row of thumbnails.
view single picture.OK

Working with pictures/videos
www.kodak.com/go/c433support 19
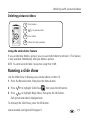
Deleting pictures/videos
Using the undo delete feature
If you accidentally delete a picture, you can use Undo Delete to retrieve it. This feature
is only available immediately after you delete a picture.
NOTE: You cannot use Undo Delete if your picture is larger than 10 MB.
Running a slide show
Use the Slide Show to display your pictures/videos on the LCD.
1 Press the Review button, then press the Menu button.
2 Press to highlight Slide Show , then press the OK button.
3 Press to highlight Begin Show, then press the OK button.
Each picture and video is displayed once.
To interrupt the Slide Show, press the OK button.
1
2
4
3
Follow the screen prompts.
Press Delete.
for previous/next.
Press Review.

Working with pictures/videos
20 www.kodak.com/go/easysharecenter
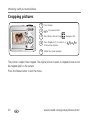
Cropping pictures
The picture is copied, then cropped. The original picture is saved. A cropped picture cannot
be cropped again on the camera.
Press the Menu button to exit the menu.
1
2
3
Follow the screen prompts.
Press Menu, choose Crop
for previous/next.
Press
Review.
, then press OK.
4
Press Telephoto (T) to zoom in, or
to move the crop box.
5
Page is loading ...
Page is loading ...
Page is loading ...
Page is loading ...
Page is loading ...
Page is loading ...
Page is loading ...
Page is loading ...
-
 1
1
-
 2
2
-
 3
3
-
 4
4
-
 5
5
-
 6
6
-
 7
7
-
 8
8
-
 9
9
-
 10
10
-
 11
11
-
 12
12
-
 13
13
-
 14
14
-
 15
15
-
 16
16
-
 17
17
-
 18
18
-
 19
19
-
 20
20
-
 21
21
-
 22
22
-
 23
23
-
 24
24
-
 25
25
-
 26
26
-
 27
27
-
 28
28


Kodak EasyShare C433 Quick start guide
- Type
- Quick start guide
- This manual is also suitable for
Ask a question and I''ll find the answer in the document
Finding information in a document is now easier with AI
Related papers
-
Kodak C633 - Easyshare Printer Dock Series 3 Quick start guide
-
Kodak EasyShare M893 IS User manual
-
Kodak Z885 - EASYSHARE Digital Camera User manual
-
-
-
-
Kodak EasyShare M340 User manual
-
-
-