
1
Table of Contents
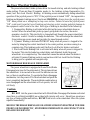
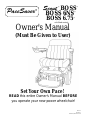
THIS MANUAL COVERS THE OPERATION OF YOUR NEW
PaceSaver Scout
Boss, Boss 6NS & Boss 6.75
POWER WHEELCHAIRS. BE SURE AND FIND THE INFORMATION
THAT PERTAINS TO YOUR NEEDS BEFORE OPERATING.
Introduction 2
Important Safety Information 3
Specifi cations 13
Getting On and Off The Power Wheelchair
14
Operating the Power Wheelchair
15
Controller Instructions 19
Your First Ride 20
The Power Wheelchair Braking Systems 21
Brake Disengage Mechanism 21
Seat Assembly Operation 22
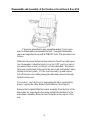
Disassembly & Assembly 23
Charging Your Batteries 24
General Care, Diagnostic & Maintenance Section 32
Diagnostics & Faults 34
Commonly Asked Questions and Possible Answers 35
PN 82253
Revised 0512
BOSS6OM_PN822530512.indd

2
PaceSaver Scout Boss, Boss 6NS & Boss 6.75 OWNERS MANUAL
Introduction
Congratulations on your choice of a power wheelchair! It is a de-
pendable vehicle built for power and performance. Its easy to operate controls give
you more of what you are looking for in a wheelchair.
But it is important that you understand what your power wheelchair is,
and what it is not. Our power wheelchairs (like all power wheelchairs) are designed
to provide safe, reliable transportation to older or moderately physically disabled
individuals who have diffi culty in getting around. It will safely take you everywhere
the specifi cations indicate as long as you follow the simple safety guidelines shown
on the next few pages.
The power wheelchair is not an all terrain vehicle that you can use out in
the fi elds to drag brush around or climb steep hills. It was not meant to go hunting
in, or transport you thru hazardous environments. It also was not designed for the
severely handicapped individual who should not be in a power wheelchair. You must
have good stability, motor control and above all else, good common sense to use our
wheelchair, or any other brand. If you feel that you cannot safely operate this vehicle
at all times, you should not use this power wheelchair!
Important
Please read the entire manual carefully before attempting to drive your
new power wheelchair.
Remember to read all service recommendations outlined in this manual to
achieve trouble free, safe and enjoyable operation of your power wheelchair. Failure
to follow the recommended service procedures will damage your power wheelchair
and such damage is not covered under warranty. Contact your dealer if you have
questions after reading this manual.
Leisure-Lift specifi cally disclaims responsibility for any bodily injuries or prop-
erty damage which may occur during or because of improper use or any use which
does not comply with applicable Federal, State, or Local laws and ordinances or
methods recommended in this manual. If in doubt about your ability to operate
your power wheelchair, consult your doctor.

3
NOTE: MODIFYING AND/OR TAMPERING IN ANY UNAUTHORIZED
MANNER WITH THE POWER WHEELCHAIR WILL VOID THE WARRANTY
AND MAY CAUSE THE WHEELCHAIR TO MALFUNCTION, EXPOSING YOU TO
PHYSICAL HARM.
ATTENTION: This manual contains specifi c information about your power wheel-
chair. While some of the information is the same for all power wheelchairs, make
sure that you follow the specifi cations and directions that apply to your powerchair.
If you are unsure of the style powerchair you have, contact your dealer.
Your powerchair is a vehicle which provides independence and freedom to people
with limited mobility. Driver error can cause injury to the driver and to other people.
Please use common sense, courtesy, and obey the following guidelines for vehicle
operation.
READ THIS ENTIRE MANUAL
BEFORE DRIVING THIS VEHICLE.
Safety Guidelines
Always turn the power switch to the OFF position when stopped or when getting off or
on the power wheelchair. This keeps you from accidentally hitting the throttle and
causing an accident. For persons with limited lower body strength, or persons who
make slide transfers and may forget to turn the power switch off, we recommend
special caution.
DO NOT operate the unit if it behaves erratically, or shows abnormal response, heating,
smoking or arcing. Turn the system off at once and call your dealer for service.
Use extra caution
when riding your
power wheelchair
off of the pavement or on rough,
uneven or soft surfaces tipping and injury may result.
See maximum incline rating
on specifi cation chart.
Do not exceed the incline specifi cations for your power wheelchair or it will become
unstable and tipping will result. Persons with limited ability to protect themselves
(like persons paralyzed on one side) should use protective equipment such as bicycle
headgear. The specifi cation chart in your manual will indicate the maximum incline
for your particular style power wheelchair.

4
Keep your feet on the footrests while riding the power wheelchair to avoid hitting
them on objects as you drive. Always wear shoes while operating your power
wheelchair.
Always wear your lap belt when riding your power wheelchair.
Secure the removable seat assembly before operating the power wheelchair to
prevent yourself from falling from the seat while moving.
Remember, The power wheelchair is built to carry a single person. Do not carry
passengers under any circumstances or accidents and bodily injury will occur.
Ensure driving surface, ramp, platform lift or elevator is capable of supporting
combined weight of user and wheelchair.
Always
go straight up or down curb cuts. You want the front wheels and the rear wheels
to climb up or go down together, not one at a time. Not doing this will result in the
power wheelchair
violently swinging from side to side (as a car would in a ditch) or
the
power wheelchair
overturning. Also approach curb access ramps the same way,
straight on, not at an angle. NEVER attempt to go up or down a regular height curb
or tipping and personal injury will result!
Warning Driving the power wheelchair in busy streets, busy parking lots, or in crowded
shopping malls can be dangerous for you or other people as you may be struck
by a vehicle or you might strike a pedestrian. Use caution in congested areas at
all times.
Lean forward a slight amount when traveling up an incline.
NEVER
leave your
power wheelchair
exposed to the elements. This includes storage out-
side or carrying the
power wheelchair
on an outside car-lift during periods of high
moisture ( mist, rain, snow, etc.) or any other inclement weather (dust or sand storms,
etc.). Use only a damp rag to clean your
power wheelchair
(never use solvents or
abrasive cleaners). The use of excessive water, as from a garden hose or bucket may
cause damage to your
power wheelchairs
electronics.
Use caution when driving off even a small curb or raised surface. The act of dropping off
the edge subjects the power wheelchair to extreme forces that can damage the frame
and other components. This type of damage is not covered under warranty.
Disconnect the batteries before performing any maintenance or if you will not be riding
the power wheelchair for more than a few days. This avoids both the possibility of
injuries due to shock and helps lengthen the battery life. Make sure that the batteries
are secure when you are using the power wheelchair.

5
Follow the directions of your doctor and/or pharmacist at all times. Do not drive the
power wheelchair while taking medications that affect your refl exes or judgment,
as your driving will be impaired and accidents may result. Do not drink alcohol
or use any other stimulants while operating this or any other vehicle.
The following are important things to help you drive the power wheelchair in the
safest possible manner. Please take note of each and every one.
WARNING DO NOT engage in the following activities with your power wheelchair or
serious personal injury may result.
DO NOT ride the power wheelchair with the brake disengaged at anytime.
DO NOT drive the power wheelchair diagonally across inclines, turn sharp on an incline or
make turns at or near full throttle at any time. Doing this will result in the power wheelchair
losing traction and control which can result in tipping and possibly serious injuries.
DO NOT drive the power wheelchair with the seat assembly higher than necessary as tip-
ping and serious injury may result. The lower the seat, the better your stability.
DO NOT drive the power wheelchair with under-infl ated tires as this increases the possibil-
ity of tipping and injury. Your stability and effi ciency (power and range) are also greatly
affected.
DO NOT remain seated on your power wheelchair while it is being loaded into a vehicle
using anything other than a special wheelchair lift, or personal injury may result.
DO NOT
ride on soft, uneven surfaces as this can cause lose of traction and control causing
tipping and that may result in serious injury.
DO NOT
stop on any incline to rest or dismount. Although the electric brake will stop and
hold you, it is best to stop in level, fl at areas where there is no possibility of rolling, or tipping
the unit or having the occupant fall out.
DO NOT ride your power wheelchair without wearing your lap belt at all times or
serious injury may result. This is especially important on ramps or inclines.

6
Leisure-Lift POWER WHEELCHAIR TIE DOWN INFORMATION
WARNING: Do not engage in the following activities with your
power wheelchair or seri-
ous injury may result.
Do not remain seated on your
power wheelchair while it is being loaded into a vehicle using
anything other than a special wheelchair lift.
Riding on a platform lift is dangerous. Failure to check weight capacity, turn off controller,
have the required precise driving control capability or have the wheelchair properly main-
tained could result in serious injury or death.
Do not use the
power wheelchair as a seat in a moving vehicle. As of this date, the Depart-
ment of Transportation has not approved any tie down system for transportation of a user
while in a
power wheelchair in a moving vehicle of any type. The rider must be seated in a
regular automotive seat and restrained by an approved automobile safety belt. The rider must
be warned that there is a many times greater likelihood of sever injury or death in the event
of an accident if they are not in the provided automotive seat and restraint system. The fol-
lowing attachment points are provided for the sole purpose of securing the mobility device
without the rider. The
power wheelchair and batteries MUST be independently and properly
restrained or stored in a separate compartment so as to prevent it from causing injury in an ac-
cident.
CONVENIENT TIE DOWN POINTS
The following is a list of convenient locations that the straps from a 4 point securement sys-
tem could be anchored on PaceSaver products. These products have not been crash tested and
certifi ed as crash worthy using these locations.
POWER WHEELCHAIRS
M1 FRONT WHEEL DRIVE
Back anchor points - Place a strap around the lower portion of each armrest support.
Front anchor points - Place a strap around each anti-tip wheel support arm just above the
small anti-tip wheel.
M1 REAR WHEEL DRIVE
Back anchor points - Place a strap around the lower portion of each armrest support.
Front anchor points - Place a strap around the top of each swivel caster fork.
SCOUT, SCOUT RF, SCOUT RF 4, BOSS, BOSS 4.5, BOSS 6NS, BOSS 6.75
Back anchor points - Place a strap around the lower portion of each armrest support.
Front anchor points - Place a strap around each anti-tip wheel support arm just above the
small anti-tip wheel.

7
DO NOT drive up, down or across inclines greater than the rating for your style power
wheelchair or tipping will result. Refer to the Specifi cation Sheet (Please Note:
Soft surfaces reduce the incline capability by more than 50%). Wet or slick surfaces
reduce steering and braking controls tremendously. Use extreme caution in these
circumstances.
DO NOT travel down ramps at high speed. Doing so will reduce traction and increase
stopping distance.
DO NOT allow the power wheelchair controls to become wet. Never wash off the
power wheelchair using a hose or a stream of water, drive through standing water or
ride in the rain. Possible loss of control and/or electronic damage will occur. Do not
attempt to ride a power wheelchair that has been soaked until it has had a chance to dry
thoroughly.
DO NOT leave the power wheelchair where it is exposed to high temperatures
(a car trunk, etc.) or to poor weather conditions such as rain or snow or freezing
conditions as damage to the unit will occur.
DO NOT disassemble any wheel at any time while still infl ated. The pressure may
blow wheel rims apart while you are loosening them.
DO NOT ride the unit near platforms, stairs, ledges, curbs or in any other potentially
dangerous situation as serious injury can result.
DO NOT ride the power wheelchair over power cords, oxygen lines, hoses or any other
material that could become entangled in the wheels or get caught in the drive mechanism
of the power wheelchair or while connected to equipment off of the power wheelchair.
DO NOT attempt to reach objects if you have to move forward in the seat.
DO NOT attempt to reach objects if you have to pick them up from the fl oor by reaching
down between your knees.
DO NOT lean over the top of the seat back to reach objects from behind as this may cause the
power wheelchair to tip over or cause you to fall out.
DO NOT shift your weight or sitting position toward the direction you are reaching as the
power wheelchair may tip over.
DO NOT tilt the
power wheelchair without assistance.
DO NOT use an escalator to move a
power wheelchair between fl oors. Serious bodily injury
may occur.

8
ALWAYS turn the power wheelchair power OFF and engage the motor locks/clutches to pre-
vent the wheels from moving BEFORE attempting to transfer in or out of the
power wheel-
chair. Also make sure every precaution is taken to reduce the gap distance.
DO NOT engage or disengage the motor locks/clutches until the power is in the OFF position.
DO NOT operate on roads, streets or highways.
DO NOT climb, go up or down hard surface ramps greater than allowed in specifi cations. Use
special caution on soft surfaces as they greatly reduce incline rating. See specifi cations for
your power wheelchair.
DO NOT attempt to move up or down an incline with a water, ice or oil fi lm or loss of control
& braking will result.
DO NOT attempt to drive over curbs or obstacles greater than maximum climbing capability
shown in specifi cations . Doing so may cause your
power wheelchair to turn over and cause
bodily harm or damage to the
power wheelchair.
DO NOT use unauthorized parts, accessories, or adapters other than those authorized by Lei-
sure-Lift.
DO NOT attempt to lift the
power wheelchair by lifting on any removable (detachable) parts.
Lifting by means of any removable (detachable) parts of a
power wheelchair may result in
injury to the user of damage to the
power wheelchair.
DO NOT stand on the frame of the
power wheelchair.
DO NOT use the footplate as a platform. When getting in or out of the
power wheelchair,
make sure that the footplate are in the upward position or swing footrests towards the outside
of the
power wheelchair. See - Getting On and Off the Power Wheelchair.
We realize that many bariatric persons can not do a side transfer or raise their legs to raise and
lower the footplate. If and only if you must step on the footplate for entering or exiting the
power wheelchair, you must follow these instructions. Your power wheelchair is equipped
with a patented infi nitely adjustable rigid anti-tip system (see fi gure 1 under Battery Removal
Section). When both of the front anti-tip wheels are lowered to contact the fl oor, you can step
on the platform without tipping the chair forward. After entry the wheels must be raised to
adjust to the driving environment - 1/4” for fl at fl oors and up to 2” for outdoor terrain. Al-
ways keep the adjustment as low as possible for your driving area. Warning: Failure to lower
the anti-tip wheels for entry and exit will result in the chair tipping forward when you stand
on the footplate which can cause you to fall and result in possible serious injury. Warning: As
with any
power wheelchair part should the anti-tip assembly become damaged, discontinue
use immediately and contact your dealer for service. Warning: Always keep anti-tip wheels at
the same height from fl oor to prevent tipping to side.
ALWAYS wear your lap belt.

9
ELECTRICAL
EXTREME care should be exercised when using oxygen in close proximity to electric cir-
cuits. Contact your oxygen supplier for instruction in the use of oxygen.
Grounding instructions:
DO NOT, under any circumstances, cut or remove the round grounding prong from any plug
used with or for Leisure-Lift products. Some devices are equipped with three-prong (ground-
ing) plus for protection against possible shock hazards. Where a two-prong wall receptacle
is encountered, it is the personal responsibility and obligation of the customer to contact a
qualifi ed electrician and have the two-prong receptacle replaced with a properly grounded
three-prong wall receptacle in accordance with the National Electrical Code. If you must use
an extension cord, use ONLY a three-wire extension cord having the same or higher electri-
cal rating as the device being connected. In addition, Leisure-Lift has placed RED/ORANGE
WARNING TAGS on some equipment. DO NOT remove these tags. Carefully read battery/
battery charger information prior to installing, servicing or operating your wheelchair.
RAIN & MOISTURE
LEISURE-LIFT has established the following rules for dealing with moisture.
End user or their attendant should allow suffi cient time to remove his/her power wheelchair
prior to a rain storm or inclement weather to retain wheelchair operation.
DO NOT leave your power wheelchair in a rain storm of any kind.
DO NOT use your power wheelchair in a shower or leave it in a damp bathroom while
taking a shower.
DO NOT leave your power wheelchair in a damp area for any length of time.
Direct exposure to rain or dampness will cause the wheelchair to malfunction electrically and
mechanically; may cause the wheelchair to prematurely rust.
Check to ensure that the batteries are secured in place, the joystick boot is NOT torn or
cracked where water can enter and that all electrical connections are secure at all times.
DO NOT use the joystick if the boot is torn or cracked. If the joystick boot becomes torn or
cracked, replace IMMEDIATELY.

10
WEIGHT TRAINING
Leisure-Lift DOES NOT recommend the use of its power wheelchair as a weight training
apparatus.
Power wheelchairs have NOT been designed or tested as a seat for any kind of
weight training. If occupant uses said wheelchair as a weight training apparatus, Leisure-Lift
shall NOT be liable for bodily injury and the warranty will be voided immediately.
SAFETY/HANDLING OF POWER WHEELCHAIRS
“Safety and Handling” of the wheelchair requires the close attention of the wheelchair user as
well as the assistant. This manual points out the most common procedures and techniques in-
volved in the safe operation and maintenance of the wheelchair. It is important to practice and
master these safe techniques until you are comfortable in maneuvering around the frequently
encountered architectural barriers.
Use this information only as a “basic” guide. The techniques that are discussed on the follow-
ing pages have been used successfully my many.
Individual wheelchair users often develop skills to deal with daily living activities that may
differ from those described in this manual. Leisure-Lift recognized and encourages each indi-
vidual to try what works best for him/her in overcoming architectural obstacles that they may
encounter. Techniques in this manual are a starting point for new wheelchair users and assis-
tants with “safety” as the most important consideration for all.
STABILITY AND BALANCE
WARNING
Always wear your lap belt.
To assure stability and proper operation of your wheelchair, you must at all times maintain
proper balance. Your wheelchair has been designed to remain upright and stable during nor-
mal daily activities as long as you do not move beyond the center of gravity.
The anti-tip wheels are normally positioned approximately two inches off the ground (with a
rider in the chair) but may be adjusted in height downward by your dealer. Because your
power
wheelchair is a "midi" (3/4) drive chair the anti-tip wheels are normally only used when brak-
ing going forward down a steep incline. Reducing this setting causes the powerchair to tilt
forward at a lesser angle before resting on the anti-tip wheels if you decelerate rapidly while
going down a hill. The normal adjustment should allow the
power wheelchair to climb a two
inch obstacle.
DO NOT lean forward out of the wheelchair any further than the length of the armrests.

11
STAIRWAYS - WARNING
DO NOT attempt to move an occupied power wheelchair between fl oors using a stairway or
escalator. Use an elevator to move an occupied power wheelchair between fl oors. If moving a
power wheelchair between fl oors by means of a stairway, the occupant MUST be removed and
transported independently of the power wheelchair Again, DO NOT use an escalator to move
a wheelchair between fl oors. Serious bodily injury may occur..
Extreme caution is advised when it is necessary to move an UNOCCUPIED power wheelchair
up or down the stairs. Leisure-Lift recommends disassembling your wheelchair into smaller,
more manageable components to keep from personal injury. Lifting by means of any remov-
able (detachable) parts of a wheelchair may result in injury to the user or damage to the wheel-
chair.
Follow this procedure for moving wheelchair between fl oors when an elevator is NOT available:
ESCALATORS - WARNING
DO NOT use an escalator to move a wheelchair between fl oors. Serious bodily injury may occur.
TRANSFERRING TO/FROM OTHER SEATS
WARNING
ALWAYS turn the wheelchair power OFF and engage the motor locks/clutches to prevent the
wheels from moving BEFORE attempting to transfer in or out of the wheelchair. Also make
sure every precaution is taken to reduce the gap distance. Always have an attendant or health-
care professional present while learning to properly transfer yourself.
CAUTION
When transferring, position yourself as far back as possible in the seat. This will prevent
damaging the upholstery and the possibility of the wheelchair tipping forward. See section
Getting On and Off the Power Wheelchair.
PERCENTAGE OF WEIGHT DISTRIBUTION
WARNING
DO NOT attempt to reach objects if you have to move forward in the seat or pick them up
from the fl oor by reaching down between your knees.
Many activities require the wheelchair user to reach, bend and transfer in and out of the
wheelchair. These movements will cause a change to normal balance, center of gravity, and
weight distribution of the wheelchair. To determine and establish your particular safety limits,
practice bending, reaching and transferring activities in several combinations in the presence
of a qualifi ed health professional BEFORE attempting active use of the wheelchair. Remem-
ber. . . Keep your lap belt on at all times.
Never roll backward down an incline as caster rotation reduces rearward stability.

12
REACHING, LEANING, BENDING AND BENDING - FORWARD
Position the rear casters so that they are extended as far rearward as possible and engage mo-
tor locks/clutches. DO NOT LEAN FORWARD OF THE ARMRESTS.
REACHING, BENDING - BACKWARDS
WARNING
DO NOT lean over the top of the back upholstery. This will change your center of gravity and
may cause you to tip over.
Position wheelchair as close as possible to the desired object. Point rear casters rearward to
create the longest possible wheelbase. Reach back only as far as your arm will extend without
changing your sitting position.
Persons having disabilities which limit their ability to remain erect without assistance,
(stroke patients, severe muscular diseases, etc.) should carefully evaluate whether they
should operate a wheelchair at all. If they decide, with the advise of their physician or an-
other advisor, that they are capable of safely operating a wheelchair, they should consider
the use of a bicycle helmet or pads when operating a wheelchair. These articles would help
protect them should they fi nd themselves in a hazardous situation where they could tip over
or fall because of their lack of balance.
DIFFERENT STYLES OF POWER WHEELCHAIRS HAVE DIFFERENT INCLINE CLIMB-
ING ABILITIES. CAREFULLY STUDY THE CHART TO SEE THE CORRECT SPECIFICA-
TIONS FOR YOUR UNIT. DO NOT EXCEED THE SPECIFICATIONS OF THE POWER
WHEELCHAIR STYLE YOU PURCHASED!

13
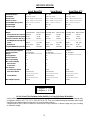
5 degrees = 8.7%
Seat Width Range:
Seat Depth:
Seat-to-Floor:
Seat-to-Footrest
Overall Width (No joystick):
Overall Height:
Overall Length
Weight
Motor/Suspensions Section
Footplate/Front Anti-Tip System
Seat and Controller (will vary)
Seat Weight will vary with size.
TOTAL
Batteries (2)
Complete W/Batteries (Gel Cell):
Battery/Size (Not Supplied)
Speed: Adjustable
Range*:
Turning Radius:
Ground Clearance
Max Curb Climbing
Max. Incline Stability
Hard Surface
Soft Surface
Tire Pressure
Front Anti-Tip Wheels
Main Drive Wheels
Caster Wheels
Max. Weight Capacity
SPECIFICATIONS
Scout Boss 6NS
24" - 30"
19.5", 21", 22.5"
19.3" - 21.3"
(uncompressed foam)
13.9" - 17.9" (uncompressed foam)
28.5" (outside tire to outside tire)
38" - 41"
49"
Pneumatic Tires Flat Free Tires
106.5 lbs. 137 lbs.
24 lbs. 24 lbs.
58.5 lbs. 58.5 lbs.
---------------------------------------
188 lbs. 217.5 lbs.
55 lbs. each 55 lbs.
305 lbs. 334.5 lbs.
Group 24
4.6 mph Max.
18 - 20 miles
(varies with weight)
27"
3"
2.5"
8
o
5
o
Solid
Flat Free-Std
(50 psi with optional pneumatic)
Flat Free-Std
(50 psi with optional pneumatic)
600 lbs.
Do Not Exceed The Maximum Incline Stability For Your Style Power Wheelchair!
Incline stability (maximum up-hill angle) is determined using applicable RESNA & ISO criteria for determining static
and dynamic stability (ISO 7176-1 & 2, ANSI WC/01 & 02). Tests are conducted using the maximum rider weight
specifi ed in the owners manual and the seat in its' least favorable position.
*Range based on 600 lb. rider on a hard level surface with Group 24 batteries. Customer's range may vary according
to customer's weight.
7 degrees = 12%
24" - 30"
19.5", 21", 22.5"
19.3" - 21.3"
(uncompressed foam)
13.9" - 17.9" (uncompressed foam)
28.5" (outside tire to outside tire)
38" - 41"
49"
Pneumatic Tires Flat Free Tires
116.5 lbs. 142 lbs.
24 lbs. 24 lbs.
58.5 lbs. 58.5 lbs.
---------------------------------------
201 lbs. 231.5 lbs.
55 lbs. each 55 lbs.
318 lbs. 348.5 lbs.
Group 24
4.6 mph Max.
18 - 20 miles
(varies with weight)
27"
3"
2.5"
8
o
5
o
Solid
Flat Free-Std
(50 psi with optional pneumatic)
Flat Free-Std
(50 psi with optional pneumatic)
600 lbs.
Scout Boss 6 Scout Boss 6.75
24" - 30"
19.5", 21", 22.5"
19.3" - 21.3"
(uncompressed foam)
13.9" - 17.9" (uncompressed foam)
28.5" (outside tire to outside tire)
38" - 41"
49"
Pneumatic Tires Flat Free Tires
106.5 lbs. 142 lbs.
24 lbs. 24 lbs.
58.5 lbs. 58.5 lbs.
-----------------------------------
188 lbs. 231.5 lbs.
55 lbs. each 55 lbs.
305 lbs. 348.5 lbs.
Group 24
4.6 mph Max.
18 - 20 miles
(varies with weight)
27"
3"
2.5"
8
o
5
o
Solid
Flat Free-Std
(50 psi with optional pneumatic)
Flat Free-Std
(50 psi with optional pneumatic)
675 lbs.

14
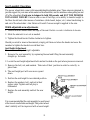
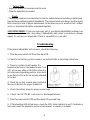
Getting On and Off The Power Wheelchair
The following is a recommended method for getting on your Power Wheelchair
1. The wheelchair should be stopped on a fl at, level surface with the power switch in the OFF posi-
tion (no visible lights).
(SEE WARNING BELOW)
2. Raise the foot rest plate so that you may back up to the wheelchair squarely. WARNING: Do not use the
footplate as a platform. When getting in or out of the wheelchair make sure that the footplates are in the up-
ward position or swing footrest towards the outside of the wheelchair.
We realize that many bariatric persons can not do a side transfer or raise their legs to raise and lower the foot-
plate. If and only if you must step on the footplate for entering or exiting the power wheelchair, you must fol-
low these instructions. Your power wheelchair is equipped with a patented infi nitely adjustable rigid anti-tip
system (see fi gure 1 under Battery Removal Section). When both of the front anti-tip wheels are lowered to
contact the fl oor, you can step on the platform without tipping the chair forward. After entry the wheels must
be raised to adjust to the driving environment - 1/4” for fl at fl oors and up to 2” for outdoor terrain. Always
keep the adjustment as low as possible for your driving area. Warning: Failure to lower the anti-tip wheels
for entry and exit will result in the chair tipping forward when you stand on the footplate which can cause you
to fall and result in possible serious injury. Warning: As with any wheelchair part should the anti-tip assem-
bly become damaged, discontinue use immediately and contact your dealer for service. Warning: Always
keep anti-tip wheels at the same height from fl oor to prevent tipping to side.
3. Position yourself squarely in front of the seat and lower yourself into the seat using the armrests if neces-
sary. (Never use the control housing or joystick as a support while getting on and off the wheelchair.)
4. Lower the footrest and place your feet securely on the footrest.
5. Buckle the safety belt around yourself belt to help hold yourself securely in the chair.
6. Push the power button on the speed control, the LED lights should activate.
7. When seated comfortably, you can drive the power wheelchair.
The method for getting off is the reverse procedure.
1. Turn the power switch OFF when stopped (no visible lights).
2. Unfasten your safety belt and raise (or have someone raise) the footrest bracket.
3. Make sure your feet are planted fi rmly on the ground and stand up.
WARNING
Keep the power button in the OFF position at all times when stopped or when getting on or off the wheel-
chair. Sudden accidental movement of the wheelchair will be avoided with the power switch in the OFF
position.
Tipping can occur if you get on the power wheelchair in a manner other than recommended. Tipping can be
avoided by keeping your weight away from the outer edges until seated. If you step into the wheelchair, sit
directly in the center of the seat, not near the edge. Tipping, loss of control or traction (wheel spin) can also occur
if you turn the joystick sharply while traveling at or near full throttle and on slick surfaces or inclines.

15
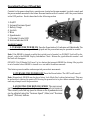
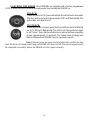
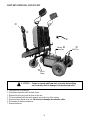
Operating the Power Wheelchair
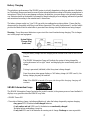
Controls for the power wheelchair operation are located on the arm mounted joystick console and
the power module mounted to the frame. Become familiar with all controls with the power button
in the OFF position. Each is described in the following section
1. On/Off
2. Increase/Decrease Speed
3. Battery Gauge
4. Joystick
5. Horn
6. Speedometer
7. Attendant Control LED
8. Service Indicator LED
Joystick Console
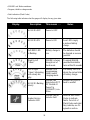
1. TURNING THE POWER ON Press the Power button. All indicators will fl ash briefl y. The
current state of battery charge will be displayed and the powerchair may be operated as normal.
Note: If the SHARK is turned on while the joystick is out of neutral, an OONAPU fault will be dis-
played - refer to the SHARK Display Information Chart.. Release the joystick back to neutral and
the fault will disappear.
OONAPU (Out Of Neutral At Power Up) is a feature that prevents SHARK for driving if the joystick
is out of neutral when SHARK is turned on or an inhibit condition removed.
This feature prevents sudden and unexpected powerchair movements.
1.1 TURNING THE POWER OFF Press the Power button. The LED's will turn off.
Note: Alternatively, SHARK may be placed into a Lock Mode (See Locking Instructions). This may
be preferable to turning the power off if leaving the powerchair at a place where unauthorized per-
sons may attempt to use the powerchair.
2. ADJUSTING THE DRIVING SPEED The user can ad-
just the chair's top speed to suit their preferences and environment.
The currently selected top speed is shown on the Speedometer and
can be adjusted using the "Increase Speed" (Hare) and "Decrease
Speed" (Tortoise) buttons.

16
Each of the speedometer's 6 large LEDs
typically represent 0%, 20%, 40%, 60%, 80%
and 100% of the chair's absolute maximum top
speed.
REMD supports 2 modes of top speed
adjustment - "5 Speed" and "VSP" modes.
In the "5 Speed" mode pressing the
Increase Speed and Decrease Speed buttons
steps between on of the 5 top speeds 20% to
100%.
In the "VSP" mode a quick single press
of the Increase Speed and Decrease Speed
buttons also steps between one of the 5 speeds
20% to 100%. However, pressing and holding
the Increase Speed (Decrease Speed) Button
ramps the top Speed up (down) in fi ne steps,
allowing practically any top speed to be selected. This can be particularly useful for matching
the chair speed to the walking speed of an accompanying pedestrian.
VSP is an extremely powerful feature, allowing both fast stepping between fi xed top speeds
by using quick presses or fi ner control using long presses. The VSP feature can be enabled or
disabled. Users can toggle between the "VSP" and "5 Speed" Modes by holding down both the
Increase Speed and Decrease Speed Buttons for approximately 2 seconds while the unit is pow-
ered up. The control unit will beep when the mode has been changed.
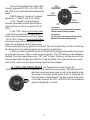
2.1. USING THE SPEEDOMETER The Speedometer is used to gauge the
relative speed of the chair in comparison to the maximum speed possible. The right-most LED
indicates current maximum speed, which can be adjusted using
the Increase (Decrease) Speed button. Refer to Adjusting the
Driving Speed for further details. Using the joystick, as the speed
of the chair increases, the LED's will fi ll in until the maximum
speed (as displayed) is reached.
Top Speed 1
Typically 20% but programmable using the
Lowest Forward Speed parameter.
Top Speed 5
Typically 100% but programmable using the
Maximum Forward Speed parameter.
20%
60%
80%
40%
0%
100%
{
Top Speed 1
Top Speed 2
Top Speed 3
Top Speed 4
Top Speed 5

17
3. BATTERY INDICATOR. The SHARK Information Gauge (located on the joystick
console) is the primary source of user feedback. It displays every possible status that SHARK
may have.
True state-of-battery-charge, including notifi cation of when the battery desperately requires
charging.
• Any green LED's lit indicates well-charged batteries.
• If only amber and red LED's are lit, the batteries are moderately charged.
Recharge before undertaking a long trip.
• If only red LED's are lit the batteries are running out of charge. Recharge as soon
as possible.
4. THROTTLE CONTROL JOYSTICK LEVER. The joystick mounted on the top
of the control panel is both the throttle and direction control lever (Push Slowly). Pushing the
joystick with your thumb in the direction of the horn button on the control faceplate will make
the wheelchair go forward or backward accordingly. Pushing the joystick in slightly will makes
the wheelchair begin to move. The further you depress the joystick, the faster the wheelchair
moves. The top speed set by the Tortoise/Hare buttons is reached by fully depressing the joy-
stick. Completely releasing the joystick will stop power to the motor, activate the brakes, and
you will come to a complete stop. For faster stops in forward, pull the joystick into reverse until
the unit stops moving, then release the joystick.
5. HORN BUTTON
Your unit also comes
equipped with a built in horn, activated by depressing the horn button.
PLEASE NOTE:
Should the joystick / brake control system not stop the unit, turning the power
switch off will engage all brakes and stop the unit abruptly. This backup system should only
be used in the unlikely event that the primary brake control is disabled, as the quick stop could
CAUSE YOU TO SLIDE OFF THE WHEELCHAIR. Remember to wear your lap belt.

18
6. LOCKING THE SHARK Most SHARKs are supplied with a factory programmed
LOCK Feature that prevents unauthorized people from turning the SHARK on.
TO LOCK:
While the power is ON, press and hold the Power button for 4 seconds.
The horn will sound a short beep and all LED's will fl ash briefl y. The
powerchair will then turn off.
TO UNLOCK:
While the SHARK is locked, press the Power button to turn the SHARK
on. All LED's will fl ash briefl y. The LED's will then perform a right-
to-left "chase". Press the Horn button twice before the timer completes
its pass (approximately 10 seconds). The current state-of-charge will
then be displayed and SHARK may be operated normally.
Note: If the user does not press the Horn button twice within the time
limit, the Horn will sound a short beep and SHARK will turn itself off. The unlock sequence must
be completed successfully before the SHARK will drive again normally.

19
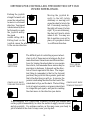
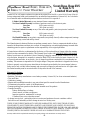
Pushing the joystick
straight forward will
cause the wheelchair
to move in a forward
direction. Your speed
is determined by how
far forward you push
the Joystick and by
the speed
control setting (# 2).
Pulling back on the
Moving the joystick di-
rectly to the left (while
stationary or moving) will
cause the chair to turn to the
left. Conversely, moving to
the right will cause it to turn
right. If you are stationary,
the chair will tend to rotate
where it sits. You may use
this to position your self in
place, or to prepare to travel
joystick causes the wheelchair to move
in the reverse direction
in a different direction.
FULL SPEED
LEFT TURN
GRADUALLY BACK
TOWARD THE RIGHT
FULL SPEED
RIGHT TURN
GRADUALLY BACK
TOWARD THE LEFT
The diffi cult part of controlling a power wheel-
chair is all of those moves in between the four
main directions. Shown here are different direc-
tions for turning the wheelchair as you operate
the vehicle, but remember these moves may be
anywhere in between, it depends on the direc-
tion of travel required at the time. The impor-
tant thing to remember is that in the forward
positions, the joystick is like a pointer, point and
that is the direction you will go. In reverse, the
pointer is indicating the direction the front of the
wheelchair will go, not the back. The best thing
to do is learn to operate your power wheelchair
in a large fl at open space, and practice making
the chair move in the direction you desire.
METHODS FOR CONTROLLING THE DIRECTION OF YOUR
POWER WHEELCHAIR.
In an emergency or a "Quick-Stop" situation, you may pull straight back
on the joystick momentarily to cause the motors to apply reverse current
and stop quickly. Use extreme caution, as this may cause your body to
pitch forward in the chair. Always wear your lap belt.

20
For your fi rst ride, we recommend the following.
When possible, always work with your dealer or therapist to learn how to use your power wheelchair.
Different chairs have different adjustable features such as spring suspension, programmable controllers,
front anti-tips, footrest height & angle, length adjustments and arm adjustments etc.
Work with your dealer to make sure the wheelchair is specifi cally fi tted to YOUR needs.
1. Make sure the area is a fl at, hard, smooth, open and free of obstacles.
2.
Make sure your lap belt is securely fastened and the seat is securely locked.
3. Depress the power switch to turn the power switch to ON.
4. Adjust the SPEED setting display (Speedometer) to low.
5. Push the control knob forward to go forward.
6. Steer the chair in different directions to get a feel for how the controls operate.
7. SLOWLY increase the Max. SPEED indicator on the speedometer by holding the button
down with the "Hare" symbol on it until the desired top speed is reached. Remember,
power compensation will automatically gives you more power and allows you to keep a
slower speed should you need it. Refer to Adjusting the Driving Speed Instructions.
8. Release the joystick to come to a stop. Take note of how the braking
feels. The clicking you might hear upon starting, and shortly after releasing the
joystick is the Electric Brake disengaging and engaging.
9. Push the joystick backwards to thumb to go backward. There is a signifi cant reduction
in speed in the reverse direction without any change in the Max. SPEED setting. Always
make sure the area is clear behind you before backing up.
10. Remember to turn the power button OFF (no visible lights) when not driving, or
getting on or off the wheelchair.
Speed controller characteristics are pre-set for the average rider. The anti-tip wheels are normally
positioned approximately 1/2" off the ground (with a rider in the chair) but may be adjusted in height.
Because your power wheelchair is a "midi" (3/4) drive chair the anti-tip wheels are normally only
used when braking going forward down a steep incline. Reducing this setting causes the powerchair
to tilt forward at a lesser angle before resting on the anti-tip wheels if you decelerate rapidly while
going down a hill. See specifi cation page for maximum obstacle climbing capability.
Warning
The power wheelchair is designed for high maneuverability but use caution when encountering
obstacles. Failure to drive cautiously can result in tipping and/or collisions which may cause physical
harm. When approaching an obstacle, keep your speed at a minimum and maintain a safe distance
from that object. Avoid all small objects on the ground. The wheelchair's ground clearance may be
less than the size of the object. Running over an object or into a depression could cause overturning,
or damage to the wheelchair. NEVER ride the unit near platforms, stairs, ledges, curbs or in any other
potentially dangerous situation as severe injury can occur.
Page is loading ...
Page is loading ...
Page is loading ...
Page is loading ...
Page is loading ...
Page is loading ...
Page is loading ...
Page is loading ...
Page is loading ...
Page is loading ...
Page is loading ...
Page is loading ...
Page is loading ...
Page is loading ...
Page is loading ...
Page is loading ...
Page is loading ...
Page is loading ...
Page is loading ...
Page is loading ...
Page is loading ...
Page is loading ...
Page is loading ...
Page is loading ...
-
 1
1
-
 2
2
-
 3
3
-
 4
4
-
 5
5
-
 6
6
-
 7
7
-
 8
8
-
 9
9
-
 10
10
-
 11
11
-
 12
12
-
 13
13
-
 14
14
-
 15
15
-
 16
16
-
 17
17
-
 18
18
-
 19
19
-
 20
20
-
 21
21
-
 22
22
-
 23
23
-
 24
24
-
 25
25
-
 26
26
-
 27
27
-
 28
28
-
 29
29
-
 30
30
-
 31
31
-
 32
32
-
 33
33
-
 34
34
-
 35
35
-
 36
36
-
 37
37
-
 38
38
-
 39
39
-
 40
40
-
 41
41
-
 42
42
-
 43
43
-
 44
44


PaceSaver Scout Owner's manual
- Category
- Scooters
- Type
- Owner's manual
Ask a question and I''ll find the answer in the document
Finding information in a document is now easier with AI
Other documents
-
Midmark Ultra-series Dental Chairs Installation guide
-
 Heartway Medical Products P15S User manual
-
 Hover Move Lite User manual
-
Merits Pioneer II Owner's manual
-
Sunrise Medical S-11 User manual
-
Summit HP-1S User manual
-
-
Infinity Riage CS Compact Massage Chair User manual
-
Eclipse P326A User manual
-
Shoprider Como Owner's manual

